

FR
EN
Self-Setting Atomic Projection
Clock with Indoor Thermometer
RM313PNFA
User Manual
INTRodUCTIoN
Thank you for purchasing the Oregon Scientific™
Self-Setting Atomic Projection Clock with Indoor
Thermometer (model: RM313PNFA). This device
bundles precise time keeping, alarm and temperature
features into a single tool you can use from the
convenience of your home. Keep this manual handy as
you use your new product. It contains practical step-by-
step instructions, as well as technical specifications and
warnings you should know.
PACkAgE CoNTENTS
Main unit
Power adapter
AA batteries for
main unit x 2
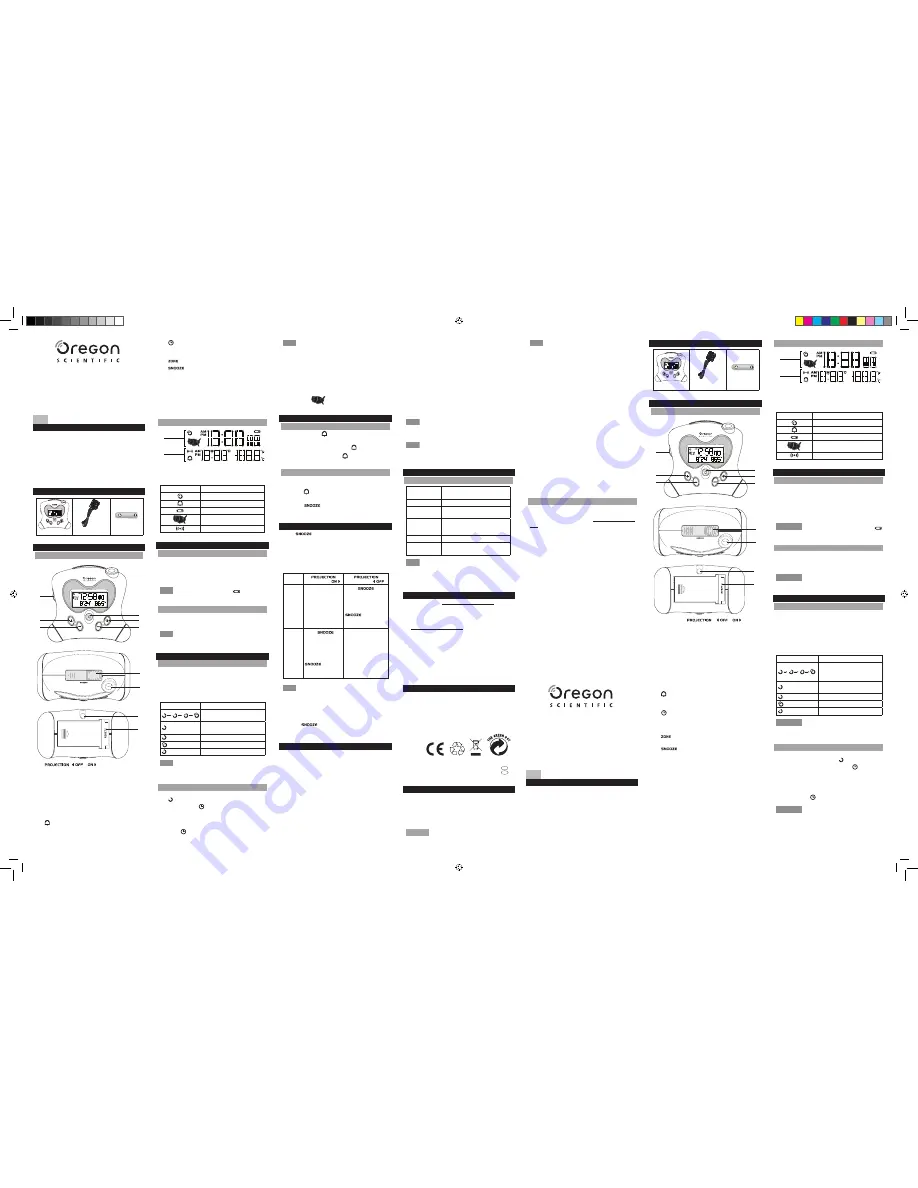
ovERvIEw
MAIN UNIT
2
1
3
4
5
6
7
8
9
10
1.
/
switch – Slide to toggle
continuous projection feature on/off.
2.
+
- Press to increase a value in setting mode, or
flip the projection by 180° in idle. Press and hold to
increase a value rapidly in setting mode, or to turn
on RF clock signal reception in idle.
3.
-
- Press to decrease a value in setting mode, or
flip the projection by 180° in idle. Press and hold
to decrease a value rapidly in setting mode, or to
turn off RF clock signal reception in idle.
4.
- Press to display the alarm time and turn on/
off the alarm function. Press and hold to enter the
alarm setting mode.
5.
- Press to toggle between clock:second /clock:
weekday display, or exit alarm time display. Press
and hold to enter setting mode.
6.
- Press to toggle between the US time zones.
7.
- Press to turn on the backlight and
projection for 5 seconds (see
Projection
/
Backlight
section), or snooze the alarm. Press
and hold until the unit beeps to turn on the
projection for 5 minutes.
8. Projection lens
9. AC power adaptor jack
10.
RESET
– Press to reset the unit to default.
LCd dISPLAy
A
B
A. Time/Weekday/Seconds display
B. Calendar (Month/Date; Date/Month)/Alarm display,
Indoor temperature display
Symbol
Description
RCC signal received
Alarm is on.
Low battery
Time zone selection indicator
Alarm display mode
gETTINg STARTEd
INSERT BATTERIES
1. Gently push the battery compartment cover in the
direction as arrow shown (see
overview
section)
to remove it from the main unit.
2. Insert the batteries, matching the polarities (
+
/
-
).
NOTE
Replace the batteries when
displays, or
when the display is dim.
AC PowER
Plug the power cable to the power jack and plug the
power adapter into a suitable power outlet.
NOTE
It is recommended to insert the battery as a
backup power source.
CLoCk
CLoCk RECEPTIoN
This clock synchronizes automatically with a clock
signal. Press and hold
+
to turn on and search for
the clock signal.
The main unit receives WWVB signal as RCC signal.
Clock signal reception indicator:
Icons
Description
Main unit is searching for clock
signal strength
(flash)
Main unit is searching for clock
signal
No clock signal
Strong RCC signal received
Weak RCC signal received
NOTE
It takes 2-10 minutes to receive the clock signal.
If the signal is weak, it could take up to 24 hours to
receive a valid signal.
SET ThE CLoCk MANUALLy
1. Press and hold - to disable signal reception. The
icon turns off.
2. Press and hold
.
3. Press once or press and hold +/- to adjust the
setting for hour, minute, year, month, date,
temperature unit (°C/°F) and language.
4. Press
to confirm each setting.
NOTE
•
The language options are English (
EN
), Spanish
(
SP
), Italian (
IT
), French (
FR
) and German (
gE
).
•
The RCC signal reception is on after each reset or
battery replacement.
•
The RCC signal turns off automatically when you
set time, year, month or date manually.
•
Press
ZoNE
to select required US time zone
(Pacific, Mountain, Central or Eastern) time as
shown on
directly.
ALARM
SETTINg/AdjUSTINg ALARM TIME
1. Press and hold
.
2. Press once or press and hold +/- to adjust the hour
and minute setting, then press
to confirm.
To turn on/off the alarm, press .
oPERATIoN
When the alarm rings, the backlight will flash.
You may:
•
Press
to stop. The alarm will ring again on the
next day.
•
Press
to snooze. The alarm rings again
after 8 minutes.
PRojECTIoN/BACkLIghT
Press
to turn on projection and backlight for
5 seconds, or press and hold until the unit beeps to turn
on the projection for 5 minutes. For the optimal projection
results, place the unit within 1.5 - 2 m (5 – 6.5 ft) from
the ceiling or wall.
To use the continuous projection feature, connect the
AC power adaptor to a suitable outlet.
switches to
switches to
With
Adapter
Continuous
projection.
Press
to
turn on the projection
and backlight for
5 seconds.
Press and hold
to turn on
the projection for
5 minutes.
Without
Adapter
Press
to
turn on the
projection and
backlight for
5 seconds.
Press and hold
to turn on
the projection for
5 minutes.
No projection,
backlight turns on for
5 seconds.
NOTE
•
When the unit connects to the power outlet, the
continuous projection turns on automatically. You
may turn on/off the continuous projection while the
unit is connected to the power outlet.
•
When the projection is on for 5 minutes, press and
hold
again to stop 5 minutes projection.
You hear a beep.
PRECAUTIoNS
•
Do not subject the unit to excessive force, shock,
dust, temperature or humidity.
•
Do not immerse the unit in water. If you spill liquid
over it, dry it immediately with a soft, lint-free cloth.
•
Do not clean the unit with abrasive or
corrosive materials.
•
Do not tamper with the unit’s internal components.
This invalidates the warranty.
•
Only use fresh batteries. Do not mix new and
old batteries.
•
Images shown in this manual may differ from the
actual display.
•
When disposing of this product, ensure it is
collected separately for special treatment.
•
Placement of this product on certain types of
wood may result in damage to its finish for
which Oregon Scientific will not be responsible.
Consult the furniture manufacturer's care
instructions for information.
•
The contents of this manual may not be reproduced
without the permission of the manufacturer.
•
Do not dispose old batteries as unsorted municipal
waste. Collection of such waste separately for
special treatment is necessary.
•
Please note that some units are equipped with
a battery safety strip. Remove the strip from the
battery compartment before first use.
NOTE
The technical specifications for this product and
the contents of the user manual are subject to change
without notice.
NOTE
Features and accessories will not be available
in all countries. For more information, please contact
your local retailer.
SPECIFICATIoNS
MAIN UNIT
L x W x H
115mm x 63mm x 105mm
(4.5in x 2.5in x 4.2in)
Weight
148 g
Temperature
range
-5°C to 50°C
(23°F to 122°F)
Temperature
accuracy
0°C to 40°C: ±1°C (± 2.0°F)
T<0°C : ±2°C (± 4.0°F)
T>40°C : ±2°C (± 4.0°F)
Resolution
0.1°C (0.2°F)
Power
2 x UM-4 (AA) 1.5 V batteries
3.6 V adapter
NOTE
When the indoor temperature is lower than
-5 °C (23.0 °F), the screen displays
LL.L
. When the
temperature is higher than 50 °C (122.0 °F), the screen
displays
hh.h
.
ABoUT oREgoN SCIENTIFIC
Visit our website www.oregonscientific.com to learn
more about Oregon Scientific products.
For any enquiry, please contact our Customer Services
at info@oregonscientific.com.
Oregon Scientific Global Distribution Limited reserves
the right to interpret and construe any contents, terms
and provisions in this user manual and to amend it, at
its sole discretion, at any time without prior notice. To
the extent that there is any inconsistency between the
English version and any other language versions, the
English version shall prevail.
EU-dECLARATIoN oF CoNFoRMITy
Hereby, Oregon Scientific, declares that this
Self-
Setting Atomic Projection Clock with Indoor
Thermometer
(model: RM313PNFA) is in compliance
with the essential requirements and other relevant
provisions of Directive 1999/5/EC. A copy of the signed
and dated Declaration of Conformity is available on
request via our Oregon Scientific Customer Service.
FCC STATEMENT
This device complies with Part 15 of the FCC Rules.
Operation is subject to the following two conditions: (1) This
device may not cause harmful interference, and (2) This
device must accept any interference received, including
interference that may cause undesired operation.
WARNING
Changes or modifications not expressly
approved by the party responsible for compliance could
void the user’s authority to operate the equipment.
NOTE
This equipment has been tested and found
to comply with the limits for a Class B digital device,
pursuant to Part 15 of the FCC Rules. These limits
are designed to provide reasonable protection against
harmful interference in a residential installation.
This equipment generates, uses and can radiate
radio frequency energy and, if not installed and
used in accordance with the instructions, may
cause harmful interference to radio communications.
However, there is no guarantee that interference will
not occur in a particular installation. If this equipment
does cause harmful interference to radio or television
reception, which can be determined by turning the
equipment off and on, the user is encouraged to try
to correct the interference by one or more of the
following measures:
•
Reorient or relocate the receiving antenna.
•
Increase the separation between the equipment
and receiver.
•
Connect the equipment into an outlet on a
circuit different from that to which the receiver
is connected.
•
Consult the dealer or an experienced radio/TV
technician for help.
This Class B digital apparatus complies with Canadian
ICES- 3(B)/NMB-3(B).
dECLARATIoN oF CoNFoRMITy
The following information is not to be used as contact
for support or sales. Please call our customer service
number (listed on our website at www.oregonscientific.
com), or on the warranty card for this product) for all
inquiries instead.
we
Name:
Oregon Scientific, Inc.
Address:
10778 SW Manhasset Dr.
Tualatin, Or 97062 USA
Telephone No.:
1-800-853-8883
declare that the product
Product No.:
RM313PNFA
Product Name:
Self-Setting Atomic Projection
Clock with Indoor Thermometer
Manufacturer:
IDT Technology Limited
Address:
Block C, 9/F, Kaiser Estate,
Phase 1, 41 Man Yue St.,
Hung Hom, Kowloon,
Hong Kong
CoUNTRIES RTTE APPRovEd CoMPLIEd
All EU countries, Switzerland
Ch
and Norway
N
CoNTENU dE L’EMBALLAgE
Unité principale
Adaptateur
secteur
2 piles AA pour
l’unité principale
vUE d’ENSEMBLE
UNITE PRINCIPALE
2
1
3
4
5
6
7
8
9
10
1. I
nterrupteur
/
– Faire
coulisser pour régler sur ON/OFF la projection
en continue.
2.
+
- Appuyez ici pour augmenter les réglages ou
inverser la projection de 180° en mode inactif.
Maintenez appuyé pour augmenter rapidement
les valeurs en mode réglage, ou pour activer le
signal de réception de l’horloge RF.
3.
-
- Appuyez ici pour diminuer les réglages ou
inverser la projection de 180° en mode inactif.
Maintenez appuyé pour augmenter rapidement
les valeurs en mode réglage, ou pour activer le
signal de réception de l’horloge RF.
4.
- Appuyez ici pour afficher l’heure de l’alarme et
activer/désactiver l’alarme. Maintenez appuyé ce
bouton pour entrer dans les réglages de l’alarme.
5.
- Appuyez pour alterner entre l’affichage
des secondes et l’affichage des jours de la
semaine. Maintenez appuyé pour entrer dans
le mode de réglage.
6.
- Appuyez ici pour commuter entre les
différents fuseaux horaires US.
7.
(Mise en veille)- Appuyez pour mettre en
veille l’alarme ou activer le rétro-éclairage pendant
5 secondes (voir la section
Projection/Retro-
éclairage
). Maintenez appuyé jusqu’à ce que
vous entendiez un bip pour activer la projection
pendant 5 minutes.
8. Lentille de projection
9. Prise adaptateur AC
10.
RESET
(Réinitialisation) – Appuyez ici pour
réinitialiser l’appareil.
AFFIChAgE LCd
A
B
A. Affichage de l’Heure/du Jour de la semaine/des
Secondes
B. Affichage du Calendrier (Mois/Date; Date/Mois),
de l’Alarme, et de la température intérieure
Symbole
Description
Signal RCC reçu
Alarme activée
Niveau de pile faible
Indicateur de sélection du fuseau
horaire
Mode d’affichage de l’alarme
PoUR CoMMENCER
INSTALLATIoN dES PILES
1. Poussez doucement le couvercle du compartiment
à piles dans la direction indiquée par la flèche
(voir la section
vue d’ensemble
) pour le retirer de
l’unité principale.
2. Installez les piles en respectant les indications de
polarité (
+
/
-
).
REMARQUE
Remplacez les piles lorsque l’icône
s’affiche ou lorsque la luminosité de l’affichage diminue.
ALIMENTATIoN SECTEUR
Branchez le câble de l’adaptateur secteur sur la prise
d’alimentation de l’appareil puis branchez l’adaptateur
sur une prise de courant.
REMARQUE
Il est recommandé d’installer les piles en
tant que source d’alimentation de secours.
hoRLogE
RECEPTIoN dE L’hoRLogE
L’horloge est désignée pour se synchroniser
automatiquement avec un signal d’horloge.
Maintenez appuyé + pour activer et rechercher le
signal d’horloge.
L’unité principale reçoit le signal DCF tant que
signal RCC.
Indicateur de réception du signal d’horloge:
Icônes
Description
L’unité principale est à la re-
cherche d’un signal d’horloge
suffisamment puissant.
(flash)
L’unite principale est à la re-
cherche d’un signal d’horloge.
Pas de signal d’horloge
Signal RCC fort reçu
Signal RCC faible reçu
REMARQUE
Cela peut prendre entre 2 et 10 minutes
pour recevoir le signal d’horloge. Si le signal est faible,
cela pourra prendre jusqu’ à 24 heures pour recevoir
un signal valide.
SET ThE CLoCk MANUALLy
1. Appuyez et maintenez appuyé pour désactiver le
signal de réception. L’icône s’éteint.
2. Appuyez sur et maintenez appuyé
.
3. Appuyez une fois sur, ou appuyez et maintenez
appuyé +/- pour ajuster le réglage de l’heure, des
minutes, de l’année, du mois, de la date, de l’unité
de température (°C/°F) et la langue.
4. Appuyez sur
pour confirmer chaque réglage.
REMARQUE
•
Les opti
ons de langue sont l’anglais (
EN
),
l’espagnol (
SP
), l’italien (
IT
), le français (
FR
) et
l’allemand (
gE
).
•
Le signal de réception RCC est activé après chaque
réinitialisation ou chaque changement de piles.
Réveil projecteur à réglage
automatique avec thermomètre
d’intérieur
RM313PNFA
Mode d’emploi
INTRodUCTIoN
Merci d’avoir choisi le Réveil projecteur à réglage
automatique avec thermomètre d’intérieur d’Oregon
Scientific™ (modèles: RM313PNFA). Cet appareil
regroupe une mesure du temps précise, une alarme,
et un suivi des températures dans un outil unique que
vous pouvez utiliser dans le confort de votre maison.
Conservez ce mode d’emploi à disposition lors des
premières utilisations de ce produit. Il contient des
instructions étape par étape, ainsi que des spécifications
techniques et autres avertissements que vous vous
devez de connaitre.
RM313PNFA_UM_MP_R8.indd 1
2015/7/21 5:32:03 PM


