background image

1

EN

 Oregon Scientific™ Slim Dual Band RF

Travel Clock (RM928N)

User Manual

TABLE OF CONTENTS

Introduction ...................................................................... 2
Key features ..................................................................... 2

Front view ...................................................................... 2
Top view ........................................................................ 2
Back view ...................................................................... 3
LCD display symbols ..................................................... 3

Safety and care instructions ........................................... 4

Safety precautions ......................................................... 4
Caring for your product .................................................. 4

Getting started ................................................................. 4

Unpacking the product ................................................... 4
Batteries ........................................................................ 4
Using the pouch as table stand ..................................... 5

Basic Displays .................................................................. 5

Indoor temperature display ............................................ 5
2

nd

 time display .............................................................. 5

Toggling between displays ............................................ 6

Radio reception ................................................................ 6

Radio reception description ........................................... 6
Enabling/disabling radio reception ................................. 6
EU / UK reception .......................................................... 7

Setting the clock manually .............................................. 7
Alarm functions ................................................................ 
8

Basic functions .............................................................. 8
Alarm displays ............................................................... 8
Adjusting the alarm time ................................................ 9

Additional Functions ....................................................... 9

Reset hole ..................................................................... 9
Backlight intensity level ................................................. 9
Key lock ......................................................................... 10

Specifications ................................................................... 10
Additional resources ....................................................... 10
Troubleshooting guide .................................................... 11
EC-Declaration of conformity ......................................... 12

Summary of Contents for RM928N

Page 1: ...sing the pouch as table stand 5 Basic Displays 5 Indoor temperature display 5 2nd time display 5 Toggling between displays 6 Radio reception 6 Radio reception description 6 Enabling disabling radio re...

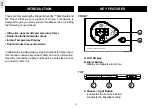
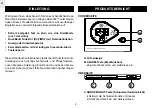
Page 2: ...r product of choice This device is designed to give you many years of reliable service including the following conveniences Ultra slim near credit card size only 7mm Radio Controlled Calendar Clock In...

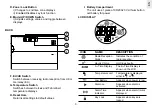
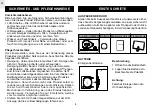
Page 3: ...rns all settings to default values H G F I I Battery Compartment The unit uses 1 piece of CR2032 3V Lithium button cell battery for power LCD DISPLAY ICON NAME DESCRIPTION Radio Reception Signal Hourl...

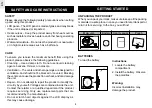
Page 4: ...for ventilation and should not be blocked or covered Blocking theventscancausetheproducttooverheat andcandamage the unit Repair Do not attempt to repair the product or modify the circuitry by yourself...

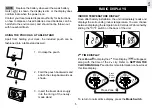
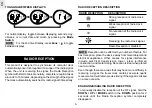
Page 5: ...old the pouch backwards and attach the clasp backwards as shown 3 Insert the travel clock snugly into the lining of the newly made stand BASIC DISPLAYS INDOOR TEMPERATURE DISPLAY Soon after battery in...

Page 6: ...ption of radio clock signal No reception of the radio clock signal Receiving the radio clock signal Radio Reception is disabled NOTE Reception can be affected by a number of factors For best reception...

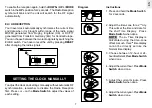
Page 7: ...SETTING THE CLOCK MANUALLY To adjust the clock and settings manually without automatic RF synchronization remember to disable the Radio Reception first Press or on the Mode Switch to adjust the values...

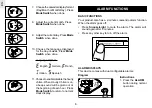
Page 8: ...toenable disablethehourly chime When Hourly Chime is on a beep sound will be given out at the beginning of each hour Press Mode Switch to return to normal clock display ALARM FUNCTIONS BASIC FUNCTIONS...

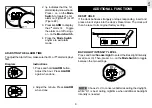
Page 9: ...its original factory setting BACKLIGHT INTENSITY LEVEL Press and hold Snooze Light to select the Backlight Intensity level LoorHi Then press or onthe ModeSwitchtotoggle between the two settings NOTE C...

Page 10: ...n Spanish and Italian Clock accuracy 0 5 second per day when RF is disabled Alarm Alarm Duration 2 minutes Power Power supply 1 x CR2032 Lithium button cell battery Operating environment Operation tem...

Page 11: ...Not Normal The measurement method is different The areas under evaluation are different or are influenced by climate Electromagneticinterferenceor objects are barring reception Orientationorplacemento...

Page 12: ...f the R TTE Directive applied standard s ETS 300 683 1997 Safety of information technology equipment Article 3 1 a of the R TTE directive applied standard s EN 60950 1997 Additional information The pr...

Page 13: ...aufsteller 5 Anzeige Modi 5 Anzeige der Innentemperatur 5 Anzeige der zweiten Zeitzone 5 Zwischen den Anzeigen umschalten 6 Funkempfang 6 Beschreibung des Funkempfangs 6 Ein Ausschalten des Funkempfan...

Page 14: ...chieden haben Dieses Produkt soll Ihnen viele Jahre ein zuverl ssiger Begleiter sein und weist folgende Besonderheiten auf Extrem kompakt fast so klein wie eine Kreditkarte nur 7 mm d nn Dual Band Fun...

Page 15: ...rad Celsius C oder Grad Fahrenheit F H G F I H RESET Taste R cksetz Taste Setzt alle Einstellungen auf die Werksvorgaben zur ck I Batteriefach Das Ger t ben tigt 1 x 3V Lithiumknopfzelle CR2032 LCD AN...

Page 16: ...nungen sind f r die Luftzirkulation vorgesehen Sie d rfen nicht verschlossen oder abgedeckt werden Ein Verschlie en der Bel ftungsl cher kann eine berhitzung des Produktes verursachen und somit das Ge...

Page 17: ...alle r ckw rts gem der Abbildung 3 F gen Sie den Reisewecker genau in das Futter Ihres selbstgemachten St nders ein ANZEIGE MODI ANZEIGE DER INNENTEMPERATUR Kurze Zeit nach dem Einlegen der Batterie m...

Page 18: ...dreimal t glich nach dem Funkzeitsignal FUNKEMPFANG BESCHREIBUNG Starker Empfang des Funkzeitsignals Schwacher Empfang des Funkzeitsignals Kein Empfang des Funkzeitsignals Suchen des Funkzeitsignals F...

Page 19: ...n gebracht wird Sie k nnen durch Bet tigen des EU UK Schalters zwischen den zwei Funksignalen w hlen Sie m ssen das Ger t neu einstellen indem Sie nach dem Wechseln des Funksignals RESET bet tigen MAN...

Page 20: ...ellen Monat ein Bet tigen Sie den Schalter MODE Modus wenn Sie fertig sind 9 Stellen Sie den aktuellen Tag ein Bet tigen Sie den Schalter MODE Modus wenn Sie fertig sind 10 W hlen Sie die Sprache f r...

Page 21: ...dr ckt Stellen Siedie Stunde ein Bet tigen Sie nochmals ALARM wenn Sie fertig sind 2 StellenSiedieMinuteein Bet tigen Sie ALARM wenn Sie fertig sind 3 Bet tigen Sie ALARM Weckfunktion um den zweiten W...

Page 22: ...keit der Hintergrundbeleuchtung Lo Niedrig oder Hi Hoch einzustellen Dr cken Sie UP oder DOWN auf dem Schalter MODE Modus um zwischen den zwei Einstellungen umzuschalten HINWEIS W hlen Sie Lo um die B...

Page 23: ...Sie unseren Kundendienst im Bedarfsfall erreichen k nnen Datumsformat DD MM Tag Monat oder MM DD Monat Tag vom Benutzer einstellbar Wochentagsanzeige In Englisch Franz sisch Deutsch Spanisch oder Ita...

Page 24: ...bewerteten Bereiche sind verschieden oder werden klimatisch beeinflusst Elektromagnetische St rungen oder Gegenst nde blockieren den Empfang Die Ausrichtung oder Platzierung des Funk Reiseweckers ist...

Page 25: ...ard s ETS 300 683 1997 Schutz der Gesundheit und Sicherheit des Benutzers Artikel 3 1 a der R TTE Richtlinie Angewandter Standard s EN 60950 1997 Zus tzliche Information DamitistdasProduktkonformmitde...

Page 26: ...de la Pantalla 5 Visualizaci n de la temperatura interior 5 Visualizaci n de la hora en el 2 huso horario 5 Alternar entre pantallas 6 Recepci n por radio 6 Descripci n de la recepci n por radio 6 Ac...

Page 27: ...st dise ado para ofrecerle muchos a os de servicio seguro incluyendo las siguientes prestaciones Ultra fino tama o aproximado a una tarjeta de cr dito s lo 7mm Reloj Calendario Controlado por Radio Vi...

Page 28: ...n por radio desde el Reino Unido o Alemania UE G Interruptor de Temperatura Cambia entre las pantallas de temperatura en grados cent grados o Fahrenheit H Reseteo Recupera la configuraci n de f brica...

Page 29: ...arto de ba o El cuidado de su Producto Para garantizarle el m ximo beneficio en la utilizaci n de este producto respete las siguientes normas Limpieza Utilice un pa o h medo No utilice ning n producto...

Page 30: ...je dentro del forro del soporte que Vd acaba de preparar Press Mode Switch Press Zone FUNCIONES B SICAS DE LA PANTALLA VISUALIZACI N DE LA TEMPERATURA INTERIOR Despu s de la instalaci n de la pila el...

Page 31: ...se al de radio 3 veces al d a RECEPCI N POR DESCRIPCI N RADIO Fuerte recepci n de la se al por radio del reloj D bil recepci n de la se al por radio del reloj Sin recepci n de la se al por radio del r...

Page 32: ...oj Normal ACTIVAR DESACTIVAR LA RECEPCI N POR RADIO Para desactivar manualmente la recepci n de la se al RF mantengapresionadoelinterruptorABAJO ARRIBA MODO en la posici n ABAJO durante 2 segundos has...

Page 33: ...uptor de Modo cuando haya concluido 9 Ajuste el d a actual Pulse el Interruptor de Modo cuando haya concluido 10 Seleccione el idioma utilizado en pantalla para el d a de la semana Pulse el Interrupto...

Page 34: ...lse ALARMA de nuevo cuando haya concluido 2 Ajustelosminutos PulseALARMA cuando haya concluido Instrucciones 1 Pulse el bot n ALARMA durante el funcionamiento normal 2 indica que ahora aparece mostrad...

Page 35: ...pila durante el d a mientras que Hi es adecuado para la noche cuando se necesita intensidad adicional en la luz de fondo BLOQUEO DE LAS TECLAS Pulse mantenga pulsado Huso Horario para bloquear desbloq...

Page 36: ...C Unidades de Temperatura C F seleccionado por el usuario FUENTES ADICIONALES Visite nuestra p gina web www oregonscientific com para conocer mejor nuestro producto as como otros productos de Oregon...

Page 37: ...s distinto Las zonas evaluadas son distintas o sufren la influencia del clima Alguna interferencia electromagn tica o alg n objeto impide la recepci n La orientaci n o la posici n de la unidad princip...

Page 38: ...TTE Est ndares aplicados ETS 300 683 1997 Protecci n de la salud y la seguridad del usuario Art culo 3 1 a de la Directiva R TTE Est ndares aplicados EN 60950 1997 Informaci n adicional El producto es...

Page 39: ...t de table 5 Affichage basique 5 Affichage de temp rature ambiante 5 Affichage du 2nd horaire 5 Passer d un affichage l autre 6 R ception radio 6 Description de la r ception radio 6 Activer et d sacti...

Page 40: ...ous apporter de nombreuses ann es de service fiable et comprend les caract ristiques suivantes Format extra plat presque de la taille d une carte de cr dit seulement 7mm Horloge et calendrier radio pi...

Page 41: ...n Remet toutes les valeurs et r glages z ro I Compartiment piles Cet appareil fonctionne avec une pile bouton CR2032 3V lithium AFFICHAGE CRISTAUX LIQUIDES IC NE NOM DESCRIPTION Signal de r ception ra...

Page 42: ...a ventilation et ne doivent tre ni obstru es ni couvertes Ceci peut causer une surchauffe et provoquer un endommagement de l appareil R parations N essayez pas de r parer ce produit ou d en modifier l...

Page 43: ...omme indiqu 3 Ins rer le r veil de voyage dans la doublure de la pochette devenue support AFFICHAGES BASIQUES AFFICHAGE DE TEMP RATURE AMBIANTE Peu apr s l installation des piles l appareil d tecte et...

Page 44: ...r ception du signal radio R ception du signal radio en cours La r ception radio est d sactiv e NOTE La r ception peut tre affect e par un certain nombre de facteurs Pour une meilleure r ception garder...

Page 45: ...r l heure et les r glages manuellement sans synchronisation RF automatique la r ception radio doit tre d sactiv e Appuyersur ou boutondemodepourajusterles valeurs de chaque r glage Schema Instructions...

Page 46: ...s de langue Anglais Allemand Fran ais Italien Espagnol 11 Choisir d activer ou de d sactiver la sonnerie d heure Quand la sonnerie d heure est activ e le r veil mettra un bip toutes les heures Appuyer...

Page 47: ...Ceci remettra l horloge ses r glages par d faut d usine INTENSITE D ECLAIRAGE DE FOND Tenir appuy le bouton Snooze Light pour choisir le niveau d intensit de l clairage de fond bas ou haut LO HI Appu...

Page 48: ...teur Affichage du jour de la semaine En Anglais Fran ais Allemand Espagnol et Italien Pr cision de l horloge 0 5 seconde par jour quandleRFestd sactiv Alarme Dur e de l alarme 2 minutes Alimentation A...

Page 49: ...sure est diff rente Les zones mesur es sont diff rentes ou influenc es par le climat Des objets ou de l interf rence lectromagn tique emp chent la r ception L orientation ou l emplacement de l apparei...

Page 50: ...directive R TTE Standards appliqu s ETS 300 683 1997 Protectiondel informationdel quipementtechnologique article 3 1 de la directive R TTE Standards appliqu s EN 60950 1997 Information suppl mentaire...

Page 51: ...lizzo della custodia come supporto da tavolo 5 Visualizzazioni di base 5 Temperatura interna 5 Secondo fuso orario 5 Come alternare le informazioni visualizzate sul display 6 Ricezione radio 6 Descriz...

Page 52: ...trollato da viaggio con doppia banda Le caratteristiche principali del suo nuovo prodotto includono Orologio ultra sottile dello spessore di una carta di credito solo 7 mm Orologio e calendario radioc...

Page 53: ...reset Riporta tutte le impostazioni ai valori di default H G F I I Vano batterie L orologio alimentato da 1 batteria a pastiglia al litio da CR2032 3V DISPLAY A CRISTALLI LIQUIDI ICONA NOME DESCRIZION...

Page 54: ...o essere coperte od ostruite in alcun modo In caso di bloccaggio delle a p e r t u r e d i v e n t i l a z i o n e i l p r o d o t t o p o t r e b b e surriscaldarsi e danneggiarsi Riparazioni Non cer...

Page 55: ...dicato in figura 3 Inserire l orologio nella fodera del supporto da tavolo VISUALIZZAZIONI DI BASE TEMPERATURA INTERNA Immediatamente dopo l inserimento della batteria l orologio rilever evisualizzer...

Page 56: ...gio completa la ricezione del radiosegnale in 2 10 minuti a seconda dell intensit del segnale L orologio ricerca automaticamente il radiosegnale 3 volte al giorno RICEZIONE RADIO DESCRIZIONE Radiosegn...

Page 57: ...r l Europa Centrale Il tasto EU UK consente di selezionare tra i due radiosegnali Dopoavermodificatoilsegnaleradio resettarel unit premendo il tasto RESET IMPOSTAZIONE MANUALE DELL OROLOGIO Per impost...

Page 58: ...ere la lingua di visualizzazione del giorno della settimana Al termine premere il tasto Mode Lingue disponibili inglese tedesco francese italiano spagnolo 11 Attivare disattivare il segnale orario Con...

Page 59: ...i minuti Al termine premere nuovamente il tasto ALARM Istruzioni 1 Premere il tasto ALARM durante il normale funzionamentodell orologio 2 Il simbolo indica che il display visualizza il primo orario di...

Page 60: ...iva delle batterie selezionare Hi la notte per una maggiore intensit di illuminazione FUNZIONE BLOCCO TASTIERA Mantenere premuto il tasto Zone per bloccare sbloccare i tasti dell orologio Questa funzi...

Page 61: ...ra 0 1 C Unit di temperatura C F selezionabile dall utente ULTERIORI INFORMAZIONI Visitate il nostro sito www oregonscientific com per ulteriori informazioni sul vostro nuovo prodotto fotocamere digit...

Page 62: ...gio Il metodo di misurazione differente Le aree di rilevazione sono differenti o influenzate da condizioni climatiche Interferenze elettromagnetiche o corpi non permettono la ricezione del radiosegnal...

Page 63: ...ETS 300 683 1997 Requisiti essenziali sulla sicurezza dell apparecchio Articolo 3 1 a della direttiva R TTE Standard applicati EN 60950 1997 Informazioni aggiuntive L apparecchio inoltre conforme all...

Page 64: ...ruiken 5 Basisdisplays 5 Display van de binnenhuistemperatuur 5 Display van de 2e tijd 5 Om af te wisselen tussen de verschillende displays 6 Radio ontvangst 6 Beschrijving van de radio ontvangst 6 De...

Page 65: ...swekker van Oregon Scientific als het product van uw voorkeur Dit toestelwerdontworpenomuvelejarenvanbetrouwbaredienst te bewijzen onder meer dankzij de volgende kenmerken Ultraslank bijna kredietkaar...

Page 66: ...pcelbatterij van het type CR2032 3V H G F I DE LCD DISPLAY ICOON BENAMING BESCHRIJVING Signaal radio ontvangst Klokslag op het uur Display van de 2e tijd Temperatuureenheid Zwakke batterij Wekker aan...

Page 67: ...n vochtigheid Gebruik het product niet in of vlakbij water of in ruimtes met een hoge vochtigheidsgraad zoals badkamers Het onderhoud van uw toestel Gelievedevolgenderichtlijneninachtnemenomhetmaximum...

Page 68: ...egeven 3 Schuif de reiswekker in de nauwsluitende voering van de staander die u zonet heeft gemaakt BASISDISPLAYS DISPLAY VAN DE BINNENHUISTEMPERATUUR Vlak na het inzetten van de batterijen begint het...

Page 69: ...vangst van een radiotijdsignaal Geen ontvangst van een radiotijdsignaal Zoekend naar het radiotijdsignaal De radio ontvangst is gedeactiveerd OPMERKING De ontvangst kan door een aantal factoren worden...

Page 70: ...STELLEN Om de klok manueel in te stellen zonder de automatische RF synchronisatie te gebruiken moet u eerst de radio ontvangst deactiveren Druk op of op de schakelaar Mode om de waarden voor elke ins...

Page 71: ...e schakelaar Mode om te bevestigen Taalopties Engels Duits Frans Italiaans en Spaans 11 Kies voor de klokslag op het uur geactiveerd gedeactiveerd Wanneer de klokslag op het uur is ingeschakeld hoortu...

Page 72: ...klok De klok wordt dan teruggesteld naar de oorspronkelijke fabrieksinstellingen Intensiteit van de displayverlichting Houd Snooze Light ingedrukt om het intensiteitniveau Lo of Hi van de displayverl...

Page 73: ...umaanduiding DD MM of MM DD instelbaar Display van de weekdag InhetEngels Frans Duits Spaans of Italiaans Nauwkeurigheid van de klok 0 5 secondes per dag wanneer RF is uitgeschakeld Wekker Duur wekker...

Page 74: ...voor de meting is anders De ge valueerde gebieden verschillen of worden door het klimaat be nvloed Elektromagnetische storingen of voorwerpen verhinderen de ontvangst De ori ntatie of plaatsing van he...

Page 75: ...oegepaste norm en N J ETS 300 683 1997 Veiligheid van de informatietechnologie uitrusting Artikel 3 1 a van het R TTE Richtlijn toegepaste norm en EN 60950 1997 Bijkomende informatie Het product is da...

Page 76: ...rte de mesa 5 Mostradores B sicos 5 Mostrador da temperatura no interior 5 Mostrador da 2 zona hor ria 5 Alternar entre mostradores 6 Recep o de R dio 6 Descri o da recep o de r dio 6 Activar desactiv...

Page 77: ...st concebidoparalheproporcionar muitos anos de funcionamento fi vel incluindo as seguintes conveni ncias Extra fino pr ximo do tamanho de um cart o de cr dito somente 7mm Rel gio Calend rio Controlado...

Page 78: ...Aparece quando as teclas est o bloqueadas D Bot o Zone i Muda para o mostrador da 2 zona hor ria ii Activa Desactiva a fun ode bloquear teclas E Selector Mode UP DOWN Ajusta as configura es valores e...

Page 79: ...de seja elevada tais como casas de banho Cuidados com o seu Produto Para se assegurar de que recebe os m ximos benef cios da utiliza o deste produto por favor respeite as seguintes orienta es Limpeza...

Page 80: ...forme indicado 3 Insira confortavelmente o rel gio de viagem no forro interior do seu suporte rec m criado MOSTRADORES B SICOS MOSTRADOR DA TEMPERATURA NO INTERIOR Logo ap s a instala o da pilha a uni...

Page 81: ...Recep o fraca de sinal do rel gio r dio Sem recep o de sinal do rel gio r dio Recebendo o sinal do rel gio r dio A recep o de R dio est desactivada NOTA A recep o pode ver se afectada por um n mero d...

Page 82: ...almentesemsincroniza o RF autom tica lembre se de desactivar primeiro a Recep o de R dio Pressione ou no Selector Mode Modo para ajustar os valores de cada acerto Diagrama Instru es 1 Pressione e mant...

Page 83: ...do feito Op es da Linguagem Ingl s Alem o Franc s Italiano Espanhol 11 Escolher activar desactivar o sinal hor rio Quando o Sinal Hor rio estiverligado ser imitidoumsinal no inicio de cada hora Pressi...

Page 84: ...e ALARM para visualizar o 2 alarme Ligueoudesligueoalarme utilizando ou no Selector Mode Modo 4 Pressione o Selector Mode em qualquer momento para sair do modo de alarme 1 2 Diagrama Instru es 1 Press...

Page 85: ...loquear desbloquear todas as teclas da unidade Isto pode ser utilizado para prevenir que os bot es sejam pressionados acidentalmente ESPECIFICA ES Dimens es Largura x Altura x Espessura 92 x 66 x 7 mm...

Page 86: ...seleccion vel pelo utilizador FONTES ADICIONAIS Visite o nosso endere o web www oregonscientific com para aprender mais sobre o seu produto e outros produtos Oregon Scientific taiscomoc marasdigitais...

Page 87: ...al O m todo de medi o diferente As reas sob avalia o s o diferentes ou est o influenciadas pelo clima Interfer ncia electromagn tica ou objectos fazendo barreira recep o A orienta o ou coloca o da uni...

Page 88: ...R TTE Padr o aplicado ETS 300 683 1997 Seguran a do equipamento de tecnologia de informa o Artigo 3 1 a das Normas R TTE Padr o aplicado EN 60950 1997 Informa o adicional Desta forma o produto est de...

Page 89: ...v ndning av h llaren som bordsst ll 5 Grundl ggande displayer 5 Inomhus temperaturdisplay 5 2a tidsdisplay 5 Hoppa mellan displayer 6 Radiomottagning 6 Radiomottagningsbeskrivning 6 M jligg r avsluta...

Page 90: ...Denna produkt r tillverkad f r att ge dig m nga rs tillfredsst llande anv ndning inkluderat f ljande bekv mligheter Extra tunn n ra kreditkortsstorlek endast 7mm Radiokontrollerad kalenderklocka Inom...

Page 91: ...knapp terst ller alla inst llningar till f rinst llda v rden H G F I I Batteri Utrymme Enheten anv nder 1 st CR2032 3V Litium knappcells batteri f r drift LCD DISPLAY SYMBOL NAMN BESKRIVNING Radiomot...

Page 92: ...ation och ska inte blockeras eller t ckas ver Blockering av ventilerna kan orsaka verhettning och kan skada produkten Reparation F rs k inte reparera produkten eller ndra dragningar sj lv Str mtillf r...

Page 93: ...nnet bak t enligt ritningen 3 F st reseuret i h llaren GRUNDL GANDE FUNKTIONER INOMHUS TEMPERATUR DISPLAY Strax efter installationen av batteriet l ser enheten av och visar denomgivandeinonmhustempera...

Page 94: ...tagning av radioklocksignal Mottagning av radioklocksignal Radiomottagningen r avst ngd OBS Mottagningen kan p verkas av en rad faktorer F r b sta mottagning placera enheten utom r ckh ll f r metallf...

Page 95: ...att st nga av radiomottagningen f rst Tryck eller p Mode f r justering av v rdet f r varje inst llning Diagram Instruktioner 1 Tryck och h ll inne Mode Switch i 2 sekunder 2 Justera tidszonen f r en...

Page 96: ...klockan r p h rs ett pipljud vid b rjan av varje timme Tryck Mode f r att komma tillbaka till normal klock display LARM FUNKTIONER GRUNDL GGANDE FUNKTIONER Din produkt har ocks en 2 minuters stigande...

Page 97: ...terst lls d till fabriksinst llning BAKGRUNDSLJUS NIV INTENSITET Tryck och h ll inne Snooze Light f r att v lja Bakgrundsljus Niv intensitet Lo eller Hi Tryck sedan eller p Mode f r att hoppa mellan...

Page 98: ...gelska Franska Tyska Spanska och Italienska Klockans noggrannhet 0 5 sekunder per dag n r RF r bortkopplad Larm Larmtid 2 minuter Str m Str mf rs rjning 1 x CR2032 Litium knappcellsbatteri Omgivnings...

Page 99: ...Normalt M tmetoderna r olika Omr denasomavl ses rolika ellerp verkasavolikav derlek Elektromagnetisk st rning eller f rem l hindrar mottagningen Orienteringen eller placeringen avhuvudenheten rinteop...

Page 100: ...ivet Till mpad standard ETS 300 683 1997 S kerhet f r informationsteknologisk utrustning Artikel 3 1 a i R TTE direktivet Till mpad standard EN 60950 1997 Ytterligare information Produkten r anpassad...

Reviews: