background image


Ortal  

Front Facing Clear 200 & 200H 

Skamotec 225 Installation Guide 

Revised: December 22, 2016 


Summary of Contents for Skamotec 225

Page 1: ...Ortal Front Facing Clear 200 200H Skamotec 225 Installation Guide Revised December 22 2016 ...

Page 2: ...hed using the recommended construction adhesive construction screws All joining SKAMOTEC 225 surfaces must be moistened with water before assembly This is to prevent the adhesive from drying out too quickly adhering incorrectly Please take care that water does not spill on Ortal unit Always maintain a minimum of 1 8 clearance from all window frame surface Always maintain a minimum of 1 8 clearance...

Page 3: ...s it is important to plan your layout Create a cut list then determine the location of your access panel your method of heat release Min 24 clearance from cavity ceiling to top of firebox opening Min Height Double Glass 9 5 8 Screen Protection 8 1 8 Min 87 7 Min 21 5 ...

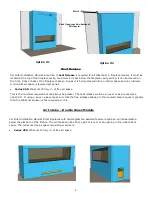
Page 4: ...equired but can always be greater The heat release could be a louver or as a reveal see option 2 If using a louver please make sure that the free airspace allowed in the louvered area is equal or greater than the minimum square inches required per unit Option 1 Option 2 Air Intake Double Glass Models Per Ortal Installation Manual Ortal fireplaces with double glass fan assisted feature require an a...

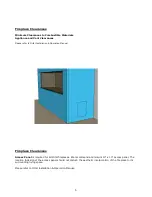
Page 5: ...tion design of the access panel should not disturb the aesthetic incorporation of the fireplace to its surrounding living space Please refer to Ortal Installation Operation Manual Fireplace Clearances Minimum Clearances to Combustible Materials Appliance and Vent Clearances Please refer to Ortal Installation Operation Manual ...

Page 6: ...anel 3 Front Side Panels 8 Joint Plate 2 RH Side Panel 7 Support Blocking 8 Joint Plate if multiple pieces 2 LH Side Panel 7 Support Blocking 8 Joint Plate if multiple pieces 1 Back Panel May be several pieces 5 Middle Front Panel 8 Joint Plate 9 Cavity Support Blocking ...

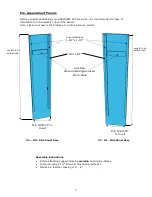
Page 7: ...es are correct Assembly instructions Before attaching support blocking moisten all joining surfaces Fastened using 2 1 2 screws construction adhesive Maintain a fastener spacing of 6 8 2 RH Side Panel Assy 2 LH Side Panel Assy Length to be determined Length to be determined Support Blocking 1 1 2 x 1 1 2 Min 1 1 2 Min Width 20 or to suit Min Width 20 or to suit Joint Plate When combining two piece...

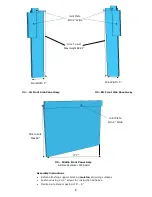
Page 8: ...t blocking moisten all joining surfaces Fastened using 2 1 2 screws construction adhesive Maintain a fastener spacing of 6 8 Min Width 5 Dim To suit Max Height 80 31 77 7 t Dim to Suit Max 48 Joint Plate Min 4 Wide 3 LH Front Side Panel Assy 3 RH Front Side Panel Assy Joint Plate Min 4 Wide Min Width 5 ...

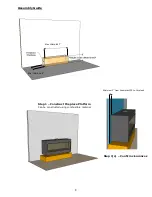
Page 9: ...9 Step 1 Construct Fireplace Platform Can be constructed using combustible material Step 1 a Confirm clearances Assembly Guide Minimum 2 from Skamotec 225 to Ortal unit Max Width 84 7 Min Width 18 5 ...

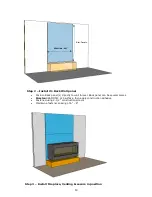
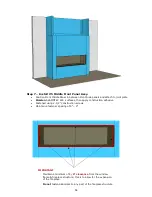
Page 10: ...ly to wall level Back panel can be several pieces Moisten SKAMOTEC 225 surface then apply construction adhesive Fastened using 2 1 2 construction screws Maintain a fastener spacing of 6 8 Step 3 Install Fireplace Venting secure in position Min Width 84 7 Dim To suit ...

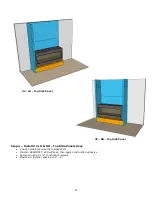
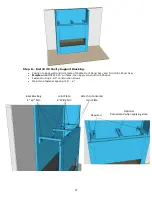
Page 11: ...e Panels Assy Position Side Panel directly to Back Wall Moisten SKAMOTEC 225 surfaces then apply construction adhesive Fastened using 2 1 2 construction screws Maintain a fastener spacing of 6 8 2 LH Top Side Panel 2 RH Top Side Panel ...

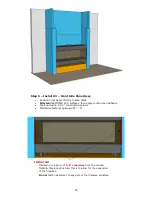
Page 12: ...ces then apply construction adhesive Fastened using 2 1 2 construction screws Maintain a fastener spacing of 6 8 IMPORTANT Maintain a minimum of 1 8 clearance from the window frame fireplace structure this is to allow for the expansion of the fireplace Do not fasten Skamotec to any part of the fireplace structure ...

Page 13: ...kamotec to any part of the fireplace structure Step 6 Install 4 Bottom Front Panel Position Bottom Front Panel in between Front side panels and directly to fireplace platform Moisten SKAMOTEC 225 surfaces then apply construction adhesive Fastened using 2 1 2 construction screws Maintain a fastener spacing of 6 8 4 Bottom Front Panel Width 77 7 Height To suit ...

Page 14: ...n SKAMOTEC 225 surfaces then apply construction adhesive Fastened using 2 1 2 construction screws Maintain a fastener spacing of 6 8 IMPORTANT Maintain a minimum of 1 8 clearance from the window frame fireplace structure this is to allow for the expansion of the fireplace Do not fasten Skamotec to any part of the fireplace structure ...

Page 15: ...nel Assy and Front Side Panel Assy Moisten SKAMOTEC 225 surfaces then apply construction adhesive Fastened using 2 1 2 construction screws Maintain a fastener spacing of 6 8 Joint Plate 4 Wide Min Back Blocking 4 x 4 Min Attach to horizontal Joint Plate Required Optional Recommend when applying stone ...

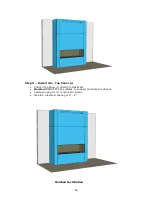
Page 16: ... 6 Top Panel s Position Top Panel s directly to Side Walls Moisten SKAMOTEC 225 surfaces then apply construction adhesive Fastened using 2 1 2 construction screws Maintain a fastener spacing of 6 8 Finished Installation ...

Page 17: ...lic latex primer building up your layers Apply finish coat Note Do not use a primer sealer mix as this is too thick will not bond to Skamotec 225 Tile Prepare the surface by moisten the surface with water use a sponge 1st apply a scratch coat of All Purpose Thin Set Mortar to the area to be tiled Then apply your nylon mesh joint tape Using a notch trowel apply a layer of All Purpose Thin Set Morta...

Reviews: