Installation Instructions for VAPRO Rupture Disks in VRDI
Holder
P.O. Box 1327 / 1701 W. Tacoma/ Broken Arrow, OK 74012
Telephone: (918) 258-5626 Fax: (918) 251-2809
“Quality Products to meet Industry Needs”
PS 11.12
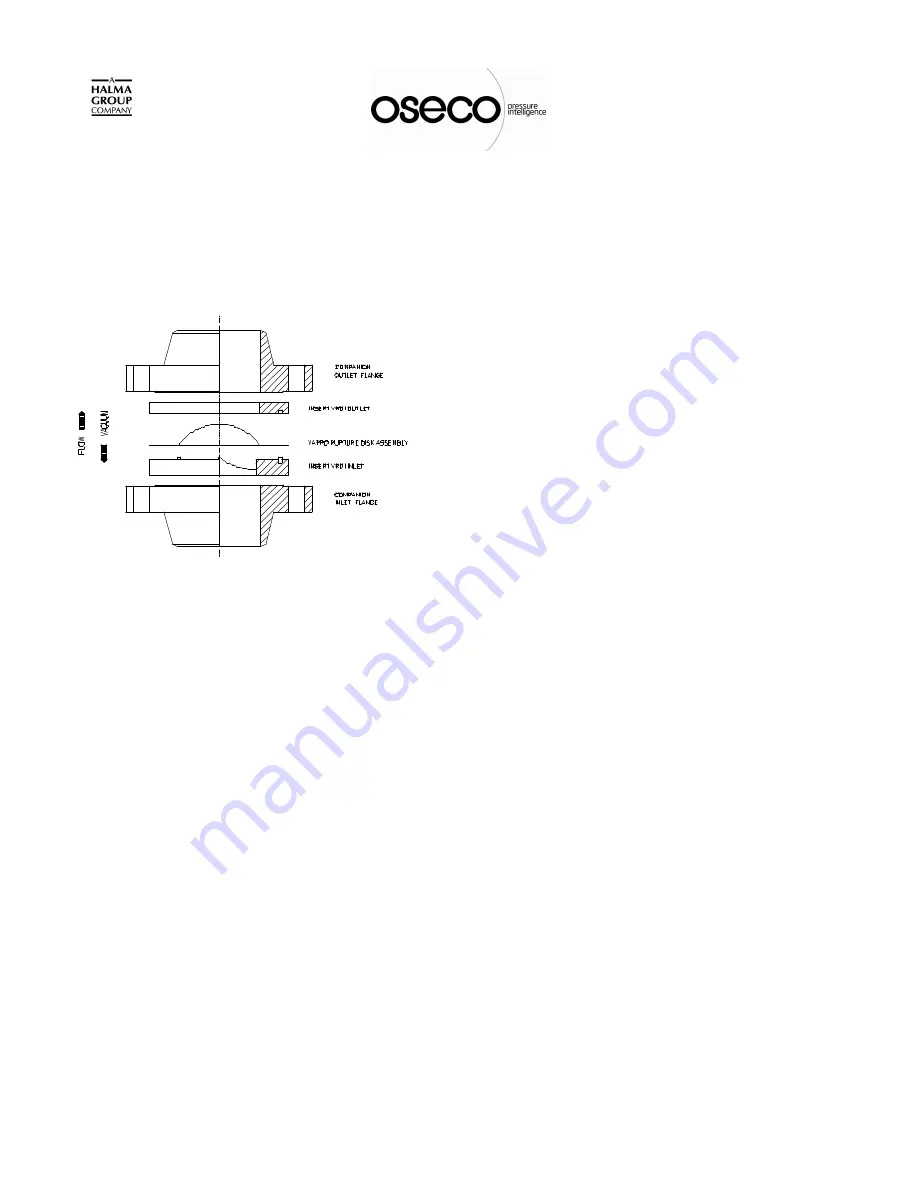
TYPICAL VRDI INSTALLATION
CAUTION
All rupture disk installations should be located to
allow full unrestricted discharge of a burst disk when
over pressure of the system occurs. Never locate a
rupture disk assembly where the discharge from a
burst disk can directly impact personnel or equipment.
Venting of a burst disk discharge must always be
routed to a safe disposal area. Handle burst rupture
disks carefully! Avoid their sharp, jagged edges when
removing same from holder. The knife blades in the
VRDI holder are extremely sharp. Handle holders
very carefully to avoid injury.
IMPORTANT
The VAPRO rupture disk assembly is a dual acting
precision piece of equipment. Handle it with
extreme care. Avoid scratching, bending, denting
or damaging the dome and/or flat seat areas of the
metal disk membrane. Handle the disk by the flat
outer annular seating surfaces and avoid the dome
area as much as possible. Never carry a VAPRO
disk/holder assembly by the name tag alone as
damage to the disk could occur. Do not place tools
or foreign objects on top of the knife blades or
holder. The knife blades must be kept very sharp
and free of nicks and defects in order for the disk
assembly to function properly.
RUPTURE DISK HOLDER PREPARATION
1) Loosen and remove flange bolting only after
verifying that the system is de-pressurized. Always
purge toxic and/or dangerous materials area from
any system that is to be opened to a safe disposal.
.
2) Slip the holder insert from between the
companion piping flanges and place on a flat work
surface. Verify that all holder restraints have been
removed. Separate the holder inlet from the outlet
and remove the existing rupture disk assembly.
3) Thoroughly inspect and clean all seating
surfaces of the disk holder. Do
not
scrape or
scratch any seating surface including the raised
nubbin area! If wiping these surfaces with a clean
cloth and a suitable solvent does not remove
surface residues, fine emery cloth or steel wool may
be utilized. Care should be exercised
not
to exert
sufficient pressure on the emery cloth or steel wool
to "cut or groove" these surfaces. When in doubt
about the proper condition of these sealing
surfaces, contact OSECO for further instructions.
4) Inspect knife blade points and edges. Knife blade
edges must be razor sharp and free of nicks or
defects. Points must be sharp and undamaged for
the disk assembly to function properly. Contact
OSECO for repair or replacement of dull or
damaged knife blades.
Do not install the Assembly if the blades are
dull, nicked or Damaged.


