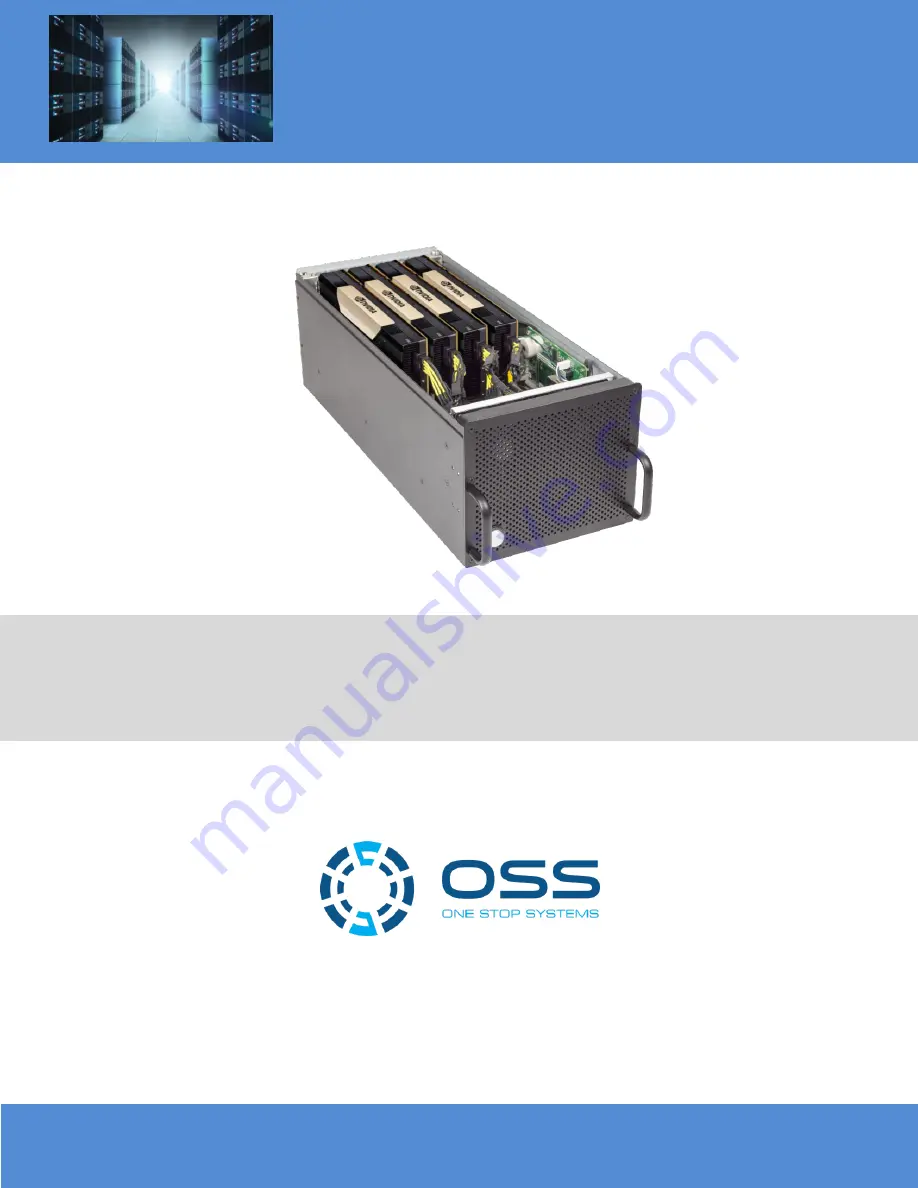
background image


ExpressBox 3450 


5 PCIe (3.0 x16) Slot Expansion Unit  


5 Slot Gen 3 Expansion Chassis User Manual 


SKU: EB3450 

www.onestopsystems.com 

Summary of Contents for EB3450

Page 1: ...ExpressBox 3450 5 PCIe 3 0 x16 Slot Expansion Unit 5 Slot Gen 3 Expansion Chassis User Manual SKU EB3450 www onestopsystems com ...

Page 2: ...5 Connect Link Cables 20 2 5 1 Connect cables to expansion unit 21 2 5 2 Connect cables to computer server 21 2 6 Cable Configurations 22 2 6 1 Cable configuration for EB3450 24 2 7 Install GPU PCIe cards 25 2 7 1 PCIe card Memory Requirements 26 2 7 2 PCIe card Power Requirements 27 2 7 3 K80 Installation 27 2 8 Connect Power Cord Cable 29 2 9 Connecting to Electrical Outlets 30 2 9 1 Use two sep...

Page 3: ...tput Load Distributions 57 3 8 5 Output Signals Redundant System 58 3 8 6 Environmental 59 3 9 EB3450 Power Consumption 59 3 9 1 Power consumption breakdown per hardware 59 4 Express I O Manager 60 4 1 Express I O Management module 60 4 2 Web Server and SNMP Features 60 4 3 Web Access and SNMP Configuration 60 4 3 1 Supported Internet Browser 61 4 4 To Access Express IO Manager SNMP 61 4 4 1 Conne...

Page 4: ...trieving the MIB File 76 4 11 Accessing the various SNMP functions 77 4 12 NetBurner Module 77 4 12 1 Replacing the NetBurner 77 4 12 2 NetBurner Installation 80 4 12 3 Replacing the Interface Board 81 4 12 4 Interface Board Installation 82 5 Troubleshooting 83 5 1 Locate the Problem 83 5 2 Computer Hangs During Power Up 83 5 3 Computer Doesn t Detect Expansion Chassis 83 5 4 Add in card doesn t w...

Page 5: ... to help you CAUTION Used to indicate and prevent the following procedure or step from causing damage to the equipment WARNING Used to indicate and prevent the following step from causing injury DANGER or STOP Used to indicate and prevent the following step from causing serious injury or significant data loss Disclaimer We have attempted to identify most situations that may pose a danger warning o...

Page 6: ...efore taking covers off a computer perform the following steps 1 Turn off the computer and any peripheral devices 2 Disconnect the computer and peripheral power cords from their AC outlets or inlets in order to prevent electric shock or system board damage In addition take note of these safety guidelines when appropriate To help avoid possible damage to systems boards wait five seconds after turni...

Page 7: ... can include wrist straps and smocks when servicing equipment You can also take the following steps to prevent damage from electrostatic discharge ESD When unpacking a static sensitive component from its shipping carton do not remove the component s anti static packaging material until you are ready to install the component in a computer Just before unwrapping the anti static packaging be sure you...

Page 8: ...the backplane Power supplies are located underneath the chassis to ensure maximum cooling is achieved through an unobstructed airflow path This simple yet unique design is perfect for keeping high performance cards operating properly even under heavy computing loads The small form factor allows you to bring HPC capabilities virtually anywhere When space is a concern the EB3450 is the perfect fit F...

Page 9: ... Expansion side The host link is Gen 3 x16 capable and will train down to Gen 2 or 1 as needed Switchless host link adapter design for minimal host expansion latency FANS Two Fans Dimension 92mm X 92mm X 38mm Airflow 185 CM fan speed adjustable through Express I O manager Speed 11500 RPM Acoustical noise at 11500 rpm 71 Max dB A lower db A at lower fan speeds POWER SUPPLY 1200W 1500W PSU Additiona...

Page 10: ...n Quantity 1 Host Interface card 1 2 1or 2 meter High Speed HD IO cable specified at order 2 3 U S Standard 115V Power Cord 1 per supplied PSU 4 Expansion Interface card 1 5 Quick Start Guide 1 6 1200W 1500W Power Supply Modules installed 2 7 Fan installed 2 ...

Page 11: ...ode DIP switch b Speed Toggle switches c Two Cable ports one for x8 and the other is x16 3 Power Supply redundant and hot swappable a Power cord socket b LED status indicator c Locking Thumb screw d 9 6 2 pin Auxiliary PCIe connectors e Hot swappable 4 Fans a 185 CFM b Air Flow from outside going inside from front of chassis to rear 5 Express I O management module a NetBurner b RJ45 port Front pan...

Page 12: ...One Stop Systems EB3450 12 ...

Page 13: ... steps Inventory the shipping carton contents for all of the required parts Gather all of the necessary tools required for installation Read this manual 1 7 Tools Required for Installation To complete the installation of the OSS product you will need a Phillips head screwdriver and ESD wrist strap to prevent electrostatic discharge ...

Page 14: ...ace For more information see Protecting Against Electrostatic Discharge in the Preface WARNING High voltages are present inside the expansion chassis when the unit s power cord is plugged into an electrical outlet Disconnect the power cord from the AC outlet before removing the enclosure cover Turning the system power off at the power on off switch does not remove power to components High voltage ...

Page 15: ...ower on Computer 10 Hardware Check 11 Verify Installation via Operating System NOTE It is highly recommended to install any 3 rd party PCIe cards High Power PCIe cards after you have verified and tested the OSS expansion is functional and there are no hardware failures When installing 3rd party PCIe card start with one card first just to see if there are any software and hardware issues or incompa...

Page 16: ...x16 User should not alter or change the settings of SW3 If you encounter problems for troubleshooting purposes only check SW3 verify the dipswitch is set to x16 EB3450 comes with 1 Expansion Interface card It is Gen3 x16 it has two available cable ports for linking either x8 or x16 connection If you need to replace or install the Expansion Interface card follow the steps below 1 Check the dipswitc...

Page 17: ...m documentation 2 4 1 Low Profile Bracket Installation If your server or computer only accommodates a low profile case card you have to change the existing mounting bracket on the Host interface card to a low profile bracket that shipped with your system as shown below Standard Interface card is mounted to a full height bracket Remove the screws that hold the card to the bracket Be sure you are us...

Page 18: ...OT function if the red dipswitch on the Interface card is set to ON and the card is inserted into the host computer As shown from the picture above the Host Interface card is set to OFF HOST Install the two One Stop System PCIe host interface cards into the host computer Use available x16 PCIe slot for both Host Interface cards Plug in the host card to the PCIe slot closest to the PCIe CPU this al...

Page 19: ... dipswitch setting when plugging in the Host Interface card into x4 or x8 PCIe slots It is ok to plug in the Host card into a PCIe slot with no identification whether it is GEN1 GEN2 x4 or x8 The host card will instantly and automatically train down to whatever the speed is of the PCIe slot it recognizes DANGER or STOP YOU MUST ONLY INSTALL THE PCIe HOST CARD INTO A PCI EXPRESS SLOT Only use cards...

Page 20: ... provides easy interconnection for blazing system performance 2 The cable system is also equipped with a rugged simple detent latching system allowing for the tightest cable placement Connect Cables to Expansion interface cards and connect the other end to Host interface cards Be attentive which port to plug in the cable to The interface card has two cable ports labeled with x8 A and x16 B Connect...

Page 21: ...ace card on the far right side of the unit Plug in the first cable to port x8 A of the Expansion Interface card Connect the second cable to port x16 B Install the cable retainer bracket to secure the cable 2 5 2 Connect cables to computer server Connect the other end of the 1st cable to host card port x8 A on the back of the computer server Connect the other end of the 2nd cable to host card port ...

Page 22: ...One Stop Systems EB3450 22 2 6 Cable Configurations The picture below shows the correct and wrong ways to connect the cables to the interface cards host and expansion x16 Cable Configuration ...

Page 23: ...One Stop Systems EB3450 23 x8 Cable Configuration ...

Page 24: ... Cable Configuration x16 Connectivity requires two cables Make sure to plug in the cables the correct way A to A and B to B OR x8 to x8 and x16 to x16 x8 Cable Configuration x8 Connectivity only use one cable Connect cable to port x8 A on both expansion and host cards ...

Page 25: ...4 To keep the cards in place secure them in the enclosure with their retaining screws 5 Connect Auxiliary power to the PCIe card if required A high power PCIe card such as a GPU requires additional power Aside from the power being supplied by the PCI Express slot which is 75 watts there is not enough to meet the power requirement for a high end GPU with power consumption of over 125 Watts A direct...

Page 26: ...80 GPUs installed in the OSS EB3450 expansion chassis Note for Nvidia K80 GPUs an additional power adapter cable is supplied with the GPU to convert from the EB 3450 supply PCI AUX power cables to the newer NVIDIA standard 8 pin CPU POWER connector 2 7 1 PCIe card Memory Requirements ...

Page 27: ...e systems adjusting the settings in BIOS of the host system accordingly might be required i e enable above 4G memory as well as increase MMIO space accordingly 2 7 2 PCIe card Power Requirements Power consumption is crucial for all CPUs and GPUs and other High End Power Hungry PCIe cards GPUs consume a great deal of power As the processing power of graphics cards has increased so has their demand ...

Page 28: ... PCIe slot and slowly push it down until firmly seated 4 Secure it with the two screws 5 Connect the EB3450 auxiliary power connector to the K80 breakout auxiliary power adapter The K80 comes with a breakout auxiliary power adapter Connect the breakout auxiliary power adapter to K80 power connector Remove slot fillers in the expansion unit ...

Page 29: ...rd Cable Plug 15A 110 120V Connector 15A 110 120V OSS only provides the 110 120V power cord NOTE User can also use 15A 220V 230V power cord plug Power Plug and Electrical outlets vary from country to country Plug in all power cords to the expansion chassis Each supplied power supply will come with a power cord Up to two Power Cords for EB3450 A single expansion backplane has two power supply modul...

Page 30: ...watt device The power supplies will support up to a 240V operation for other geographies If you have 30 amp 110 or 120 volt lines you can run two 1200 watt devices At 230 240V the PSUs will support up to 1500W of power and sizing must be done accordingly At 220V or above both power supplies may be powered from one circuit however it is still suggested to run from separate circuits for redundancy W...

Page 31: ...xample Electrical outlets vary from country to country 2 9 2 Don t use multiple electrical outlets on one circuit line This applies to 110V 120V and 220V 230V The image below is just an example Electrical outlets vary from country to country See picture below a power strip populated with four power cords should not be connected on a single electrical outlet This applies to 110V 120V and 220V 230V ...

Page 32: ... 110V 120V and 220V 230V The image is just an example Electrical outlets vary from country to country Once you have plugged in all power cables to proper electrical outlets or turned the power strip switch to ON position all AMBER LEDs are immediately illuminated on the back of the power supply unit Each power supply module is designated with one indicator LED see picture below Two Solid Green LED...

Page 33: ... state when the host computer issues its master power on bus reset Each power supply has individual power LEDs to indicate its power status The power supply has no power switch that you can flip ON and OFF Once the expansion unit power cable is plugged into an electrical outlet the entire system is ready to be powered up through the main power switch push button located on the front panel Upon con...

Page 34: ...ce cards Interface and Expansion cards operating normally will show up with 8 Solid Green LEDs see picture below Reset is de asserted LED D5 is turned off 15 Solid Green LEDs on the backplane are illuminated see picture below Check LED PORT 0 D9 status see if it is illuminated solid green or blinking fast Go to page 41 for LED status descriptions 1 solid Blue LED is illuminated on the front panel ...

Page 35: ...2 2 Check Front Panel Status 1 solid LED is illuminated on the Front Panel Status indicator when the system is up and running 2 12 3 Check Backplane LEDs 15 Solid Green LEDs on each backplane are illuminated when the system is turned on and operating normally LED STATUS COLOR D14 D12 D10 D8 D6 D4 D2 D42 ON Solid Green D1 D3 D5 D7 D9 D11 D13 ON Solid Green D33 D39 D40 D41 D43 D44 D16 OFF None D37 D...

Page 36: ... up menu Next click on Device Manager in the leftmost Computer Management window Finally click on the View Menu and select View Devices by Connection PCI Express Root Port with a PCI Standard PCI to PCI Bridge beneath it The Device Manager will display the available slots within the chassis As reference you can determine which slot you inserted your PCIe card in by following the outline that is sh...

Page 37: ...ce 8 SLOT 2 Device 16 SLOT 3 Device 20 SLOT 4 Device 12 SLOT 5 Device 4 This is the physical PCIe slot on the backplane PCI Standard PCI to PCI Bridge PCI standard PCI to PCI Bridge This is Device 4 PCI Standard PCI to PCI Bridge This is Device 8 PCI Standard PCI to PCI Bridge This is Device 12 PCI Standard PCI to PCI Bridge This is Device 16 PCI Standard PCI to PCI Bridge This is Device 20 ...

Page 38: ...One Stop Systems EB3450 38 GPU in slot 1 comes up under device 8 in Windows Device Manager see screenshot below ...

Page 39: ...One Stop Systems EB3450 39 GPU in slot 2 comes up under device 16 in Windows Device Manager see screenshot below GPU in slot 3 comes up under device 20 in Windows Device Manager see screenshot below ...

Page 40: ... information Ispci vvv Displays the most comprehensive information about the expansion system Typical output from lspci vvv is verbose but you can dig through the information to find very important information There are so many registers and settings associated with PCI Express Switches For example the image below is showing the OSS Chassis on Bus 2 Device 0 and Function 0 Some information has bee...

Page 41: ...One Stop Systems EB3450 41 Use the lspci grep 8796 command to check that the OSS card slot devices are detected see image below ...

Page 42: ...nk see screenshot below Use lspci grep NVIDIA this allows you to check on the Nvidia GPUs Device 1024 is the Nvidia K40 GK107 is the local video card in the host computer lspci s 01 00 0 vvv grep LnkSta LnkSta Speed 8GT s Width x16 for our PLX 2 13 4 Slot and port reference ...

Page 43: ...press Downstream Port Slot MSI 00 Capabilities a4 Subsystem PLX Technology Inc Device 8796 Capabilities 100 Device Serial Number aa 87 00 10 b5 df 0e 00 Capabilities fb4 Advanced Error Reporting Capabilities 138 Power Budgeting Capabilities 10c 19 Capabilities 148 Virtual Channel Capabilities e00 12 Capabilities f24 Access Control Services Capabilities b70 Vendor Specific Information ID 0001 Rev 0...

Page 44: ...wer Management version 3 Capabilities 48 MSI Enable Count 1 8 Maskable 64bit Capabilities 68 Express Downstream Port Slot MSI 00 Capabilities a4 Subsystem PLX Technology Inc Device 8796 Capabilities 100 Device Serial Number aa 87 00 10 b5 df 0e 00 Capabilities fb4 Advanced Error Reporting Capabilities 138 Power Budgeting Capabilities 10c 19 Capabilities 148 Virtual Channel Capabilities e00 12 Capa...

Page 45: ...oration GK107 NVS 510 rev a1 prog if 00 VGA controller Subsystem NVIDIA Corporation Device 0967 Flags bus master fast devsel latency 0 IRQ 61 Memory at f4000000 32 bit non prefetchable size 16M Memory at c0000000 64 bit prefetchable size 256M Memory at d0000000 64 bit prefetchable size 32M I O ports at d000 size 128 virtual Expansion ROM at f5000000 disabled size 512K Capabilities 60 Power Managem...

Page 46: ...One Stop Systems EB3450 46 3 Additional Technical Information 3 1 EB3450 Configuration ...

Page 47: ...450 47 3 2 Backplane and LEDs a Five PCIe x16 slot electrical and mechanical b One designated Link Up SLOT for Interface card see picture below c Slot LEDs Link and Activity LEDs see below Slot LEDs Link and Activity LEDs ...

Page 48: ... When Off 2nd Bank 0V9 D1 900mV I O Power Solid power rail OK OFF power rail out of range 3V3 D3 3 3V System Power Solid power rail OK OFF power rail out of range 1V8 D5 1 8V System Power Solid power rail OK OFF power rail out of range 1V8 AUXILIARY D7 1 8V Auxiliary System Power Solid power rail OK OFF power rail out of range PORT 0 D9 Slot 0 Link Solid Gen 3 Link Fast Blinking Gen 2 Link Slow Bl...

Page 49: ...Link Slow Blinking Gen 1 Link OFF Not Linked Slot 2 PORT 16 D12 Slot 2 Link Solid Gen 3 Link Fast Blinking Gen 2 Link Slow Blinking Gen 1 Link OFF Not Linked Slot 3 PORT 20 D14 Slot 3 Link Solid Gen 3 Link Fast Blinking Gen 2 Link Slow Blinking Gen 1 Link OFF not Linked Slot 4 PORT 12 D12 Slot 4 Link Solid Gen 3 Link Fast Blinking Gen 2 Link Slow Blinking Gen 1 Link OFF not Linked Slot 5 PORT4 D10...

Page 50: ... LEDs 4 Rx Hint and Tx presets 5 Cable ports x8 A and x16 B 6 SW4 toggle switch for interface mode setting host or expansion 7 Heatsink During normal operation LEDs D7 D8 and D3 should be on and solid green at all times If any of these LEDs are off it means that there is a power problem with the unit LED D5 will turn on Amber when PCIe reset is asserted and turn off when the reset is de asserted I...

Page 51: ...ternate display will be activated Phase equalization mode D400 will not be lit D401 Phase equalization complete D402 Phase 3 successful D403 Phase 2 successful D404 Phase 1 successful For any link below gen 3 the display will alternate between these two A 75 on 25 off duty cycle indicates a gen 2 link whereas a 25 on 75 off duty cycle is a gen 1 link ...

Page 52: ...ent Lights up if a PCIe clock has been detected No clock present Clock is present D3 3 3V good When on means that the locally generated 3 3V is good and within specification When off means that there is a problem with the local 3 3V 3 3V is bad 3 3V is good D8 1 0V good When on means that the locally generate 1 0V is good and within specification When off means that there is a problem with the loc...

Page 53: ...h heat generating GPUs These are high CFM RPM and replaceable fans 3 7 1 How to Replace Fans EB3450 has two fans that are easily replaceable First you will need to remove the chassis lid Then locate the two mounting screws located on both sides of the unit see pictures below Slowly pull the fan housing in a slanted position ...

Page 54: ...nnect the two power cable connectors see pictures below Set the fan on a flat and sturdy surface Remove the screws see pictures below Remove the fan grills see pictures below Remove metal piece and replace the faulty or defective fan ...

Page 55: ...0 54 0 max W Speed 11500 RPM Max Air Flow at Zero Static Pressure 5 255 min 4 729 m3 min185 55 min 168 98 CFM Max Air Pressure at Zero Air Flow 64 10 min 51 92 mnH20 2 523 min 2 044 inchH20 Acoustical Noise AVG 71 Max 75 5 dB A Installation Type UL Class A Operating Temp 10 to 70 Deg C Storage Temp 40 to 75 Deg C Operating Humidity 5 to 90 RH Storage Humidity 5 to 95 RH Model PFR091 SP00 ...

Page 56: ...g 110 240 label is located on top of the power supply module 3 8 1 Power Supply Specifications Scope This document defines a series of power supply systems with the output power of up to 1200W at 120V and 1500W at 240V and with 12V 5Vsb output rails or ATX output rails for 1U system application The power supply system consists of one 1 or two 2 power supply modules providing the 12V 5Vsb output ra...

Page 57: ...nt 3 8 3 DC Output DC Output Voltage Regulations The DC output voltages remain within the regulation ranges shown in Table 2 for both the power supply module and the completed power system when measured at the load end of the output connectors under all AC line O P loads and environmental conditions The remote sensing is provided to 12V 5V and 3 3V outputs to compensate for excessive cable drops 5...

Page 58: ...or hazardous condition will occur with all the DC output connectors disconnected from the load The power supply may latch into the shutdown state Isolation Primary to Secondary 4242Vdc Primary to Earth GND 2800Vdc 3 8 5 Output Signals Redundant System Audible Alarm Power Fail Signal The Audible alarm and Power Fail signal are available from the signal card located on the backplane The audible alar...

Page 59: ...erating 0 to 16 000 feet 5000 meter Storage 0 to 50 000 feet Mean Time between Failures MTBF 100K hours minimum at full load 25o C 3 9 EB3450 Power Consumption The EB3450 expansion unit draws 295W Fan SNMP Backplane Interface board of power without any boards cards in the backplane 3 9 1 Power consumption breakdown per hardware 1 Fan 90W 2 SNMP 2 5W 3 Backplane A single BP capable of powering all ...

Page 60: ...ts the Simple Network Management Protocol SNMP for remote monitoring and administration by offering the following features Internal Temperature monitoring Clear Alarm button monitoring Power supply 1 status Power supply 2 status Traps are defined to alert the SNMP server in case of overheating or failure in any of the subsystems mentioned above Remote chassis turn ON and turn Off Remote Audible Al...

Page 61: ...page 4 4 1 Connect Ethernet Cable Connect one end of the cable to the RJ 45 port located to the top of the Expansion Interface card back of the chassis Connect the other end to your local area network connector or any computer In case you connect the chassis to a local computer laptop be sure to use a Hub with a regular network cable or a crossover cable without a Hub 4 4 2 Configure Network Setti...

Page 62: ...computer prior to setting up the Network adapter 1 Go to your computer 2 Right click the network icon below the system tray 3 Click Open Network Sharing Center 4 Click Local Area Network 5 Click Properties a Select Internet Protocol Version 4 TCP IPV4 b Click Properties 6 Select Use the following IP address a For IP address enter 192 168 1 20 b For Subnet mask enter 255 255 255 0 7 Click OK ...

Page 63: ...92 168 1 1 5 Then press enter to accept the new settings 6 You need to restart the network by typing service network restart command in the terminal 7 Type ifconfig to check and verify that the new IP address and Subnet mask have been accepted see screenshot below When done you can reset the Network Adapter IP address and restart your Network Manager reset the Network Adapter IP address sudo ip ad...

Page 64: ...error occurs or unable to start the Express IO Manager check your Ethernet cable connection Make sure the Ethernet cable is plugged in and firmly inserted Check to see if the cable has been cut chewed or otherwise damaged If it is damaged or broken please replace it with a known good cable 4 4 6 Authentication Log in The Authentication login for the browser will appear The define username will be ...

Page 65: ...EB3450 65 Linux Ubuntu Log in screen 4 4 7 Default Home Webpage The user will be directed to the OSS home webpage for the expansion device See screenshot below as the default home webpage 4 5 Express IO Manager Webpage ...

Page 66: ...vice 4 5 2 ADMINISTRATOR TAB The device is capable of allowing separate users to have access to the PCIe system Based on the MODE that the device is operating in a maximum of 4 users could share the same Expansion set To add users click on the checkbox and then enter their name under Enable Disable Users You would then configure their setting based on login information and remote monitoring The co...

Page 67: ... obtain an MIB file in text format for a report 4 5 4 ALARM SETTINGS With the SNMP built into the chassis you can oversee the configurations that are used to set off an alarm whenever there is a malfunction with the equipment pertaining to the interior of the chassis This feature is shown on Alarm Settings These settings are recommended to stay at its default condition 4 5 5 NETWORK ...

Page 68: ...e Stop Systems EB3450 68 The Network tab allows you to change your IP address It can also permit or prevent certain IP addresses from accessing the extended feature of the chassis 4 5 6 REMOTE MANAGEMENT ...

Page 69: ...ot linked The Turn Off Chassis or Turn On Chassis is greyed out if EB3450 is linked to a live host computer 4 5 7 How to remote Turn ON and Off the chassis If you are already connected to a host computer do the following 1 Power down the host computer 2 Press the EB3450 front power button to Off position 3 Refresh the Express IO Manager 4 The remote Turn On Chassis is enabled 5 Press the Turn On C...

Page 70: ...ing on and how many lanes the slot is using This variation is based on the PCI Express card that is inserted into the slot The Port Temp is the temperature of the port on the PLX chip The Manager Temp is the temperature of the management module The Backplane Temp the temperature of the Upstream port The port temperatures do not appear in the spotlight window and only appear in pcie_info HTML 4 5 9...

Page 71: ...eed from 20 to 100 5 Click submit 6 Click save 4 5 10 Fan Configuration This feature allows you to change and set the Fan RPM Revolutions per minute With a high RPM the fan will move more air or remove more heat from the expansion chassis Changing the RPM affects the air movement and the noise level As you increase the RPM of a fan the noise or decibel dBa also increases Decreasing the RPM also de...

Page 72: ...times continuously 6 The EB3450 will shut down and reboot back up If it does not power up press the front button to power it up 7 Start your Internet Browser a Type 192 168 1 10 b Enter User name default c Enter password OSS d You should be able to login Check the SNMP make sure it is set back to default configuration If you are having an issue resetting the system to factory default parameters or...

Page 73: ...e power cord to the power supply If the unit is completely turned OFF Plug a power cord to the power supply unit You need a standby power for the SNMP NetBurner If the unit is already turned ON and running leave it as is 4 Set the IPv4 IP address to 192 168 1 20 5 Launch the AutoUpdate jar by double clicking the AutoUpdate jar ...

Page 74: ...k FIND button select Device and then click OK 7 Check the Reboot box 8 Click on Browse select the EB3450_2_0_0_APP s19 then click Open 9 Click update 10 Login Authentication screen will come up enter User Name default and Password OSS ...

Page 75: ...rror 13 Click OK 14 Click X to close the AutoUpdate jar 4 8 To Check and verify if the update 1 Launch Internet Explorer and type in the system IP address 192 168 1 10 and press enter Enter User Name default Enter Password OSS 2 Click OK 3 SNMP Web GUI will come up on the upper right hand of the web you ll see the updated version Express I O Manager 2 0 0 ...

Page 76: ...10 Retrieving the MIB File The MIB file is available for download at http www OSS com drivers asp in the SNMP section of that page After you click on the MIB file link save the file as type All Files to your preferred location You may then open the file using Notepad or equivalent text editor and all the information needed to configure your SNMP agent will be displayed on the screen ...

Page 77: ...play the OSS chassis MIB contents in an explorer like Tree interface A snapshot from the MIB Browser by iReasoning is shown below Under the MIB Tree the OSS Chassis will have status information that can be read by expanding the respective folders This information is also available in the Web interface mentioned previously In addition if we expand the sendAction folder as shown above we gain access...

Page 78: ...One Stop Systems EB3450 78 Position the EB3450 on its side to gain access to the NetBurner module see pictures below Unplug the Ethernet cable ...

Page 79: ... the interface board with two hands by placing both index fingers underneath the side of the card and both thumbs on the topside of the card see pictures below Use firm upward pressure underneath the card and a gentle rocking motion until the card comes loose ...

Page 80: ...rner Installation Align the NetBurner module on top of the Interface board connectors Gently apply pressure on top of the NetBurner module and slowly press it down until the card is firmly seated Reconnect the Ethernet cable to the RJ45 port ...

Page 81: ...s EB3450 81 4 12 3 Replacing the Interface Board First disconnect all the attached wires including the Ethernet cable from the board see picture below Remove all 4 screws see pictures below Remove the Interface board ...

Page 82: ...stallation To install the new Interface board just follow the previous steps in reverse order Place the board in the chassis and align it on top of the 4 mounting screw holes Secure the board with 4 screws Connect all wires and plug in the Ethernet cable ...

Page 83: ... or defective expansion chassis You may need to replace the Interface card or the chassis c If it still hangs the problem is in the computer and not with the expansion chassis or the 3rd Party cards 4 If it boots up OK without any 3rd Party cards installed try adding only one card and see if it boots up a If it boots up OK with one card in it shut it down and swap cards Repeat this until all cards...

Page 84: ...hernet card that has drivers built into the operating system Using this type of card will avoid any future questions about drivers possibly being installed incorrectly 4 Turn on the OSS Expansion chassis and then turn on the computer 5 5 Windows Error Codes If you are having a problem with one of your devices and the Device status box shows a Windows Error Code refer to the following list of error...

Page 85: ... 4 Anti static wipes Do not use a vacuum because vacuums create ESD First remove the thumbscrews and the top chassis cover Next use a can of compressed air from your local computer store to blow out any dust that may have accumulated in the chassis fans Be sure to keep the can of compressed air about six inches from the parts being sprayed with air Pay particular attention to the fans in the chass...

Page 86: ...g fans require cleaning depends on environmental conditions where your OSS Expansion chassis is located To clean the cooling fans follow these simple steps First power down the chassis and then loosen the thumbscrews to remove the top cover Next remove the fan housing Locate the two mounting screws located on both sides of the unit see pictures below Slowly pull the fan housing in slanted position...

Page 87: ...rdy surface Remove the dust and buildup from the fan blades by blowing it free with a can of compressed air If necessary clean any remaining buildup from the blades with damp cotton swabs Remove lingering residue with a damp cotton swab or cloth Reassemble your Fan housing following the previous steps in reverse order ...

Page 88: ...h 185 cfm 8 Are there any imitations to the types of boards that can be used in the ExpressBox 3450 Answer Although optimized for double wide GPU modules any PCI Express board may be used within the system The ExpressBox 3450 support Gen 3 Gen 2 and Gen 1 boards of any data width x1 x4 x8 x16 9 What size is the dimension Answer The enclosure is 8 5 Wide x 7 25 High 4U x 20 Deep high 4U 10 How are ...

Page 89: ...as it can cause the system to crash and can damage the end connector of the cable 17 Can I disconnect the cable while the host computer and EB3450 unit are ON Answer Do not disconnect the Interface cable while the system is running as this can cause failure and damage the hardware 18 Can I plug in a GPU or any PCIe cards while the EB3450 is On Answer Do not plug any PCIe cards while the EB3450 is ...

Page 90: ... should be removed or not to be installed prior to shipment to avoid or prevent possible damage Note Expansion board and PCIe PCI cards that arrive damaged in shipment will not be covered under warranty 8 2 Returning Merchandise to OSS If factory service is required a Service Representative will give you a Return Merchandise Authorization RMA number Put this number and your return address on the s...

Page 91: ...es Operation is subject to the following two conditions 1 this device may not cause harmful interference and 2 this device must accept any interference received including interference that may cause undesired operation Changes or modifications not expressly approved by the party responsible for compliance could void the user s authority to operate the equipment NOTE The assembler of a personal com...

Page 92: ...One Stop Systems EB3450 92 Manual P N 09 09998 02 Rev B ...

Reviews: