background image

Page 1

Otter XT X-Over Resort
Installation and Set-Up Instructions

Otter XT X-Over Resort

Fits Large Otter II & Pro Sled Only

Parts Identifi cation and Check List

PARTS LIST
 Item #  Qty  Part # 

Description

  1 

200821 

Sled - Black

  2 

201137 

Tent - XT X-Over Resort

  3 

201232 

Frame Bracket “A”

  4 

201233 

Frame Bracket “B”

  5 

201207 

Back Adjustable Pole

  6 

200494 

Top Back Support Pole

  7 

201411 

Top Front Support Pole - Adjustable

  8 

200362 

Front Adjustable Support Pole

  9 

201222 

Left Side Back Elbow and Extension

  10 

201223 

Right Side Back Elbow and Extension

  11 

201224 

Left Side Center Elbow and Extension

  12 

201225 

Right Side Center Elbow and Extension

  13 

201226 

Left Side Front Elbow and Extension

  14 

201227 

Right Side Front Elbow and Extension

  15 

201409 

Left Side Bottom Elbow and Extension

  16 

201410 

Right Side Bottom Elbow and Extension

  17 

201230 

Middle Main Frame

  17a 

201380 

Middle Main Frame with Pivot

  18 

200195 

Black End Cap

  19 

200615 

5/16 Washer

  20 

401017 

1/4 x 3/4 Hex Bolt

  21 

14  400648 

1/4 Nylon Hex Lock Nut

  22 

30  200942 

7/16” Self Tapping Screw

  23 

200982 

Plastic Trim Lock Kit

  24 

201370 

Quick Switch Bracket Kit - Pro

MODEL NUMBERS:
Complete Pkg   XT X-Over Resort  

201173

2

1

5

6

7

8

3

4

18

19

21

20

23

13

14

17

9

10

11

12

22

15

16

17a

24

Summary of Contents for Pro X-Over Resort

Page 1: ...bow and Extension 11 1 201224 Left Side Center Elbow and Extension 12 1 201225 Right Side Center Elbow and Extension 13 1 201226 Left Side Front Elbow and Extension 14 1 201227 Right Side Front Elbow...

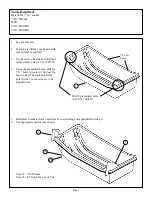
Page 2: ...6 Use appropriate fasteners as shown 3 19 26 4 1 Lay out all parts 2 Position sled Item 1 as shown with curved front to your left 3 Tip the sled on its side and drill the 4 marked holes using a 5 16 d...

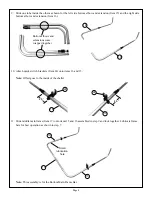
Page 3: ...Locking mechanism 8 Position middle main frame with pivot Item 17a left side front elbow and extension Item 13 and right side front elbow and extension Item 14 as shown Align locking mechanism in ite...

Page 4: ...est operation as shown in step 7 9 Slide one tube inside the other as shown for the left side bottom elbow and extension Item 15 and the right side bottom elbow and extension Item 16 15 16 17 Bottom e...

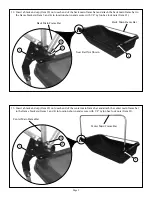
Page 5: ...of the back main frame bar and attach the back main frame bar to the frame brackets Item 3 and 4 in location shown and secure with 1 4 nylon hex lock nuts Item 21 13 Insert a black end cap Item 18 ont...

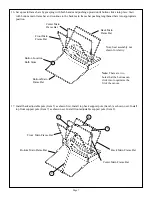
Page 6: ...main frame bar to the frame brackets Items 3 and 4 in location shown by pushing the white conversion clips onto the aluminum bushings on the brackets 15 Insert a black end cap Item 18 onto each end of...

Page 7: ...he buttons can click into to optimize the t of the canvas 16 Set up main frame bars by grasping with both hands and pushing upward until button clicks into place Start with bottom main frame bar and c...

Page 8: ...ont main frame bar from normal position to side door position A All support poles should be installed B Unclip the front main frame bar from the frame brackets Items 3 and 4 move it forward and clip i...

Page 9: ...he back adjustable pole to achieve this Once the front is set and the top support poles are in place the back adjustable pole can be extended until it is snug Install the plastic trim lock in the posi...

Page 10: ...iding the bar farther into the tube 3 Fold the tent in towards the sled so all the bars are laying on top of the sled 4 Tuck in excess tent material 5 Ready for transport 6 Reverse to set up the shhou...

Page 11: ...Page 11 Otter Outdoors Inc 411 W Congress St Maple Lake MN 55358 Phone 320 963 6480 www otteroutdoors com Otter XT X Over Resort August 2019...

Reviews: