background image


EXHIBIT C-6 

TO  

M. HERMES DECLARATION  

Summary of Contents for Deluxe LP

Page 1: ...EXHIBIT C 6 TO M HERMES DECLARATION ...

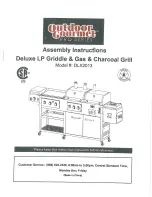
Page 2: ...Assembly Instructions Deluxe LP Griddle Gas Charcoal Grill Model DLX2013 Please keep this instruction manual for future reference Monday thru Friday Made in China ...

Page 3: ...en if you purchased this grill assembled 4 Keep this Grill Guide for future reference 5 Contact 1 888 922 2336 should you need assembly assistance or have any questions THIS GRILL IS FOR OUTDOOR USE ONLY if stored indoors then detach and leave propane cylinder outside TO THE INSTALLER OR PERSON ASSEMBLING THIS GRILL Leave this Grill Guide with the consumer TO THE CONSUMER Retain this Grill Guide f...

Page 4: ...ed area This gas grill is not intended to be installed in or on recreational vehicles and or boats Never use any other type of fuel for this grill other than LP gas propane Only use the pressure regulator with a type 1 connector that is supplied with this gas grill Before each use check the gas hose for excessive abrasion cracking fraying wear or cuts Replace a hose assembly showing those signs wi...

Page 5: ...Table of Contents Tools and Parts Hardware Assembly Instructions Care and Maintenance Warranty Information ...

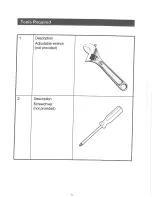
Page 6: ...Tools Required Description Adjustable wrench not provided Description Screwdriver not provided ...

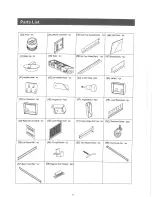
Page 7: ...meter u Zpcs 5 Stack Gas Zpcs 5 Warming Rack 23365 7 Charcoal Basket 1pc 8 Lift System 1pc 4vW i 7 I Ash Pan 1pc 12 Left Back Leg ipc 10 Flame tamer Spcs 15 Ash Pan Handie 25305 16 Receiving Tray 2pc 20 Knob Base 1pc 28 Right Back Leg 1pc J 32 Left Door 1pc Y M 29 Right Front Leg 1pc 30 Electrode 7P0 ...

Page 8: ... Handle 2pc5 c q 46 HInges Lid 4pcs 47 Hinges Body tflpcs J 51 Lower storge sheff leg 1pc 52 Direction 1 caste gpcs 49 Right side cart panel 1pc NI Iffiil 1 III II III IIIIII III nu_ nu an_ Mu 111 56 Front Fence Rail 1pc 54 Oil cup Gn ddIe 1pc 55 Tank retainer screw 1pc 53 Left Fence Rail 1pc 57 Back Fence Rail 1pc 58 Magnetic Door Stopper Zpcs ...

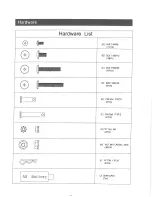
Page 9: ...rdware List A BOLT M4X8 14PCS B BOLT M6X12 wqpc C BOLT M6X35 12903 D BOLT M6X4O spas _ E PIN Roll 7 22 2 ZPCS In œO œO a 4Fâ CS G K Nut M4 zpcs â O H NUT M6 FLANGE LOCK 4 1q cs I R PIN 15 28 6F CS J Battery AA 196 ...

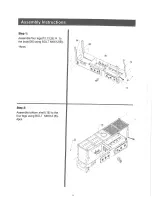
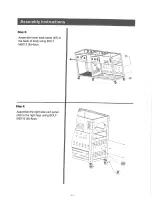
Page 10: ...Assembly Instructions Step 1 Assemble four Iegs 12 13 28 29_ to the body 38 using BOLT M6X12 B 14pcs Step 2 Assemble bottom shelf 18 to the four legs using BOLT M6X12 B 4pcs ...

Page 11: ... Step 3 Assemble four directional casters 7 to the four legs and two directional casters 52 to the bottom shelf Step 4 Turn over the grill body and assemble the left side can panel 34 to the body using BOLT M6X12 B 4pcs If ...

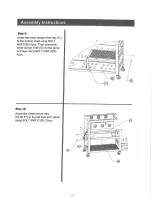
Page 12: ...Assembly Instructions Step 5 Assemble lower back panel 48 to the back of body using BOLT M6X12 B 4pcs Step 6 Assembfe the right side cart panel 49 to the right legs using BOLT M6X12 B 4pcs 4 1 ...

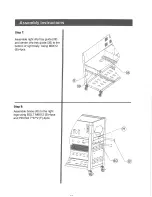
Page 13: ...nstructions J Step 7 Assemble right drip tray guide 39 and center drip tray guide 35 to the bottom of right body Using M6X12 Step 8 Assemble brace 40 to the right legs using BOLT M6X12 B 4pcs and PIN Roii 7 37 2 F 4pcs ...

Page 14: ...stroge shelf leg 51 to the bottom shelf using BOLT ll l6X12 B 2pcs Then assemble lower storge shelf 50 to the panel and legs using BOLT M6X12 B 4pcs Step 10 Assemble three frence rails 53 56 57 to the left legs and panel using BOLT M6X12 B 12pcs 4 1 ...

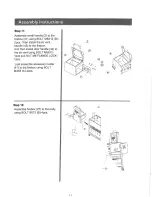
Page 15: ... 2pcs Then install the air vent handle 43 to the firebox And then install door handle 42 to the air vent using BOLT M6X12 lpcs and NUT M6 FLANGE LOCK 1pcs Last assemble accessory holder 41 to the firebox using BOLT M4X8 A 4pcs Step 12 Assemble firebox 27 to the body using BOLT 8X12 B 4pcs 4 I ...

Page 16: ...box charcoal pan 25 into the firebox WARNING IF YOU WANT TO CLEAN THEASH PAN PLEASE MOVE THE BOTTOM CAPINADVANCE Step 14 Attach the handle 43 to the grill air vent Then assemble charcoal basket lift handle 26 to the left side of grill using PIN Roll 7 22 2 E 1pcs and R PIN 1 5 28 I lpcs H11 ...

Page 17: ...he left side grili using BOLT M6X12 B 4pcs See the back view Then using PIN Roll 7 22 2 E 1pcs and R PIN 1 5 28 i tpcs Back View Front View Step 16 Install two thermometers 4 to the iid 44 45 Then assemble two lid handles 3 to the lid using BOLT M6X12 B 4pcs ...

Page 18: ... Assemble four hinges 46 to the lid using BOLT M6X35 C Spcs Step 18 Assemble four hinges 47 to the body using BOLT M6X4O 8pcs Then put the lid on the body using PIN Roll 7 3T 2 F 4pcs and R PIN 1 5 28 l 4 303 to fix the hingeses 17 ...

Page 19: ...le two gas stacks 5 to the gas lid and charcoal stack 24 to â f V T the charcoal rid using BOLT M6X12 â â B â I2pcs and NUT M6 FLANGE â LOCK H 12pcs __ â _â _ _ _â œ _ _ Step 20 Assemble warming rack 6 to the grill using BOLT Vl6X35 C 4pcs 40 ...

Page 20: ... Instructions _ I Step 21 Assemble grease pan connector 19 to the right side of gas grill using BOLT M6X12 B 2pcs Step 22 Assemble grease pan connerctor 19 to the left side of gas grill using BOLT M6X12 B 2pcs ...

Page 21: ...bly Instructions Step 23 B 4pcs to Assemble BOLT M6 12 the left legs Step 24 m 3T 2 Ho dB 09 b m TS 9U my Ud D0 rb a I 90 Se em ms huh mm fie Am M6X12 from step 23 _ _x_ _ m 2E _ SE _ 3 Q3352 3 7E5959 3 sea ...

Page 22: ... 25 to the R 2pcs cf B 2 4 I VA 6 M T L O B Q m S U V1 0 0 b T 0 KS CC 30 01 Attach the extension wire 22 Step 26 Assemble small handle 2 to the sear bumer body using BOLT M6X12 B 2pcs Then assemble knob base 20 using BOLT M4X8 ...

Page 23: ...ble sear bumer 21 to the sear bumer body Then put electrode 30 on the sear bumer using BOLT M4X8 A 4pcs and K Nut G 2pcs Step 28 Assemble receiving tray 16 to the bottom of sear bumer body Then put the griddle 31 on the left side of body ...

Page 24: ... 10 into the gas grill and charcoal basket 7 into the charcaol grill Then put cooking grid 1 into the grill and sear burner body And then put cooking grid 9 into the firebox Step 30 Assemble knobs 33 to the body Then assemble Battery J to the body ...

Page 25: ... using BOLT M6X12 B Zpcs Then put heat shield 60 on the drip tray using BOLT M4X8 A 4pcs Assemble ash pan handle 15 to the ash pan 11 using BOLT M6X12 B 2pcs Step 32 Put ash pan 11 under charcoal grill and drip tray 14 under gas grill Then put receiving tray 16 under drip tray ...

Page 26: ...Assembly Instructions Step 33 Assemble small handle 2 to the left door 32 and right door 36 using BOLT M6X12 B 4pcs Step 34 Assemble magnet assembly 58 to the bottom of grill using BOLT M 4X8 A 4pcs GE ...

Page 27: ...Assembly Instructions Step 35 Put LP Tank into the grill body connect regulator Then assemble tank retainer screw 55 to the back of grill body ...

Page 28: ...his grill 12 Do not use charcoal briquettes lava rock or any type of ceramic product in the gas section of this grill 13 Do not install or use on or in a recreational vehicle and or boats U 9 NOTE If the outdoor cooking gas appliance is not in use the gas must be turned off at the supply cylinder LP Gas and Cylinder Information Your new gas grill operates on LP Liquid Petroleum Gas It is odorless ...

Page 29: ...was purchased The LP Liquid Propane gas cylinder specifically designed to be used with this grill must have a 20 lb 9 1 kg capacity incorporating a Type 1 cylinder valve and an over filling protection device OPD This grill is designed to fit Worthington Manchester or SMPC brand 20 lb 9 1 kg cylinders Other brand DOT cylinders may fit this grill if the cylinder has similar dimensions of the top and...

Page 30: ...kwise until it stops 2 Place the cylinder on the hook beside of body with the valve facing outward See Assembly Instructions to secure Be sure all burner controls are turned to the Off position Remove the safety cap from the from the cylinder valve Center the nipple ofthc regulator into the cylinder valve Turn the black nut clockwise until it stops Hand Tighten Only Do Not Use A Wrench 9 4 P The r...

Page 31: ... or order replacement parts as needed Continue to test as necessary until no leaks are detected 8 Close the LP tank valve by tuming the hand wheel clockwise 4 l A WARNING 1 DO NOT USE THE GRILL if you cannot stop the leaks Be sure the LP cylinder valve is closed If the LP cylinder is still leaking contact your LP dealer or local fire department 2 Do not use any match or open flame or smoke during ...

Page 32: ...will not light 7 Vlfhen lit turn the control knob to the desired setting LIGHTING THE GAS GRILL SECTION PROCEDURE 1 Open the lid 2 Ensure all burner control knobs are in the Off position 3 Turn on the LP gas by turning the hand wheel on the cylinder valve 4 Note Each of the 3 main burners on your grill has its own automatic igniter 5 Push the knob in fully and slowly trun it counter colocl wise to...

Page 33: ...s in the Smoker Chamber and the food in the Smoker chamber Follow these steps for cooking with charcoal and direct heat in the main Smoker Chamber 1 For best results use a metal charcoal starter and fill the starter with about 3 lbs of charcoal and light the charcoal 2 After 30 minutes dump the charcoal into the bottom of the Smoker Chamber on the charcoal grates which should be at the lowest adju...

Page 34: ...shed with warm water and mild dish soap ELECTRONIC IGNITER H visually inspect for cracks Replace if a crack is found Do not use water to clean the igniter BURNERS we recommend you clean your burners at least twice a year or before use ifthe grill has notibeen used in over one month A WARNING Small insects such as spiders are able to access the burner tubes Sometimes they will build nests or spin w...

Page 35: ...Always inspect the burner flame after lighting A good flame should be primarily blue with a yellow tip and have a minimal amount of noise Some yellow tips are OK if under one inch New burners sometimes have oil residue which will cause yellow flame when burning off Variations in gas supply altitude weather and other factors can all impact burner performance Older grills can also Show more yellow f...

Page 36: ...of noise My grill has a low flame on some burners or some burners will not light at all What can cause this This can be caused by the regu1ator s flow limiting device which is generated by a sudden change in pressure Opening the tank valve too quickly can cause this In this case close the LP tank valve and disconnect from the regulator Let it stand for 10 minutes Reconnect the regulator to the LP ...

Page 37: ...ll used commercially purposes This limited warranty is the sole warranty given by the manufacturer and is in lieu of all other warranties express or implied including implied warranty of merchantability or fitness for a particular purpose Neither manufacturer dealers nor the retail establishment selling this product have any authority to make any wanantiesor to promise remedies in addition to or i...

Reviews: