background image

ORX05TELUA AND ORX05ACLRA

OWNER’S MANUAL

RX-5 TENT

RX-5 LIVING ROOM & ZIP-IN FLOOR

Summary of Contents for ORX05ACLRA

Page 1: ...ORX05TELUA AND ORX05ACLRA OWNER S MANUAL RX 5 TENT RX 5 LIVING ROOM ZIP IN FLOOR...

Page 2: ...ck that all parts are present and that you familiarise yourself with the assembly and disassembly of the product Oztent Australia Pty Ltd 10 12 2021 All rights reserved Oztent Australia Pty Ltd www oz...

Page 3: ...you read all instructions contained in this manual carefully We want you to have a safe and enjoyable experience After unpacking your new Oztent product please check that it is not damaged and that a...

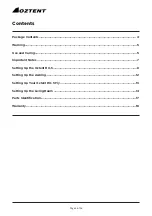
Page 4: ...s Package Contents 4 Warning 5 Use and Caring 5 Important Notes 7 Setting Up the Oztent RX 5 8 Setting Up the Awning 12 Setting Up Your Oztent RX 5 Fly 13 Setting Up the Living Room 14 Parts Identific...

Page 5: ...Reflective Guy Ropes 13 4 Pegs 18 5 1 9m Poles 2 6 2 3m Poles 2 7 2 6m Spreader 2 8 Oversized Zippered Carry Bag 2 Package Contents RX 5 Living Room Zip In Floor Item General Part Name Qty 1 Zip In E...

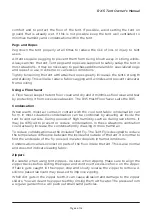
Page 6: ...hes strong winds and other potential hazards to reduce the risk of loss or injury Select a site that s level well drained and is protected from the wind and other elements Clear the campsite of sharp...

Page 7: ...contact with the cool tent fabric condensation can form In most situations condensation can be controlled by allowing air inside the tent to vent outside During periods of high humidity such as durin...

Page 8: ...ver store food or cooking equipment in the tent When packing away ensure that there are no insects inside the tent as they may try to eat their way out causing holes in the material Important Notes 1...

Page 9: ...Page 8 of 18 RX 5 Tent Owner s Manual Setting Up the Oztent RX 5 Step 1 Take the Tent out of the bag Place the poles pegs and fly away from the Tent space Step 2 Swing out both arms one at a time...

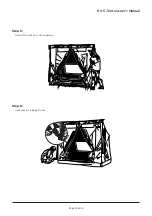
Page 10: ...Page 9 of 18 Step 3 Pull the tent up using the swing tab found near the top frame Step 4 Reach inside the tent and lock the hinges in place pushing them up Before After...

Page 11: ...Page 10 of 18 RX 5 Tent Owner s Manual Step 5 Adjust the tent so it sits properly Step 6 Hammer in all pegs stakes...

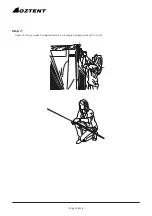
Page 12: ...Page 11 of 18 Step 7 Peg out all guy ropes at approximately a 45 degree angle to secure the tent...

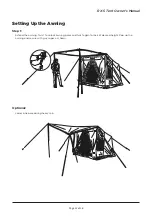
Page 13: ...ner s Manual Setting Up the Awning Step 1 Extend the awning Twist to unlock awning poles and twist again to lock at desired height Pop up the awning and secure with guy ropes as shown Optional Lower o...

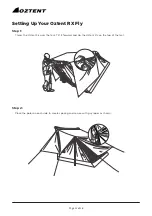
Page 14: ...ing Up Your Oztent RX Fly Step 1 Throw the Oztent Fly over the tent Tilt it forward and zip the Oztent Fly on the top of the tent Step 2 Place the poles on each side to create spacing and secure with...

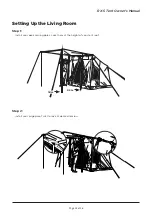
Page 15: ...18 RX 5 Tent Owner s Manual Setting Up the Living Room Step 1 Install your peak awning poles Lock them at the height of your tent roof Step 2 Install your ridge pole Twist to lock at desired tension...

Page 16: ...l Note For easy set up lower down the taller poles before zipping on the panels Step 4 Fully extend the peak awning poles once the Living Room Panel is zipped on Note Ensure that orange pole caps plac...

Page 17: ...bols on tent with A and B on the zip in floor Note Lift poles gently and slide zip in floor section under poles Position pole bases on reinforced panel on zip in floor Step 6 Zip in orange zipper to f...

Page 18: ...n Extrusion OZME 2 Hinge OZH 3 Corner OZC 4 Foot Fitting OZFF 5 Foot OZF 6 M8 Nut Washer and Slider OZS 7 Brace Extrusion with Fittings SZSA 6 5 7 2 3 3 1 4 2 Hinge 3 Corner 6 M8 Nut Washer and Slider...

Page 19: ...he following situations which are not exhaustive a The Product is damaged by i accident ii misuse or abuse including failure to properly maintain or service iii normal wear and tear iv storm damage or...

Page 20: ...Oztent Australia Pty Ltd PO Box Q1700 Sydney NSW 2000 Australia Ph 02 8706 5100 USA Ph 855 569 8368 International Ph 61 2 8706 5100 www oztent com...

Reviews: