

≥
Please read these instructions carefully before using this product and save this manual for future use.
<
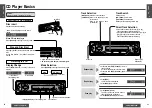
VOL
SEL
BAND
TUNE
MUTE
M/L
1
2
3
4
5
6
7
12
SOURCE
REP
CQ-DP151W
CD RECEIVER
45W
X
4
LOUD
RANDOM
PWR
8
11
9
10
TRACK
DISP
MONO/LO
C
REMOTE
SCAN/APM
(CQ-DP151W)
CD Player/Receiver
CQ-DP151/DP101W
Operating Instructions


