background image

Notice for DVB functions


This DVD Recorder is for viewing and recording free to view channels only, not Pay TV or encrypted channels unless connected to an external 
source capable of receiving Pay TV or encrypted channels.
This unit does not have an analogue broadcast tuner.

• This unit has the capability for DVB speci

fi

 cations. But future DVB services cannot be guaranteed.

Operating Instructions

DVD Recorder

Model No.

 DMR-EZ28EB        

Dear customer

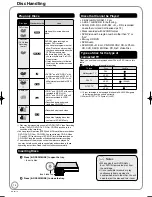
Thank you for purchasing this product. 
For optimum performance and safety, please read these instructions carefully.

Before connecting, operating or adjusting this product, please read the instructions completely.  
Please keep this manual for future reference.
Note: “EB” on the packaging indicates the United Kingdom.


Trademark of the DVB Digital Video Broadcasting Project (1991 to 1996) 


Declaration of Conformity No. 5137, 16th November 2007

The illustrations in these Operating Instructions show images of the silver model.

Quic

k Star

t Guide

P6 – 12

Region number supported by this unit

Region numbers are allocated to DVD recorders and DVD-Video according to where they are sold.
• The region number of this unit is “

2

”.

• The unit will play DVDs marked with labels containing “

2

” or “

ALL

”.

Example:


2

ALL

3

5

2

Web Site: http://www.panasonic-europe.com

EB

RQT9118-B

DMR-EZ28-EB ̲RQT9118-B.indb   1

DMR-EZ28-EB ̲RQT9118-B.indb   1

2008/04/04   10:31:39

2008/04/04   10:31:39

Summary of Contents for Diga DMR-EZ28EB

Page 1: ...tions carefully Before connecting operating or adjusting this product please read the instructions completely Please keep this manual for future reference Note EB on the packaging indicates the United Kingdom Trademark of the DVB Digital Video Broadcasting Project 1991 to 1996 Declaration of Conformity No 5137 16th November 2007 The illustrations in these Operating Instructions show images of the ...

Page 2: ...ew using an integrated Digital Video Broadcasting tuner Enjoy Digital Broadcast Connection with HDMI terminal 10 Deep Colour 72 HDMITM V 1 3 with Deep Colour High Quality Picture Easy to Find and Select You can enjoy linked operations with the TV and receiver by using VIERA Link or Q Link Linked operations with the TV VIERA Link HDAVI ControlTM Q Link 38 You can set the Timer Recordings on Digital...

Page 3: ...laced please ensure that the replacement fuse has a rating of 5 ampere and that it is approved by ASTA or BSI to BS1362 Check for the ASTA mark or the BSI mark on the body of the fuse If the plug contains a removable fuse cover you must ensure that it is refitted when the fuse is replaced If you lose the fuse cover the plug must not be used until a replacement cover is obtained A replacement fuse ...

Page 4: ...ceiver EXT LINK 25 Recording from an External Device 26 Recording from a VCR etc 26 Recording from a DV Camcorder 26 Advanced Timer Recording 27 Manual timer recordings 27 To cancel a timer recording in progress 28 To deactivate timer programme e g to interrupt a daily or weekly timer programming 28 Check Change or Delete Programmes 29 Notes on timer recording 29 Making timer recordings on the tel...

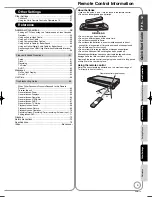
Page 5: ...7 General Issues DVB T 67 General Issues TV Guide 68 Playback Issues Sound 68 Playback Issues Picture 69 Playback Issues Operation 70 Recording Issues Recording Timer recording External input 70 Editing Issues DVD 71 Glossary 72 Safety precautions 73 Specifications 74 Index Back cover About batteries Insert so the poles and match those in the remote control Do not use rechargeable type batteries R...

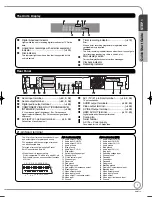
Page 6: ...function TEXT Show Digital TEXT MHEG service 36 STTL Show subtitles 36 bm Transmission window bn TV operations 57 bo Channel select Change pages in the TV Guide list 18 30 bp Show timer recording list 27 bq Input select Tuner AV1 AV2 AV3 DV 16 25 26 br Skip approx 1 minute forward 33 bs Exit the menu screen bt Show the TV Guide screen 16 19 30 ck Show FUNCTION MENU window 37 By using the FUNCTION ...

Page 7: ... S VIDEO output terminal 59 bk HDMI AV OUT terminal 10 60 Digital audio and video output terminal bl Cooling fan bm Serial number bn AC IN Power supply Connection for the AC mains lead 21 pin Scart terminal 19 20 21 1 3 5 7 9 11 13 15 17 2 4 6 8 10 12 14 16 18 The 21 pin Scart terminal transmits both input and output signals for picture and sound TVs equipped with the same type of terminal can be ...

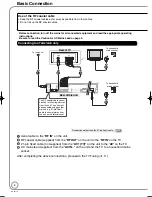
Page 8: ...xial cable cannot be used for showing pictures from the unit The unit must be connected using another method e g 21 pin Scart cable to show pictures from the unit on the television set Aerial cable to the RF IN on the unit RF coaxial cable supplied from the RF OUT on the unit to the RF IN on the TV 21 pin Scart cable not supplied from the AV1 TV on the unit to the AV on the TV AC mains lead suppli...

Page 9: ...e RF IN on the unit RF coaxial cable supplied from the RF OUT on the unit to the RF IN on the TV 21 pin Scart cable not supplied from the AV1 TV on the unit to the AV on the TV 21 pin Scart cable not supplied from the AV on the satellite receiver to the AV2 EXT on the unit AC mains lead supplied from the AC IN on the unit the TV and the satellite receiver to a household mains socket After completi...

Page 10: ...38 Linked Operations with the TV VIERA Link HDAVI Control Q Link This unit incorporates HDMI V 1 3 with Deep Colour technology It is recommended that you use Panasonic s HDMI cable Recommended part number RP CDHG10 1 0 m RP CDHG15 1 5 m RP CDHG20 2 0 m RP CDHG30 3 0 m RP CDHG50 5 0 m etc Non HDMI compliant cables cannot be utilized Regarding VIERA Link HDAVI ControlTM function AV1 TV COMPONENT VID...

Page 11: ...ot quick Quick Front display Turns off The clock display disappeared Stays lighted e g TV Guide is displayed within 1 second after GUIDE is pressed while the unit is off Power Save On Minimise standby power consumption without Quick Start function and AV2 loop through in standby Off With Quick Start function and AV2 loop through in strandby On Off OK RETURN SELECT When setup has completed the conf...

Page 12: ...e several times a day However if the clock is not set correctly adjust the clock In the case of a power failure the clock setting remains in memory for approximately 60 minutes With the unit stopped e r to select To Others then e r to select Setup then e r to select Others then q e r to select Clock then e r to select Off of Automatic then Clock Automatic Off Time Date 15 45 39 Please set clock ma...

Page 13: ...ncrease in available space whenever a title has been erased RW V and RW discs will only show an increase in available space when their last title has been erased R R DL R R DL The discs will show no increase in available space after deleting titles You may not be able to record depending on the condition of the discs and you may not be able to play them due to the condition of the recording Disc C...

Page 14: ...62107 format data recorded on CD R RW Close the session or finalise the disc after recording The producer of the disc can control how discs are played So you may not always be able to control play as described in these operating instructions Read the disc s instructions carefully Discs that Cannot be Played 2 6 5 2 GB DVD RAM 12 cm 3 95 4 7 GB DVD R for Authoring DVD R DVD R DL DVD RW R R DL recor...

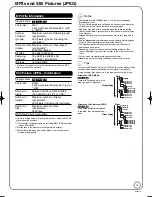
Page 15: ...s may not display or be playable Images recorded at a very high resolution may take a long time to display English alphabetical characters and Arabic numerals are displayed correctly Other characters may not display correctly The display order on this unit may differ from how the order is displayed on a computer Depending on how you create the disc writing software files tracks and folders groups ...

Page 16: ...2 7 ITV1 10 Channel4 31 Channel5 45 ITV2 70 S4C HotWars DIYS O S News Sex in the City Me out of here Pop Idol Rugby 15 to 1 Scrapheap Challenge Corotation Street Mon 18th 24 Hr Prog Type VIEW info ChangeDisplayMode Guide CSI NY Emmerd Prog Type All Types e r to select the current programme then Selecting a Channel without TV Guide To select desired channel Press 1 2 CH To directly enter Channels Y...

Page 17: ...r List Audio Tracks Subtitles Trailer DVD TOP MENU DVD V e r w q to select an item then You can sometimes use the numbered buttons to select an item VCD Press the numbered buttons to select an item e g 5 15 Tips To return to the menu screen DVD V 1 Press OPTION 2 Press e r to select Top Menu or Menu and press OK VCD Press RETURN Notes RAM R R DL RW V R R DL RW RW VR Playback starts from the most r...

Page 18: ...th the numbered buttons 16 When no channel setting is performed on the unit and broadcast is recorded directly from the satellite receiver select a channel on the connected equipment and press INPUT SELECT to select AV2 to select the recording mode Recording mode 22 Remaining time to start recording Elapsed recording time Pausing Recording Press h PAUSE Press again to restart recording The title i...

Page 19: ...l information on TV Guide RAM R R DL RW V R R DL RW Preparation Turn on the television and select the appropriate video input to suit the connections to this unit Turn on this unit Insert a disc that you use for recording 14 RAM If the disc is protected release protection 48 Confirm that the clock on the unit s display is set to the correct time The TV Guide list appears e r w q to select the futu...

Page 20: ...RAM OK RETURN e r w q to select the title then A check mark is displayed Repeat this step until you select all necessary items Press h PAUSE again to cancel w to select Delete then Tips To return to the previous screen Press RETURN To view other pages Press e r w q to select Previous or Next and press OK You can also press u i to view other pages Delete Titles During Playback RAM R R DL RW V R R D...

Page 21: ... finalised after recording 49 It is necessary to finalise DVD R etc on this unit after recording titles to them You can then play them in the same way as a commercially sold DVD Video However the discs become play only and you can no longer record You can record again if you format DVD RW CHG SEARCH ENTER OFF MENU RETURN TOP MENU DISPLAY VOL ON A SURROU ND MONITOR MODE PICTURE MODE REPEAT OPEN DC ...

Page 22: ...g which varies the amount of data recorded to suit the picture quality so actual recording times and remaining recording times shown by the unit will be different R DL R DL The difference will be especially noticeable Use a disc enough remaining blank space When recording to DVD RAM using EP 8Hours mode play may not be possible on DVD players even if they are compatible with DVD RAM In this case u...

Page 23: ...alise Press the OPEN CLOSE button to exit This disc cannot be played on other DVD players without finalising to start finalising or to eject the disc without finalising Notes You cannot stop finalising once you have started it Tips If you want to provide the disc with a name or set play menu select select Disc Name 48 or Auto Play Select 49 in DVD Management before finalising Refer to Finalising 4...

Page 24: ...an 8 hours Tips To exit the screen Press EXIT To stop recording partway Press g STOP To show the remaining recording time Press STATUS to show the remaining recording time REC 0 59 BBC ONE Wales DVD RAM 1 DVB Remaining time Playing while you are recording Chasing Playback RAM Allows playback from the beginning of the title you are recording During recording Tips To stop play Press g STOP once To s...

Page 25: ...atellite receiver Refer to the equipment s operating instructions The unit turns off and EXT L lights on the unit s display to indicate timer recording standby has been activated While the unit is in EXT LINK standby mode or recording most operations on this unit are prohibited OPEN CLOSE 8 etc When you operate press EXT LINK to cancel EXT LINK standby mode or recording The unit turns on and EXT L...

Page 26: ...le Recording 24 you can record the content of a video cassette approx 1 8 hours to a 4 7 GB disc with the best possible quality of recording without wasting disc space To skip unwanted parts Press h PAUSE to pause recording Press again to restart recording To stop recording Press g STOP The confirmation screen appears Press OK Notes When timer recording starts while recording from an external devi...

Page 27: ...the same time Tips When recording finishes The confirmation screen appears Press OK to finish DV camcorder recording To stop recording Press STOP The confirmation screen appears Press OK If the DV camcorder recording function does not work properly check the connections and DV equipment settings and turn the unit off and back on If that does not work follow the instructions of Recording from a VCR...

Page 28: ...K Date Setting Each press of e changes items in the order below Each press of r changes items in the reverse order Daily timer Weekly timer One month later minus one day Current date SAT SUN SUN SAT MON SAT MON FRI You can also use the numbered buttons to enter Name Date Start and Stop You can also press REC MODE to switch Mode and press STTL to switch STTL To cancel a timer recording in progress ...

Page 29: ... s display when no timer programme is set or when all timer programmes are deactivated The Guide Link function may not work if you manually change the start end time by over 10 minutes Programmes that failed to record are deleted from the timer recording list at 4 a m two days later Notes on timer recording When a timer recording is set DVDs that were recorded using a different TV system cannot be...

Page 30: ...o change channels Landscape view Press e r to select a channel Portrait view Press w q to select a channel The TV Guide list appears for this channel To view a programme list for another day Jump ahead 24 hours Press the Green button to jump ahead by one day Jump back 24 hours Press the Red button You can only jump back to the current date Past information cannot be viewed To browse through the TV...

Page 31: ...pe VIEW info ChangeDisplayMode Guide Prog Type News and Factual Holliday Programme Corotation Street Pepsi Chart Show Holiday Sport Rugby Terminator2 Eastenders Pop Idol News Me out of here Emmerd The Bill News 45 ITV2 e g Programme type News and Factual is selected in step of Landscape view e r w q to select the programme Notes The broadcasters allocate individual programmes to topic areas This f...

Page 32: ...c Currently recording One time only recording restriction 72 CPRM NTSC PAL Title recorded using a different encoding system from that of the TV system currently selected on the unit Alter the TV System setting on this unit to suit 55 Search During playback or There are 5 search speeds Each press increases the search speed R R DL RW up to 3 speeds Press q PLAY to restart normal playback Tips Depend...

Page 33: ...art normal playback Notes VCD allows Frame by Frame in the forward direction only Time Slip RAM R R DL RW V R R DL This function does not work with finalised discs RW RW VR Use to skip in 1 minute or 10 minute increments During playback e r to select the time then Each time you press e r the time increases e or decreases r by 1 minute intervals Press and hold for 10 minute intervals Manual Skip RA...

Page 34: ...e playback mode on the screen is set to JPEG press OK Otherwise 1 Press RETURN to exit the screen 2 Press FUNCTION MENU 3 Press e r to select Playback then press OK 4 Press e r to select JPEG then press OK Selecting Still Pictures in Another Folder From the Picture JPEG View screen e r w q to select Folder then CD JPEG JPEG Menu Folder OK RETURN F 1 21 image001 image002 image003 image004 image005 ...

Page 35: ...ording Track list is shown A Group No B Track No in the group C Track No Total tracks in all groups 001 Both Ends Freezing 002 Lady Starfish 003 Life on Jupiter 004 Metal Glue 005 Paint It Yellow 006 Pyjamamama 007 Shrimps from Mars 008 Starperson 1 1 My favorite 2 3 4 5 6 7 8 Total Track Tree G 1 T 1 TOTAL 1 111 MP3 Menu Group No Prev Next Number 0 9 A B C Selected group e r to select a track the...

Page 36: ...select the information of another channel Press e r Press OK to watch the selected channel To change the length of time digital channel information is displayed for 54 On Screen Messages Notes Everytime you change the channel a digital channel information appears automatically They disappear again after a short time If you record a digital radio broadcast or a digital broadcast that is not being r...

Page 37: ...nnel settings and all created profiles are deleted The timer recording programmes are also cancelled A new DVB Service has been found Start DVB Auto Setup Selecting DVB Auto Setup will delete current Profile settings and allTimer Programmes OK RETURN New Service No Yes Tips The display hide setting can be changed 54 By using the FUNCTION MENU window you may access the main functions quickly and ea...

Page 38: ...pin Scart cable 8 9 Notes The following systems from other manufacturers have similar function to Q Link from Panasonic For details refer to your television s operating instructions or consult your dealer Q Link registered trademark of Panasonic DATA LOGIC registered trademark of Metz Easy Link registered trademark of Philips Megalogic registered trademark of Grundig SMARTLINK registered trademark...

Page 39: ...u is displayed 17 Menu DVD V Menu is displayed 17 Rotate RIGHT JPEG Rotate still pictures 35 Rotate LEFT JPEG Zoom in JPEG Enlarge or shrink the still picture 35 Zoom out JPEG e g FUNCTION MENU Top Menu Menu Control Panel OK RETURN Notes You cannot use the OPTION menu while the Top Menu for DVD Video is displayed Select an item then Using the Control Panel VIERA Link Using the Control Panel you ca...

Page 40: ...ed discs RW RW VR You can edit titles on the DIRECT NAVIGATOR screen deleting unwanted parts of titles such as commercials changing Thumbnail dividing and deleting titles etc Tips Maximum numbers of items on a disc RAM R R DL RW V R R DL RW Titles 99 49 Accessing the Title View Preparation RAM Release protection disc cartridge 48 Setting Protection Insert a disc Press DIRECT NAVIGATOR Press e r w ...

Page 41: ...e r to select Enter Name then press OK Entering Text 40 Set up Protection Cancel Protection RAM R R DL RW Use to prevent accidental erasure of titles Perform steps of Accessing the Title View 40 Press e r to select Set up Protection or Cancel Protection then press OK Press w to select Yes then press OK The lock symbol appears when the title is protected DVD RAM DIRECT NAVIGATOR Title View 07 08 BB...

Page 42: ...l Delete ChangeThumbnail Divide Title Enter Name S SUB MENU Select No 0 9 Divide Title Page 02 02 Previous 06 1 1 SUN Next OK RETURN 07 06 1 1 SUN 08 Next 06 Preview Divide Finish 0 00 00 08 Divide PLAY DVD RAM DIRECT NAVIGATOR Press OK at the point you want to divide For quicker editing below Tips Selecting Preview then pressing OK plays the title from 10 seconds prior to 10 seconds after the div...

Page 43: ...Combine Chapters Title View Delete Chapter Tips To exit the menu screens Press DIRECT NAVIGATOR To view other pages Press e r w q to select Previous or Next and press OK You can also press u i to view other pages Multiple editing Only Delete Chapter Select with e r w q and press h PAUSE Repeat A check mark appears Press h PAUSE again to cancel Chapter Operations Create Chapter You can divide a tit...

Page 44: ...View left Press w q to select the source title then press r Press OK to select all the chapters in the title then skip to step Press w q to select the source chapter you want to add to the playlist then press OK Press e to cancel Press OPTION to select Create Chapter then press OK if you want to create a new chapter in the source title 43 Press w q to select the position to insert the chapter then...

Page 45: ...b To edit Press OPTION to display the menu list Refer to Chapter Operations right Move Chapter Create Chapter Combine Chapters Delete Chapter Playlist View Add Chapter You can go back to the Playlist View Chapter Operations Add Chapter 1 Press e r to select Add Chapter then press OK 44 Creating Playlists Move Chapter 1 Press e r to select Move Chapter then press OK 2 Press e r w q to select the po...

Page 46: ...ct the soundtrack number Soundtrack numbers are displayed even when there is only one audio type Subtitle RAM R R DL RW V R R DL RW RW VR Only discs that contain subtitle on off information Turn the subtitle on off Subtitle on off information cannot be recorded using this unit DVD V Turn the subtitle on off and select the language below Sound track Subtitle language VCD SVCD only Turn the subtitle...

Page 47: ...tects the film and video content and appropriately converts it Auto2 In addition to Auto1 automatically detects film contents with different frame rates and appropriately converts it Video Select when using Auto1 and Auto2 and the content is distorted Input NR Only when AV1 AV2 AV3 or DV is selected Reduces video tape noise during recording Depending on the video signal jittering may occur Automat...

Page 48: ...n the single sided DVD RAM at once Important Once deleted contents cannot be recovered RAM Perform preparation steps of Accessing the Management Menus left Press e r to select Delete all titles then press OK Press w to select Yes then press OK Press w to select Start then press OK A message appears when deleting is finished Press OK to complete Notes Deleting does not work if one or more titles ar...

Page 49: ...ng on the condition and mode of recording Tips After you have finished recording and try to eject the disc a screen asking if you want to finalise the disc appears 23 Create Top Menu RW RW discs contain no Top Menu data Top Menu is a convenient function We recommend you create the menu before playing a RW disc on other equipment Perform preparation steps of Accessing the Management Menus 48 Press ...

Page 50: ...ting itself Timer recording may not work correctly if you edit the profiles during timer recording standby Channel numbers cannot be changed due to broadcast restrictions Setup Tuning Disc Picture Sound Display Connection Others Edit Profiles Auto Setup Restart DVB Manual Tuning Signal Condition OK SELECT TAB RETURN Add New DVB Services Edit Profiles Profile 1 RETURN All Services 1 BBC ONE Wales 2...

Page 51: ...nd Display Connection Others Edit Profiles Auto Setup Restart Signal Condition OK SELECT TAB RETURN DVB Manual Tuning Add New DVB Services Add New DVB Services Please wait 8 6 21 h C y t i l a u Q g o r P Channel Service Name Net ID TS ID RETURN RETURN to cancel The unit starts searching for newly available digital terrestrial channels This takes about 5 minutes The bar over the table shows you th...

Page 52: ...with the numbered buttons 62 Language code list Automatic If the language selected for Soundtrack is not available subtitles of that language will automatically appear if available on the disc Settings for Recording Press OK to show the following settings Recording time in EP mode Select the maximum number of hours for recording in EP mode EP 6Hours You can record for 6 hours on an unused 4 7 GB d...

Page 53: ...equipment or to convert the signals to PCM 2ch on the unit before output Bitstream When you have connected the unit to a piece of equipment having Dolby Digital logo PCM When you have connected the unit to a piece of equipment that doesn t have Dolby Digital logo DTS Choose whether to output by Bitstream which processes DTS signals on other connected equipment or to convert the signals to PCM 2ch ...

Page 54: ... rselect item Setup Tuning Disc Picture Sound Display Connection Others TV Aspect Progressive TV System HDMI Settings 16 9 Off PAL SELECT TAB RETURN AV1 Output RGB 2 AV2 Settings TV Aspect This setting needs to be changed when connected to a 4 3 standard aspect TV Press e r to select the TV Aspect then press OK 16 9 4 3 Letterbox Setup Tuning Disc Picture Sound Display Connection Others TV Aspect ...

Page 55: ...igital audio cable 60 and connected to a TV with an HDMI cable 10 and you want to enjoy the highest quality of audio from discs VIERA Link On Off Select when you do not want to use HDAVI Control AV1 Output Set according to the terminal of the connected TV Select Video with component or S Video with component for component output progressive output Set according to the signal and terminal of the co...

Page 56: ...E appears on the unit s display The TV Guide download can be interrupted by switching on the unit To avoid hearing the startup sound of System Update for the unit perform the following steps Select the time for Software Update below TV Guide Software search period Set TV Guide Download in Standby and Software Update in Standby below to Off and update manually below Software Update Search Now TV Gu...

Page 57: ...ons do not work repeat steps to using different codes if available Some TVs may not be compatible with the unit s remote control Remote Control Codes for the TV Manufacturer Code No Panasonic 01 02 03 04 AIWA 35 AKAI 27 30 BEJING 33 BEKO 05 71 72 73 74 BENQ 58 59 BP 09 BRANDT 10 15 BUSH 05 CENTREX 66 CHANGHONG 69 CURTIS 05 DAEWOO 64 65 DESMET 05 DUAL 05 ELEMIS 05 FERGUSON 10 34 FINLUX 61 Manufactu...

Page 58: ...Be sure to read the Caution for AC Mains Lead on page 3 Adding a VCR Connecting to aTelevision and a Video Cassette Recorder AV1 TV COMPONENT VIDEO OUT AV2 EXT AV OUT RF IN Rear of TV Rear of this unit To household mains socket 21 pin Scart cable not supplied 21 pin Scart cable not supplied RF coaxial cable not supplied AC mains lead supplied To the aerial To household mains socket Rear of VCR RF ...

Page 59: ...Leave the yellow cable unconnected Using Component Video Cables The COMPONENT VIDEO OUT terminals on this unit can be used for either interlace or progressive output 73 to provide a purer picture than the S VIDEO OUT terminal RF OUT DIGITAL AUDIO OUT PCM BITSTREAM OPTICAL RF IN AV1 TV COMPONENT VIDEO OUT AV OUT AV2 EXT Rear of TV Rear of this unit AUDIO IN R L VIDEO IN Red White Red White COMPONEN...

Page 60: ...ou to enjoy high quality digital video and audio with just one cable When connecting to an HDMI compatible HDTV High Definition Television the output can be switched to 1080p 1080i or 720p HD video Please use High Speed HDMI Cables that have the HDMI logo as shown on the cover When outputting 1080p signal please use the HDMI cables 5 0 meters or less When connecting with a Panasonic TV VIERA or a ...

Page 61: ... brand of TV When are the software updates broadcast The unit shows automatically when a software update has been broadcast and also automatically updates the software if this function has not been switched off in the Setup menu 56 Discs Page Can I play DVD Video bought in another country You cannot play DVD Video if its region number does not include 2 or ALL Refer to the disc s jacket for more i...

Page 62: ... Guide data is lost And if the unit is left unpluged for approximately 60 minutes the clock and timer recordings that have been set are lost DVB T Page Which aerial is suitable for receiving digital terrestrial broadcasts Any terrestrial roof aerial can be used However depending on the area where you live a new aerial may be necessary Consult your local TV aerial installer Can this unit receive or...

Page 63: ...RT You have inserted a disc the unit cannot play or record onto 13 14 UNFORMAT You inserted an unformatted DVD RAM DVD RW RW an unused R R DL or DVD RW DVD Video format that has been recorded on other equipment Format the disc to use it However all the recorded contents on the disc are deleted 48 F74 The HDMI connection could not be authenticated due to a transfer malfunction Consult the dealer wh...

Page 64: ...ot be mounted DO NOT in a vertical position It s designed to operate in the horizontal position Before moving the unit ensure the disc tray is empty Failure to do so will risk severely damaging the disc and the unit Cautions about condensation Condensation can cause unreliable playback of recordings Condensation may form in the following cases The unit is brought from cold surroundings into a well...

Page 65: ...or the ratings level ratings password Owner ID and Clock return to the factory preset The timer recording programmes are also cancelled On the main unit Press and hold 2 CH and CH 1 for about 5 seconds Refer to Tips of Auto Setup Restart 51 for detail information To reset the ratings level settings With the unit stopped Press OPEN CLOSE to open the disc tray On the main unit Press and hold REC and...

Page 66: ...uring searching may not be displayed accurately Compared to the actual recorded time the elapsed time displayed is less Only when recording in NTSC The displayed recording play time is converted from the number of frames at 29 97 frames equal to 0 999 seconds to one second There will be a slight difference between the time displayed and the actual elapsed time e g actual one hour elapsed time may ...

Page 67: ... connection for the equipment connected with an HDMI cable was changed or if there was a power failure or the plug was removed from the household mains socket HDAVI Control may not work In this case perform the following operations 1 When the HDMI cable is connected to all equipment with the power on turn the TV VIERA on again 2 Change the TV VIERA settings for the HDAVI Control function to off an...

Page 68: ...erformed or the unit was in the delivery status The Auto Setup was then started and interrupted Do an Auto Setup again and let it continue right through to the end The data is only saved after this has been completed The Signal Strength is over 100 10 Reduce the signal amplification at your aerial 51 Poor picture in spite of good signal quality Overmodulation makes the signal strength display go t...

Page 69: ... timer recording Timer recordings work regardless of whether the unit is on or off To confirm the timer recording is going to work properly turn the unit on The 4 3 aspect ratio picture expands left and right Screen size is wrong Use the TV to change the aspect If your TV does not have that function set Progressive in the Picture menu to Off If you connect an HDMI cable set Aspect for 4 3 Video in...

Page 70: ...unction does not work Memorized positions are cancelled when the tray is opened The Video CD picture does not display properly When connecting to Multi system TV select NTSC in TV System in the Setup menu When connecting to PAL TV the lower part of the picture cannot be displayed correctly during search 55 Time Slip Manual Skip etc do not work These functions do not work with finalised discs Time ...

Page 71: ... louder than normal however this is not a problem Cannot record video or sound from the external device The external device is not correctly connected The proper external input channel AV2 AV3 or DV is not selected Press INPUT SELECT to change 9 26 58 The DV auto recording function does not work If images cannot be recorded or if the recording is aborted check the connections and the DV equipment ...

Page 72: ...iscs Generally appropriate for TV drama programmes or animation Finalise A process that makes play of a recorded CD R CD RW DVD R etc possible on equipment that can play such media You can finalise DVD R DVD R DL DVD RW DVD Video format R and R DL on the unit After finalising the disc becomes play only and you can no longer record or edit However finalised DVD RW can be formatted to become recorda...

Page 73: ... screen flicker Placement Set the unit up on an even surface away from direct sunlight high temperatures high humidity and excessive vibration These conditions can damage the cabinet and other components thereby shortening the unit s service life Do not place heavy items on the unit Voltage Do not use high voltage power sources This can overload the unit and cause a fire Do not use a DC power sour...

Page 74: ...B T Channel Coverage UK UHF 21 to 68 ch RF converter output Not provided Video Video system PAL colour signal 625 lines 50 fields NTSC colour signal 525 lines 60 fields Recording system MPEG2 Hybrid VBR Video In PAL NTSC AV1 AV2 21 pin AV3 pin jack 1 Vp p 75 Ω termination S Video In PAL NTSC AV2 21 pin AV3 S terminal 1 Vp p 75 Ω termination RGB In PAL AV2 21 pin 0 7 Vp p 75 Ω termination Video Out...

Page 75: ...ug from AC receptacle AV1 TV COMPONENT VIDEO OUT AV OUT AV2 EXT RF OUT RF IN DIGITAL AUDIO OUT PCM BITSTREAM OPTICAL COMPONENT VIDEO OUT AV OUT Back of product Inside of product For your safety be sure not to connect or handle the equipment with wet hands Your attention is drawn to the fact that recording pre recorded tapes or discs or other published or broadcast material may infringe copyright l...

Page 76: ... 19 FUNCTION MENU Window 37 GGuide 16 19 30 HHDMI 10 38 39 60 72 IInitialize 56 JJPEG 15 34 72 LLanguage Audio 46 Code list 62 Soundtrack 46 Subtitle 46 LPCM 53 72 MManual Skip 33 Menu MP3 35 On screen 46 Pictures 34 Setup 50 Mode Recording 22 Still mode 52 MP3 15 35 72 NName Disc 48 Entering text 40 Playlist 45 Title 27 41 New Service 37 51 54 Noise reduction NR 47 OOn screen Digital channel info...

Reviews: