background image

Information

Getting Started

TV Operation

Disc Operation

Information

LSQT0942 A

TV / DVD Combination

Operating Instructions

Model No. 

• Connection and Initial Setup Procedures are on pages 10 and 13.

PV-27DF5 

MULTI FORMAT PLAYBACK

*Ability to play back may depend on recording 
conditions.

As an 

E

NERGY 

S

TAR

®

 Partner, Panasonic Corporation of North America 

has determined that this product or product model meets the 

E

NERGY 

S

TAR

®

 guidelines for energy efficiency.

Please read these instructions carefully before attempting to connect, operate, 

or adjust this product. Please save this manual.

Spanish Quick Use Guide is included.

(Guía para rápida consulta en español está incluida.)

Summary of Contents for PV27DF5 - DVD/TV UNIT

Page 1: ...y to play back may depend on recording conditions As an ENERGY STAR Partner Panasonic Corporation of North America has determined that this product or product model meets the ENERGY STAR guidelines for energy efficiency Please read these instructions carefully before attempting to connect operate or adjust this product Please save this manual Spanish Quick Use Guide is included Guía para rápida co...

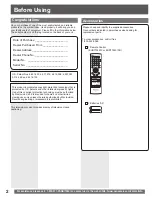
Page 2: ...__________________ Dealer Phone No _____________________ Model No __________________________ Serial No ___________________________ 1 Remote Control EUR7724010 or EUR7724010R 2 Batteries AA Congratulations Accessories To order accessories call toll free 1 800 332 5368 Before Using This television receiver provides display of television closed captioning U S Patent Nos 4 631 603 4 577 216 4 819 098 ...

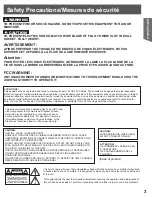
Page 3: ...DE CHOCS ÉLECTRIQUES NE PAS EXPOSER CET APPAREIL À LA PLUIE OU À UNE HUMIDITÉ EXCESSIVE CAUTION LASER RADIATION WHEN OPEN DO NOT STARE INTO BEAM Inside of product CAUTION UNIT IS A CLASS I LASER PRODUCT HOWEVER THIS UNIT USES A VISIBLE LASER BEAM WHICH COULD CAUSE HAZARDOUS RADIATION EXPOSURE IF DIRECTED BE SURE TO OPERATE THE UNIT CORRECTLY AS INSTRUCTED WHEN THIS UNIT IS PLUGGED INTO THE WALL OU...

Page 4: ...ATION section of these safeguards 1 KEEP UNIT WELL AWAY FROM WATER OR MOISTURE such as vases sinks tubs etc 2 IF EXPOSED TO RAIN MOISTURE OR STRONG IMPACT unplug unit and have it inspected by a qualified service technician before use 3 ELECTRICAL STORMS During a lightning storm or before leaving unit unused for extended periods of time disconnect all equipment from the power source as well as the ...

Page 5: ...uning TV 13 TV Operation 16 MTS Broadcast TV Stereo System 18 TV Timer Features 19 Closed Caption System 20 Video Audio Setting 22 V Chip Control Features 24 Display Features 28 Basic Disc Operation 29 DVD RAM Operation 33 Disc Operation Using Information Screen 35 Special Disc Operation 38 Settings for DVD Operation 41 Warning and Instruction Displays 45 Glossary 45 Before Requesting Service 46 G...

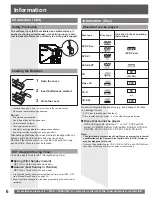
Page 6: ...pring First Sunday in April DST ON Sets clock ahead one hour Autumn Last Sunday in October DST ON Turns clock back one hour Information Information Unit Discs that can be played Discs that cannot be played DVD with Region No other than 1 or ALL DVD from PAL system DVD ROM DVD R DVD AUDIO DVD RW DVD RW CD ROM CDV CVD CD G CD TEXT SACD Photo CD Note The digital audio content side of DualDiscs do not...

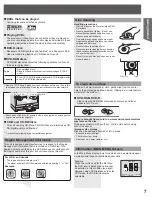
Page 7: ...he DVD disc does not correspond to the Region number of this unit this unit cannot play this disc Region Management Information Handling precautions Sticking a label on the disc may impair DVD R playback Do not attach sticker to disc Do not use discs with exposed adhesive from tape or left over peeled off stickers Only hold disc by edges as shown at right Fingerprints dirt and scratches can cause ...

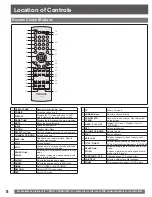
Page 8: ...OW Activates reverse rapid scene search in Play mode Increases reverse slow motion speed in still mode Up to 5 levels 14 AUDIO Selects the desired audio mode 15 ANGLE Selects the desired angle in DVD mode 16 TIMER Set ON TIMER or SLEEP TIMER 17 RETURN Returns to DVD menu screen 18 DVD Set to DVD mode 19 TV Sets to TV mode 20 NUMBER Keys Selects a channel directly 21 ADD DELETE CLEAR Adds or delete...

Page 9: ...r track Goes to next menu screen 11 STOP Stops playback 12 PLAY Begins playback 13 OPEN CLOSE Opens or closes the disc tray 2 3 6 4 5 7 8 9 10 11 12 13 15 14 1 14 ON TIMER Indicator Lights when the On Timer is set 15 Remote Sensor Receives infrared signal from remote control 1 AC Power Plug When plugged into an AC outlet this unit consumes 0 9 W of electric power in OFF condition 2 Optical digital...

Page 10: ...omponent concerned Read the instruction manual for each system component carefully before connecting it Notes on connections Connecting the RF in Terminal Note to CABLE system installer This reminder is provided to call the CABLE Cable TV System Installer s attention to Article 820 40 of the NEC that provides guidelines for proper grounding and in particular specifies that the cable ground shall b...

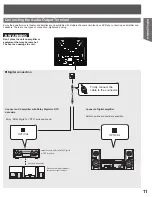
Page 11: ... DTS decoders Digital connection Connecting the Audio Output Terminal Please see amplifier manual for speaker requirements Speakers example Amplifier with built in Dolby Digital or DTS decoders Firmly connect the cable to the connector OPTICAL OPTICAL Connect a Digital amplifier Enjoy Dolby Digital or DTS surround sound Smart one line connection is possible Don t place the unit on amplifier or equ...

Page 12: ...our reference Dolby Digital is a digital sound compression technique developed by the Dolby Laboratories Licensing Corporation Supporting 5 1 channel surround sound as well as stereo 2 channel sound this technique enables a large quantity of sound data to be efficiently recorded on a disc Linear PCM is a signal recording format used in CDs While CDs are recorded in 44 1 kHz 16 bit DVDs are recorde...

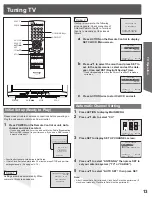
Page 13: ...he Remote Control or unit Auto channel and clock set start If you use a cable box turn it on and set it to the Public Broadcasting Service PBS channel in your time zone If you use a DSS receiver it must be turned off 5 Press to select AUTO SET then press SET Note After Channel Auto Set is finished Clock Auto Set will be performed If clock is set manually Clock Auto Set will not be performed 2 Pres...

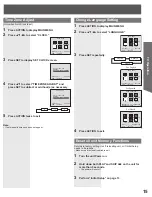
Page 14: ...uto clock is set 2 Press to select CLOCK 3 Press SET to display SET CLOCK screen 1 Press ACTION to display MAIN MENU 5 Press and press SET to select and set the month date year time and DST Daylight Saving Time To Make Corrections repeatedly press to move to error then correct 6 Press ACTION twice to start the clock and exit this mode Manual Clock Setting CHANNEL 08 ADDED CHANNEL 08 DELETED SET CL...

Page 15: ...it 1 Turn the unit Power on 2 Hold down both PLAY and SKIP Ι on the unit for more than 5 seconds The power will shut off 3 Perform Initial Setup on page 13 English Spanish French 1 0 1 Note If set manually time zone does not appear 1 Press ACTION to display MAIN MENU MAIN MENU DVD LOCK LANGUAGE TV CLOCK CH SELECT SET SET END ACTION SET CLOCK AUTO CLOCK SET MANUAL TIME ZONE ADJUST 1 SELECT SET SET ...

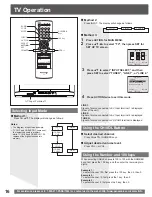
Page 16: ...of source connected to AV Input terminal 2 is displayed TUNER Signal of source connected to VHF UHF terminal is displayed TV CH69 CABLE CH125 LINE2 TV CH2 CABLE CH1 When selecting CABLE channels 100 to 125 with the NUMBER keys first press the 100 key and then enter the remaining two digits Example 1 To select channel 125 first press the 100 key then 2 then 5 Example 2 To select channel 12 first pr...

Page 17: ... solid blue when signal is absent or weak 1 Press ACTION to display MAIN MENU 2 Press to select CH 3 Press SET to display SET UP CHANNEL screen 6 Press ACTION twice to return to the normal screen 4 Press to select WEAK SIGNAL DISPLAY 5 Press SET to set ON or OFF Note If the unit is connected to equipment which has a blue screen feature selecting ON will have no effect on the other equipment Weak S...

Page 18: ...r the sub language 1 Press AUDIO to select the desired audio mode as described above Arrow shows selection Each press of AUDIO will change the audio mode as shown below SAP is selected with first press of AUDIO MONO broadcast Normal monaural sound broadcast Example Equipped with TV Noise Reduction for true MTS reproduction TV Noise Reduction is required for good stereo separation and audio fidelit...

Page 19: ... TIMER SET is displayed ON TIMER Indicator lights up on the unit This unit can be set for auto power off 1 Press TIMER to display SET TIMER screen 2 Press to select SLEEP TIMER 3 Press SET repeatedly to select the desired time To cancel press SET repeatedly until 0 appears 4 Press TIMER to return to the normal screen Pressing DISPLAY with sleep timer set displays remaining time Make sure a disc is...

Page 20: ...C2 A narration of selected TV programs is displayed Check TV program listings for CC Closed Caption broadcasts Caption Mode TEXT C1 or C2 Most of the screen will be blocked out When the TV station broadcasts information such as program listings it will appear in this space Caption Mode OFF Closed Caption Text narration will not be displayed Notes The closed caption or text signal may be broadcast ...

Page 21: ...display CAPTION screen 6 Press to select CAPTION MODE 7 Press SET repeatedly to select OFF 8 Press to select CC ON MUTE 9 Press SET repeatedly to select desired mode The caption may be broadcast over CAP C1 or C2 Caption On Mute Feature NO CAP C1 CAP C2 CC ON MUTE CAP C1 or C2 A narration of selected TV programs is displayed when MUTE button is pressed for silence CC ON MUTE NO A narration will no...

Page 22: ... easy setting of picture and sound suitable for each program source 1 Press ACTION to display MAIN MENU 2 Press to select TV 3 Press SET to display SET UP TV screen 4 Press to select SET UP VIDEO AUDIO 5 Press SET to display SET UP VIDEO AUDIO screen MUSIC Sound suited to music Factory setting SPEECH Sound suited to dialogue NORMAL AUTO Audio AGC Auto Gain Control The sound level is automatically ...

Page 23: ...SET to display AUDIO ADJUST screen 8 Press to select an item 9 Press to adjust To Reset AUDIO Controls Press and SET to select and set STANDARD All controls return to their factory settings BASS Control To adjust the intensity of low frequency sound TREBLE Control To adjust the intensity of high frequency sound BALANCE Control Controls the difference in audio level between the left and right speak...

Page 24: ...s repeatedly to move the cursor b Press NUMBER keys to make the correction 2 Press to select LOCK 3 Press SET to display LOCK screen Enter Secret Code Changing your secret code You will need your current code 1 While this OSD on screen display is displayed press ADD DLT CLEAR to clear current code 2 Enter new secret code V Chip Control Feature is This unit has a built in V Chip Control which allow...

Page 25: ... Press to select CHANGE SETTINGS 4 Press SET to display screen 5 Press to select VIEW NR PROGRAMS 6 Press SET to set YES or NO NR Not Rated PROGRAMS Some movies such as old movies or foreign movies have no ratings 7 Press to select and SET to set ratings to be blocked See US MOVIES Ratings Chart on page 27 8 Press ACTION to redisplay LOCK menu and continue with US TV PROGRAMS Ratings Or press ACTI...

Page 26: ...t ratings to be blocked See Canadian French Language Ratings Chart on page 27 E Exempt PROGRAMS Some TV shows such as news sports weather bulletins and emergency information have no ratings 7 Press to select VIEW E PROGRAMS 8 Press SET to set YES or NO 10 Press ACTION three times to exit this mode LOCK US MOVIES OFF CHANGE SETTINGS US TV PROGRAMS OFF CHANGE SETTINGS NEXT PAGE SELECT SET SET END AC...

Page 27: ...ldren under 13 R RESTRICTED Children under 17 must be accompanied by a parent or adult NC 17 OVER AGE 17 ONLY No one 17 and under admitted X ADULTS ONLY Canadian French Rating US Rating If a program or movie exceeds the ratings you have set a message will appear on a black background and sound is muted When V Chip Control is activated Blocking Message CH 08 PROGRAM RATING EXCEEDED RATING PG 13 ACC...

Page 28: ...with the Weak Signal Display Feature set to OFF see page 17 the screen will turn solid blue TV Status Clock Display Blue Screen Display Channel Display No broadcast signal in TV mode Only when Weak Signal Display is set to OFF See page 17 Power turns off Note This feature is canceled if any button is pressed during above conditions Auto Shut Off DISPLAY 08 12 00PM CH 08 STEREO SAP MONO RATING PG 1...

Page 29: ... 12 cm disc CLOSE READING 1 MAIN STORY 2 SUBTITLE 3 AUDIO SOUNDTRACK 4 INFORMATION LOVE STORY Example Play Disc 1 2 To return to Main MENU of DVD play stops Press TITLE MENU or RETURN To return to Main MENU of Video CD play stops Press RETURN While Main MENU is displayed press SKIP Ι or SKIP Ι to go to next or previous Main MENU of disc screen SKIP function not available with all discs Please refe...

Page 30: ...seconds of a track chapter program play list start point skips to the previous start point When a NUMBER key is used in disc mode it performs a different operation from TV mode Using the NUMBER keys Example 1 To select 12 first press the 10 key then 1 then 2 Example 2 To select 2 press the 2 key DVD and CD Video CD Pressing SKIP Ι once midway through a chapter track returns to start of that chapte...

Page 31: ...ion is not offered on the disc When disc is removed language reverts to initial setting If this language is not recorded on the disc the language recorded will be heard Audio Soundtrack Language DVD V DVD V 1 MAIN STORY 2 SUBTITLE 3 AUDIO SOUNDTRACK 4 INFORMATION LOVE STORY 3 Press SET or PLAY to access Step 3 not necessary when using NUMBER keys Note Repeat steps 2 3 if there is more than one men...

Page 32: ...it information Each press of DISPLAY changes the on screen display as follows Please refer to pages 35 37 Note When DISPLAY is pressed during play of a Video CD with Play control the NUMBER keys are not available on the displayed screen In this case press DISPLAY again to remove the displayed screen DISPLAY button does not function while main menu of DVD title menu of DVD Direct Navigator or Play ...

Page 33: ...tray 5 Press PLAY to start play Disc tray closes automatically Play begins from the first program title recorded on the DVD RAM Play List Page1 5 No Date Length Title SELECT SET SET END MENU 1 2 3 4 00 01 00 00 03 12 00 15 01 00 03 00 Movie Picture Playback Still Picture Playback Hybrid Playback Partial Playback 2002 12 24 5 15 41AM 2002 12 25 4 31 49AM 2002 12 25 8 24 25AM 2002 12 25 12 45 00AM T...

Page 34: ...MBER keys starts play automatically The number of available titles varies with each disc Play List Page1 5 No Date Length Title SELECT SET SET END MENU 1 2 3 4 00 01 00 00 03 12 00 15 01 00 03 00 Movie Picture Playback Still Picture Playback Hybrid Playback Partial Playback 2002 12 24 5 15 41AM 2002 12 25 4 31 49AM 2002 12 25 8 24 25AM 2002 12 25 12 45 00AM 3 Press SET or PLAY to start playing Pre...

Page 35: ...tion screen 1 DVD V DVD V b SURROUND MODE See page 40 b Chapter Go directly to a preset chapter number This function does not work with some discs c Disc currently being played The type of disc currently inserted is displayed TITLE chapter chapter chapter REPEAT CHAPTER REPEAT TITLE REPEAT OFF CURRENT PLAYBACK POSITION Example a b a c d b 12 34 56 1 2 3 4 5 6 00 20 00 2 0 0 0 SET Example d Elapsed...

Page 36: ...n disc information screen 2 is displayed it is not possible to enter an elapsed playing time CD b TRACK 12 TIME 00 35 12 PBC OFF PROGRAM PLAY NEXT DISPLAY Disc information screen 3 VCD TRACK 12 TIME 00 35 12 PBC OFF ENTER 0 9 SET SET NEXT DISPLAY 1 Press DISPLAY in Play or Stop mode to display On Screen Display 2 Press SET to enter selected item Change the item by pressing or the NUMBER keys and p...

Page 37: ...in Play or Stop mode to display On Screen Display 2 Press to select an item 3 Press SET to enter selected item Change the item by pressing or the NUMBER keys and press SET Disc information screen 4 b Disc currently being played The type of disc currently inserted is displayed a Direct Navigation PROGRAM or PLAY LIST No Go directly to a preset title number RAM a b c a b c Example 12 34 56 1 2 3 4 5...

Page 38: ...ess to select DVD 3 Press SET to display DVD MAIN MENU 4 Press to select PLAY MODE 5 Press SET to display PLAY MODE screen 6 Press to select PROGRAM PLAY 7 Press SET to display screen 8 Press to select a track number Track numbers on disc are displayed 9 Press SET to set Repeat steps 8 9 to select another track The selected track is added on the right side MAIN MENU DVD LOCK LANGUAGE TV CLOCK CH S...

Page 39: ...6 Press SET to set mode To cancel select REPEAT OFF in step 5 then press SET MAIN MENU DVD LOCK LANGUAGE TV CLOCK CH SELECT SET SET END ACTION Program Repeat Play Random Play CD CD DVD MAIN MENU DISC LANGUAGES AUDIO OUTPUT STILL MODE AUTO TV MODE 4 3 Pan Scan PLAY MODE SELECT SET SET END ACTION PLAY MODE PROGRAM PLAY RANDOM PLAY SELECT SET SET END ACTION REPEAT OFF SURROUND OFF SELECT SET SET END ...

Page 40: ...SET END ACTION SET UP TV CAPTION INPUT SELECT TUNER SET UP VIDEO AUDIO DVD VOL ADJUST 2 SELECT SET SET END ACTION DVD Volume Adjust V S S Virtual Surround Sound DVD V 4 Press to select DVD VOL ADJUST 5 Press SET to set the level 0 1 or 2 Notes This function not available with DVD RAM ANGLE Indicator lights up on the unit when a scene recorded from different angles is detected The angle number can ...

Page 41: ...riginal Original disc language Other Other language selection 1 AUTO Same language as selected for AUDIO If language set for AUDIO is used in playback subtitles will not appear If another language is used during playback the subtitles will appear in the language selected at AUDIO setup English Spanish French Japanese Other Other language selection 1 To enter OTHER code number Press NUMBER keys Ple...

Page 42: ...ingua 7365 Irish 7165 Italian 7384 Japanese 7465 Javanese 7487 Kannada 7578 Kashmiri 7583 Kazakh 7575 Kirghiz 7589 Korean 7579 Kurdish 7585 Laotian 7679 Latin 7665 Latvian Lettish 7686 Lingala 7678 Lithuanian 7684 Macedonian 7775 Malagasy 7771 Malay 7783 Malayalam 7776 Maltese 7784 Maori 7773 Marathi 7782 Moldavian 7779 Mongolian 7778 Nauru 7865 Nepali 7869 Norwegian 7879 Oriya 7982 Pashto Pushto ...

Page 43: ...ifier that doesn t have a built in dts decoder OFF Normal audio range is selected Factory preset ON For dynamic sound even at low volume This is useful for late night listening Dolby Digital DVDs only DVD V Note Make settings according to amplifier connected to optical audio output as shown in above table Type of amplifier to be connected Recommended setting LPCM DVD Dolby Digital dts No amplifier...

Page 44: ...on some discs Set the screen display style for widescreen video material playback 1 Press ACTION in Stop mode to display MAIN MENU 2 Press to select DVD 3 Press SET to display DVD MAIN MENU MAIN MENU DVD LOCK LANGUAGE TV CLOCK CH SELECT SET SET END ACTION Selecting TV MODE DVD V 4 Press to select TV MODE 5 Press SET repeatedly for mode 4 3 Pan Scan Widescreen video data is played in Pan Scan style...

Page 45: ...ayback quality Film and video DVD Videos are recorded using either film or video Usually film is recorded at 24 frames per second the rate movies are filmed at while video is recorded at 30 frames per second Frame still and field still Frames are the still pictures that go together to make a moving picture There are about 30 frames shown each second One frame is made up of two fields A regular tel...

Page 46: ...Y SELECT SET POWER etc buttons cannot be selected Press TV for TV mode 9 Press DVD for DVD mode 9 Check remote batteries 6 DVD CD Video CD Play fails to start even when PLAY is pressed This unit cannot play discs other than DVDs CDs and Video CDs 6 The disc may be dirty and require cleaning 7 Picture is distorted during rapid advance or rapid reverse The picture will be somewhat distorted at times...

Page 47: ... líneas de energía eléctrica Cuando instale la antena nunca toque los cables de energía eléctrica los circuitos eléctricos u otros recursos de energía EMPALMADOR DE CONEXIÓN A TIERRA EQUIPO DE SERVICIO ELÉCTRICO BAJADA DE ANTENA UNIDAD DE DESCARGA DELA ANTENA SECCIÓN S10 20 DEL NEC CONDUCTORES CONEXIÓN A TIERRA SECCIÓN S10 20 DEL NEC SISTEMA DE ELECTRODOS DE CONEXIÓN A TIERRA DEL SERVICIO ELÉCTRIC...

Page 48: ...nexiones del cable o antena antes de conectar la alimentación Enchufe el cable de alimentación de la unidad en un tomacorriente de CA Los ajustes se realizan automáticamente Cuando se termina al configuración aparecerá la siguiente pantalla Si la configuración no está completa aparecerá la siguiente pantalla Verifique la conexión de la antena cable al terminal de entrada RF luego pruebe ajustar ma...

Page 49: ...emplo 3 Para seleccionar el canal 2 primero presione el 2 Selección del modo de entrada Uso del botón CH VOL Uso de la tecla Number y 100 Apagado del audio Sintonización rápida 4 Presione ACTION dos veces para salir de este modo MENU PRINCIPAL DVD BLOQUEO IDIOMA TV RELOJ CANAL ELEGIR FIJAR SET TERMINAR ACTION PREPARAR TV DIALOGO TITULADO ENTRADA SINTONIZADOR AJUSTE DEL VIDEO AUDIO VOLUMEN DEL DVD ...

Page 50: ...ente que en el modo de televisión Uso de las teclas NUMBER Ejemplo 1 Para seleccionar el canal 12 primero presione la tecla 10 luego 1 luego 2 Ejemplo 2 Para seleccionar el canal 2 primero presione el 2 2 Presione DVD para ajustar el modo remoto a DVD DVD y CD Al presionar SKIP Ι una vez hasta la mitad durante un capítulo o pista se vuelve al comienzo de ese capítulo o pista Cada presión adicional...

Page 51: ...cil acceso se exhibe su lista preseleccionada de escenas favoritas El funcionamiento puede variar de acuerdo a como editó el DVD RAM Lista de reproducción 4 Presione PLAYLIST para borrar el menú de lista de reproducción Al usar las teclas NUMBER se comienza automáticamente la reproducción El número de títulos disponibles varía con cada disco Lista Repro Pagina1 5 No Fecha Longitud Titulo ELEGIR FI...

Page 52: ... no charge for parts You must carry in or mail in your product or arrange for in home service as applicable during the warranty period If non rechargeable batteries are included they are not warranted This warranty only applies to products purchased and serviced in the United States or Puerto Rico This warranty is extended only to the original purchaser of a new product which was not sold as is A ...

Page 53: ...the warrantor PARTS AND SERVICE INCLUDING COST OF AN IN HOME SERVICE CALL WHERE APPLICABLE WHICH ARE NOT COVERED BY THIS LIMITED WARRANTY ARE YOUR RESPONSIBILITY Customer Services Directory Obtain Product Information and Operating Assistance locate your nearest Dealer or Servicenter purchase Parts and Accessories or make Customer Service and Literature requests by visiting our Web Site at http www...

Page 54: ...n System EIA Standard NTSC color Speaker 2 pieces 5 W Operating Temperature 5 C 35 C 41 F 95 F Operating Humidity 10 75 Weight 47 kg 103 6 lbs Dimensions W H D 760 mm 29 7 8 642 mm 25 1 4 502 mm 19 3 4 Discs played DVD disc DVD Video DVD R 12 cm 5 single sided single layer 12 cm 5 single sided double layer 12 cm 5 double sided double layer one layer per side 8 cm 3 single sided single layer 8 cm 3...

Page 55: ...Information Display 32 Initial Setup Ready to Play 13 INPUT button 8 Input Mode 16 L Language Code List 42 Location of Controls 8 M Main Menu of DVD 31 MENU PLAY LIST button 8 Multiple Angle Viewing 40 MUTE button 8 N Number and 100 keys 16 NUMBER Keys 8 30 O ON TIMER 19 OPEN CLOSE 8 Optical digital audio output connector 9 P Phones Jack 9 Picture Zoom 32 Play a DVD RAM 33 PLAY button 8 Play Disc ...

Page 56: ...ation of North America One Panasonic Way Secaucus New Jersey 07094 Panasonic Sales Company PSC Division of Panasonic Puerto Rico Inc Ave 65 de Infantería Km 9 5 San Gabriel Industrial Park Carolina Puerto Rico 00985 Printed in Indonesia LSQT0942 A S0205 0 P LSQT0942 A ...

Reviews: