background image

2011/07/17

EB EG GN GS

VQT3R83

Operating Instructions

Home Theater Audio System

Model No. 

SC-HTB15

Dear customer

Thank you for purchasing this product.
For optimum performance and safety, please read these instructions carefully.

Before connecting, operating or adjusting this product, please read the instructions completely.
Please keep this manual for future reference.

Model number suffix “EB” denotes UK model.

SC-HTB15EGEBGNGS_VQT3R83.book  Page 1  Tuesday, June 28, 2011  2:34 PM

Summary of Contents for SC-HTB15

Page 1: ...mer Thank you for purchasing this product For optimum performance and safety please read these instructions carefully Before connecting operating or adjusting this product please read the instructions...

Page 2: ...curs please increase separation between this unit and the mobile telephone For the United Kingdom Ireland Continental Europe Australia and New Zealand This unit is intended for use in moderate climate...

Page 3: ...espond with the coloured markings identifying the terminals in your plug proceed as follows The wire which is coloured Blue must be connected to the terminal which is marked with the letter N or colou...

Page 4: ...ers 10 When placing the speakers on a wall 10 When placing the speakers on a table 13 Speaker fall prevention measures 16 Step 3 Connections 18 Basic connection 18 Connection with HDMI compatible devi...

Page 5: ...cable to model SC HTB15 for variety of regions Unless otherwise indicated illustrations in these Operating Instructions are of the model for the United Kingdom and Ireland Operations in these Operatin...

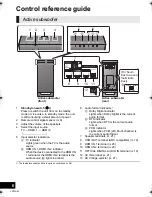
Page 6: ...l is the audio source B lights in amber 6 Audio format indicators C Dolby Digital indicator Lights when Dolby Digital is the current audio format D DTS indicator Lights when DTS is the current audio f...

Page 7: ...ote control 1 2 3 4 5 Remove the insulation sheet A before using To replace a button type battery 1 While pressing the stopper B pull out the battery holder 2 Set the button type battery with its i ma...

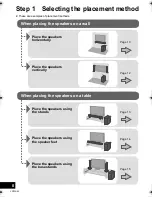
Page 8: ...n placing the speakers on a wall When placing the speakers on a table Place the speakers horizontally Page 10 Place the speakers vertically Place the speakers using the base stands Place the speakers...

Page 9: ...speakers on a wall The wall or pillar on which the speakers are to be attached should be capable of supporting 33 kg per screw Consultation with a qualified building contractor is recommended when at...

Page 10: ...speaker joint or vice versa Be sure to verify the orientation of the speaker with the label on the rear of the speaker Use screws A to secure the speakers to the speaker joint Keep the screws out of r...

Page 11: ...Leave at least 20 mm of space above and each side of the speaker to allow enough space for fitting the speaker The position in the wall where the screw is to be attached as well as the screw should be...

Page 12: ...y the screwing positions on the wall Leave at least 20 mm of space above and each side of the speaker to allow enough space for fitting the speaker The position in the wall where the screw is to be at...

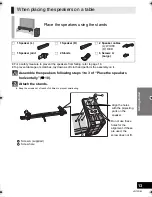
Page 13: ...peakers horizontally 10 Attach the stands Keep the screws out of reach of children to prevent swallowing When placing the speakers on a table Place the speakers using the stands 1 Speaker L 1 Speaker...

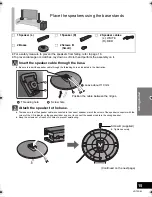
Page 14: ...speaker feet to the bottom of the speakers Keep the speaker feet out of reach of children to prevent swallowing Place the speakers using the speaker feet 1 Speaker L 1 Speaker R 2 Speaker cables L WHI...

Page 15: ...ake sure that the speaker cable is connected to the correct speaker match the colour of the speaker connector with the colour of the L R indicator on the speaker label so as not to connect the speaker...

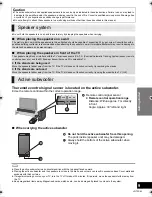
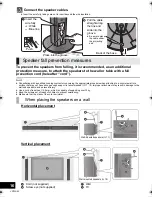
Page 16: ...proper attachment may result in damage to the wall and speakers and personal injury Use a cord of less then 2 0 mm which is capable of supporting over 10 kg Keep the screws out of reach of children to...

Page 17: ...placing the speakers on a table Horizontal placement Vertical placement A Cord not supplied B Screw eye not supplied Depending on the placement of the speakers the screwing position of the screw eye m...

Page 18: ...o signal from a 3D compatible Blu ray Disc Player to a FULL HD 3D TV Verify if the TV s HDMI terminal is labelled HDMI ARC What is ARC ARC is an abbreviation of Audio Return Channel also known as HDMI...

Page 19: ...Getting started 19 VQT3R83 A HDMI cable not supplied B Optical digital audio cable not supplied B Not labelled HDMI ARC HDMI IN OPTICAL OUT TV Active subwoofer...

Page 20: ...pplied HDMI standby pass through Even if this system is in standby mode the audio and or video signal from the device connected to the HDMI IN 1 or HDMI IN 2 terminal will be sent to the TV connected...

Page 21: ...ead is for use with the active subwoofer Do not use it with other equipment Also do not use cords for other equipment with the active subwoofer Speaker cable connection A RED Front speaker Rch B WHITE...

Page 22: ...cancel press the button again or adjust the volume Muting is cancelled if this system is turned off If there is sound coming out of the TV s speakers reduce the volume of the TV to its minimum The max...

Page 23: ...l digital audio cable Dolby Virtual Speaker and the 3D surround effect will be automatically cancelled if the audio signal s sampling frequency is greater than 48 kHz 3D sound 3D sound Dolby Virtual S...

Page 24: ...on The availability and function of the settings may vary depending on the TV Refer to the operating instructions for the TV for details Speaker control You can select whether audio output is from th...

Page 25: ...ting blinks for 10 sec 2 While the indicator is blinking press TV to change the setting The setting changes each time TV is pressed The setting will be reset to on when this system is turned off To tu...

Page 26: ...C mains lead and reconnect the HDMI cable s 18 to 20 VIERA Link related operations no longer function properly Check the VIERA Link setting on the connected devices Have you turned the VIERA Link sett...

Page 27: ...e changed from main to secondary If the audio received from the connected device is not Dolby Dual Mono or the output setting is not Bitstream the setting cannot be changed from this system Change the...

Page 28: ...ator blinks for 10 sec When the audio output mode is Multi channel mode 23 When 3D surround effect and clear mode dialog effect are on 25 When the dual audio setting is Main 25 The indicators blink fo...

Page 29: ...m cone typek1 MAIN UNIT GENERAL Power consumption 52 W In standby condition 0 1 W Power supply For EG EB GN AC 220 V to 240 V 50 Hz For GS AC 110 V to 127 V 220 V to 240 V 50 60 Hz Dimensions WkHkD 18...

Page 30: ...s in the European Union If you wish to discard electrical and electronic equipment please contact your dealer or supplier for further information Information on Disposal in other Countries outside the...

Page 31: ...s pninger m ikke dekkes til med aviser duker gardiner eller lignende SUOMI Laite Tulipalo s hk isku tai vahinkovaaran v ltt miseksi j l anna t m n laitteen altistua sateelle kosteudelle pisaroille tai...

Page 32: ...t with ease and confidence by phoning our Customer Care Centre Monday Thursday 9 00 a m 5 30 p m Friday 9 30 a m 5 30 p m Excluding public holidays Or go on line through our Internet Accessory orderin...

Reviews: