background image

©

2004 Matsushita Electric Industrial Co., Ltd. All

rights

reserved.

Unauthorized

copying

and

distribution is a violation of law.

TU-PT700U

GP7P Chassis

Digital Media Receiver

Specifications

Power Source

120 V AC, 60 Hz

Power Consumption

Maximum

45 W

Stand-by condition

22 W

Dimensions (W × H × D)

16.9” (430 mm) × 3.4” (86 mm) × 14.8” (377 mm)

Mass (weight)

approx. 13.2 lbs

Channel Capability-ATSC / NTSC

VHF/ UHF : 2-69, CATV:1-135

FEATURES

Two screen display functions

LINEAR PIP

BBE VIVA 3D

V-Chip

CLOSED CAPTION

HDMI

3D Y/C FILTER

JPEG Viewer

CableCARD TM slot

Accessories Supplied

AC cord

Display-Receiver cable

Operating Condition

Temperature

32 °F - 104 °F (0 °C - 40 °C)

Humidity

20 % - 80 %

Connection Terminals

RGB INPUT

D-SUB 15pin

R,G,B / 0.7 Vp-p (75

W

)

HD VD / TTL Level (high impedance)

AV INPUT 1- 3

VIDEO (Phono Jack Type)

1.0 Vp-p (75

W

)

S-VIDEO (Mini DIN 4-pin)

Y : 1.0 Vp-p (75

W

) C : 0.286 Vp-p (75

W

)

AUDIO L-R (Phono Jack Type × 2)

0.5 Vrms

AV PROG. OUT

VIDEO (Phono Jack Type)

1.0 Vp-p (75

W

)

AUDIO L-R (Phono Jack Type × 2)

0.5 Vrms

AUDIO OUT

AUDIO L-R (Phono Jack Type × 2)

0.5 Vrms

COMPONENT VIDEO INPUT1-2

Y

1.0 Vp-p (including sync)

PB / PR

0.7 Vp-p

AUDIO L-R (Phono Jack Type × 2)

0.5 Vrms

HDMI/AUDIO INPUT

HDMI type A Connector

AUDIO L-R (Phono Jack Type × 2)

0.5 Vrms

DIGITAL AUDIO OUT

PCM / Dolby Digital, Fiber Optic

DISPLAY OUT

D-sub 26-pin, Digital RGB 24-pin

ORDER NO. ITD0411063C1

B19 Canada : B07

Summary of Contents for TU-PT700U

Page 1: ...splay Receiver cable Operating Condition Temperature 32 F 104 F 0 C 40 C Humidity 20 80 Connection Terminals RGB INPUT D SUB 15pin R G B 0 7 Vp p 75 W HD VD TTL Level high impedance AV INPUT 1 3 VIDEO Phono Jack Type 1 0 Vp p 75 W S VIDEO Mini DIN 4 pin Y 1 0 Vp p 75 W C 0 286 Vp p 75 W AUDIO L R Phono Jack Type 2 0 5 Vrms AV PROG OUT VIDEO Phono Jack Type 1 0 Vp p 75 W AUDIO L R Phono Jack Type 2...

Page 2: ...P Board Block Diagram 47 13 4 P Board 1 of 2 Schematic Diagram 49 13 5 P Board 2 of 2 Schematic Diagram 50 13 6 H and T Board Block Diagram 51 13 7 H Board 1 of 2 and T Board Schematic Diagram 52 13 8 H Board 2 of 2 Schematic Diagram 53 13 9 DT and JA Board Block Diagram 54 13 10 DT Board 1 of 8 Schematic Diagram 56 13 11 DT Board 2 of 8 Schematic Diagram 57 13 12 DT Board 3 of 8 Schematic Diagram...

Page 3: ...16 1 Replacement Parts List Notes 87 16 2 Electrical Replacement Parts List 88 1 Applicable signals Video Component RGB PC HDMI input signals 3 TU PT700U ...

Page 4: ... more sensitivity to measure the potential across the resistor 4 Check each exposed metallic part and measure the voltage at each point 5 Reverse the AC plug in the AC outlet and repeat each of the above measurements 6 The potential at any point should not exceed 0 75 volts RMS A leakage current tester Simpson Model 229 or equivalent may be used to make the hot checks leakage current must not exce...

Page 5: ...embly 3 Use only a grounded tip soldering iron to solder or unsolder ES devices 4 Use only an anti static solder removal device Some solder removal devices not classified as anti static ESD protected can generate electrical charge sufficient to damage ES devices 5 Do not use freon propelled chemicals These can generate electrical charges sufficient to damage ES devices 6 Do not remove a replacemen...

Page 6: ...has a higher melting point than standard solder Typically the melting point is 50 70 F 30 40 C higher Please use a high temperature soldering iron and set it to 700 20 F 370 10 C Pb free solder will tend to splash when heated too high about 1100 F or 600 C If you must use Pb solder please completely remove all of the Pb free solder on the pins or solder area before applying Pb solder If this is no...

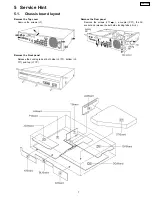
Page 7: ...emove the Front panel Release the Locking tabs at both side 2 bottom 3 and top 1 Remove the Rear panel Remove the screws 11 a coupler PF1 the AC socket and release the both side locking tabs 2 5 Service Hint 5 1 Chassis board layout 7 TU PT700U ...

Page 8: ...t SW T Board Analog tuner DG Board Global tv signal processing Core GC2M GC2S Micom 64M SDRAM Sync SW BEE VIVA DV Board DVI I F receiver DVI HDMI select Audio DAC AD converter LVDS G Board Front AV Video 3 input PC input K Board Power SW Power LED Key SW P Board Power Supply BL Board Blue LED JA Board DT Board DG Board connection JG Board JPEG Interface 8 TU PT700U ...

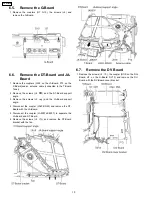
Page 9: ...e Shield cover and remove a coupler JG31 6 2 Remove the P Board 1 Remove the couplers P2 P10 P11 P13 P18 PF1 the screws 2 and remove the JA Board support angle 2 Remove the screws 4 and remove the P Board 6 3 Remove the K Board 1 Remove a coupler K12 the screws 3 and remove the K Board 6 4 Remove the BL Board 1 Remove a coupler BL1 the screws 2 and remove the BL Board 6 P C Board replacement metho...

Page 10: ...e DT Board support angle 3 Remove the screws 2 and the JA Board support angle 4 Disconnect the coupler JA23 DG23 and remove the DT Board with the JA Board 5 Disconnect the coupler JA8007 JK8007 to separate the JA Board and DT Board 6 Remove the screws 2 and remove the DT Board bracket with the fan 6 7 Remove the DV Board 1 Remove the screws 4 the coupler DG3 on the DG Board H7 on the H Board DV13 ...

Page 11: ... 1 Remove the screws 7 the couplers DG2 DG5 DG7 DG10 DG12 DG31 DV Board support angle and T Board support angle 2 Remove the DG Board with the H Board and T Board H Board T Board 1 Disconnect the coupler DG1 H1 and separate the DG Board and H Board with the T Board 2 Disconnect the couplers T21 H21 T22 H22 the tuner cable and remove the T Board from the H Board 11 TU PT700U ...

Page 12: ...7 Location of Lead Wiring 12 TU PT700U ...

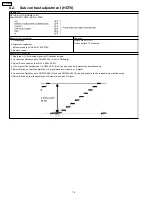
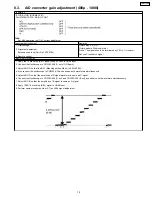
Page 13: ... bar Probe The signal should be terminated by 75W 1 resistor Not use Cross hatch signal Adjustment Procedures 1 Apply the 10 stair step B W signal to Composite video input 2 Connect the Oscilloscope to CN3303 A38 G out of G Board 3 Adjust Sub contrast so that the B W Blanking portion White is 0 60V 0 02V 4 Also connect the oscilloscope to CN3303 A34 R out and observe both waveforms simultaneously ...

Page 14: ... step signal to HD baseband signal 2 Connect the Oscilloscope to CN3303 A38 G out of DR Board 3 Adjust Sub contrast so that B W is 0 60V 0 02V 4 Also connect the oscilloscope to CN3303 A34 R out and observe both waveforms simultaneously 5 Adjust R drive so that the amplitude of R signal waveform is same as G signal 6 Connect the Oscilloscope to CN3303 A38 G out and CN3303 A36 B out and observe the...

Page 15: ...e 10 stair step B W signal 480p or 480i to HDMI input 2 Connect the Oscilloscope to CN3303 A38 G out of DR Board 3 Adjust ADC G so that the B W Blanking portion White is 0 53V 0 02V 4 Also connect the oscilloscope to CN3303 A34 and observe both waveforms simultaneously 5 Adjust ADC R so that the amplitude of R signal waveform is same as G signal 6 Connect the Oscilloscope to CN3303 A38 G out and C...

Page 16: ...to the normal screen Press any button on the unit or in the remote control Screen Display Display Ref No Description Board Remarks EEPROM IC002 EEPROM for Main MPU DG Receiver TNR1 TNR8000 Tuner1 DT Receiver BBE IC4203 BBE VIVA DG Receiver YUV_SW IC4302 YUV switch H Receiver DVI_TX IC5201 LVDS DV Receiver DVIDDC IC5001 DDC EEPROM DV Receiver IO_DR IC3304 DVI I F Reciver DR Display PANEL Panel Disp...

Page 17: ...es of the Power LED on the front panel of the unit Blinking times Point Circuit Board Parts 1 time 5V power supply trouble P IC7504 2 times SOS Power circuit P IC7501 IC7508 3 times DTV DTV circuit P IC404 4 times FAN SOS P IC7508 5 times Power start Note DV JK5003 pin24 Note Note When 5 times LED blinking happened power off and power on again it will recover Exchange or check the JK5003 pin24 whe...

Page 18: ...or Serviceman Mode may be used as a quick guide Quick Entry to Serviceman Mode At times when minor adjustments need to be done to the electronic controls the method of Entering the serviceman Mode without removal of the cabinet back is as follows using the Remote Control 1 Press the MENU button to display the Main menu select SET UP icon and then select the Program CH to set Cable only Input Setup...

Page 19: ...ontrol to select one of the available Service Adjustments and press the OK button Note Write Down the original value set for each address before modifying anything It is easy to erroneously adjust the wrong item 2 Press Volume Up Down on the Remote Control to adjust the level of the selected Service Adjustment 19 TU PT700U ...

Page 20: ...JPEG Service Mode Note To exit from JPEG Service mode press EXIT or power button on remote control 20 TU PT700U ...

Page 21: ...ower on the Digital media receiver 11 1 IIC mode Select the IIC mode by Up Down button channel on the remote control at the front page of CAT mode then press the OK button on the remote control IIC mode structure To exit the IIC mode press the EXIT or MENU button on the remote control 21 TU PT700U ...

Page 22: ... this version can be upgrade by 1 replace of new version IC 2 Loading the new version software from loader tool TZSC07036 Memory data change To exit the CD mode press the EXIT button on the remote control 11 3 SD mode Select the SD mode by Up Down channel button on the remote control at the front page of CAT mode then press the OK button on the remote control To exit the SD mode press the EXIT but...

Page 23: ...11 4 IIC mode structure following items value is sample data 23 TU PT700U ...

Page 24: ...24 TU PT700U ...

Reviews: