DE
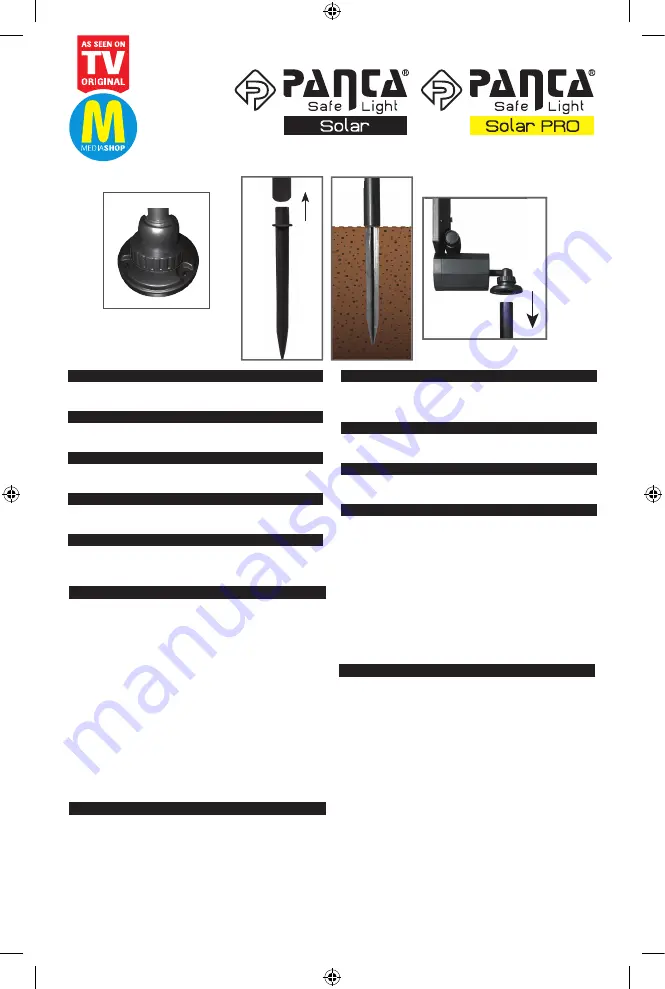
Boden-Montage: Vor der Montage stellen Sie sicher, dass die Montageplatte
am Schwenkarm befestigt ist. #A
1. Schieben Sie den Erdspieß in die Stange – fest hineindrücken, bis die
Enden aneinander liegen. #1
2. Fest in den Boden stecken.
ACHTUNG: Vor der Montage der Erdspieße im
Boden unbedingt sichergehen, dass der Erdboden weich ist. Harter Boden
kann die Halterungen beschädigen oder brechen. #2
3. Montageplatte auf die Stange setzen. #3
WICHTIG: Wählen Sie für das Gerät einen Ort mit tagsüber möglichst viel
Sonnenschein. Vermeiden Sie Bereiche unter Bäumen oder Büschen, da dies
eine ordnungsgemäße Aufladung des Geräts verhindert. Installieren Sie das
Gerät nicht in der Nähe einer vorhandenen Außenleuchte. Der eingebaute
Sensor verhindert das Einschalten des Solar-Lichts.
EN
Ground installation: Before installing, ensure that the mounting plate is
attached to the swivel arm.
1. Push the ground spike into the pole - push in firmly until the ends touch. #1
2. Stick firmly in the ground.
CAUTION: Make sure that the ground is soft
enough before installing the ground spikes. Harder ground surfaces can
damage or break the brackets. #2
3. Place the mounting plate on the rod. #3
IMPORTANT: Choose a location with as much sunshine as possible during
the day for the device. Avoid areas under trees or bushes, as these can
prevent the device from charging properly. Do not place the device in the
vicinity of an existing outdoor light. The built-in sensor will prevent the solar
light from being switched on.
FR
Montage au sol : Avant le montage, assurez-vous que le support de montage
est fixé au bras pivotant.
1. Insérez le piquet dans la tige - poussez fermement jusqu‘à ce que les
extrémités soient bien emboîtées. #1
2. Plantez le piquet fermement dans le sol.
ATTENTION : Avant de planter
les piquets dans le sol, assurez-vous que le sol est mou. Un sol dur risque
d‘endommager ou casser les piquets. #2
3. Posez le support de montage sur la tige. #3
IMPORTANT : placez l‘appareil dans un endroit le plus ensoleillé possible.
Évitez les endroits sous les arbres ou les buissons, car cela empêchera
l‘appareil de se charger correctement. N‘installez pas l‘appareil à proximité
d‘une lampe extérieure existante. Le capteur intégré empêche la lampe
solaire de s‘allumer.
ERDSPIESSE - 2er SET
#1
#2
#3
#A
DE
Lieferumfang: 2 x Erdspieß (Info: 1 Erdspieß besteht aus 2 Teilen) passend für Panta Safe
Light Solar und Panta Safe Light Solar PRO
EN
Package Contents: 2 x ground spikes (info: 1 ground spike consists of 2 parts) suitable for
Panta Safe Light Solar and Panta Safe Light Solar PRO
FR
Contenu de la livraison : 2 x piquets (info : 1 piquet est composé de 2 parties) compatibles
avec les lampes Panta Safe Light Solar et Panta Safe Light Solar PRO
IT
Fornitura: 2 picchetti da terra (info: 1 picchetto da terra è composto da 2 parti) adatte per
Panta Safe Light Solar e Panta Safe Light Solar PRO
NL
Leveringsomvang: 2 x grondpennen (ter informatie: 1 grondpen bestaat uit 2 delen)
geschikt voor Panta Safe Light Solar en Panta Safe Light Solar PRO
HU
A csomag tartalma: 2 db földbe szúrható nyárs (információ: 1 földbe szúrható nyárs 2
részből áll), amely illeszkedik a következő modellekhez: Panta Safe Light Solar és Panta
Safe Light Solar PRO
CZ
Obsah Balení: 2 x zemnicí hrot (Informace: 1 zemnicí hrot se skládá z 2 dílů) vhodný pro
Panta Safe Light Solar a Panta Safe Light Solar PRO
SK
Rozsah dodávky: 2 x zemný hrot (informácie: 1 zemný hrot sa skladá z 2 častí) vhodný pre
Panta Safe Light Solar a Panta Safe Light Solar PRO
RO
Pachetul de livrare: 2 x ţepuşe pentru sol (info: 1 ţepuşă pentru sol este formată din 2
părţi) adecvat pentru Panta Safe Light Solar şi Panta Safe Light Solar PRO
M29236_PantaSafeLightSolar_PRO_Upsell_Manual_20210311_CP.indd 1
M29236_PantaSafeLightSolar_PRO_Upsell_Manual_20210311_CP.indd 1
12.03.21 10:11
12.03.21 10:11


