background image

Hotwire

®

 TDM SDSL

Termination Units

Models 8777 and 8779

User’s Guide

Document No. 8700-A2-GB20-40

May 2002

Summary of Contents for Hotwire 8777

Page 1: ...Hotwire TDM SDSL Termination Units Models 8777 and 8779 User s Guide Document No 8700 A2 GB20 40 May 2002 ...

Page 2: ... needed For additional information concerning warranty sales service repair installation documentation training distributor locations or Paradyne worldwide office locations use one of the following methods Internet Visit the Paradyne World Wide Web site at www paradyne com Be sure to register your warranty at www paradyne com warranty Telephone Call our automated system to receive current informat...

Page 3: ...e MIB Support 1 4 SNMP Trap Support 1 4 2 Using the Asynchronous Terminal Interface User Interface Access 2 1 Management Serial Port Settings 2 1 Logging In to the Hotwire DSLAM 2 2 Initiating an ATI Session 2 2 Menu Hierarchy 2 4 Screen Work Areas 2 5 Navigating the Screens 2 6 Keyboard Keys 2 6 Function Keys 2 7 Switching Between Screen Work Areas 2 8 Ending an ATI Session 2 9 Exiting From the D...

Page 4: ...onnect Modes 4 4 Assigning Time Slots 4 5 5 IP Addressing Selecting an IP Addressing Scheme 5 1 Configurations Not Running IP Conservative Software 5 1 All Configurations 5 2 IP Addressing Example 5 2 6 Security Overview 6 1 ATI Access Levels 6 2 Creating a Login 6 3 Deleting a Login 6 4 Controlling SNMP Access 6 5 Assigning SNMP Community Names and Access Types 6 5 Limiting SNMP Access through th...

Page 5: ...he Test Menu 8 1 Running Network Tests 8 2 Network Line Loopback 8 4 Repeater Loopback 8 5 DTE Loopback 8 6 Remote Send Line Loopback 8 7 Send and Monitor 511 8 8 Device Tests 8 9 Lamp Test 8 9 Ending an Active Test 8 10 Telco Initiated Tests 8 11 Telco Initiated Line Loopback 8 11 Telco Initiated Payload Loopback 8 11 Telco Initiated Remote Line Loopback 8 12 9 Transferring Firmware and Configura...

Page 6: ...37 Configuring and Testing Inband Management A 39 B Standards Compliance for SNMP Traps SNMP Traps B 1 ifIndex B 1 warmStart B 2 authenticationFailure B 2 linkUp and linkDown B 2 Enterprise Specific Traps B 4 C Connector Pin Assignments Overview C 1 Front Panel 50 pin DTE Connector Pinouts C 1 8610 8620 and 8810 8820 DSLAM Telco 50 pin Connector Pinouts C 3 D Technical Specifications E Cross Conne...

Page 7: ... s features and capabilities Chapter 2 Using the Asynchronous Terminal Interface Provides instructions for accessing the user interface and navigating the screens Chapter 3 Initial Startup and Configuration Provides procedures for setting up the user interface and configuring the unit Chapter 4 Cross Connecting Ports Provides instructions for cross connecting the time slots of the DSL and DTE port...

Page 8: ... compliance information Appendix C Connector Pin Assignments Lists the pin assignments for the front panel DTE connector Appendix D Technical Specifications Contains physical and regulatory specifications network and port interfaces power consumption values and accessory part numbers Appendix E Cross Connection Worksheets Contains worksheets to help plan and configure cross connection of DTE and D...

Page 9: ...qualities Hotwire 2 wire TDM SDSL products transmit data over 14 000 feet 4 6 km at rates up to 2 048 Mbps Hotwire products support autorate Units first synchronize to the highest line rate that the 2 wire loop supports then automatically configures the unit to the highest multiple of 64 Kbps supported by that line rate Eight line rates are available At all rates an 8 Kbps management channel is av...

Page 10: ...nal interface for configuring and managing the unit locally or remotely by Telnet session Local Management Provides local management using the DSLAM management card with a Terminal or PC via the Management Serial port of the DSLAM Network Management System NMS via the Management MCC port of the DSLAM through the port card s 10BaseT port Remote Management Provides remote management Out of band usin...

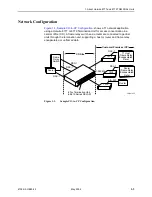
Page 11: ... A frame relay switch and a router are connected to partner units through the termination unit supporting a host or router and frame relay encapsulated or unframed data Figure 1 1 Sample CO to CP Configuration Frame Relay Switch Router T1 Host Frame Relay Encapsulated Data 00 16414 02 Router Frame Relay Encapsulated Data EIA 530 Router 1 544 Mb 87xx Termination Unit in 8610 Series DSLAM CO Site 79...

Page 12: ...and RFC 2863 was 1573 Defines the general objects for use with a network management protocol in TCP IP internets and provides general information about the unit MIB II is backward compatible with MIB I DS1 E1 MIB RFC 2495 was 1406 Reports the performance status of the DSX 1 or G 703 interface and supports the features found on the DSX 1 or G 703 Performance Statistics screen Entity MIB RFC 2037 Su...

Page 13: ...hronous terminal interface session can be active at a time and another user s session cannot be forced to end To automatically log out a user due to inactivity enable the Inactivity Timeout option see Table A 12 Telnet Session Options in Appendix A Configuration Options Security can limit ATI access in several ways To set up security or a login ID refer to Chapter 6 Security Management Serial Port...

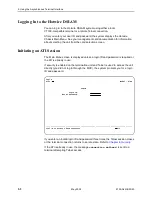
Page 14: ...ion The Main Menu screen is displayed unless a login ID and password is required or the ATI is already in use If security is enabled on the termination unit and Telnet is used to access the unit directly you did not log in through the MCC the system prompts you for a login ID and password If you enter an invalid login ID and password three times the Telnet session closes or the terminal connection...

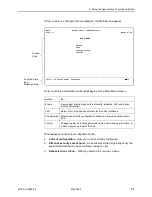
Page 15: ...face and each user Data selection criteria What you entered in previous screens main Access Level Administrator Slot 4 Model 87xx MAIN MENU Status Test Configuration Control Ctrl a to access these functions Exit Screen Area Function Keys and Message Area Select To Status View system status diagnostic test results statistics LED and device identity information Test Select start stop and cancel test...

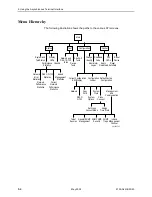
Page 16: ...ns Download Code Apply Download Port LEDs 02 16607 03 Reset AutoRate DSX 1 G 703 Statistics Reset Device Default Factory Configuration Configuration Loader Current Configuration Edit Display Network DSX 1 G 703 Copy Ports System Options Management and Communication Telnet Session General SNMP Management SNMP NMS Security SNMP Traps System Clock Cross Connect Set Cross Connect Mode Assign Time Slot...

Page 17: ... line that lists function keys specific to the screen field value choices and system messages displays the highest level alarm from the Health and Status screen main config network Slot 4 Model 87xx Port 3 NETWORK INTERFACE OPTIONS Port Status Enable Margin Threshold 3db Excessive Error Rate Threshold 1E 5 AutoRate Disable DSL Line Rate 1552 kbps EIA 530 Payload Rate 1536 kbps Transmit Attenuation...

Page 18: ...d messages area below the dotted line at the bottom of the screen Esc Return to the previous screen Tab Move cursor to the next field on the screen Backspace Move cursor to the previous field on the screen Enter Accept entry or display valid options on the last row of the screen when pressed before entering data or after entering invalid data Ctrl k Tab backwards move cursor one field to the left ...

Page 19: ...ng the spacebar to scroll through other valid values Press Enter to select the value Function Keys All function keys located below the dotted line operate the same way upper or lowercase throughout the screens For the screen function Select And press Enter to ClrFar F or f Clear far end network statistics and refresh the screen ClrNear N or n Clear near end network statistics and refresh the scree...

Page 20: ...he dotted line 2 Select either the function s designated underlined character or press the Tab key until you reach the desired function key Example To save the current options type s or S Save 3 Press Enter The function is performed 4 To return to the screen area above the dotted line press Ctrl a again main config network Slot 4 Model 87xx Port 2 NETWORK INTERFACE OPTIONS Margin Threshold 3db Exc...

Page 21: ...ess Enter If you have accessed the unit through the management card the Hotwire Chassis Card Selection menu appears Exiting From the DSLAM Session You can manually log out of the system or after five minutes of inactivity the system will automatically log you out Procedure To manually exit from the Hotwire DSLAM system 1 Return to the Hotwire Chassis Main Menu by selecting Exit from either the Hot...

Page 22: ...2 Using the Asynchronous Terminal Interface 2 10 May 2002 8700 A2 GB20 40 ...

Page 23: ... firmware These procedures include Entering Identity Information on page 3 2 Configuring the Unit on page 3 3 Accessing and Displaying Configuration Options on page 3 4 Configuration Options Current and Default Factory Configurations Configuration Loader Saving Configuration Options on page 3 9 Restoring Access to the User Interface on page 3 10 Resetting the Device on page 3 10 Disabling AutoRate...

Page 24: ...try fields are System Name The general SNMP system name System Location The physical location of the SNMP managed device System Contact Identification information such as contact name phone number or mailing address Valid entry values are any printable ASCII character ASCII printable characters include Numeric 0 9 Upper or lowercase A Z Space All ASCII symbols except the caret Select Clear to rese...

Page 25: ...the Configuration branch menu to display or change configuration option settings Configuration Options The termination unit is shipped with factory settings in the Default Factory Configuration area You can find default information by Referring to Appendix A Configuration Options Accessing the Configuration branch of the termination unit s menu The termination unit has two sets of configuration op...

Page 26: ...t Then Current Configuration The selected configuration option set is loaded and the Configuration Edit Display menu screen appears Configuration Loader The Configuration Loader screen is displayed allowing you to upload or download configurations from a TFTP server or the MCP Flash File System FFS Default Factory Configuration The factory set configuration option set is loaded and the Configurati...

Page 27: ...s menu selection sequence Main Menu Configuration Current Configuration or Main Menu Configuration Default Factory Configuration In the menu selection sequences contained in this manual Current Configuration is assumed and shown main config edit Slot 4 Model 87xx CONFIGURATION EDIT DISPLAY Network DSX 1 G 703 Copy Ports System Options System Clock Cross Connect Management and Communication Ctrl a ...

Page 28: ...ble A 6 DSL network and DTE interface ports by copying options from port to port System Options System Options Table A 7 General system options of the unit System Clock System Clock Options Table A 8 LTU system clock options Cross Connect Cross Connect Mode Options Model 8779 Table A 10 Assign Time Slots Options Table A 11 DS1 and DS0 cross connect ports Management and Communication Telnet Session...

Page 29: ...up to three characters The system will automatically upload the configuration file and create directories and filenames as needed UNIX machine If your server is hosted by a UNIX machine the configuration file you name must already exist It will not be created on the UNIX system by the TFTP server It is critical that you work with your system administrator to plan the naming conventions for directo...

Page 30: ...TFTP server destination is the DSL link port or IMC Internal Management Channel if the TFTP destination is the Management port of the MCC 5 Position the cursor at the Start Transfer field Use the spacebar to select Yes Press Enter When the data transfer is complete the Transfer Status field changes to Completed successfully 6 Position the cursor at the Activate new configuration prompt and select ...

Page 31: ...f the Telnet Session configuration option is changed a message displays on the Save Configuration screen warning that an answer of Yes will cause the Telnet session to disconnect Do not answer Yes unless you are prepared to disconnect If the DSL Mode configuration option is changed the Save Configuration screen bears the warning that an answer of Yes will cause the system to reset Do not answer Ye...

Page 32: ...ards Reset Slot 2 Enter DSLnn where nn is the slot number for the DSL card you wish to reset 3 Enter Reset 4 Enter Y if you want to clear NVRAM also otherwise enter N 5 Enter Y at the prompt to confirm NOTE When you enter Y all data connectivity is interrupted Resetting the Device If the user interface is functional and you would like to reset the card without removing the card from the DSLAM foll...

Page 33: ...es to Disable and the DSL Line Rate field appears 2 Enter a DSL Line Rate and press Enter Resetting AutoRate The Reset AutoRate function of the Control branch causes the unit to repeat the AutoRate sequence The unit attempts to establish the DSL link at the highest rate or the value of DSL Line Rate which represents the AutoRate ceiling when AutoRate is enabled If the link fails the next lower rat...

Page 34: ...nter the TFTP server IP address or M1 for the MCP FFS 3 For an LTU go to Step 4 For an NTU position the cursor in the Destination field Use the spacebar to select a network destination for the TFTP server Select one of the following DSL if the TFTP server destination is the EOC IMC if the TFTP destination is via the MCP 4 Position the cursor in the Immediately Apply Download field If you would lik...

Page 35: ...1 Press the Escape key to return to the Control menu Select Apply Download 2 On the Apply Download screen type Yes to reset the card and activate the code Selecting Yes causes the termination unit to reset NOTE The termination unit has two flash memory banks to hold executable firmware You can switch between these two firmware versions by applying the firmware listed on the Apply Download screen m...

Page 36: ...3 Initial Startup and Configuration 3 14 May 2002 8700 A2 GB20 40 ...

Page 37: ...n the Cross Connect Mode screen Define all DS1 Bypass ports Define all DS1 Cross Connect ports Define all DS0 Cross Connect ports On the Assign Time Slots screen configure the DS0 cross connections This chapter describes the use of the Cross Connect Mode and Assign Time Slots screens See Appendix A Configuration Options for information about configuration options presented on the other screens Exa...

Page 38: ...erface The entire DSL interface can be connected to any DSL or G 703 interface through cross connect circuitry Ports can be switched through software DS0 Cross Connect mode 8777 Any time slot of any DSX 1 interface can be connected to any time slot of any DSL interface Time slots can be individually allocated for voice or data DS0 Cross Connect mode 8779 Any time slot of any DSL interface can be c...

Page 39: ...s Connection Worksheets contains a skeleton diagram for this purpose It also contains worksheets for documenting your time slot cross connections before you begin to configure them DSX 1 G 703 DSL Port 1 Voice Data Port 1 DSX 1 G 703 DSL Port 2 Voice Data Port 2 DSX 1 G 703 DSL Port 3 Voice Data Port 3 DSX 1 G 703 DSL Port 4 Voice Data Port 4 DSX 1 G 703 DSL Port 5 Voice Data Port 5 DSX 1 G 703 DS...

Page 40: ...d 2 have been changed to DS0 Cross connect and Ports 3 8 have been changed to DS1 Bypass Unassigned appears next to Ports 1 and 2 because time slots associated with the cross connection have not yet been assigned main config xconnect_mode Slot 18 Model 8777 CROSS CONNECT MODE DSX 1 Port MODE DSL Port 1 DS0 Cross connect Unassigned 2 DS0 Cross connect Unassigned 3 DS1 Bypass 3 4 DS1 Bypass 4 5 DS1 ...

Page 41: ...Port Number 1 8 Time Slot 1 24 d Data or v Voice TS01 TS02 TS03 TS04 TS05 TS06 TS07 D 1 1 v D 2 1 v D 1 3 v D 2 3 v D 1 5 v D 2 5 v D 1 7 v TS08 TS09 TS10 TS11 TS12 TS13 TS14 D 2 7 v D 1 9 v D 2 9 v D 1 11 v D 2 11 v D 1 13 v D 2 13 v TS15 TS16 TS17 TS18 TS19 TS20 TS21 D 1 15 v D 2 15 v D 1 17 v D 2 17 v D 1 19 v D 2 19 v D 1 21 v TS22 TS23 TS24 D 2 21 v D 1 23 v D 2 23 v TS01 TS02 TS03 TS04 TS05 ...

Page 42: ... v D 1 09 v D 2 09 v D 1 11 v D 2 11 v D 1 13 v D 2 13 v TS15 TS16 TS17 TS18 TS19 TS20 TS21 D 1 15 v D 2 15 v D 1 17 v D 2 17 v D 1 19 v D 2 19 v D 1 21 v TS22 TS23 TS24 D 2 21 v D 1 23 v D 2 23 v Key D DSL X DSX 1 I IBMC d data v voice Ctrl a to access these functions ESC for previous menu MainMenu Exit Save Clear_All main config cross_connect timeslot Slot 18 Model 8777 ASSIGN TIME SLOTS DSX 1 P...

Page 43: ...ated with the cross connection have been assigned main config xconnect_mode Slot 18 Model 8777 CROSS CONNECT MODE DSX 1 Port MODE DSL Port 1 DS0 Cross connect 1 2 2 DS0 Cross connect 1 2 3 DS1 Bypass 3 4 DS1 Bypass 4 5 DS1 Bypass 5 6 DS1 Bypass 6 7 DS1 Bypass 7 8 DS1 Bypass 8 Assign_DS0s Ctrl a to access these functions ESC for previous menu MainMenu Exit Save Clear_All ...

Page 44: ...4 Cross Connecting Ports 4 8 May 2002 8700 A2 GB20 40 ...

Page 45: ... IP address of the LTU s Network Interface menu The termination unit is assigned an IP address and subnet through the DSLAM s Configuration DSL Cards Set IP Address menu Once the address is assigned you can use the ATI to assign Peer IP addresses to the DSL ports These addresses are used as the IP addresses of the remote units and must be in the same subnet as the DSLAM management card See Table A...

Page 46: ...that is needed to reach every device on a subnet The unit s routing table supports a maximum of 20 routes IP Addressing Example Figure 5 1 Peer IP Address Assignments shows IP addressing in a typical network Note that the Peer IP Address Refers to the IP address of the unit configured as an NTU Is assigned by the LTU Figure 5 1 Peer IP Address Assignments 99 16617 DSLAM DSLAM 79xx 79xx 79xx MCC Ba...

Page 47: ...lnet Login Required option Limit the access by setting a Session Access Level option of Operator for the Telnet Session Disable the access with the Telnet Session option See Table A 12 Telnet Session Options in Appendix A Configuration Options For information on configuring user accounts in IP Conservative mode see the Hotwire Management Communications Controller MCC Card IP Conservative User s Gu...

Page 48: ...r the login access level See Table A 12 Telnet Session Options in Appendix A Configuration Options When an access level of Operator is applied to Telnet sessions a Login ID with Administrator authority is effectively reduced to Operator It is no longer possible to change configuration options and full access can be restored only by reloading factory defaults See Restoring Access to the User Interf...

Page 49: ...is menu selection sequence Main Menu Control Administer Logins 2 Select New and press Enter The Login Entry screen is displayed main control admin_logins Slot 4 Model 87xx ADMINISTER LOGINS Page 1 of 1 Login ID newuser Access Level Administrator Are You Sure Yes ESC for previous menu MainMenu Exit Save PgUp PgDn New Delete main control admin_logins Slot 4 Model 87xx LOGIN ENTRY Login ID newuser Pa...

Page 50: ...leting a Login Procedure 1 To delete a login record follow this menu selection sequence Main Menu Control Administer Logins 2 Select PgUp or PgDn and press Enter to page through login pages records until you find the one to be deleted 3 Once the correct record is displayed select Delete and press Enter 4 To complete the delete action select Save and press Enter When the deletion is complete Comman...

Page 51: ...agement Options in Appendix A Configuration Options to Enable SNMP Management Assign the SNMP community names of the SNMP Managers that are allowed to access the unit s Management Information Base MIB Specify Read or Read Write access for each SNMP community name Limiting SNMP Access through the IP Addresses of the Managers The unit provides an additional level of security through validation of th...

Page 52: ...6 Security 6 6 May 2002 8700 A2 GB20 40 ...

Page 53: ...ge 7 2 Health and Status Messages Self Test Results Messages Test Status Messages Device Messages on page 7 10 Performance Statistics on page 7 11 Viewing Network Error Statistics Viewing Network Performance Statistics Viewing DSX 1 Performance Statistics Viewing DSX 1 Performance Statistics Viewing G 703 Performance Statistics Viewing LED Status on page 7 22 Front Panel LEDs on page 7 24 Changing...

Page 54: ...stic test run on the device itself Refer to Table 7 2 Self Test Results Messages Test Status Currently active tests Refer to Table 7 3 Test Status Messages main status system Slot 2 Model 87xx SYSTEM AND TEST STATUS Page 1 of 1 HEALTH AND STATUS SELF TEST RESULTS TEST STATUS LOS at Net Pt n CPU Failed No Test Active OOF at Net Pt n Device Failed LLB Test Active Pt n EER at Net Pt n Net DSL Failed ...

Page 55: ...unit to clear the condition and message Download Failed A firmware download was interrupted Ensure that the file exists on the TFTP server Repeat the download EER at DSX 1 Pt n An Excessive Error Rate EER condition has been detected on the DSX 1 interface 1 Verify the attached equipment coding is compatible 2 Verify the clock configuration 3 Contact network provider EER at G 703 Pt n An EER condit...

Page 56: ...F is declared when any three consecutive frame synchronization bits are incorrect frames not containing the frame alignment signal are received with an error three times consecutively or for CRC 4 framing CRC multiframe bit alignment fails 1 Verify that the network cable is securely attached at both ends 2 Verify that the units line framing and line coding are compatible with the attached equipmen...

Page 57: ...work provider to troubleshoot the line NTU LTU Mismatch Pt n The NTU is not compatible with the LTU Contact network provider NTU TS16 Not Supported The LTU is configured for TS16 signaling and the NTU is not configured to support TS16 signaling 1 Verify endpoint is a G 703 product EIA 530 A products do not support signaling 2 Replace endpoint or reconfigure TS16 to data OOF at Net P n An Out Of Fr...

Page 58: ...ce 1 Check the status of the attached device 2 Verify that the Line Coding Line Framing and Time Slot 16 configuration options selected are compatible with the connected G 703 equipment s configurations See G 703 Interface Options Model 8779 in Appendix A Configuration Options Secondary System Clock Failed A failure has occurred in the fallback clock for the system clock Contact your service repre...

Page 59: ...full data path test DeviceFailed One or more of the unit s integrated circuits has failed device level testing DSL Framer x Fail The DSL framer for Ports 1 4 Framer A or 5 8 Framer B failed DSL xcvr Fail Pt n The DSL transceiver failed on Port n DSX 1 Failed Pt n The unit failed to internally loop data on the DSX 1 Port n DTE Framer x Fail The DTE framer for Ports 1 4 Framer A or 5 8 Framer B fail...

Page 60: ...he unit failed memory data verification Test 1 or memory address verification Test 2 Passed No errors were detected No action is needed PLD Failed Pt n An error was detected in a Programmable Logic Device 1 Reset the unit and try again 2 Call your service representative for assistance TSI CPLD Fail The Complex Programmable Logic Device serving the Timeslot Interchanger failed TSI Fail The Timeslot...

Page 61: ...oopback test is active on Port n Lamp Test Active The Lamp Test is active causing the LEDs on the front panel to light LLB Test Active Pt n A network Line Loopback test is active on Port n No Test Active No tests are currently running Remote LLB Dn Active Pt n A Remote Line Loopback Down command is being sent Remote LLB Up Active Pt n A Remote Line Loopback Up command is being sent RLB Test Active...

Page 62: ...ction requested has successfully completed No action is needed Invalid Character x A nonprintable ASCII character x has been entered Re enter information using valid characters Invalid Password Login is required and an incorrect password was entered access is denied Try again Contact your system administrator to verify your password Invalid Send Pattern Already Active A pattern test was already in...

Page 63: ...n password combinations has been reached 1 Delete another login password combination 2 Re enter the new login ID No Security Records to Delete Delete was selected from the Administer Login screen and no security records had been defined No action is needed Enter a security record Password Matching Error Re enter Password Password entered in the Re enter Password field of the Administer Logins scre...

Page 64: ...rted by the remote equipment Maximum value is 900 Complete Whether the interval register contains data for all 900 seconds of the interval main status performance net_error Slot 4 Model 87xx Port 2 NETWORK ERROR STATISTICS Current Interval Timer 002 Error Events Counter 0034 ES SES FEBE Complete Near Far Near Far Near Far Near Far Current Int 000 000 000 000 000 000 Yes No Interval 01 000 000 000 ...

Page 65: ...isabled Interval xx Historical performance data for up to 96 15 minute intervals 24 hours When blank the port is disabled Worst Interval The number of the interval with the worst highest performance data for both the near and far end statistics If two or more intervals are equal the oldest interval is displayed When blank the port is disabled Near and Far Tot A running 24 hour total of the near an...

Page 66: ...gister contains data for all 900 seconds of the interval Fields on this screen include Field Contains Current Interval Timer The number of seconds which have elapsed in the current 15 minute interval Maximum value is 900 seconds 15 minutes This counter is reset every 15 minutes When zero the port is disabled Payload Rate The rate of data transfer DSL Line Rate The rate of the DSL line Current Int ...

Page 67: ... Errored Seconds Contains the number of bursty errored seconds for the current interval A bursty errored second is any second with more than one but less than 320 CRC errors Maximum value is 900 CSS Controlled Slip Seconds Seconds during which one or more controlled slips as defined in TR 54016 occurred Maximum value is 900 LOFC Loss of Frame Count Contains the number of times that an LOF is decla...

Page 68: ...t Interval Timer The number of seconds which have elapsed in the current 15 minute interval Maximum value is 900 seconds 15 minutes This counter is reset every 15 minutes When zero the port is disabled Error Events Counter A running total of CRC and OOF events Range 0 65535 This counter is reset when the statistics are cleared When zero the port is disabled Current Int Performance data for the cur...

Page 69: ...Errored Seconds Contains the number of bursty errored seconds for the current interval A bursty errored second is any second with more than one but less than 805 CRC error events CRC mode or more than one but less than 16 FAS errors non CRC mode Maximum value is 900 CSS Controlled Slip Seconds Seconds during which one or more controlled slips as defined in TR 54016 occurred LOF Loss of Frame Secon...

Page 70: ... number of seconds which have elapsed in the current 15 minute interval Maximum value is 900 seconds 15 minutes This counter resets every 15 minutes When zero the port is disabled Error Events Counter A running total of CRC errors Range 0 65535 This counter resets when the statistics are cleared When zero the port is disabled Current Interval Performance data for the current 15 minute interval Whe...

Page 71: ...aintain a Bit Error Rate BER of 10 6 or better XmtPw The transmit power level RxGn The receiver gain level The following Network Error Statistics are collected for the selected port ES Errored Seconds Seconds during which one or more ESF error events occurred SES Severely Errored Seconds Seconds during which more than 320 cyclic redundancy check CRC error events or at least one Out of Frame OOF ev...

Page 72: ...ce Statistics Inband Management Statistics Field Contains Current Interval Timer The number of seconds which have elapsed in the current 15 minute interval Maximum value is 900 seconds 15 minutes This counter is reset every 15 minutes When zero the port is disabled Payload Rate The rate of data transfer DSL Line Rate The rate of the DSL line main status performance inband Slot 4 Model 8779 INBAND ...

Page 73: ...n the IBMC the number of frames received from the DLCI and the number of frames received from the LMI 0 4 294 967 295 The counts of DLCI and LMI frames are not displayed if Inband Management Type is PPP RX Octets A count of the total number of octets received on the IBMC the number of octets received from the DLCI and the number of octets received from the LMI 0 4 294 967 295 The counts of DLCI an...

Page 74: ...Loop LEDs display the activity on the DSL network To view the Display LEDs status screen follow this menu selection sequence Main Menu Status Display LEDs The LED status display screen is updated every 5 seconds main status leds Slot 18 Model 87xx DISPLAY LEDs SYSTEM DSX 1 G 703 Port DSL LOOP Alarm Off P1 Link Up P1 Link Up Test Off P2 Link Up P2 Link Up P3 Link Up P3 Disabled P4 Link Up P4 Link U...

Page 75: ... Loss of Frame alignment The port has an Excessive Error Rate condition The port received a Yellow Alarm The port received an Alarm Indication Signal The port has been administratively disabled G 703 PORT P1 through P8 Link Up Link Down LOF EER RAI AIS Disabled Recoverable signal present on the G 703 network No signal on the port The port has a Loss of Frame alignment The port has an Excessive Err...

Page 76: ...ing normally Unit is in minimum mode and a download is required Alrm Amber On Off Device failure Power On Self Test POST is not complete or an alarm was reported on a DSL DSX 1 or G 703 port No alarms Test Amber On Off Slow Cycling Loopback test or 511 test pattern in progress No tests POST in progress PORTS when DSX 1 or G 703 selected 1 2 3 4 5 6 7 8 Green On Off Slow Cycling Fast Cycling Recove...

Page 77: ...een refer to Table 7 1 Health and Status Messages for the recommended action Table 7 6 Troubleshooting 1 of 2 Symptom Possible Cause Solutions Alarm LED is on A system failure has occurred Refer to Table 7 1 Health and Status Messages for recommended action Cannot access the unit via the ATI The terminal is not set up for the correct rate or data format or the unit is configured so it prevents acc...

Page 78: ... Chapter 8 Testing Stop the test or wait for the test to end Make sure the far end device is on Not receiving data on one or more time slots The DSL line rate does not support the number of DSL time slots defined Match the number of DSL time slots to the DSL line rate See Table A 2 Payload Rates and DSL Line Rates for Model 8777 Table A 3 Payload Rates and DSL Line Rates for G 703 for information ...

Page 79: ... 703 Tests Start and stop tests on the DSX 1 G 703 or network interface Device Tests Start and stop the Lamp Test Abort All Tests To abort current tests excluding network initiated loopback tests An aborted test may continue to run for a few seconds as the abort command is sent to the remote end and processed main test Slot 18 Model 87xx TEST Network DSX 1 G 703 Tests Device Tests Abort All Tests ...

Page 80: ...art Inactive 00 00 00 Remote Loopbacks Send Line Loopback Down Send Inactive 00 00 00 Pattern Tests Send and Monitor 511 Stop Active 10 12 42 Errors 99999 Ctrl a to access these functions ESC for previous menu MainMenu Exit ResetMon main test network_G703 Slot 4 Model 8779 Port 2 NETWORK G 703 TESTS Test Command Status Results Local Loopbacks Network Line Loopback Start Inactive 00 00 00 Network R...

Page 81: ...ayed when a test is Active Stop is displayed Position the cursor at the desired Start or Stop command and press Enter The Results column displays the test duration Selecting Abort All Tests from the Test menu will not disrupt a Send and Monitor 511 test When the Send and Monitor 511 test is active ResetMon is available to reset the error counter to zero ...

Page 82: ...onding DSX 1 port Procedure To run a Network Line Loopback 1 Position the cursor at the Start command next to Network Line Loopback on the Network DSX 1 or Network G 703 Tests screen 2 Press Enter The Start command is changed to Stop Status is changed to Active 3 To manually stop the test verify that the cursor is positioned at the Stop command 4 Press Enter Status is changed to Inactive The Netwo...

Page 83: ...rsor at the Start command next to Repeater Loopback on the Network DSX 1 or Network G 703 Tests screen 2 Press Enter The Start command is changed to Stop Status is changed to Active 3 To manually stop the test verify that the cursor is positioned at the Stop command 4 Press Enter Status is changed to Inactive A Repeater Loopback cannot be started when any other loopback test is in progress CAP DSL...

Page 84: ...ponding port and data received on the connected ports will be ignored Procedure To run a DTE Loopback 1 Position the cursor at the Start command next to DTE Loopback on the Network DSX 1 or Network G 703 Tests screen 2 Press Enter The Start command is changed to Stop Status is changed to Active 3 To manually stop the test verify that the cursor is positioned at the Stop command 4 Press Enter Statu...

Page 85: ...Network DSX 1 or Network G 703 Tests screen 2 Press the spacebar to select either Up or Down 3 Position the cursor at the Send command next to Up or Down selection 4 Press Enter The local unit stops sending the loopback command automatically after 10 seconds Status is changed to Sending for 10 seconds then back to Inactive The Remote Send Line Loopback cannot be started when any other loopback or ...

Page 86: ...Start command next to Send and Monitor 511 on the Network DSX 1 Tests screen or the Network G 703 Tests screen 2 Press Enter The Start command is changed to Stop 3 To manually stop the test verify that the cursor is positioned at the Stop command 4 Press Enter When a Send and Monitor 511 test is active a count of bit errors is displayed next to the test duration and the ResetMon virtual function k...

Page 87: ...operly Procedure To test the LEDs 1 Position the cursor at the Start command next to Lamp Test on the Device Tests screen 2 Press Enter The Start command is changed to Stop During the Lamp Test all LEDs blink simultaneously every second 3 To stop the Lamp Test position the cursor at the Stop command The LEDs are restored to their normal condition 4 Press Enter main test card Model 87xx DEVICE TEST...

Page 88: ...efault is 10 minutes Refer to Table A 7 System Options in Appendix A Configuration Options Command column Under the Command column on any test screen position the cursor at Stop next to the active test and press Enter to stop a specific test Abort All Tests menu selection Select Abort All Tests from the Test menu to stop all tests running on all interfaces Command Complete appears when all tests o...

Page 89: ...Initiated Payload Loopback Hotwire 8777 Termination Units support payload loopback as specified in AT T TR 54016 and ANSI T1 403 A Telco initiated line loopback loops the received signal on the DSX 1 interface back to the DSX 1 interface Framing CRC and FDL bits are regenerated at the point of the loopback and BPVs are removed DSL time slots mapped to the DSX 1 port are sent all ones Activation an...

Page 90: ...he remote unit and passes it back to the Telco through the local unit The following figure shows the data flow for a remote Telco initiated payload loopback Telco Initiated Remote Line Loopback cannot be used in cross connect mode CAP DSX 1 Port CAP T1 LIU Framer Framer Transceiver 99 16626 CAP CAP T1 LIU Framer Framer Transceiver Telco Local Remote DSX 1 Port AIS DSL ...

Page 91: ...low this menu selection sequence Main Menu Control Download Code main control download_code Slot 4 Model 87xx DOWNLOAD CODE Image File Name Clear TFTP Server IP Address IP 000 000 000 000 Clear Destination DSL1 Immediately Apply Download No Start Transfer Yes Packets Sent 0000000 Packets Received 0000000 Bytes Sent 0000000 Bytes Received 0000000 Transfer Status Transfer Pending Ctrl a to access th...

Page 92: ...ield Use the spacebar to select a network destination for the TFTP server 4 Position the cursor in the Immediately Apply Download field If you would like the download to be effective immediately select Yes 5 Position the cursor at the Start Transfer field Use the spacebar to select Yes Press Enter When the data transfer is complete If you selected Yes in Step 4 the card is reset If you selected No...

Page 93: ... the Control menu Select Apply Download 2 On the Apply Download screen type Yes to reset the card and activate the code Selecting Yes causes the termination unit to reset NOTE The termination unit has two flash memory banks to hold executable firmware You can switch between these two firmware versions by applying the firmware listed on the Apply Download screen ...

Page 94: ...nal suffix of up to three characters The system will automatically upload the configuration file and create directories and filenames as needed UNIX machine If your server is hosted by a UNIX machine the configuration file you name must already exist It will not be created on the UNIX system by the TFTP server It is critical that you work with your system administrator to plan the naming conventio...

Page 95: ...r destination is the DSL link port or IMC Internal Management Channel if the TFTP destination is the Management port of the MCC card 5 Position the cursor at the Start Transfer field Use the spacebar to select Yes Press Enter When the data transfer is complete the Transfer Status field changes to Completed successfully 6 Position the cursor at the Activate new configuration prompt and select Yes t...

Page 96: ...9 Transferring Firmware and Configurations Using TFTP 9 6 May 2002 8700 A2 GB20 40 ...

Page 97: ...y Ports Copy Port Options Table A 6 DSL network and DTE interface ports by copying options from port to port System Options System Options Table A 7 General system options of the unit System Clock System Clock Options Table A 8 System clock options Cross Connect Cross Connect Mode Options Model 8777 Table A 9 Cross Connect Mode Options Model 8779 Table A 10 Assign Time Slots Options Table A 11 DS1...

Page 98: ...red and used Enable The port can be configured and used Disable The port cannot be configured or used Margin Threshold Possible Settings 5db 4db 3db 2db 1db 0db 1db 2db 3db 4db 5db 6db 7db 8db 9db 10db Default Setting 0db Determines the level expressed in decibels at which a signal to noise margin condition is recognized 5db to 10db Sets the margin threshold to this value main config network Slot ...

Page 99: ...Setting 1552 Possible Settings Model 8779 144 272 400 528 784 1040 1552 2064 Default Setting 2064 Specifies the fixed line rate of the LTU when AutoRate is disabled See Table A 2 Payload Rates and DSL Line Rates for Model 8777 or Table A 3 Payload Rates and DSL Line Rates for G 703 for information about maximum payload rates for different DSL line rate DSL Line Rate is only available when the unit...

Page 100: ...d 64 2048 The synchronous port speed of the remote NTU in Kbps Transmit Attenuation Possible Settings 0dB 15dB Default Setting 0dB Determines how much the unit s transmit power is reduced to accommodate a short line length 0dB The full transmit power is used no attenuation 1dB 15dB The unit s transmit power is reduced by the specified amount Peer IP Address LTU Possible Settings 001 000 000 000 22...

Page 101: ...only when the unit is configured as an LTU and only when the port is in a DS0 cross connect ESF ESF framing formatting is used for transmitted and received data over the DSL Interface D4 D4 framing format is used for transmitted and received data over the DSL Interface Circuit Identifier Possible Settings ASCII text field Default Setting blank Uniquely identifies the circuit number of the transmis...

Page 102: ...load Rate Kbps Time Slots 2064 1920 30 1984 31 1920 1984 2048 30 31 32 1552 1408 22 1472 23 1536 24 1040 896 14 960 15 960 1024 15 16 784 640 10 704 11 576 640 768 9 10 12 528 384 6 448 7 448 512 7 8 400 256 4 320 5 320 384 5 6 272 128 2 192 3 192 256 3 4 144 N A N A 64 1 64 128 1 2 For firmware versions N2 03 05 and below the payload rate is only selectable at a DSL line rate of 144 Kbps while al...

Page 103: ...ation fields for the port are inaccessible no alarms or traps associated with the port are generated and the LED associated with the port is OFF NOTE Cross connections are not cleared when a port is disabled Line Coding Format Possible Settings AMI B8ZS Default Setting B8ZS Specifies the line coding format to be used by the DSX 1 interface AMI Indicates the line coding format used by the DSX 1 int...

Page 104: ...rovides equalization for a cable length up to 266 feet 266 399 feet Provides equalization for a cable length up to 399 feet 399 533 feet Provides equalization for a cable length up to 533 feet 533 655 feet Provides equalization for a cable length up to 655 feet Excessive Error Rate Threshold Possible Settings 1E 4 1E 5 1E 6 1E 7 1E 8 1E 9 Default Setting 1E 4 Determines the error rate at which an ...

Page 105: ...can be configured and used This field is read only when the port is configured as the inband management port Enable The port can be configured and used Disable The port cannot be configured or used Configuration fields for the port are inaccessible no alarms or traps associated with the port are generated and the LED associated with the port is OFF NOTE Cross connections are not cleared when a por...

Page 106: ...le Settings CRC4 noCRC4 Default Setting noCRC4 Specifies the framing format to be used by the G 703 interface Line Framing is only available when the unit is configured as an LTU The NTU is automatically configured to match the framing format used by the LTU CRC4 CRC4 framing formatting is used for transmitted and received data over the G 703 Interface noCRC4 Non CRC4 framing format is used for tr...

Page 107: ...primary clock source for the unit in Bypass mode Primary Clock Source is available only when the unit is configured as an LTU When configured as an NTU the clock source is derived from the DSL Internal Timing is derived from the internal oscillator G 703 Timing is derived from the G 703 interface Table A 5 G 703 Interface Options Model 8779 3 of 3 ...

Page 108: ... Controls the source of the configuration options 1 8 The configuration of the selected port is copied To Port y Possible Settings 1 2 3 4 5 6 7 8 All Default Setting 1 Controls the target of the configuration options 1 8 The configuration of the selected port is replaced If Perform Copy Then Increment is selected the port number is incremented by 1 after the copy All The configurations of all por...

Page 109: ... PPP link NOTE Changing this option will reset the card Test Timeout Possible Settings Enable Disable Default Setting Enable Allows tests to end automatically The feature should be enabled when the unit is remotely managed so that control can be regained after a test is accidentally executed Enable Loopback and pattern tests end when test duration is reached Disable Tests run until manually termin...

Page 110: ...o Telco loopback commands Disable The unit will not respond to Telco loopback commands Remote Telco Line Loopback Model 8777 Possible Settings Enable Disable Default Setting Disable Determines if the unit will perform a Telco initiated loopback on just the local unit or if the loopback will be performed on the remote DSL unit See Telco Initiated Tests in Chapter 8 Testing Enable The loopback will ...

Page 111: ...03 interface which is generating timing or from the internal oscillator on the card providing a Stratum 4 reference Typically the primary clock source is a DSX 1 G 703 port which is being used in a cross connection The LTU secondary clock sources are restricted to G 703 ports configured for Bypass mode On an LTU when the system clock is configured for something other than internal DSX 1 G 703 port...

Page 112: ...nerate timing which is consistent with the last clock reference A switch is made back to the primary clock when it becomes available Holdover mode is meant to be used for short durations while network synchronization is temporarily disrupted The switch back to primary secondary clock is made when they become available again Figure A 1 System Timing shows clocking in an LTU Figure A 1 System Timing...

Page 113: ...DSL Port 6 DSL Port 7 DSL Port 8 DS1 Bypass DS1 Bypass NTU DS0 or DS1 Cross Connect G 703 Port 1 G 703 Port 2 G 703 Port 3 G 703 Port 4 G 703 Port 5 G 703 Port 6 G 703 Port 7 G 703 Port 8 Stratum 1 Clock DS1 Bypass DS1 Bypass LTU DSL Port 1 DSL Port 2 DSL Port 3 DSL Port 4 DSL Port 5 DSL Port 6 DSL Port 7 DSL Port 8 DS1 Bypass DS1 Bypass NTU 02 16650 01 Stratum 3 Clock System Clock Configuration P...

Page 114: ... NOTE If the G 703 port is configured for Bypass mode the Primary Clock Source configuration option on the G 703 Interface Options screen must be set to G 703 not Internal see Table A 5 All ports configured as system clock sources must be traceable to the same clock reference DSL Port n Timing is derived from the specified port The port must be enabled and in a cross connection Internal Timing is ...

Page 115: ...u selection sequence Main Menu Configuration Current Configuration Cross Connect Select Set Cross Connect Mode to configure the cross connect mode for each port Assign Time Slots to assign time slots for each cross connected port main config cross_connect Slot 18 Model 87xx CROSS CONNECT CONFIGURATION Set Cross Connect Mode Assign Time Slots Ctrl a to access these functions ESC for previous menu M...

Page 116: ... To access the Set Cross Connect Mode screen follow this menu selection sequence Main Menu Configuration Current Configuration Cross Connect Set Cross Connect Mode The following screen is displayed for Model 8777 main config xconnect_mode Slot 18 Model 8777 CROSS CONNECT MODE DSX 1 Port MODE DSL Port 1 DS1 Bypass 1 2 DS1 Bypass 2 3 DS1 Bypass 3 4 DS1 Bypass 4 5 DS1 Bypass 5 6 DS1 Bypass 6 7 DS1 By...

Page 117: ... Cross Connect All DSL port numbers and time slot assignments are cleared For information about the cross connection system see Chapter 4 Cross Connecting Ports main config xconnect_mode Slot 18 Model 8779 CROSS CONNECT MODE Source Destination G 703 MODE DSL 1 DS1 Bypass 1 2 DS1 Bypass 2 3 DS1 Bypass 3 4 DS1 Bypass 4 5 DS1 Bypass 5 6 DS1 Bypass 6 7 DS1 Bypass 7 8 DS1 Bypass 8 Assign_DS0s Ctrl a to...

Page 118: ...ss connect Individual time slots of the DSX 1 interface may be connected to any time slot of any of the DSL interfaces Unassigned None of the time slots associated with the port are assigned Disabled The DSX 1 port is disabled No time slot assignments can be made to the port To enable the port use the DSX 1 Interface screen This value is displayed but cannot be entered DSL Port Possible Settings 1...

Page 119: ... Individual time slots of the G 703 or DSL interface may be connected to any time slot of any of the interfaces configured for DS0 cross connect Unassigned None of the time slots associated with the port are assigned Disabled The G 703 port is disabled No time slot assignments can be made to the port To enable the port use the G 703 Interface screen This value is displayed but cannot be entered Un...

Page 120: ...4 TS05 TS06 TS07 D d D d D d D d D d D d D d TS08 TS09 TS10 TS11 TS12 TS13 TS14 D d D d D d D d D d D d D d TS15 TS16 TS17 TS18 TS19 TS20 TS21 D d D d D d D d D d D d D d TS22 TS23 TS24 D d D d D d Key D DSL X DSX 1 d data v voice Ctrl a to access these functions ESC for previous menu MainMenu Exit Save Clear_All main config cross_connect timeslot Slot 18 Model 8779 ASSIGN TIME SLOTS G 703 Port 1 ...

Page 121: ...L time slots is the DSL line rate divided by 64 rounded down to a whole number See Table A 2 Payload Rates and DSL Line Rates for Model 8777 and Table A 3 Payload Rates and DSL Line Rates for G 703 for more information on available time slots at different DSL line rates main config cross_connect timeslot Slot 18 Model 87xx ASSIGN TIME SLOTS DSL Port 1 DSOs to Allocate Start TS Assign To D TS01 TS0...

Page 122: ...ngs Model 8779 D G Default Setting D Shows the type of port to which this time slot is connected D The time slot is connected to a DSL port G The time slot is connected to a G 703 port Model 8779 X The time slot is connected to a DSX 1 port Model 8777 I Model 8779 only The time slot is connected to an Inband Management Channel IBMC read only Port Possible Settings 1 8 Default Setting Blank Selects...

Page 123: ...lot specified in the DS0s to Allocate and Start TS options to a Port Type and Data or Voice setting After the time slot is assigned the Data or Voice setting can be changed D The time slot is assigned to a DSL port G The time slot is assigned to a G 703 port Model 8779 X The time slot is assigned to a DSX 1 port Model 8777 Time Slot Number Possible Settings Model 8777 1 24 Default Setting Blank Po...

Page 124: ...these options determine what level of security to apply to the session to control access Only one Telnet session is allowed at a time Initial values are determined by the configuration you currently have loaded NOTE Telnet Session is only available for IP Complex systems To access the Telnet Sessions Options screen follow this menu selection sequence Main Menu Configuration Current Configuration M...

Page 125: ...ng Administrator The Telnet session access level is interrelated with the access level of the Login ID Refer to ATI Access Levels in Chapter 6 Security for more information Administrator This is the higher access level permitting full control of the 87xx Termination Unit Access level is determined by the Login ID If Telnet Login Required is disabled the session access level is Administrator Operat...

Page 126: ...g in IP Conservative mode Table A 13 General SNMP Management Options 1 of 2 SNMP Management Possible Settings Enable Disable Default Setting Enable Enable or disables the SNMP management features Enable Enables SNMP management capabilities Disable Disables SNMP management capabilities main config management SNMP Slot 4 Model 87xx GENERAL SNMP MANAGEMENT OPTIONS SNMP Management Enable Community Nam...

Page 127: ...mode Read Allows read only access get for Community Name 1 Read Write Allows read write access get for Community Name 1 Community Name 2 Possible Settings ASCII text field Default Text null string Identifies the name of the second community allowed to access the unit s MIB The community name must be supplied by an external SNMP manager when that manager attempts to access an object in the MIB This...

Page 128: ...ent security Slot 4 Model 87xx SNMP NMS SECURITY OPTIONS NMS IP Validation Enable Number of Managers 5 NMS 1 IP Address 135 014 040 001 Clear Access Type Read Write NMS 2 IP Address 135 014 003 027 Clear Access Type Read Write NMS 3 IP Address 135 014 001 008 Clear Access Type Read NMS 4 IP Address 135 014 002 024 Clear Access Type Read NMS 5 IP Address 204 128 146 035 Clear Access Type Read Ctrl ...

Page 129: ...s An NMS IP address is required for each manager NMS n IP Address Possible Settings 001 000 000 000 223 255 255 255 Clear Default Setting 000 000 000 000 Specifies the Internet Protocol address used to identify each SNMP manager 001 000 000 000 223 255 255 255 Enter an address for each SNMP manager The range for the first byte is 001 to 223 with the exception of 127 The range for the remaining thr...

Page 130: ...ified Select the type of SNMP traps to be sent from the unit To access the SNMP Traps Options screen follow this menu selection sequence Main Menu Configuration Current Configuration Management and Communication SNMP Traps main config management trap Slot 4 Model 87xx SNMP TRAPS OPTIONS SNMP Traps Enable Number of Trap Managers 9 NMS 1 IP Address 135 014 040 001 Clear NMS 2 IP Address 135 014 003 ...

Page 131: ...00 000 Specifies the Internet Protocol address used to identify each SNMP trap manager NMS n IP Address is not available when the unit is running in IP Conservative mode 001 000 000 000 223 255 255 255 Enter an address for each SNMP trap manager The range for the first byte is 001 to 223 with the exception of 127 The range for the remaining three bytes is 000 to 255 Clear Clears the IP address and...

Page 132: ...etting Both Determines if SNMP traps are generated for link up and link down for one of the communication interfaces Disable No linkUp or linkDown SNMP traps are generated Up A linkUp trap is generated when the unit recognizes that one of the communication interfaces is operational Down A linkDown trap is generated when the unit recognizes a failure in one of the communication interfaces Both Send...

Page 133: ...n Inband Management Channel NOTE Inband Management Channel is only available for Model 8779 Termination Units configured as an LTU main config management inband Slot 4 Model 8779 INBAND MANAGEMENT CHANNEL Inband Management Select Enable Inband Management Type PPP Inband Management Port 1 Inband Management Time Slot 1 Inband Management DLCI 16 Inband Management LMI Standard Ctrl a to access these f...

Page 134: ...anagement Port Possible Settings 1 8 Default Setting 1 Selects the G 703 port for the Inband Management Channel Only ports configured for DS0 cross connection or Unassigned are eligible for inband management Inband Management Time Slot Possible Settings 1 15 or 17 31 Default Setting 1 Selects the G 703 time slot for the Inband Management Channel Inband Management DLCI Possible Settings 16 1007 Def...

Page 135: ...ter 2 Configure the MCP card for inband management using a console session not Telnet session From the MCP card follow this menu selection sequence Main Menu Configuration Ports Ethernet Port The Ethernet Ports screen appears 3 Enter Internal for Management Port Type and the slot number of the 8779 unit to be tested for Management Port Card Slot Then Enter yes to reset the port and save your chang...

Page 136: ... 18 Model 8779 CROSS CONNECT MODE Source Destination G 703 MODE DSL 1 DS0 Cross connect Unassigned 2 DS0 Cross connect Unassigned 3 DS0 Cross connect Unassigned 4 DS0 Cross connect Unassigned 5 DS0 Cross connect Unassigned 6 DS0 Cross connect Unassigned 7 DS0 Cross connect Unassigned 8 DS0 Cross connect Unassigned Assign_DS0s Ctrl a to access these functions ESC for previous menu MainMenu Exit Sav...

Page 137: ...uration 1 Connect the G 703 port to the MUX DCAS to be used in the test 2 Configure the upstream router for PPP mode The router s WAN port should be configured on the same IP address segment as the MCP card main config cross_connect timeslot Slot 18 Model 8779 ASSIGN TIME SLOTS G 703 Port 1 DSOs to Allocate Start TS Assign To D TS01 TS02 TS03 TS04 TS05 TS06 TS07 I D D D D D D TS08 TS09 TS10 TS11 T...

Page 138: ...orm Telnet to the MCP card and verify that you can navigate through the DSLAM From the management platform FTP a firmware file to an external TFTP server on your network From the 8779 unit download the configuration file to an external TFTP server on your network If an SNMP trap manager is available generate a trap and verify that the trap was received by the trap manager If OpenLane Service Level...

Page 139: ...Specific Traps on page B 4 ifIndex The object ifIndex is a variable binding for several traps The following ifIndex values are supported for Hotwire 87xx TDM SDSL Termination Units For a unit defined as an LTU running IP Conservative software or a unit not running IP Conservative software all traps have at a minimum a variable binding of the Overloaded ifIndex OI The formula for the OI is LTU Slot...

Page 140: ...communication interface is not operational The network and synchronous port interfaces physical sublayer are represented by an entry in the MIB II interfaces table and supported by the DS1 MIB SNMP Trap Description Possible Cause warmStart The unit has reinitialized itself The trap is sent after the unit resets and stabilizes No variable bindings Reset command Power disruption SNMP Trap Descriptio...

Page 141: ... 2863 This object specifies the operational state of the interface up 1 DSL Port DSL link is established and no alarms exist DSX 1 or G 703 Port No alarm conditions exist EOC Based on the state of the link layer protocol down 2 DSL Port DSL link is not established or alarms exist DSX 1 or G 703 Port Alarm condition exists EOC Based on the state of the link layer protocol testing 3 DSL DSX 1 or G 7...

Page 142: ...or more of the unit s hardware components enterpriseDeviceFail 3 An internal device failure No variable bindings Operating software has detected an internal device failure enterpriseSecondaryClock Fail 4 The unit has lost its secondary clock source No variable bindings Hardware failure in the unit or the clock source enterpriseTestStart 5 A test is running Variable bindings devSelfTestResults ifIn...

Page 143: ...enterpriseSecondaryClock FailClear 104 The LTU has recovered and is using its secondary clock source No variable bindings enterpriseTestStop 105 All tests have been halted Variable bindings ifIndex RFC 2863 ifAdminStatus RFC 2863 ifOperStatus RFC 2863 ifType RFC 2863 ifTestType RFC 2863 All tests on an interface have been stopped by timeout or an Abort All Tests command enterpriseFallback AutoRate...

Page 144: ...1 test testSendLLBUp 7 Initiates an LLB Up message to the remote unit testSendLLBDown 8 Initiates an LLB Down message to the remote unit enterpriseTest Start Any one of the following tests is active on the interface Line Loopback Repeater Loopback Remote Line Loopback Send and Monitor 511 enterpriseTest Stop No tests currently running on the interface DSX 1 or G 703 ifIndex RFC 2863 ifAdminStatus ...

Page 145: ...ion unit provide the 4 wire DSX 1 or G 703 interface from each DSL port to the DTE The following table lists the pin assignments for each of these interfaces Table C 1 Front Panel DTE Connector Pinouts 1 of 2 DSX 1 or G 703 Port 50 Pin Connector Pinout Function Port 1 27 Data Out Ring 2 Data Out Tip 26 Data In Tip 1 Data In Ring Port 2 30 Data Out Ring 5 Data Out Tip 29 Data In Tip 4 Data In Ring ...

Page 146: ...ta Out Tip 38 Data In Tip 13 Data In Ring Port 6 42 Data Out Ring 17 Data Out Tip 41 Data In Tip 16 Data In Ring Port 7 45 Data Out Ring 20 Data Out Tip 44 Data In Tip 19 Data In Ring Port 8 48 Data Out Ring 23 Data Out Tip 47 Data In Tip 22 Data In Ring Table C 1 Front Panel DTE Connector Pinouts 2 of 2 DSX 1 or G 703 Port 50 Pin Connector Pinout Function ...

Page 147: ... 8820 DSLAMs provide the 2 wire loop interface from each DSL port to either the POTS splitter shelf or if the loop is not being shared with POTS then to the Main Distribution Frame MDF The following table lists the pin assignments for each of these interfaces Table C 2 Rear Connector Pinouts Port Connector Pins Tip Ring Port 1 1 26 Port 2 2 27 Port 3 3 28 Port 4 4 29 Port 5 5 30 Port 6 6 31 Port 7...

Page 148: ...C Connector Pin Assignments C 4 May 2002 8700 A2 GB20 40 ...

Page 149: ...o the equipment s label for approvals on product Power The termination unit contains a DC to DC converter that requires 48V power input The 48V power is distributed through the Hotwire DSLAM backplane Maximum Power Dissipation 27 watts Result 92 12 Btu hr Physical Environment Operating temperature Storage temperature Relative humidity Shock and vibration 0 to 50 C 32 to 122 F 20 C to 70 C 4 F to 1...

Page 150: ...D Technical Specifications D 2 May 2002 8700 A2 GB20 40 ...

Page 151: ...ction from the viewpoint of the DSX 1 or G 703 ports or the associated DSL ports The unit can be configured using either viewpoint so it may not be necessary or useful to fill in all the worksheets Use the completed port connection diagram and time slot assignment worksheets to configure the cross connection using the Cross Connect Mode and Assign Time Slots screens See Chapter 4 Cross Connecting ...

Page 152: ...oss Connect See Determining the Configuration in Chapter 4 Cross Connecting Ports for a sample completed port connection diagram DSX 1 G 703 DSL Port 1 Voice Data Port 1 DSX 1 G 703 DSL Port 2 Voice Data Port 2 DSX 1 G 703 DSL Port 3 Voice Data Port 3 DSX 1 G 703 DSL Port 4 Voice Data Port 4 DSX 1 G 703 DSL Port 5 Voice Data Port 5 DSX 1 G 703 DSL Port 6 Voice Data Port 6 DSX 1 G 703 DSL Port 7 Vo...

Page 153: ... DSX 1 Port 1 Time Slot Assignments DSX 1 Port 2 TS01 Port Type D DSL X DSX 1 Port Number 1 8 Time Slot 1 24 d Data or v Voice TS01 TS02 TS03 TS04 TS05 TS06 TS07 D D D D D D D TS08 TS09 TS10 TS11 TS12 TS13 TS14 D D D D D D D TS15 TS16 TS17 TS18 TS19 TS20 TS21 D D D D D D D TS22 TS23 TS24 D D D TS01 TS02 TS03 TS04 TS05 TS06 TS07 D D D D D D D TS08 TS09 TS10 TS11 TS12 TS13 TS14 D D D D D D D TS15 TS...

Page 154: ...1 8 Time Slot 1 24 d Data or v Voice TS01 TS02 TS03 TS04 TS05 TS06 TS07 D D D D D D D TS08 TS09 TS10 TS11 TS12 TS13 TS14 D D D D D D D TS15 TS16 TS17 TS18 TS19 TS20 TS21 D D D D D D D TS22 TS23 TS24 D D D TS01 TS02 TS03 TS04 TS05 TS06 TS07 D D D D D D D TS08 TS09 TS10 TS11 TS12 TS13 TS14 D D D D D D D TS15 TS16 TS17 TS18 TS19 TS20 TS21 D D D D D D D TS22 TS23 TS24 D D D ...

Page 155: ...1 8 Time Slot 1 24 d Data or v Voice TS01 TS02 TS03 TS04 TS05 TS06 TS07 D D D D D D D TS08 TS09 TS10 TS11 TS12 TS13 TS14 D D D D D D D TS15 TS16 TS17 TS18 TS19 TS20 TS21 D D D D D D D TS22 TS23 TS24 D D D TS01 TS02 TS03 TS04 TS05 TS06 TS07 D D D D D D D TS08 TS09 TS10 TS11 TS12 TS13 TS14 D D D D D D D TS15 TS16 TS17 TS18 TS19 TS20 TS21 D D D D D D D TS22 TS23 TS24 D D D ...

Page 156: ...1 8 Time Slot 1 24 d Data or v Voice TS01 TS02 TS03 TS04 TS05 TS06 TS07 D D D D D D D TS08 TS09 TS10 TS11 TS12 TS13 TS14 D D D D D D D TS15 TS16 TS17 TS18 TS19 TS20 TS21 D D D D D D D TS22 TS23 TS24 D D D TS01 TS02 TS03 TS04 TS05 TS06 TS07 D D D D D D D TS08 TS09 TS10 TS11 TS12 TS13 TS14 D D D D D D D TS15 TS16 TS17 TS18 TS19 TS20 TS21 D D D D D D D TS22 TS23 TS24 D D D ...

Page 157: ...8 Time Slot 1 24 d Data or v Voice TS01 TS02 TS03 TS04 TS05 TS06 TS07 X X X X X X X TS08 TS09 TS10 TS11 TS12 TS13 TS14 X X X X X X X TS15 TS16 TS17 TS18 TS19 TS20 TS21 X X X X X X X TS22 TS23 TS24 X X X TS01 TS02 TS03 TS04 TS05 TS06 TS07 X X X X X X X TS08 TS09 TS10 TS11 TS12 TS13 TS14 X X X X X X X TS15 TS16 TS17 TS18 TS19 TS20 TS21 X X X X X X X TS22 TS23 TS24 X X X ...

Page 158: ...8 Time Slot 1 24 d Data or v Voice TS01 TS02 TS03 TS04 TS05 TS06 TS07 X X X X X X X TS08 TS09 TS10 TS11 TS12 TS13 TS14 X X X X X X X TS15 TS16 TS17 TS18 TS19 TS20 TS21 X X X X X X X TS22 TS23 TS24 X X X TS01 TS02 TS03 TS04 TS05 TS06 TS07 X X X X X X X TS08 TS09 TS10 TS11 TS12 TS13 TS14 X X X X X X X TS15 TS16 TS17 TS18 TS19 TS20 TS21 X X X X X X X TS22 TS23 TS24 X X X ...

Page 159: ...8 Time Slot 1 24 d Data or v Voice TS01 TS02 TS03 TS04 TS05 TS06 TS07 X X X X X X X TS08 TS09 TS10 TS11 TS12 TS13 TS14 X X X X X X X TS15 TS16 TS17 TS18 TS19 TS20 TS21 X X X X X X X TS22 TS23 TS24 X X X TS01 TS02 TS03 TS04 TS05 TS06 TS07 X X X X X X X TS08 TS09 TS10 TS11 TS12 TS13 TS14 X X X X X X X TS15 TS16 TS17 TS18 TS19 TS20 TS21 X X X X X X X TS22 TS23 TS24 X X X ...

Page 160: ...8 Time Slot 1 24 d Data or v Voice TS01 TS02 TS03 TS04 TS05 TS06 TS07 X X X X X X X TS08 TS09 TS10 TS11 TS12 TS13 TS14 X X X X X X X TS15 TS16 TS17 TS18 TS19 TS20 TS21 X X X X X X X TS22 TS23 TS24 X X X TS01 TS02 TS03 TS04 TS05 TS06 TS07 X X X X X X X TS08 TS09 TS10 TS11 TS12 TS13 TS14 X X X X X X X TS15 TS16 TS17 TS18 TS19 TS20 TS21 X X X X X X X TS22 TS23 TS24 X X X ...

Page 161: ...ing CAS Time Slot 16 is used for signaling and is unavailable for cross connection When a G 703 port is configured for Common Channel Signaling CCS in a DS0 Cross Connect the user must cross connect Time Slot 16 and any associated time slots TS01 Port Type D DSL G G 703 I IBMC Port Number 1 8 Time Slot 1 31 d Data or v Voice TS01 TS02 TS03 TS04 TS05 TS06 TS07 D D D D D D D TS08 TS09 TS10 TS11 TS12...

Page 162: ...703 port is configured for CCS in a DS0 Cross Connect the user must cross connect Time Slot 16 and any associated time slots TS01 Port Type D DSL G G 703 I IBMC Port Number 1 8 Time Slot 1 31 d Data or v Voice TS01 TS02 TS03 TS04 TS05 TS06 TS07 D D D D D D D TS08 TS09 TS10 TS11 TS12 TS13 TS14 D D D D D D D TS15 TS16 TS17 TS18 TS19 TS20 TS21 D D D D D D D TS22 TS23 TS24 TS25 TS26 TS27 TS28 D D D D ...

Page 163: ...703 port is configured for CCS in a DS0 Cross Connect the user must cross connect Time Slot 16 and any associated time slots TS01 Port Type D DSL G G 703 I IBMC Port Number 1 8 Time Slot 1 31 d Data or v Voice TS01 TS02 TS03 TS04 TS05 TS06 TS07 D D D D D D D TS08 TS09 TS10 TS11 TS12 TS13 TS14 D D D D D D D TS15 TS16 TS17 TS18 TS19 TS20 TS21 D D D D D D D TS22 TS23 TS24 TS25 TS26 TS27 TS28 D D D D ...

Page 164: ...703 port is configured for CCS in a DS0 Cross Connect the user must cross connect Time Slot 16 and any associated time slots TS01 Port Type D DSL G G 703 I IBMC Port Number 1 8 Time Slot 1 31 d Data or v Voice TS01 TS02 TS03 TS04 TS05 TS06 TS07 D D D D D D D TS08 TS09 TS10 TS11 TS12 TS13 TS14 D D D D D D D TS15 TS16 TS17 TS18 TS19 TS20 TS21 D D D D D D D TS22 TS23 TS24 TS25 TS26 TS27 TS28 D D D D ...

Page 165: ...703 port is configured for CCS in a DS0 Cross Connect the user must cross connect Time Slot 16 and any associated time slots TS01 Port Type D DSL G G 703 I IBMC Port Number 1 8 Time Slot 1 31 d Data or v Voice TS01 TS02 TS03 TS04 TS05 TS06 TS07 D D D D D D D TS08 TS09 TS10 TS11 TS12 TS13 TS14 D D D D D D D TS15 TS16 TS17 TS18 TS19 TS20 TS21 D D D D D D D TS22 TS23 TS24 TS25 TS26 TS27 TS28 D D D D ...

Page 166: ...703 port is configured for CCS in a DS0 Cross Connect the user must cross connect Time Slot 16 and any associated time slots TS01 Port Type D DSL G G 703 I IBMC Port Number 1 8 Time Slot 1 31 d Data or v Voice TS01 TS02 TS03 TS04 TS05 TS06 TS07 D D D D D D D TS08 TS09 TS10 TS11 TS12 TS13 TS14 D D D D D D D TS15 TS16 TS17 TS18 TS19 TS20 TS21 D D D D D D D TS22 TS23 TS24 TS25 TS26 TS27 TS28 D D D D ...

Page 167: ...703 port is configured for CCS in a DS0 Cross Connect the user must cross connect Time Slot 16 and any associated time slots TS01 Port Type D DSL G G 703 I IBMC Port Number 1 8 Time Slot 1 31 d Data or v Voice TS01 TS02 TS03 TS04 TS05 TS06 TS07 D D D D D D D TS08 TS09 TS10 TS11 TS12 TS13 TS14 D D D D D D D TS15 TS16 TS17 TS18 TS19 TS20 TS21 D D D D D D D TS22 TS23 TS24 TS25 TS26 TS27 TS28 D D D D ...

Page 168: ...703 port is configured for CCS in a DS0 Cross Connect the user must cross connect Time Slot 16 and any associated time slots TS01 Port Type D DSL G G 703 I IBMC Port Number 1 8 Time Slot 1 31 d Data or v Voice TS01 TS02 TS03 TS04 TS05 TS06 TS07 D D D D D D D TS08 TS09 TS10 TS11 TS12 TS13 TS14 D D D D D D D TS15 TS16 TS17 TS18 TS19 TS20 TS21 D D D D D D D TS22 TS23 TS24 TS25 TS26 TS27 TS28 D D D D ...

Page 169: ...TS01 Port Type D DSL G G 703 Port Number 1 8 Time Slot 1 31 d Data or v Voice TS01 TS02 TS03 TS04 TS05 TS06 TS07 G G G G G G G TS08 TS09 TS10 TS11 TS12 TS13 TS14 G G G G G G G TS15 TS16 TS17 TS18 TS19 TS20 TS21 G G G G G G G TS22 TS23 TS24 TS25 TS26 TS27 TS28 G G G G G G G TS29 TS30 TS31 G G G ...

Page 170: ...TS01 Port Type D DSL G G 703 Port Number 1 8 Time Slot 1 31 d Data or v Voice TS01 TS02 TS03 TS04 TS05 TS06 TS07 G G G G G G G TS08 TS09 TS10 TS11 TS12 TS13 TS14 G G G G G G G TS15 TS16 TS17 TS18 TS19 TS20 TS21 G G G G G G G TS22 TS23 TS24 TS25 TS26 TS27 TS28 G G G G G G G TS29 TS30 TS31 G G G ...

Page 171: ...TS01 Port Type D DSL G G 703 Port Number 1 8 Time Slot 1 31 d Data or v Voice TS01 TS02 TS03 TS04 TS05 TS06 TS07 G G G G G G G TS08 TS09 TS10 TS11 TS12 TS13 TS14 G G G G G G G TS15 TS16 TS17 TS18 TS19 TS20 TS21 G G G G G G G TS22 TS23 TS24 TS25 TS26 TS27 TS28 G G G G G G G TS29 TS30 TS31 G G G ...

Page 172: ...TS01 Port Type D DSL G G 703 Port Number 1 8 Time Slot 1 31 d Data or v Voice TS01 TS02 TS03 TS04 TS05 TS06 TS07 G G G G G G G TS08 TS09 TS10 TS11 TS12 TS13 TS14 G G G G G G G TS15 TS16 TS17 TS18 TS19 TS20 TS21 G G G G G G G TS22 TS23 TS24 TS25 TS26 TS27 TS28 G G G G G G G TS29 TS30 TS31 G G G ...

Page 173: ...TS01 Port Type D DSL G G 703 Port Number 1 8 Time Slot 1 31 d Data or v Voice TS01 TS02 TS03 TS04 TS05 TS06 TS07 G G G G G G G TS08 TS09 TS10 TS11 TS12 TS13 TS14 G G G G G G G TS15 TS16 TS17 TS18 TS19 TS20 TS21 G G G G G G G TS22 TS23 TS24 TS25 TS26 TS27 TS28 G G G G G G G TS29 TS30 TS31 G G G ...

Page 174: ...TS01 Port Type D DSL G G 703 Port Number 1 8 Time Slot 1 31 d Data or v Voice TS01 TS02 TS03 TS04 TS05 TS06 TS07 G G G G G G G TS08 TS09 TS10 TS11 TS12 TS13 TS14 G G G G G G G TS15 TS16 TS17 TS18 TS19 TS20 TS21 G G G G G G G TS22 TS23 TS24 TS25 TS26 TS27 TS28 G G G G G G G TS29 TS30 TS31 G G G ...

Page 175: ...TS01 Port Type D DSL G G 703 Port Number 1 8 Time Slot 1 31 d Data or v Voice TS01 TS02 TS03 TS04 TS05 TS06 TS07 G G G G G G G TS08 TS09 TS10 TS11 TS12 TS13 TS14 G G G G G G G TS15 TS16 TS17 TS18 TS19 TS20 TS21 G G G G G G G TS22 TS23 TS24 TS25 TS26 TS27 TS28 G G G G G G G TS29 TS30 TS31 G G G ...

Page 176: ...TS01 Port Type D DSL G G 703 Port Number 1 8 Time Slot 1 31 d Data or v Voice TS01 TS02 TS03 TS04 TS05 TS06 TS07 G G G G G G G TS08 TS09 TS10 TS11 TS12 TS13 TS14 G G G G G G G TS15 TS16 TS17 TS18 TS19 TS20 TS21 G G G G G G G TS22 TS23 TS24 TS25 TS26 TS27 TS28 G G G G G G G TS29 TS30 TS31 G G G ...

Page 177: ...ptions A 15 system clock references A 18 community names for SNMP 6 5 General SNMP Management Options A 31 Configuration SNMP Traps Options A 37 configuration AutoRate 3 11 Copy Ports Options A 12 Cross Connect A 19 DSX 1 Interface Options A 5 A 7 editing and displaying options 3 5 example of network 1 3 G 703 Interface Options A 9 General SNMP Management Options A 30 loader 9 4 menu 3 4 Network I...

Page 178: ... A 8 Line Framing A 8 Port Status A 7 Primary Clock Source A 8 port LEDs 7 24 DTE Framer x Fail self test result 7 7 LIU x Fail self test message 7 7 LIU x Fail self test result 7 7 loopback 8 6 E EER Excessive Error Rate status message 7 3 effective access level 6 2 EIA 530 Payload Rate A 4 ending an ATI session 2 9 Enterprise SNMP traps B 4 Specific Traps A 36 environment requirements D 1 error ...

Page 179: ...o initiated 8 11 LOS Loss Of Signal status message 7 4 7 5 M main menu 2 2 Management and Communication Options A 28 port access 6 1 port settings 2 1 Margin Threshold A 2 Max DSL AutoRate A 3 MCC defined 1 2 MCP FFS 3 7 9 4 Memory Test n Fail self test result 7 8 messages health and status 7 3 line 24 7 10 self test results 7 7 test status 7 9 MIB list of supported MIBs 1 4 support 1 4 Monitor an...

Page 180: ...L Mode A 13 Secondary holdover mode A 16 System Clock failure A 16 System Clock Reference A 18 security 6 1 self test results 7 7 Send and Monitor 511 8 9 Remote Line Loopback 8 7 Set Cross Connect Mode A 20 size of card D 1 SNMP enable disable traps A 35 Enterprise Specific Traps A 36 general management capabilities 1 4 limiting management access 6 5 Link Trap Interfaces A 36 Link Traps A 36 NMS ...

Page 181: ... 13 timing DSX 1 clock source A 8 examples A 16 G 703 clock source A 11 System Clock configuration options A 15 references A 18 Transmit Attenuation A 4 traps SNMP B 1 B 2 troubleshooting 7 25 DSX 1 performance statistics 7 15 error statistics 7 12 G 703 performance statistics 7 17 Health and Status messages 7 3 Inband Management Statistics 7 20 performance statistics 7 13 7 19 TSI CPLD Fail self ...

Page 182: ...Index IN 6 May 2002 8700 A2 GB20 40 ...
Reviews: