background image

INSTRUCTION BOOKLET

GAS COOKER

SIG 224

Please read this instruction booklet before using the appliance

GB

All manuals and user guides at all-guides.com

all-guides.com

Summary of Contents for SIG 224

Page 1: ...INSTRUCTIONBOOKLET GAS COOKER SIG 224 Please read this instruction booklet before using the appliance GB All manuals and user guides at all guides com a l l g u i d e s c o m ...

Page 2: ...e hot surfaces of the cooker l Unstable or misshapen pans should not be used on the hob burners as unstable pans can cause an accident by tipping or spillage l Never leave the cooker unattended when cooking with oil and fats l This cooker should be kept clean at all times A build up of fats or foodstuffs could result in a fire l Never use plastic dishes in the oven or on the hob burners Never line...

Page 3: ...NORMAL GAS OVEN ELECTRIC GRILL Description of the Cooker Rapid burner Semi rapid burner Control panel Ovendoor Semi rapid burner Auxiliary burner Cooker lid Important Safety Information 2 Description of the Cooker 3 Control Panel 4 Accessories 4 Operation 5 Gas oven 5 Using the Oven 6 Before the First Use of the Cooker 6 Using the Gas oven 7 Gas Oven Cooking Charts 8 Grilling 10 Maintenance and Cl...

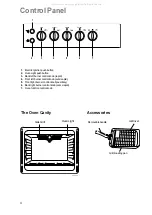
Page 4: ...ntrol knob rapid 4 Front left burner control knob semi rapid 5 Front right burner control knob auxiliary 6 Back right burner control knob semi rapid 7 Oven function control knob 7 6 5 4 1 3 Accessories 2 The Oven Cavity Gas Grill Oven Light FO 2440 P Q Grill trivet Removable handle Grill roasting pan All manuals and user guides at all guides com ...

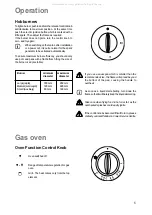
Page 5: ...r minimum maximum diameter diameter Large rapid 180 mm 260 mm Medium semi rapid 120 mm 220 mm Small Auxiliary 80 mm 160 mm If you use a saucepan which is smaller than the recommended size the flame will spread beyond the bottom of the pan causing the handle to overheat As soon as a liquid starts boiling turn down the flame so that it will barely keep the liquid simmering Take care when frying food...

Page 6: ...uite normal and is not a fault with the oven To prevent discoloration regularly wipe away condensation and also soilage from surfaces Hints and Tips 4 3 2 1 Using the Oven Before the First Use of the Cooker Remove all packaging both inside and outside the cooker before using it Before first use the oven should be heated without food During this time an unpleasant odour may be emitted This is quite...

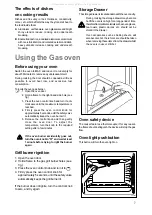
Page 7: ...void heat loss and excessive fuel consumption To ignite the oven gas burner 1 Open the oven door 2 Hold a flame to the right hand side hole see fig 3 Press the oven control knob and turn it anti clockwise until the maximum temperature is reached 4 Firmly press the oven control knob for approximately 5 seconds until the safety valve automatically keeps the oven burner lit 5 Release the control knob...

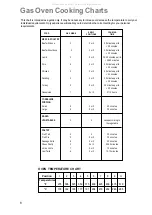
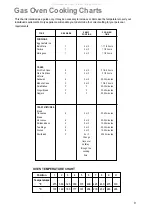
Page 8: ...minutes BAKED VEGETABLES 3 2 varies according to the vegetable PASTRY Fruit Tart 5 2 35 minutes Fruit Pie 5 2 or 3 35 minutes Sausage Rolls 6 2 or 3 20 minutes Choux Pastry 5 2 or 3 25 30 minutes Vol au Vents 7 2 or 3 15 minutes Jam Tarts 4 2 or 3 10 15 minutes GAS MARK FOOD This chart is intended as a guide only It may be necessary to increase or decrease the temperature to suit your individual r...

Page 9: ... 2 or 3 40 50 minutes Rolls and Buns 6 2 or 3 15 20 minutes Tea Rings 5 2 or 3 25 35 minutes Scones 6 2 or 3 15 20 minutes Shortbread 3 25 35 minutes GAS MARK FOOD Gas Oven Cooking Charts This chart is intended as a guide only It may be necessary to increase or decrease the temperature to suit your individual requirements Only experience will enable you to determine the correct setting for your pe...

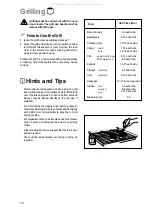
Page 10: ...l pan if preferred Food should be thoroughly dried before grilling to minimise splashing Brush lean meats and fish lightly with a little oil or melted butter to keep them moist during cooking Accompaniments such as tomatoes and mushrooms may be placed underneath the grid when grilling meats When toasting bread we suggest that the top runner position is used The food should be turned over during co...

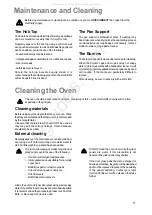
Page 11: ... pads unsuitable for non stick saucepans steel wool pads bath sink stain removers Should the hob top become heavily soiled it is recommendedthatacleaningproductsuchasHobBrite or Bar Keepers Friend is used Maintenance and Cleaning Cleaning the Oven The Pan Support The pan support is dishwasher proof If washing it by hand takecarewhendryingitastheenamellingprocess occasionally leaves rough edges If ...

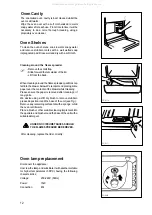
Page 12: ...suitable detergent UNDER NO CIRCUMSTANCES SHOULD THE FLAME SPREADER BE REMOVED After cleaning replace the lids correctly FO 0176 FO 0177 Oven Shelves To clean the oven shelves soak in warm soapy water and remove stubborn marks with a well wetted soap impregnated pad Rinse well and dry with a soft cloth FO 0424 Oven lamp replacement Disconnect the appliance Unscrew the lamp and substitute it with a...

Page 13: ...own have been replaced correctly e g after cleaning u Check the main jet is not blocked and the burner crown is clear of food particles u Check the burner cap and crown have been replaced correctly e g after cleaning u Check a cooking function temperature have been selected u Check the socket switch or the switch from the mains supply to the oven is ON u Check the light bulb and replace it if nece...

Page 14: ...se this Parkinson Cowan appliance or any part thereof is proved to be defective by any reason only of faulty workmanship or materials we will at our option repair or replace the same FREE OF ANY CHARGE for labour materials or carriage on condition that The appliance has been correctly installed and used only on the gas and electricity supply stated on the rating plate The appliance has been used f...

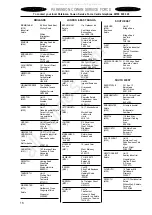
Page 15: ...ld S9 1GB NORTH WEST BIRKENHEAD 1 Kelvin Park M11 Dock Road Birkenhead L41 1LT CARLISLE Unit 8 M10 South John Street Carlisle CA2 5AJ ISLE OF MAN South Quay Ind Estate M64 Douglas Isle of Man LIVERPOOL Unit 1 M15 Honeys Green Precinct Honeys Green Lane Liverpool L12 9JH MANCHESTER Unit 30 Oakhill Trading M09 Estate Devonshire Road Worsley Manchester M28 3PT PRESTON Unit 250 M13 Dawson Place Walton...

Page 16: ...d M49 Enfield London EN3 7BB GRAVESEND Unit B4 M57 Imperial Business Estate Gravesend Kent DA11 0DL HARPENDEN Unit 4 M46 Riverside Estate Coldharbour Lane Harpenden AL5 4UN LETCHWORTH 16 17 Woodsite Ind Est M50 Works Road Letchworth Herts SG6 1LA LONDON 2 4 Royal Lane M76 Yiewsley West Drayton Middlesex UB7 8DL MAIDENHEAD Reform Road M60 Maidenhead Berkshire SL6 8BY MOLESEY 10 Island Farm Avenue M...

Page 17: ...ven light 15 W Supply voltage 50 Hz 230 240 V Important Safety Requirements This appliance must be installed in accordance with the Gas Safety Installation and Use Regulations current addition and the I E E Wiring Regulations Detailed recommendations are contained in the following British Standard Codes of Practice B S 6172 B S 5440 Part 2 and B S 6891 Current Editions Provision for Ventilation Th...

Page 18: ... cooker worktop This cooker must only be installed by qualified personnel according to the manufacturer s instructions and to the relevant British Standards FO 1141 Location of the appliance This appliance must not be installed in a bed sitting room of volume less than 20m or in a bathroom shower room or garage It is essential that the appliance is positioned as stated below see fig i e shelves wa...

Page 19: ... level to engagement edge on back of cooker dimension A of Fig 2 Assemble upper bracket to lower bracket so that underside of bracket is dimension A 3mm 1 8 above floor level Re position cooker and check that top bracket engages into cooker back to a depth of 75mm 3 as shown in Fig 2 Should the stability bracket currently installed not allow the cooker to stand correctly ask the installer to repla...

Page 20: ...arked with the letter E or the earth symbol or coloured green and yellow Connect the blue neutral wire to the terminal in the plug which is marked with the letter N or coloured black Connect the brown live wire to the terminal in the plug which is marked with the letter L or coloured red NOTE The earth wire should be about 2 cm longer than the live and neutral wires Upon completion there must be n...

Page 21: ...the gas tap control shaft or on the lower right hand side of the shaft see diagram To adjust use a thin bladed screwdriver and turn the adjustment screw until the flame is steady and does not extinguish when the knob is turned from MIN to MAX Repeat this procedure for all burners Pressure Testing Removeleft hand pan support and front left burner cap and crown Fit manometer tube over the injector T...

Page 22: ...replace the gas oven nozzle follow this procedure a remove the bottom of the oven b undo screw 1 and take the oven burner out c with a socket spanner 7 unscrew and remove the nozzle situated in the bottom of the oven and replace it with the proper one see Table on page 18 d reassemble the burner following the same procedure backwards FO 1061 Minimum level adjustment of gas oven burner After settin...

Page 23: ...e nozzle situated in the top of the oven and replace it with the proper one see Table at page 21 d undo the fixing screw of the metal ring of primary air adjustment and adjust the relevant opening see diagram e reassemble the burner following the same pro cedure backwards Natural gas adjustment full opening width LPG adjustment opening 10 mm wide 23 All manuals and user guides at all guides com ...

Page 24: ...35674 1402 04 00 Grafiche MDM Forlì All manuals and user guides at all guides com ...

Reviews: