READ AND FOLLOW ALL INSTRUCTIONS BEFORE OPERATING YOUR LOW-VOLTAGE LIGHT. SAVE
THIS MANUAL FOR FUTURE REFERENCE.
Warning:
1. Be sure to turn off power to the wires by either turning off the circuit breaker or by removing the fuse
from the fuse box.
2. Do not install or operate a fixture that has missing or damaged parts.
3. Fixture must not be installed within 10 feet of a pool, spa, fountain, or other body of water.
4. Do not bury the power cable deeper than 6 inches (152mm) below the surface.
5. This fixture is to be used only with a power unit (transformer) rated at 12 volts (AC).
6. When maintaining the fixtures, be sure to remove leaves, pine needles, grass clippings, mulch, or any
debris that has accumulated on the light bulb, lens, or body of the fixture.
Assembly and operation:
1. Determine the desired location for mounting the fixture.
2. Carefully remove the landscape light from the box. This fixture features a 3x0.5W “bright white” LED
module as the light source.
3. At the desired location, hammer the ground stake into the ground. To avoid damage to the stake, place
a board on top of the stake while hammering. If the ground is hard and the stake is difficult to install,
make a crosscut into the ground using a flat shovel.
4. Attach the vertical tube to the glass shade kit. Next, gently screw the vertical tube onto the installed
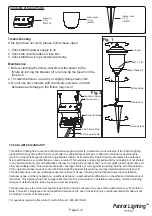
ground stake. Finally, attach the top cover to the glass shade kit. (See Fig. 1)
5. Dig a wireway trench into the ground, going from the fixture location to the power unit
(transformer).
6. Lay 18 GA fixture wire into the trench.
7. Turn off power.
8. Follow instructions below to make the wire connections using the Quick Clip Connector.
Note: Make sure the contacts pierce the insulation in the wires when making the quick clip
connector wiring.
Quick Clip Connector wiring instructions:
(See Fig. 2)
1. Make sure power is turned off.
2. The full length of the 18 GA fixture wire may be used to connect with the 16 GA or 12 GA power cable.
When planning the wiring, please note the following conditions:
- If the full length of the 18 GA fixture wire will be used, then the wiring must be protected by
routing it close to the fixture or securing it to a building structure such as a house or deck.
- If the 18 GA fixture wiring will be trimmed, it should be cut off so that it can attach to the Quick
Clip Connector within 3 inches of the fixture or building structure.
- If it is necessary to make the connections underground, then no more than 3 inches of the 18 GA
fixture wire can be buried.
3. The Quick Clip Connector accommodates one 18 GA fixture wire, and either a 16 GA or 12 GA power
cable, by flipping over the Connector base.
4. Place the 16 GA power cable across the area marked 16 GA on the Connector base. Place the 18 GA
fixture wire across the area marked 18 GA on the Connector base.
5. After the wires are in place, attach the Connector top to the Connector base with the supplied screws.
Make sure that the wires remain flat in the Connector base, and the screws are tightened all the way
down. The contacts will automatically pierce the insulation in the wires.
LOW-VOLTAGE LANDSCAPE LIGHT
Assembly and operating instructions
Models: 343-2400
Page 1 / 2
TM
Patriot Lighting
111107


