background image

Page 

09/07/2009

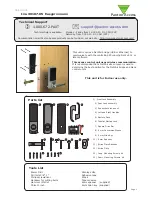
Parts list

Tools List

Power Drill

Drill bits 3/8”, ”.

Philips screwdriver

Hacksaw for cutting bolts

Hammer / Mallet

Chisel  inch

Stanley knife

Adhesive tape

Pencil

Tape measure

8mm spanner    (supplied)

2mm Allen key  (supplied)

)  Front Lock Assembly

  2)  Rear Lock Assembly


  3)  Rubber Escutcheon  x2

  4)  Left and Right Handles  

  5)  Battery Pack

  6)  Tubular Mortice Lock

  7)  Square Drive Bar

  8)  8 mm Conversion Sleeve 

  9)  2 mm Allen Key 

0)  8 mm Spanner

)  Strike Plate Backbox 

2)  Strike Plate

3)  Long  Mounting Screws  x4

4)  Short  Mounting Screws  x4

This unit is for Indoor use only.

Technical Support

Technical help is available:     Monday - Friday from 2:00 AM - 5:00 PM (PST)

                               Saturday from :00 AM - 5:00 AM (PST)

.800.672.PAXT

support@paxton-access.com

Ins-30107-US  Easyprox nano 

Documentation on all Paxton Access products can be found on our web site - http://www.paxton-access.com/

This access control unit uses wireless communication.  

It is recommended that a Net2Air site surveyor is used to 

determine the best position for the Net2Air bridge and Nano 

control units.

This unit requires a Net2Air bridge (USB or Ethernet) to 

communicate with the controlling PC running Net2 v4.4 or 

later software.

 ONLY

Paxton Access

4HIS BATTERY PACK IS TO BE REPLACED

WITH 0AXTON !CCESS PART NUMBER

Paxton Access

4HISBATTERYPACKISTOBE
REPLACEDWITH0AXTON!CCESS
PARTNUMBER

746-003

ONLY

6

4HISBATTERYPACKISTOBE
REPLACEDWITH0AXTON!CCESS
PARTNUMBER

***-***

ONLY

6

Paxton Access

Summary of Contents for Easyprox nano

Page 1: ...ay Friday from 12 00 AM 5 00 PM PST Saturday from 1 00 AM 5 00 AM PST 1 800 672 PAXT support paxton access com Ins 30107 US Easyprox nano Documentation on all Paxton Access products can be found on ou...

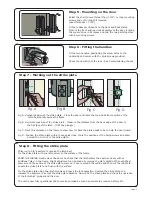
Page 2: ...1 Marking out Step 2 Drilling Step 3 Fitting the latch Step 4 Fitting the battery pack Drill a 1 hole in the door edge at least 3 deep to accept the latch Drill the 4 x 3 8 holes for the mounting scre...

Page 3: ...h NOT the plunger Fig C Mark this distance on the frame to show how far back the plate needs to be to hold the door closed Fig D Position the strike plate within these guide lines Mark the positions o...

Page 4: ...o its previous door open time default 3 seconds and present a user card This test confirms the correct and free operation of the mechanical lock and also ensures that the electronic circuits will shut...

Page 5: ...gured within a time window Reader Local settings for the reader Output Configures the lock for timed release or toggle mode Events Shows the events for this control unit only Access Rights Lists users...

Page 6: ...readiness for a token read Should nothing occur within 3 seconds the unit will go back to sleep If a token is read then the Easyprox nano moves into full operation The token number is checked against...

Page 7: ...itry to operate as normal This allows the door to be opened with a valid user card giving access to the lock allowing the battery pack to be replaced ve ve When the battery voltage falls below 4V the...

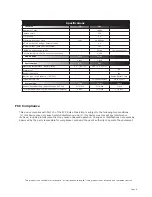
Page 8: ...Keypad module Required space on Door Total outside dimensions includes handle clearence Battery type High capacity 746 003 Typical Battery Life Vandal resistance Read Range Keyfob Token This product...

Reviews: