background image

ISSUED: 07-08-05  SHEET #: 055-9430-1

Visit the Peerless Web Site at www.peerlessindustries.com

1 of 9

For customer service call 1-800-729-0307 or 708-865-8870.

Read instruction sheet before you start installation and assembly.

Maximum Load Capacity: 25 lb (11 kg)

Installation and Assembly - PRS Series Projector Mount

Installations:

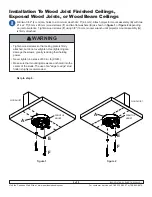
To Wood Joist Finished Ceilings,
Exposed Wood Joists, or Wood Beam Ceilings ............................................................................ step 2, page 3

To Concrete Ceilings ........................................................................................................................ step 3, page 4

Applications:

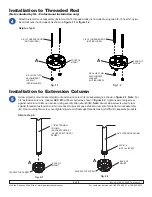
Threaded Rod .................................................................................................................................. step 4, page 5

Extension Column ............................................................................................................................ step 5, page 5

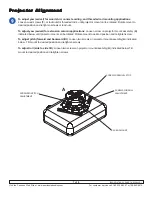
Projector Alignment:

Adjusting Roll, Pitch, and Yaw ........................................................................................................ step 9, page 7

Turn to the appropriate page for your ceiling installation.

PRS


SERIES

PROJECTOR

MOUNT

• Installer must verify that the ceiling will safely support

four times the combined weight of all attached equip-
ment and hardware.

WARNING

Models: PRS 1P, PRS 1PS, PRS 1PW

Summary of Contents for PRS 1P

Page 1: ...tions To Wood Joist Finished Ceilings Exposed Wood Joists or Wood Beam Ceilings step 2 page 3 To Concrete Ceilings step 3 page 4 Applications Threaded Rod step 4 page 5 ExtensionColumn step 5 page 5 P...

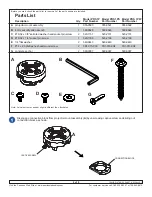
Page 2: ...5 0592 B 4 mm security allen wrench 1 560 9646 560 9646 560 9646 C 10 32 x 3 8 serrated washer head socket pin screw 2 520 1151 520 2151 520 2151 D 10 32 x 1 4 socket pin screw 1 520 1196 520 2196 520...

Page 3: ...using 3 8 10 mm socket wrench until projector mount assembly A is firmly attached Skip to step 6 Installation To Wood Joist Finished Ceilings Exposed Wood Joists or Wood Beam Ceilings F F A WOOD JOIST...

Page 4: ...l CORRECT concrete metal bracket plaster dry wall concrete ceiling F F F Illustration A Installation to Concrete Ceilings A 2 A CONCRETECEILING E G G G Note It is the responsibility of the installer t...

Page 5: ...extension columns reducer ACC 913 will be required as shown in figure 2 2 Tighten swivel stop screw against extension column or reducer using security allen wrench B Note Swivel stop screw is used to...

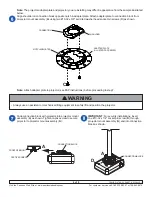
Page 6: ...ead socket pin screws C as shown Slide connection block with projector into projector mount assembly A as shown Tighten captive screw to secure projector to projector mount assembly A IMPORTANT For se...

Page 7: ...cations Loosen screw on projector mount assembly A indicated below until projector mount can be rotated Rotate mount to desired position and retighten screw To adjust pitch forward and backward tilt L...

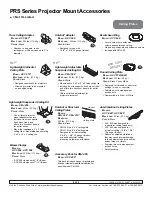
Page 8: ...27 2 kg COLOR White Mounts above 2 x 4 or 2 x 2 false ceiling tile Includes tie wire supports flush mount tube and offers two knockout panels for outlet boxes Offers unlimited adjustment for projecto...

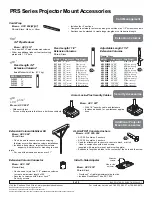
Page 9: ...h security lock For use with projectors that have a built in security slot Extension column Side to side adjuster Extension Columns Security Accessories Additional Projector Mount Accessories PRS Seri...

Reviews: