background image

valid only in combination with original bicycle operating instructions

System instruction

Pendix eDrive 

compatible with

Pendix.bike PRO App

Summary of Contents for eDrive Series

Page 1: ...valid only in combination with original bicycle operating instructions System instruction Pendix eDrive compatible with Pendix bike PRO App...

Page 2: ...removal on the bike 9 6 2 ON OFF switch of the ePower 9 6 3 Setting the assistance levels 9 6 4 Connecting removing ePower from charging unit 10 6 5 Charging the ePower 10 6 6 Charging level indicato...

Page 3: ...peed or performance For your own safety always wear a helmet Always activate the brakes of your Pedelec before putting your foot down on a pedal The motor causes you to move forward the moment you mov...

Page 4: ...your Pedelec switch off the electric system and remo ve the battery Do not clean your Pedelec with a steam jet high pressure cleaner or water hose If you do so water can enter electric parts or the m...

Page 5: ...497 Wh 2 x 497 Wh Range optimum 13 28 km 13 28 km 41 79 km 62 120 km 124 240 km Voltage 48 V Battery dimensions d x h 80 x 190 mm 80 x 190 mm 80 x 276 mm 80 x 342 mm 80 x 342 mm USB C interface Bluet...

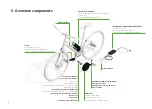
Page 6: ...sor wheel speed sensor mounting kit wheel speed sensor spoke magnet bottom bracket unit electronic bottom bracket square shaft shaft length 128 mm bottom bracket thread BSA 1 375 x 24 TPI LH FG34 cran...

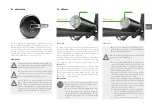
Page 7: ...e SMART mode On delivery the battery is partly charged In order to obtain the energy for the entire distance of a journey with your Pe delec you must charge the battery to its maximum level You can op...

Page 8: ...g unit with or without the power station To use the power station sim ply insert the plug of the charging unit into the power station from below If you do not want to use the power station you can onl...

Page 9: ...the SMART mode The assistance levels distinguish according to their strength Do not change the assistance level while riding Doing so is a safety hazard Always keep both hands on the handlebar while...

Page 10: ...plug of the charging Remember that after a sudden temperature change from cold to warm condensed water can form on the battery contacts To avoid this store the battery in the same place as where you...

Page 11: ...ry has been reset Safety U bolt as bicycle lock ePower300 500 In its lower section the Pendix battery has been fitted with a withdrawable safety lock Whenever you do not wish to take the battery with...

Page 12: ...uencies between 60 and 70 per minute In this range less energy is used than at other frequencies which allows for a longer distance ePower150 ePower300 ePower500 The actual range depends on many Facto...

Page 13: ...into the wall socket Make sure that the battery is properly connected to the charging unit You can see this when the LED display lights up in the color of the charging status selected connection is t...

Page 14: ...atteries that are no longer usable to your authorized bicycle salesman technician 11 Technical data eMaschine motor gearless mid mounted motor performance 250 W nominal speed max 25 km h motor setting...

Page 15: ...erger Stra e 20 08056 Zwickau Germany email info pendix com www pendix com These operating instructions are covered by requirements and scope of EN ISO 4210 2017 and 15194 When supply and effective us...

Page 16: ...This Pendix eDrive was assembled by Pendix GmbH Innere Schneeberger Stra e 20 08056 Zwickau Germany www pendix com Rev 01_10 2020 Systemanleitung EN A3D 705 002 R01 CN20 245 001...

Reviews: