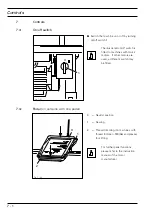
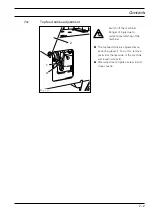
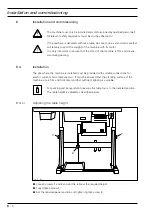
background image

INSTRUCTION MANUAL

296-12-18 354/002

Betriebsanleitung  engl. 06.09

This instruction manual applies to machines from the 
following serial numbers onwards:
#  

2 565 145

1243

-712/02

Industrial

®

Summary of Contents for 1243-712/02

Page 1: ...INSTRUCTION MANUAL 296 12 18 354 002 Betriebsanleitung engl 06 09 This instruction manual applies to machines from the following serial numbers onwards 2 565 145 1243 712 02 Industrial ...

Page 2: ... whether in whole or in part is not permitted without our prior permission and not without written indication of the source PFAFF Industrie Maschinen GmbH Postfach 3020 D 67653 Kaiserslautern Königstr 154 D 67655 Kaiserslautern Editing illustrations PFAFF Dept TES ...

Page 3: ...s premises 5 1 5 03 Disposal of packing materials 5 1 5 04 Storage 5 1 6 Explanation of symbols 6 1 7 Controls 7 1 7 01 On off switch 7 1 7 02 Pedal 7 1 7 03 Top feed stroke adjustment 7 2 8 Installation and commissioning 8 1 8 01 Installation 8 1 8 01 01 Adjusting the table height 8 1 8 01 02 Tensioning the v belt 8 2 8 01 03 Fitting the upper V belt guard 8 2 8 01 04 Fitting the lower belt guard...

Page 4: ...11 3 11 04 03 Hook to needle clearance needle rise needle height and needle guard 11 4 11 04 04 Bobbin opener 11 6 11 04 05 Safety coupling 11 7 11 04 06 Top feed lifting motion 11 8 11 04 07 Presser foot lift 11 9 11 04 08 Needle thread tension release 11 10 11 04 09 Pressure of the lifting presser 11 11 11 04 10 Thread check spring 11 12 11 04 11 Bobbin winder 11 13 11 05 Adjusting the thread tr...

Page 5: ...ust not be operated without its safety devices all regulations relevant to safety must be adhered to When part sets are changed e g needle presser foot and needle plate during threading when the workplace is left unattended and during maintenance work the machine must be isolated from the power supply by pressing the on off switch or removing the plug from the mains Daily maintenance work must onl...

Page 6: ...d safety devices Before threading changing bobbin and needle cleaning etc switch off main switch 1 04 Important notes for the user This instruction manual is part of the equipment of the machine and must be available to the operating staff at all times The instruction manual must be read before the machine is operated for the first time Both operating and technical staff must be instructed on the ...

Page 7: ...at may affect its safety 1 05 02 Technical staff Technical staff are persons who have been trained in electrical engineering electronics pneumatics and mechanical engineering They are responsible for lubricating servicing repairing and adjusting the machine The technical staff must be sure to observe the following items always observe the notes on safety in this instruction manual in their work pr...

Page 8: ...t of the machine When a mechanically operated clutch motor without actuation lock is switched off always wait until the motor has stopped Danger of injury Do not operate the machine without take up lever guard 1 Danger of injury by the movement of the take up lever Do not operate the machine without belt guard 2 and 3 Danger of injury from running drive belts Do not operate the machine without fin...

Page 9: ...itching work Any use of this machine which is not approved by the manufacturer shall be considered as improper use The manufacturer shall not be held liable for any damage arising out of improper use Proper use shall also be considered to include compliance with the operation adjustment service and repair measures specified by the manufacturer ...

Page 10: ...arance height 115 mm Fabric clearance PFAFF 1243 712 02 max 20 mm Net weight sewing head 42 kg Power supply See motor service manual Power consumption See motor service manual Fuse protection See motor service manual Working noise level Emission level at workplace PFAFF 1243 712 02 at a speed of 800 spm 78 dB A Noise measurement in accordance with DIN 45 635 48 A 1 Subject to alteration or compara...

Page 11: ... various plastics The electrical equipment consists of plastics and copper The machine must be disposed of in accordance with applicable local pollution control regulations If necessary a specialist is to be consulted Special care is to be taken that parts soiled by lubricants are separately disposed of in accordance with the applicable local environmental pollution control regulations ...

Page 12: ... liable for transportation inside the customer s premises nor to other operating locations 5 03 Disposal of packing materials The packing materials of this machine comprise paper cardboard and VCE fibre Proper dis posal of the packing material is the responsibility of the customer 5 04 Storage If the machine is not in use it can be stored as it is for a period of up to six months but It should be ...

Page 13: ...uction Manual work to be carried out and important information are drawn to your attention by symbols The symbols have the following meanings Note information Cleaning care Lubrication Servicing repairing adjustment maintenance only to be carried out by specialist personnel ...

Page 14: ... to machines with Quick motors If other motors are used a different switch may be fitted O 1 7 02 Pedal on versions with one pedal 0 Neutral position 1 Sewing 2 Thread trimming on machines with thread trimmer 900 56 and presser foot lifting For further pedal functions please refer to the instruction manual of the motor manufacturer Fig 7 02 0 1 2 ...

Page 15: ...e machine Danger of injury due to unintentional starting of the machine The top feed stroke is adjusted by re positioning lever 1 To do this remove cover 2 at the rear side of the machine and loosen screw 3 After adjustment tighten screw 3 and close cover 2 Fig 7 03 ...

Page 16: ...teady also during sewing 8 01 Installation The site where the machine is installed must be provided with suitable connections for electric current and compressed air It must be ensured that the standing surface of the machine site is firm and horizontal and that sufficient lighting is available For packing and transportation reasons the table top is in the lowered position The table height is adju...

Page 17: ...onto belt guard section 3 Screw on belt guard section 3 Screw on belt guard section 4 8 01 02 Tensioning the v belt Loosen nuts 1 Tension v belt by adjusting bracket 2 Tighten nuts 1 Fig 8 02 shows a Quick motor If a different motor is used please refer to the instruction manual of the motor manufacturer Fig 8 02 Fig 8 03 1 2 2 cm 2 4 3 1 ...

Page 18: ...ig 8 04 shows a Quick motor If a different motor is used please refer to the instruction manual of the motor manufacturer Fig 8 04 Fig 8 05 1 8 01 05 Fitting tilt lock Attach tilt lock 1 included in the accessories with screw 2 Do not operate the machine without tilt over safeguard 1 Danger of crushing between upper part and the table top 1 2 ...

Page 19: ...ds insert the stand in the hole in the table top and secure it with the nuts provided Fig 8 07 Fig 8 06 8 01 06 Fitting the synchronizer Slide synchronizer 1 onto the shaft Slightly tighten screws 2 Insert plug of the synchronizer into the control box Adjust synchronizer see Chapter 11 05 14 Adjusting the synchronizer 2 1 ...

Page 20: ... it is connected correctly to the terminal box If not the machine must not be operated The balance wheel must rotate towards the operator when the machine is running If not have the motor connection changed by a mechanic 8 03 Switching the machine on off Switch the machine on or off see Chapter 7 01 On off switch Carry out a test run Fig 8 09 1 2 8 01 08 Mounting the thread retainers Screw the thr...

Page 21: ...struction manual are to be observed Special attention is to be paid to all Notes on Safety All setting up work is only to be carried out by appropriately trained personnel Before all preparation work the machine is to be switched off at the on off switch or disconnected from the electricity supply by removing the plug from the mains Fig 9 01 The selection of the correct needle depends on the model...

Page 22: ...inder by pressing bobbin winder shaft 2 and lever 3 at the same time The bobbin fills up during sewing The tension of the thread on bobbin 1 is adjusted with knurled screw 4 The bobbin winder stops automatically when there is enough thread on bobbin 1 If the thread is wound unevenly Loosen nut 5 Turn the thread guide 6 accordingly Tighten nut 5 9 02 Winding the bobbin thread adjusting the thread t...

Page 23: ...he bobbin case Insert bobbin case 2 so that it clicks into place Close the latch 1 and close the cover of the hook compartment Do not operate the machine when the cover of the hook compartment is open Danger of injury by moving parts Fig 9 04 9 04 Threading the bobbin case adjusting the thread tension Thread the bobbin as shown in Fig 9 04 When the thread is pulled the bobbin must rotate in the di...

Page 24: ...le thread tension Fig 9 05 Switch off the machine Danger of injury due to unintentional starting of the machine Thread needle thread as shown in Fig 9 05 Be sure to thread the needle from the left Regulate the needle thread tension by turning knurled screw 1 1 ...

Page 25: ...race In this position remove the bobbin case 2 Clean the hook race with paraffin When inserting the bobbin case ensure that horn 3 fits into the groove of the needle plate Screw hook jib 1 back on Insert the bobbin case and close the cover of the hook compartment 10 Care and maintenance 10 01 Servicing and maintenance intervals Clean the hook compartment daily more often if in continuous operation...

Page 26: ...see arrows twice a week Switch off the machine Danger of injury Only use oil with a mean viscosity of 22 0 mm s at 40ºC and a density of 0 865 g cm at 15ºC We recommend PFAFF sewing machine oil part no 280 1 120 144 10 03 General lubrication Fig 10 02 ...

Page 27: ...the front and tilt the machine backwards Fill oil reservoir 1 through hole 2 up to the top marking Only use oil with a mean viscosity of 22 0 mm2 s at 40º C and a density of 0 865 g cm3 at 15º C We recommend PFAFF sewing machine oil Order No 280 1 120 144 Fig 10 03 2 3 1 10 05 Lubricating the needle head parts Turn the machine off Danger of injury if the machine is started accidentally Unscrew the...

Page 28: ...entioned here The screws and nuts in brackets are for securing of machine parts which are to be loosened before making the adjustment and tightened again after the adjustment has been carried out 11 02 Tools gauges and other accessories Screwdrivers with blade widths from 2 to 10 mm Screwdrivers with blade widths from 7 to 14 mm Allen keys from 2 to 6 mm Metal rule part No 08 880 218 00 Needle ris...

Page 29: ... wheel to set the needle just above the needle hole Re position needle bar frame 4 according to Requirement Tighten screws 1 2 and 3 11 04 Adjustment of the basic machine 11 04 01 Needle position in needle hole Requirement The needle must be exactly centred in the needle hole ...

Page 30: ... preliminary adjustment Requirement With the needle bar at b d c the clearance between needle bar and needle plate must be 23 mm Fig 11 02 Position the height of needle bar 1 screws 2 according to Requirement but do not turn it 1 2 2 3 m m ...

Page 31: ...eedle eye must be 0 8 1 00 mm below the hook point and 3 The needle guard 5 must lightly touch the needle Loosen screws 1 and 2 Bring the needle to its b d c and slide the 1 8 mm thick feeler gauge under the needle bar bearing Place the screw clamp on the feeler gauge and tighten it Remove feeler gauge and turn the balance wheel in the sewing direction until the screw clamp is resting on the needl...

Page 32: ...the needle is not deflected by needle guard 5 While ensuring that the bevel pinion 4 is not too close and that the hook does not have too much play tighten screws 2 Adjust the needle height in accordance with requirement 2 Align needle guard 5 in accordance with requirement 3 3 2 1 4 1 Fig 11 03 0 05 0 1 mm 0 8 1 mm 5 ...

Page 33: ...ener 1 and bobbin case base 3 nor between the projection 4 and the retaining trip of the needle plate 4 3 1 Fig 11 04 Thread the machine and load test material Sew a few stitches by turning the balance wheel and while doing so check the requirement Adjust bobbin opener 1 screw 2 according to the requirement 2 ...

Page 34: ...e manufacturer If the thread jams the safety coupling 4 disengages to prevent damage to the hook A description of how to re engage the coupling in follows Remove the jammed thread Press plunger 1 and turn the balance wheel until pawl 2 engages the groove 3 Fig 11 05 4 1 2 3 4 ...

Page 35: ...3 and needle point 6 must reach the needle plate at the same time Fig 11 06 Push lever 1 screw 2 fully up in its slot Lower lifting presser 3 onto the needle plate Loosen screws 4 just enough to allow eccentric 5 to be turned on its shaft Turn eccentric 5 according to Requirement Tighten screws 4 5 4 4 2 1 6 3 ...

Page 36: ...t at a maximum the presser foot 5 5 5 5 5 must be 20 mm 20 mm 20 mm 20 mm 20 mm above the needle plate when it is at its t d c Fig 11 07 Set needle bar at b d c Re position actuator 1 screws 2 according to Requirement 1 Push lever 3 screw 4 to the top end of its linkage slot Turn balance wheel to set lifting presser 4 at t d c Turn crank 6 screw 7 according to Requirement 2 2 6 7 1 172 mm 5 20 mm ...

Page 37: ...he take up lever at b d c the tension disks must be apart by their maximum clear ance of 1 0 mm Fig 11 08 Set take up lever at b d c Turn eccentric 1 screws 2 until the tension disks are at their maximum clearance Adjust tension screw 3 according to Requirement 1 2 2 3 1 0 mm ...

Page 38: ...11 11 Adjustment 11 04 09 Pressure of the lifting presser Requirement The material must be reliably held even at the highest sewing speed Turn screw 1 according to Requirement Fig 11 09 1 ...

Page 39: ...shed when the needle point enters the material spring stroke of about 7 mm Fig 11 10 Adjust stop 1 screw 2 according to Requirement To adjust the pressure of the spring turn screw 3 screw 4 For technical reasons the length of the thread check spring stroke may vary upwards or downwards a little 1 2 3 7 mm 5 4 ...

Page 40: ...th the bobbin winder disengaged friction wheel 5 must not run against drive wheel 1 3 The bobbin winder must switch itself off when the filled thread is about 1 mm from the rim of the bobbin Position drive wheel 1 screws 2 according to Requirements 1 and 2 Position pin 3 screw 4 according to Requirement 3 Fig 11 11 1 mm 4 3 5 1 2 ...

Page 41: ...Remove catch 1 screws 2 Remove plate 3 screws 4 Loosen the four screws of control cam 5 and screws 6 of retaining collar 7 Move control cam 5 laterally in accordance with requirement 1 In this position bring retaining collar 7 to rest on control cam 5 and tighten screws 6 Bring the take up lever to its TDC by turning the balance wheel Turn control cam 5 in the direction of rotation in accordance w...

Page 42: ...is activated Screw out screw 1 and swing out connecting rod 2 Loosen screws 3 and 4 Bring the needle bar to needle rise position by turning the balance wheel Bring clamp 5 to rest on the right side of the housing Keeping this position press control lever 6 to the bottom of the cam track and move it in accordance with the requirement In this position tighten screw 3 Screw 4 remains loosened until t...

Page 43: ...imming mechanism in resting position there must be a distance of 0 3 mm between the largest eccentricity of control cam 1 and pawl 2 Position the largest eccentrictiy of control cam 1 underneath pawl 2 by turning the balance wheel Move bearing bolt 3 screw 4 in accordance with the requirement ...

Page 44: ... pawl 3 Bring the machine to needle rise position by turning the balance wheel Loosen screw 1 until the engaging solenoid can be turned with difficulty Manually activate engaging lever 2 2 2 2 2 so that pawl 3 engages Press solenoid planger 4 as far as possible into solenoid housing 5 and move both the solenoid housing and the solenoid planger in accordance with the requirement In this position ti...

Page 45: ...g care to ensure that screw 3 is still loose press control lever 4 down to the base of the track of control cam 5 Maintaining this position lightly tighten screw 3 while bringing release trip 6 into a resting position against engaging lever 1 and laterally against control lever 2 in the direction of the arrow By lightly tapping on release trip 6 in the direction of the arrow while simultaneously t...

Page 46: ...at TDC and with control lever 3 at starting position there must be a clearance of approx 0 3 mm between bolt 4 and the outer diameter of control cam 5 Bring the needle bar to TDC by turning the balance wheel Turn screw 1 nut 2 in accordance with the requirement Carry out a check by tapping control lever 3 ...

Page 47: ...1 to control lever 3 using screw 2 Loosen nuts 4 right and left handed thread Bring the machine to needle rise position by turning the handwheel and activate engaging lever 5 Taking care to ensure that lever 6 is touching stop 7 see arrow turn linkage rod 8 in accordance with the requirement In this position tighten both nuts 4 Fig 11 18 5 6 4 3 2 1 8 9 7 ...

Page 48: ...irection of rotation until the machine is in needle rise position and then activate engaging lever 2 Taking care to ensure that control lever 3 is engaged loosen the remaining screws on control cam 1 Continue turning the balance wheel in its direction of rotation until the point of the needle is 12 mm above the needle plate In this position and taking care to ensure that control cam 1 is touching ...

Page 49: ...ition there must be a distance of approx 5 mm between catch 1 and control lever 6 Lightly affix catch 1 and cover plate 2 using screws 3 Move catch 1 as far as possible in the direction of the arrow and then move it laterally in accordance with the requirement In this position tighten screws 3 Using screws 5 screw plate 4 on ...

Page 50: ...Fig 11 21 Loosen screw 1 enough so that thread catcher 2 can be turned Loosen the screws in retaining collar 3 Bring the take up lever to its TDC by turning the balance wheel Move thread catcher 2 in accordance with the requirement In this position and taking care to ensure that retaining collar 3 is touching the shaft bushing tighten screws 3 of the retaining collar Screw 1 remains loosened for t...

Page 51: ...ad catcher 4 and align it in accordance with requirement 1 In this position tighten screws 2 Screw 1 remains loosened for the following adjustment Fig 11 22 4 3 m m 5 2 3 1 11 05 11 Knife Requirement 1 The elongated hole of knife 3 must be parallel to knife carrier 5 and the knife must not be touching the casting see arrow 2 When the point of needle catcher 4 protrudes approx 3 mm over the cutting...

Page 52: ...g care to ensure that screw 1 is loosened bring the machine to needle rise position and activate the engaging lever By turning the balance wheel further bring rock shaft 2 to its left point of reversal Maintaining this position turn thread catcher 3 in accordance with the requirement In this position and taking care to ensure that there is no horizontal play tighten screw 1 Fig 11 23 4 3 2 4 3 1 ...

Page 53: ... 5 and guide sleeve 7 4 It must be posible to insert and remove the bobbin case from the hook without any interference Fig 11 24 Align carrier 1 screws 2 in such a way that it is in the middle of its adjustment range and parallel to the bedplate of the machine Unhook spring 3 see Page 11 38 Manually pivot thread catcher 4 over clamp spring 5 Bend clamp spring 5 in accordance with requirement 1 Hoo...

Page 54: ...er 1 screws 2 as well In this position and taking care to ensure that carrier 1 is parallel to the machine bedplate tighten screws 2 and 6 If sewing problems occur after the thread has been trimmed check the height of the spring under the bobbin in the hook The height of the spring must be approx 1 mm 1 mm 1 mm 1 mm 1 mm 3 5 1 2 7 1 mm ...

Page 55: ...ment according to motor instruction manual 11 05 11 Adjusting the synchronizer Requirement 1 On a seam interruption the machine must position 4 mm past b d c 2 After a thread trim the machine must position at t d c of the take up lever ...

Page 56: ...e und Maschinen AG is an authorized licensee of the PFAFF trademark PFAFF Industriesysteme und Maschinen AG Hans Geiger Str 12 IG Nord D 67661 Kaiserslautern Telefon 49 6301 3205 0 Telefax 49 6301 3205 1386 E mail info pfaff industrial com Gedruckt in der BRD Printed in Germany Imprimé en la R F A Impreso en la R F A ...

Reviews: