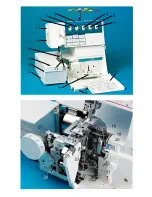
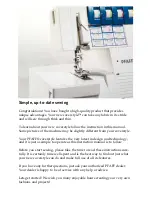
background image

O w n e r ´ s   m a n u a l

Summary of Contents for Coverstyle

Page 1: ...O w n e r s m a n u a l ...

Page 2: ...4 6 1 2 3 5 17 8 9 12 13 15 16 14 10 11 7 ...

Page 3: ...Needle plate 12 Swivel plate 13 Adjusting knob for seam width 14 Seam width viewing window 15 Needle holder 16 Sewing light cover 17 Adjusting knob for presser foot pressure 18 Upper overedge looper 19 Lower overedge looper 20 Two thread chainstitch looper 21 Threading aid for the two thread chainstitch looper cover stitch looper 22 Swiveling stitch width latch 23 Movable upper blade 24 Fixed lowe...

Page 4: ...r 4 Insert the top fabric layer right side down into the opening of the Gathering Foot G making sure it is even with the bottom layer 5 Lower the presser foot and sew Hold top layer taut while guiding lower layer with no tension Sew the layers together as it gathers Tip Increase the needle thread tension if needed Strap and Belt Loop Foot L The Strap and Belt Loop Foot L is used to create straps a...

Page 5: ... the sewing machine to the nearest authorized dealer or service center for examination repair electrical or mechanical adjustment Never operate the sewing machine with any air openings blocked Keep ventilation openings of the sewing machine and foot controller free from the accumulation of lint dust and loose cloth Keep fingers away from all moving parts Special care is required around the sewing ...

Page 6: ...tion manual guarantee card 1 machine cover 1 accessory box 1 power table We reserve the right to change the machine equipment and the assortment of accessories without prior notice or make modifications to the performance or design Such modifications however will always be to the benefit of the user and the product Please note that on disposal this product must be safely recycled in accordance wit...

Page 7: ...eatures the very latest in design and technology and it is just as simple to operate as this instruction manual is to follow Before you start sewing please take the time to read these instructions care fully It is certainly time well spent and is the best way to find out just what your new coverstyle can do and make full use of all its features If you have any further questions just ask your autho...

Page 8: ... bulb sewing lamp changing 60 Loopercover 8 Lubricating the machine 58 Machine cover 6 Maintenance 58 60 Needle holder 13 Needle inserting tool 13 Needle plate disengaging lever 38 Needle plate removing 38 Needle position 12 Needle threader 25 Needle changing 13 Power table 35 Presser foot lifter 10 Presser foot pressure 28 Presser foot 11 Presser foot changing 11 Program overview 40 43 Rubber fee...

Page 9: ...Thread tensions setting 39 Thread unreeling disc 9 Threading aid for the 2 thread chain stitch looped cover stitch looped 19 21 Threading paths overview 26 28 Threading the 2 thread chain stitch looped cover stitch looped violet 18 21 Threading the lower overedge looper yellow 16 17 Threading the needle s 22 23 Threading the upper overedge looper pink 15 Threading important note 24 Threading Threa...

Page 10: ...en the sewing process is finished push the telescopic thread guide 32 together The spool stand 34 must be pushed to its full extent in to the machine regardless of whether a spool is attached Place the cover over the machine The accessories should be stored in the accessory box ...

Page 11: ...tlet Do not modify the plug in any way Foot controller type 4C 325G 230V 4C 335B 110 125V 4C 335G 220 240V YC 482M 110 125V YC 483 5 230V has to be used with this overlock machine Connecting the foot control Connect the plug of the foot control to the connection socket 39 of the machine The sewing speed is regulated by activating the foot control Electrical connection Connect the foot control cord...

Page 12: ...e looper cover or swivel plate 12 is opened for safety reasons i e se wing with the machine is no longer possible Waste container optional Order No 2992499381111 Insert the upper latch of the waste container 45 into the upper slot of the looper cover 7 Apply pressure to the lower part of the contai ner until the lower latches flick into place in the lower slots of the looper cover To remove the wa...

Page 13: ... its highest position To ensure optimum thread feed turn the tele scopic parts slowly until you hear the locking balls flick into place Thread unreeling disc The thread unreeling disc in the accessory box is used for small spools spools with notched or rough ends Place the spool on the spool pin 35 Place the thread unreeling disc on top of the spool Make sure the spool disc 37 is used under the sp...

Page 14: ...e the thread net and or the thread unreeling disc if needed Presser foot lifter The presser foot can be raised and lowered using the presser foot lifter 43 The maximum vertical lift of 6 5 mm for the presser foot for particularly thick fabrics can be achieved by pressing the presser foot lifter towards the rear Once an initial thread chain has been created the presser foot lifter no longer needs t...

Page 15: ...st position by turning the hand wheel towards you Raise the presser foot and press lever A at the rear of the presser foot holder The presser foot will be released automatically from the holder Pivot the presser foot clockwise until the front half of presser foot clears holder and remove by sliding foot away from you towards back of machine To attach Place the presser foot behind and perpendicular...

Page 16: ...The different needle positions are depicted in a schematic drawing in the instruction manual Also refer to the examples above and below Insert the needle s as shown on the program overview see pages 40 43 Note If the needles R2 and L1 have been in serted the left needle will be somewhat higher than the right needle Note If the needles L1 and L2 have been inserted the left needle will be somewhat l...

Page 17: ...e Loosen the fastening screw of the needle without remo ving it with the Allen key behind the swivel plate and pull the needle down to remove To insert Insert the needle into hole E of the needle inserting tool so that the flat needle shank K faces the flat side L of the inserting tool Insert the needle fully into the holder and tighten the fastening screws Remove the needle inserting tool Overloc...

Page 18: ...ront fol lowing the colored threading paths Lift the carry handle 3 upwards Thread through the underside of the carrying handle and through the rear thread guides 44 using both hands to pull the thread down until it slips under the thread guide Guide the thread through the tension discs and pull it down until it is positioned firmly between the tension discs Return the carrying handle to its origi...

Page 19: ...r 18 is in its highest position Thread in a sequence of 1 to 8 Thread from the front through the eye of the upper overedge looper 8 Pull approximately 4 10 cm of thread through the looper and place it to the left under the presser foot Thread through the thread guides 1 to 7 which are marked with a pink dot ...

Page 20: ...16 Threading the lower overedge looper yellow Turn the handwheel towards you until the lo wer overedge looper 19 is on the extreme right Thread in a sequence of 1 to 10 ...

Page 21: ...edge looper C threading point 10 Press lever A downwards and hook the thread into guide B Please also refer to the drawing below Note The lever returns automatically to its position as soon as you start sewing Pull approximately 4 10 cm of thread th rough the looper and place it to the left under the presser foot ...

Page 22: ...the two thread chainstitch looper and cover stitch looper violet for the chainstitch Turn the handwheel towards you until the two thread chainstitch looper 20 is on the extreme right Thread in a sequence of 1 to 11 ...

Page 23: ...hread chainstitch looper and the cover stitch looper threading point 11 Push lever A upward and hook the thread into slot B Also refer to the drawing below Note The lever returns automatically to its position as soon as you start sewing Pull approximately 4 10 cm of thread through the looper and place it to the left under the presser foot ...

Page 24: ... the two thread chainstitch looper and cover stitch looper for the cover stitch violet prog 02 Turn the handwheel towards you until the two thread chainstitch looper 20 is on the extreme right Thread in a sequence of 1 to 10 ...

Page 25: ...ugh eye C of the two thread chainstitch looper and the cover stitch looper threading point 10 Press lever A upward and hook the thread into slot B Also refer to the drawing below Note The lever returns automatically to its position as soon as you start sewing Pull approximately 4 10 cm of thread through the looper and place it to the left under the presser foot ...

Page 26: ...he thread must be guided through the lower slot of thread guide 4 Pull approximately 4 10 cm of thread through the looper and place it to the left under the presser foot Note For the cover stitch the thread must also be guided through the lower thread guide 7 ...

Page 27: ...g 09 a 4 thread safety stitch seam Prog 08 and a 2 thread chainstitch Prog 01 Thread in a sequence of 1 to 9 The thread must be guided through the upper slot of thread guide 5 Pull approximately 4 10 cm of thread through the looper and place it to the left under the presser foot ...

Page 28: ...thread and then rethread the needle threads Changing a spool on a threaded machine Cut the threads off close to the spool and re place with new spools Tie together the threads which are still in the machine with the new threads and pull the threads out of the needle eyes Raise the presser foot Pull on the needle threads until the knots are about 6 inches 15 cm past the last thread guide in front o...

Page 29: ... to be found in the accessory box One of the two triangles must point upwards Place the needle threader onto the front groove of the needle Slide the needle threader down to the needle eye and press it lightly against the needle A small metal pin is pushed through the needle eye and the needle is automatically threaded Thread loops must be pulled to the back ...

Page 30: ...ading sequences Program 01 2 thread chainstitch Program 03 2 thread flatlock narrow Program 11 2 thread serging narrow Program 12 2 thread rolled hem Program 13 folded 2 thread rolled hem Program 02 cover stitch Program 04 2 thread flatlock wide ...

Page 31: ...e narrow Program 14 3 thread rolled hem Program 15 folded 3 thread rolled hem Program 16 3 thread flatlock narrow Program 07 4 thread overedge seam Program 06 3 thread overedge wide Program 17 3 thread serging wide Program 18 3 thread flatlock wide Program 08 4 thread safety stitch seam ...

Page 32: ...ser foot pressure on the machine is suitable for medium heavy fabrics The presser foot pressure does not need to be adjusted for most fabrics If you are working with light or heavy fabrics then you may need to adjust the pressure In this case 6 setting positions are available which you can select using the adjusting knob for the presser foot pressure 17 The standard setting is N ...

Page 33: ...hread chain and raise the presser foot Remove the thread chain carefully from the swiveling stitch width latch 22 Pull the thread chain forwards and clamp it under the spring Butt the fabric up against the front of the needle s If necessary make an approx 1 5 3 cm cut into the fabric along the cut line using a pair of scissors Lower the presser foot and start sewing The thread chain pulls automati...

Page 34: ... Push the knob for lowering the upper blade 27 fully to the right To lower the upper blade turn the knob towards you until the upper blades clicks into place below The upper blade is now disenga ged Engaging the upper blade Push the knob for lowering the upper blade to the right and swivel the blade back until it clicks into the operating position again Close the looper cover and the swivel plate ...

Page 35: ...itch width latch 22 remains in the basic position when sewing all types of standard overlock seams exception Program 01 02 For rolled hems Pull knob A to the right and swivel the swive ling stitch width latch 22 downwards This setting allows you to sew all types of rolled hems ...

Page 36: ... place and push the converter onto the overedge looper bracket To remove the converter gently push the point of the converter from the eye of the upper overedge looper You can now remove the con verter by pulling it upwards from the overedge looper bracket Position the upper overedge looper 18 right next to the needle by turning the handwheel towards you ...

Page 37: ...o tight move the movable upper blade 23 to the left by turning the seam width adjusting knob downwards Note The top row of numbers on the dial refers to the seam width of a standard 3 thread overedge seam The width settings 3 5 mm through 6 0 mm are measured from needle R1 to the outer fabric edge This width is decreased by 2 0 mm when only using needle R2 i e you have a seam width that is complet...

Page 38: ...er the swiveling stitch width latch see page 31 and disengage the upper blade see page 30 Ensure that the upper blade is disen gaged by turning the handwheel towards you Disengage the upper overedge looper Move the upper overedge looper 18 into its lowest position by turning the handwheel towards you Move the looper disengaging lever 9 to the left Ensure that the looper is disengaged by turning th...

Page 39: ...machine to its previous settings after sewing with the cover stitch or two thread chainstitch Open the looper cover and remove the power table Move the looper disengaging lever to the right thus re engaging the upper overedge looper Bring the swiveling stitch width latch into the basic position see page 31 and engage the up per blade see page 30 Push the blade guard into the looper cover and close...

Page 40: ...the rear feed dog Note The function of the differential feed also de pends on the set stitch length and the type of fabric being used Set the regulator wheel for the differential feed 41 to 0 5 At this setting the front feed dog feeds half as fast as the rear feed dog This means that the front feed dog feeds only half as much fabric as the rear feed dog causing the fabric to stretch Here you will ...

Page 41: ...wever you should always test your setting first on a piece of scrap fabric Type of fabric effect Differential feed setting gather 2 0 normal 1 0 stretch 0 5 Very light fabrics silk satin poplin taffeta linings Normal fabrics light and medium heavy cottons fine cords thermal wear Light knitwear jerseys polo fabrics cut pile pullovers tricot fine knitwear and gathered fabrics Heavy knitwear sweatshi...

Page 42: ...er foot and move the needle s to the highest position Remove the presser foot and open the swivel plate Press down the needle plate disengaging lever 26 The needle plate 11 is raised out of its mount The needle plate can be removed to the left Note The machine should be unthreaded when remo ving the needle plate Inserting the needle plate Place the needle plate to the rear on the guide pin A and p...

Page 43: ... be adjusted once the upper blade is secured Setting thread tension The following pages contain directions for setting thread tensions for all programs Adjust the tension by turning the tensioning wheel until the dot marker is at the desired setting The settings for adjusting thread tension are recommendations Fabric type thread quality and needle gauge will influence seam results Always sew off a...

Page 44: ...Program 04 2 thread flatlock wide Serging medium heavy fabrics Joining stretch fabrics with a flatlock seam 2 5 5 Program 05 3 thread overedge narrow Serging light easily frayed fabrics 2 5 5 Program 06 3 thread overedge wide Serging tightly woven easily frayed fabrics 3 5 5 Program 07 4 thread overedge Joining and simultaneous serging of all fabrics in particular stretchy fab rics 2 5 5 5 Program...

Page 45: ...able 50 with without Converter 28 with without Thread tension The value refer to medium heavy fabrics and normal polyester thread blue green pink yellow violet 5 0 2 0 6 0 6 0 1 0 1 5 5 0 1 5 5 5 4 0 3 0 2 0 5 0 2 0 2 0 5 0 4 0 2 0 2 0 5 0 1 5 5 5 2 0 5 0 5 0 2 0 2 0 2 0 ...

Page 46: ...d hem Serging very light fabrics Decora tive edges 1 2 5 5 Program 14 3 thread rolled hem Serging light to medium heavy fabrics Decorative edges 1 2 5 5 Program 15 Folded 3 thread rolled hem Serging light to medium heavy fabrics Decorative edges 1 2 5 5 Program 16 3 thread flatlock narrow Serging medium heavy fabrics Joining stretch fabrics with a flatlock seam and decorative edges 1 5 5 5 Program...

Page 47: ... Power table 50 with without Converter 28 with without Thread tension The value refer to medium heavy fabrics and normal polyester thread blue green pink yellow violet 5 0 4 0 1 0 4 0 1 0 1 5 6 0 4 0 4 0 5 0 4 0 3 0 5 0 2 5 7 5 1 5 2 0 6 0 7 0 0 5 8 0 1 0 2 0 7 0 ...

Page 48: ... one inch 2 5 cm fabric width to sew a finished hem of 3 4 inch 2 cm Note Set the seam width at 3 5 cm To start sewing Raise the presser foot and place the fabric under the presser foot so the needles pierce the fabric for the first stitch Position the fabric at the desired width using the marked guideli nes on the power table When starting to sew pull the fabric taut towards the rear and sew slow...

Page 49: ...ory box into the guide holder A from the left The edge guide can be set as required by sliding it to the left or right After the second click tum the handwheel away from you until the needles are in their highest position Raise the presser foot this will release the tension on the threads Hold the threads tightly at the end of the seam and pull the fabric from the machine Cut the threads Pull the ...

Page 50: ...n the underside of the fabric The looper thread violet is situated loosely in between The right needle thread green is too loose causing large loops on the underside of the fabric Set the green thread tension to a higher value The needle threads green and blue are set too tightly causing folds in the fabric Set the green and blue thread tension to a lower value ...

Page 51: ...ts of the 2 thread chainstitch and the 2 thread flatlock you can refer to the correction possibi lities of these seam below and on page 51 Note Attach the converter see page 32 when sewing a 4 thread safety stitch seam 2 thread chainstitch Program 01 When all tensions are correctly set the needle thread blue is just slightly visible on the tunderside of the fabric The needle thread blue is too loo...

Page 52: ...of needle thread on the underside of the fabric Set the blue and green thread tension to a higher value The upper looper thread pink appears on the underside of the fabric Set the pink thread tension to a higher value and or the yellow thread tension to a lower value The lower looper thread yellow appears on the top side of the fabric Set the yellow thread tension to a higher value and or the pink...

Page 53: ...n the underside of the fabric Set the pink thread tension to a higher value and or the yellow thread tension to a lower value The needle thread is too loose causing loops on the underside of the fabric Set the relevant needle thread tension to a higher value The lower looper thread yellow appears on the top side of the fabric Set the yellow thread tension to a higher value and or the pink thread t...

Page 54: ...d is too tight Set the needle thread tension blue to a lower value The upper looper thread pink appears on the underside of the fabric Set the pink thread tension to a higher value The lower looper thread yellow is too loose Set the yellow thread tension to a higher value ...

Page 55: ...d to sew the 2 thread flatlock seam The needle thread is too loose or the lower looper thread yellow is too tight Set the relevant needle thread tension to a higher value and or the yellow thread tension to a lower value The lower looper thread yellow is too loose and or the needle thread is too tight Set the yellow thread tension to a higher value and or the relevant needle thread tension to a lo...

Page 56: ...he upper looper thread pink appears on the underside of the fabric Set the pink thread tension to a higher value and or the yellow thread tension to a lower value The lower looper thread yellow appears on the top side of the fabric Set the yellow thread tension to a higher value and or the pink thread tension to a lower value ...

Page 57: ...thread tension to a lower value and or the yellow thread tension to a higher value The upper needle thread green is too loose Set the green thread tension to a higher value The lower looper thread yellow appears on the top side of the fabric Set the yellow thread tension to a higher value and or the pink one to a lower value ...

Page 58: ...thread rolled hem The upper needle thread green is too tight Set the green thread tension to a lower value and or the yellow thread tension to a higher value The lower looper thread yellow is too tight Set the yellow thread tension to a lower value and or the green thread tension to a higher value ...

Page 59: ... be at tached to sew the 2 thread rolled hem The upper needle thread green is too loose Set the green thread tension to a higher value and or the yellow thread tension to a lower value The lower looper thread yellow is too loose Set the yellow thread tension too a higher value ...

Page 60: ...the 2 needle 3 thread assembly seam The upper needle thread green is too loose Set the green thread tension to a higher value The lower needle thread blue is too loose Set the blue thread tension to a higher value The lower looper thread yellow is too tight Set the yellow thread tension to a lower value ...

Page 61: ... linen dress fabrics Cotton no 40 60 Synthetic thread no 70 140 2 0 4 0 mm Heavy fabrics tweed suit fabrics denim heavy cloth Cotton no 30 50 Synthetic thread no 70 140 2 0 4 0 mm Knitwear Cotton no 40 60 Synthetic thread no 70 140 2 0 4 0 mm 2 or 3 thread rolled hems Polyester thread no 120 140 Mercerized thread bulk thread 1 0 2 0 mm Thread chart for 2 3 and 4 thread overedge seams ...

Page 62: ... the upper and lower blades the differential feed and the looper area Cleaning the rubber feet Clean the rubber feet from time to time with alcohol This ensures good stability Lubricating the machine Turn off the electrical power Move the upper looper into its highest position Lubricate the points shown above with recom mended sewing machine oil every time you clean the machine Use only one or two...

Page 63: ...box Then remove the upper blade To insert Attach the new upper blade and gently tighten the fastening screw Then turn the handwheel until the upper blade is in the lowest position In this position the front edge of the upper blade must be 0 5 to 1 0 mm lower than the cut ting edge of the lower blade When the upper blade has been properly inserted you can fully tighten the fastening screw Loosen th...

Page 64: ...ver can be removed Push the light bulb fully into its socket Rotate counter clockwise through half a turn and remove Guide the new light bulb max 15 W into the socket and twist until both pins on the bulb click into place Press the bulb right into the socket twisting it clockwise until it is securely fixed Replace the sewing light cover and tighten the fastening screw ...

Page 65: ...ed incorrectly threaded Insert new needle see page 13 Insert needle correctly see page 13 Use needle system EL X 705 Thread properly see page 14 23 Stitch formation faulty Incorrect setting of thread tension Re set thread tensions see page 46 56 3 or 4 thread overedge seam has an irregular appearance and the upper looper thread has not interlocked in the seam The converter is attached The converte...

Page 66: ...hread spool stand 35 Thread spool pin 36 Cone thread adapter 37 Spool disc 38 Electrical power master switch 39 Machine socket foot control 40 Handwheel 41 Regulator wheel for differential feed 42 Stitch length adjustment knob 43 Presser foot lifter 44 Rear thread guides 45 Power table 46 Foot control 47 Accessory box ...

Page 67: ...44 38 39 43 42 41 40 31 32 33 34 37 36 35 ...

Page 68: ...VSM Group AB SE 561 84 Huskvarna SWEDEN www pfaff com 413 03 60 26B English Inhouse 2006 VSM Group AB All rights reserved Printed in Sweden on environmentally friendly paper ...

Reviews: