background image

1.

CONNECTING YOUR TV-VIDEO COMBI

4

. . . . . . . . . . . . . .

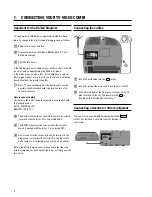
Connecting the cables

4

. . . . . . . . . . . . . . . . . . . . . . . . . . . . .

Connecting a decoder or other equipment

4

. . . . . . . . . . . .

2.

INSTALLING YOUR TV-VIDEO COMBI

5

. . . . . . . . . . . . . . . .

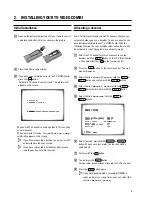
Initial installation

5

. . . . . . . . . . . . . . . . . . . . . . . . . . . . . . . . . .

Allocating a decoder

5

. . . . . . . . . . . . . . . . . . . . . . . . . . . . . .

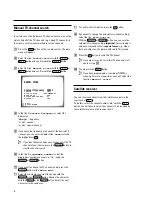
Manual TV channel search

6

. . . . . . . . . . . . . . . . . . . . . . . . .

Satellite receiver

6

. . . . . . . . . . . . . . . . . . . . . . . . . . . . . . . . . .

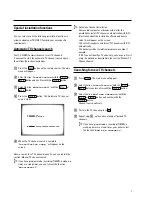
Special installation functions

7

. . . . . . . . . . . . . . . . . . . . . . .

Automatic TV channel search

7

. . . . . . . . . . . . . . . . . . . . . .

Searching for new TV channels

7

. . . . . . . . . . . . . . . . . . . . .

Allocating a channel number

8

. . . . . . . . . . . . . . . . . . . . . . .

Delete a TV Channel

8

. . . . . . . . . . . . . . . . . . . . . . . . . . . . . . .

Setting the language

9

. . . . . . . . . . . . . . . . . . . . . . . . . . . . . .

Setting the time and date

9

. . . . . . . . . . . . . . . . . . . . . . . . . . .

3.

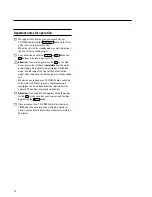
IMPORTANT NOTES FOR OPERATION

11

. . . . . . . . . . . . . .

SUMMARY OF USER GUIDE

11

. . . . . . . . . . . . . . . . . . . . . . .

User guide (OSD)

11

. . . . . . . . . . . . . . . . . . . . . . . . . . . . . . . . .

4.

TV SET FUNCTIONS

13

. . . . . . . . . . . . . . . . . . . . . . . . . . . . . .

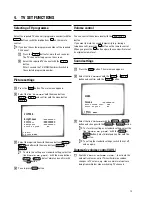
Selecting a TV programme

13

. . . . . . . . . . . . . . . . . . . . . . . .

Automatic volume control (AVL)

13

. . . . . . . . . . . . . . . . . . . .

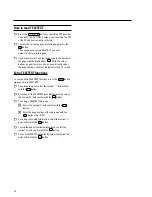
How to read TELETEXT

14

. . . . . . . . . . . . . . . . . . . . . . . . . . . .

5.

PLAYBACK FUNCTIONS

15

. . . . . . . . . . . . . . . . . . . . . . . . . .

Playing a cassette

15

. . . . . . . . . . . . . . . . . . . . . . . . . . . . . . . .

Tape position indication

15

. . . . . . . . . . . . . . . . . . . . . . . . . . .

Searching for tape position with the picture (picture
search)

15

. . . . . . . . . . . . . . . . . . . . . . . . . . . . . . . . . . . . . . . . .

Still picture

15

. . . . . . . . . . . . . . . . . . . . . . . . . . . . . . . . . . . . . .

Searching for tape position without the picture (wind
and rewind)

15

. . . . . . . . . . . . . . . . . . . . . . . . . . . . . . . . . . . . .

Instant View

15

. . . . . . . . . . . . . . . . . . . . . . . . . . . . . . . . . . . . .

Automatic search for a tape position (index search)

16

. .

Picture interference

16

. . . . . . . . . . . . . . . . . . . . . . . . . . . . . .

Cleaning the video heads

16

. . . . . . . . . . . . . . . . . . . . . . . . .

6.

MANUAL RECORDING

17

. . . . . . . . . . . . . . . . . . . . . . . . . . . .

Recording without automatic switch-off

17

. . . . . . . . . . . .

Recording with automatic switch-off (OTR
one-touch-recording)

17

. . . . . . . . . . . . . . . . . . . . . . . . . . . . .

Protecting your recordings

17

. . . . . . . . . . . . . . . . . . . . . . . .

Auto-assembling

17

. . . . . . . . . . . . . . . . . . . . . . . . . . . . . . . . .

7.

PROGRAMMED RECORDING (TIMER)

19

. . . . . . . . . . . . . . .

’VPS’ (Video Programming System) and ’PDC’
(Programme Delivery Control)

19

. . . . . . . . . . . . . . . . . . . . .

Programming a recording (with ’VIDEO Plus+’)

19

. . . . . . .

Programming a recording (without ’VIDEO Plus+’)

20

. . . .

Programming a recording with TELETEXT

21

. . . . . . . . . . .

How to check or change a TIMER

22

. . . . . . . . . . . . . . . . . .

8.

ADDITIONAL FUNCTIONS

23

. . . . . . . . . . . . . . . . . . . . . . . . .

Parental control

23

. . . . . . . . . . . . . . . . . . . . . . . . . . . . . . . . . .

Switching the On-screen display (OSD) on or off

23

. . . . .

Continuous playback

24

. . . . . . . . . . . . . . . . . . . . . . . . . . . . .

Switch off function (SLEEP TIMER)

24

. . . . . . . . . . . . . . . . .

Switch on function (WAKE-UP TIMER)

24

. . . . . . . . . . . . . .

9.

Before you call an engineer

25

. . . . . . . . . . . . . . . . . . . . . . .

Technical terms used

25

. . . . . . . . . . . . . . . . . . . . . . . . . . . . .

CONTENTS

3

Summary of Contents for 14PV335

Page 1: ...icture picture search 15 Still picture 15 Searching for tape position without the picture wind and rewind 15 Instant View 15 Automatic search for a tape position index search 16 Picture interference 16 Cleaning the video heads 16 6 MANUAL RECORDING 17 Recording without automatic switch off 17 Recording with automatic switch off OTR one touch recording 17 Protecting your recordings 17 Auto assembli...

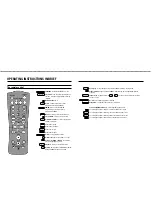
Page 2: ...ect the previous programme number PLAY G Playback To play a recorded cassette H Rewind During STOP and STANDBY rewind during PLAYBACK reverse scanning STOP h Pause Stop To stop the tape except while a TIMER recording is being made I Forward wind During STOP and STANDBY forward wind during PLAYBACK forward scanning INDEX E Index search In combination with H I to search for previous next recording o...

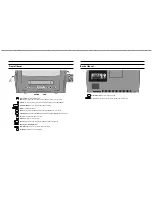
Page 3: ...uring PLAYBACK reverse scanning I Forward wind During STOP and STANDBY forward wind during PLAYBACK forward scanning 5 Record To record the programme selected G Playback To play a recorded cassette Pause Stop To stop the tape except while a TIMER recording is being made AUDIO Audio input socket left right stereo VIDEO Video input socket To connect a camcorder or videogames w Headphones socket To c...

Page 4: ...he facilities available in your country for disposing of the packaging of the TV VIDEO Combi in a way that helps to protect the environment C This electronic equipment contains many materials that can be recycled Please inquire about the possibilities for recycling your old set DVIDEO Plus and PlusCode are registered trademarks of Gemstar Development Corporation The VIDEO Plus system is manufactur...

Page 5: ...u have plugged your TV VIDEO Combi into the mains you will be welcomed with an OSD picture All you have to do is follow the instructions in the intelligent help line for the next step Enjoy the Automatic TV channel search save function and the automatic time adjustment Automatic Volume Leveller This prevents a sudden increase of the volume for example during commercials Simple programming system f...

Page 6: ...NEUTRAL N BROWN LIVE L d The BLUE wire must be connected to the terminal which is marked with the letter N or coloured BLACK e The BROWN wire must be connected to the terminal which is marked with the letter L or coloured RED f Do not connect either wires to the earth terminal in the plug which is marked with the letter E or by the safety earth symbol or coloured green or green and yellow Before r...

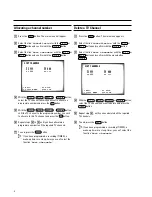
Page 7: ... connected decoder will automatically be activated for the TV programme you want to watch a Select the TV channel for which you want to use the decoder with the P p button on the TV VIDEO Combi or the number buttons 0 9 on the remote control b Press the MENU button on the remote control The main menu will appear c Select the line Installation with the BP r or AP q buton and confirm with the SqC bu...

Page 8: ...e programme number you want e g 01 using the DSr or SqC button g If you want to change the TV channel name press the SqC button in line Name edit E Select the character you want to change with the DSr or the SqC button Change the character with the BP r or the AP q button Select the next character in the same way E To confirm the information press the OK button h If you want to change the automati...

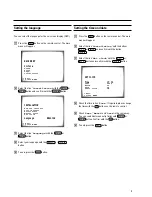
Page 9: ...ER a wake up timer or a sleep timer you can t select the function Autoinstall DAutomatic Channel Installation Some cable companies or broadcasters offer the possibility to install TV channels automatically with ACI Information about the installation offered and how to select it will appear on the screen This set will recognize and install TV channels with ACI automatically TV channels will be stor...

Page 10: ...ted a programme number to all the required TV channels g To end press the MENU button DIf you have programmed a recording TIMER a wake up timer or a sleep timer you can t select the function Sort channels Delete a TV Channel a Press the MENU button The main menu appears b Select the line Installation with the BP r or AP q button and confirm with the SqC button c Select the line Sort channels with ...

Page 11: ...guage with the DSr or SqC button e To end press the MENU button Setting the time and date a Press the MENU button on the remote control The main menu will appear b Select the line Installation with the buttons BP r or AP q and confirm with the button SqC c Select the line Set clock with the BP r or AP q button and confirm with the SqC button SET CLOCK Time 15 36 Year 2000 Month 06 Date 08 Smart cl...

Page 12: ...me a Press the MENU button on the remote control The main menu will appear b Select the line Installation with the buttons BP r or AP q and confirm with the button SqC c Select the line Set clock with the BP r or AP q button and confirm with the SqC button d Select the line Smart clock with the menu buttons BP r or AP q e Switch the function on with the menu buttons DSr or SqC f Confirm with the O...

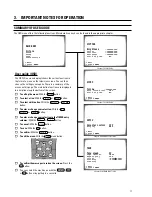
Page 13: ...ection With the 0 9 DSr or SqC button E To enter or change your selection in the TIMER entry columns With the BP r or AP q button E To cancel With the MENU button E To save With the OK button E To confirm With the SqC button E To exit the menu With the MENU menu button E To confirm the messages in red on the screen Press the OK button E You can switch the machine on with the P p z or 0 9 button or...

Page 14: ...ly No programmed recordings will then be made The red lamp at the front of the set will not be alight After some time the date and clock settings will be lost We advice you to keep your TV VIDEO Combi connected to the mains at all times to ensure that programmed recordings can be made and that the television works normally The power consumption will be low E Attention If you switch off the applian...

Page 15: ...ect YES and confirm with the OK button d To end press MENU button Volume control You can control the volume level with the _Sp button If you want to mute the sound temporarily e g during a telephone call press the y button on the remote control When you press the y button again the sound will return at its original volume level Sound settings a Press the MENU button The main menu appears b Select ...

Page 16: ...of the TV screen Extra TELETEXT functions To use the extra TELETEXT functions press the MENU button when you are in TELETEXT E To enlarge the print select the symbol g and confirm with the OK button E To switch off the TELETEXT decoder temporarily select the symbol d and confirm with the OK button E To call up a TELETEXT sub page a Select the symbol and confirm with the OK button b Enter the page ...

Page 17: ...he menu buttons BP r or AP q and confirm with the SqC button c Select the line Tape counter with the menu buttons BP r or AP q d With the menu buttons DSr or SqC select USED to check the time used or LEFT to check the time left on the tape e Confirm with the OK button Searching for tape position with the picture picture search a While a cassette is playing press the H reverse or I forward button o...

Page 18: ...ill remain until you remove the cassette Tracking during still picture If the still picture vibrates vertically you can improve the still picture as follows a During still picture press the MENU button b Select the line Tape with the BP r button or AP q and confirm with the SqC button c Select the line Jitter with the BP r or AP q button d Hold the DSr or SqC button until the picture quality is at...

Page 19: ...the RECORD OTR n button on the remote control When you are recording the red recording light at the front panel of the TV VIDEO Combi will be lit d Press the RECORD OTR n button again and again until the display on the TV VIDEO Combi shows the desired end time or length of the recording DTo cancel this information press the CLEAR button e Confirm with the OK button f To end press the MENU button P...

Page 20: ...g speed double recording time SP Standard Play normal recording speed DThe picture quality will be adversely affected when recording at half recording speed LP DFor playback the correct recording speed will automatically be selected e Confirm with the OK button f To end press the MENU button 18 ...

Page 21: ... the programme s start time for example 20 15 and VPS 20 14 you must enter 20 14 as the start time If you want to programme a time that is different from the VPS or PDC time you must switch off VPS or PDC Programming a recording with VIDEO Plus All the information required for a programming is contained in the PlusCode programming number a Press the TIMER s button on the remote control b Select th...

Page 22: ...nsert cassette No cassette will appear DIf you have inserted a cassette with erase protection when you want to start a recording the cassette will be ejected f Press the OK button g Confirm the message on the screen with the OK button A TIMER recording can only start if the set is not used for other video recorder functions e g playback h To end press the TIMER s button Programming a recording wit...

Page 23: ...programme you have selected In this case you should programme the recording as described in the paragraph programming a recording e Use the BP r and AP q buttons to move the cursor h to the TV programme you want to record DIf you want to cancel this function press TELETEXT e f Press OK The timer menu will appear The required programming information has been stored in a TIMER block Please check the...

Page 24: ... with the BP r or AP q button or with the 0 9 buttons DUnder LP use the BP r or AP q button to select the recording speed SP or LP f Confirm with the OK button g To end press the TIMER s button h Make sure that the cassette you have put in can be recorded on How to clear a TIMER a Press the TIMER s button on the remote control b Select the line TIMER PROGRAMMING with the menu buttons BP r or AP q ...

Page 25: ...ly operate the TV VIDEO Combi with the remote control DIf you want to eject a cassette with activated parental control press the STOP h button several seconds Switching the On screen display OSD on or off You can switch the On Screen Display of the current operating information on or off a Press the MENU button The main menu appears b Select the line Setup with the menu buttons BP r or AP q and co...

Page 26: ...off after a predetermined period a Press the TIMER s button on the remote control b Select line Sleep timer with the BP r or AP q button and confirm with the SqC button c Determine the time left until switch off in 15 minutes intervals using the BP r or AP q button DYou can switch the function off with the CLEAR button on the remote control d Confirm with the OK button e To end press the TIMER s b...

Page 27: ...et the TIMER properly check the TIMER blocks You have programmed the wrong time or date check time and date You have put in a cassette that cannot be recorded on undo the erase protection on the cassette PDC or VPS switched on but PDC VPS time wrong enter PDC or VPS time exactly to the minute Have the aerial checked Smart Clock setting does not work You have stored a TV channel on programme number...

Page 28: ...26 3103 166 26421 0073 011 14PV330 07 14PV334 335 07 WwnnNNNwwnwNNnwnWwnNnwWnNNwnnW ...

Reviews: