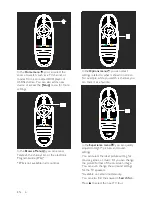
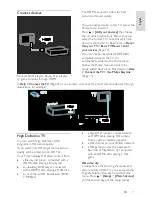
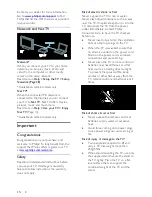
background image


EN User Manual 


Register your product and get support at  

www.philips.com/welcome  


46PFL76x5H 
42PFL76x5C 
42PFL76x5H 
40PFL76x5H 
37PFL76x5H 
37PFL75x5H 
32PFL76x5C 
32PFL76x5H 
32PFL74x5H 


Summary of Contents for 32PFL74X5H

Page 1: ...EN User Manual Register your product and get support at www philips com welcome 46PFL76x5H 42PFL76x5C 42PFL76x5H 40PFL76x5H 37PFL76x5H 37PFL75x5H 32PFL76x5C 32PFL76x5H 32PFL74x5H ...

Page 2: ...ings 33 Change channel settings 35 Install channels 36 Change language settings 37 Setup network 38 Change other settings 42 Update software 43 Reinstall the TV 44 5 Connect the TV 45 First connections 45 About cables 45 TV connectors overview 47 Connect devices 48 Connect more devices 54 Use Philips EasyLink 58 Use a CAM 61 Insert SD card 62 6 Troubleshooting 63 Contact us 63 General TV issues 63...

Page 3: ...o open or close the Home menu In the Home menu you can access connected devices picture and sound settings and other useful features To open or close the Browse menu In the Browse menu you can access Teletext the channel list or the electronic Program Guide EPG EPG is not available in all countries ...

Page 4: ...lose the Experience menu In the Experience menu you can access a range of frequently used settings Back To return to the previous TV channel or menu Press and hold to return to watching TV Red To select the red option access digital Interactive TV services or watch TV demonstration clips Available on certain models only ...

Page 5: ...To select the blue option Read more about the remote control in Help Use your TV Remote control Overview Page 14 Alternatively find the answer in Search for Press to select the next TV tour The TV menus Let s learn more about these frequently used menus the Home menu the Browse menu the Options menu the Experience menu ...

Page 6: ...untries In the Options menu you can select settings related to what is shown on screen For example while you watch a channel you can mark it as a favorite In the Experience menu you can quickly adjust Ambilight picture and sound settings You can select the ideal picture setting for movies games or music Or you can change the picture format of the on screen image You can even change the surround se...

Page 7: ...arn to connect the most common devices through illustrations for example High Definition TV You can watch High Definition HD programs in HD picture quality If you watch non HD programs the picture quality will be similar to non HD TVs Your TV can display HD video content from a Blu ray disc player connected with a HDMI cable playing a Blu ray disc an upscaling DVD player connected with a HDMI cabl...

Page 8: ... shock or fire Never expose the TV to rain or water Never place liquid containers such as vases near the TV If liquids are spilt on or into the TV disconnect the TV from the power outlet immediately Contact Philips Consumer Care to have the TV checked before use Never insert objects into the ventilation slots or other openings on the TV When the TV is swivelled ensure that no strain is exerted on ...

Page 9: ...tion slots on the TV Risk of injury fire or power cord damage Never place the TV or any objects on the power cord To easily disconnect the TV power cord from the power outlet ensure that you have full access to the power cord at all times When you disconnect the power cord always pull the plug never the cable Disconnect the TV from the power outlet and aerial before lightning storms During lightni...

Page 10: ...lection of batteries because correct disposal helps to prevent negative consequences for the environmental and human health Environmental efforts This TV has been awarded the European Union Ecolabel for its environmental qualities A TV that is awarded the Ecolabel contains energy efficient features To access energy saving settings whilst watching TV press the green button on the remote control The...

Page 11: ...e European Ecolabel Find detailed information on standby energy consumption warranty policy spare parts and recycling of this TV at the Philips website for your country at www philips com Information on end of use Inform yourself on the correct disposal of this TV and batteries see Get started Important End of use Page 10 Use a Kensington lock NonPublish Your TV is equipped with a Kensington secur...

Page 12: ...ce is 3 5m 138 from the front of the screen While seated your eyes should be level with the center of the screen For best Ambilight effect position the TV 25 cm away from the wall Product highlights Full HD LCD display This TV is equipped with a full High Definition HD LCD display supporting the maximum HD resolution of 1920x1080p This display offers a brilliant flicker free progressive scan pictu...

Page 13: ...ect the TV to a network See Setup the TV Set up network Page 38 Video store The Philips Video store gives you access to a wide range of high quality movies that you can watch directly on your TV See Use your TV Enjoy Net TV Video stores Page 25 Multimedia View or play your own multimedia files such as photos music and videos from the USB connection on the side of the TV or directly from your PC Se...

Page 14: ... move vertically 4 Ambilight Switches Ambilight on or off During TV standby switches lounge light on or off 1 Ambient sensor remote control sensor Remote control Overview NonPublish 1 Standby Switches the TV to standby if it is on Switches on the TV if it is in standby 2 Home Accesses the home menu 3 Browse Accesses the browse menu to select TV channel list the Electronic Program Guide and teletex...

Page 15: ...ns to a previous menu screen Press and hold to return to watching TV Not supported in MHEG mode Batteries Open the battery cover on the back of the remote control to insert the batteries Type AAA LR03 1 5V or Type CR2032 3V Make sure the and ends of the batteries line up correctly and are marked inside Remove the batteries if you are not using the remote control for a long time Dispose of batterie...

Page 16: ...enus Home NonPublish The home menu gives you easy access to connected devices picture and sound settings and other useful features 1 Press 2 Select an item in the home menu then press OK to access the menu 3 To exit the home menu press or To start an activity highlight the desired item with the Navigation buttons and press OK Help Accesses the electronic user manual Watch TV Switches back to the a...

Page 17: ...t displays the TV channels and possible radio stations installed on your TV 1 While watching TV press 2 Select Channel list then press OK 3 Select a channel then press OK to access the channel 4 Press to exit the channel list without changing the channel Add your devices NonPublish After you connect a device to the TV add this device in the home menu for easy access In the home menu select Add you...

Page 18: ... is red press on the remote control 2 Alternatively switch on the TV from standby by pressing any key on the side of the TV NonPublish Notes The front LED indicator does not turn on when the TV is switched on The TV requires some time to start up During this time the TV will not respond to the remote control or side controls This is normal behavior To switch to standby Press on the remote control ...

Page 19: ...d Press to mute the sound Press again to restore the sound Use the Sound menu to adjust headphone volume For more information see Setup the TV Change picture and sound settings More sound settings Page 34 Use Smart picture settings NonPublish Use the Smart picture experience menu to access frequently used picture settings 1 While watching TV press 2 Select Smart picture then select one of the foll...

Page 20: ...ll the screen subtitles remain visible Recommended for minimal screen distortion but not for HD or PC Auto zoom Enlarges the picture to fill the screen Recommended for minimal screen distortion but not for HD or PC Super zoom Removes the black bars on the sides of 4 3 broadcasts Not recommended for HD or PC Movie expand 16 9 Scales the classic 4 3 format to 16 9 Not recommended for HD or PC Wide s...

Page 21: ... how Ambilight switches off when the TV is switched off Lounge light mood Selects a lounge light mode This setting is applied when lounge light is enabled in standby mode Scenea lounge light Switch on or off Scenea lounge light when Scenea is enabled Wall colour Selects a color to match the wall color Ambilight will correct its colours to mix best with the colour of the wall behind the TV Set Ambi...

Page 22: ...ites are not tailored to be viewed on a TV screen and certain plug ins for example to view pages or videos are not available on your TV The number of services available on Net TV can change The functionality of services can change as well These changes are updated automatically You can view the latest services added or changed in the New category Net TV displays one page at a time and in full scre...

Page 23: ... another activity The Start page The Start page shows your favorite services and some recommended services You can browse Net TV from this page To return to the Start page press Browse Open a Net TV service Select a Net TV service with the Navigation buttons To open a selected service press OK A closing lock animation means that the page you have opened is a secure page Navigate a Net TV service N...

Page 24: ...y To clear the Net TV memory completely including your favorites the parental control code passwords cookies and history press Options and select Clear Net TV memory Net TV services for another country Services may differ for each country To switch to the services of another country select Country at the bottom right of the page and press OK Select a country and press OK NonPublish Koninklijke Phi...

Page 25: ...onsist of your email address and a personal PIN code When you are logged in you can select the payment method a credit card or a value code in most cases Consult the video store website for more information on their payment terms To enter a number code PIN use the Numeric buttons on the remote control To enter an email address select the text field on the page and press OK Select a character on th...

Page 26: ...TV on a channel To open the Online TV service of a TV channel directly press the Red key If this service is available the TV will open the page of the broadcaster The availability of Online TV services varies by country ...

Page 27: ...language correctly when that language uses a different character set 3 Press to exit the options menu Select a teletext language Some digital TV broadcasters have several teletext languages available You can set your primary and secondary language 1 Press 2 Select Setup Channel settings or Satellite settings Languages Primary Text or Secondary Text 3 Select your preferred teletext languages then p...

Page 28: ...gital channels EPG allows you to View a list of digital programs being broadcast View upcoming programs Group programs by genre Set reminders when programs start Setup preferred EPG channels Note EPG is not available in all countries Switch on EPG NonPublish 1 Press 2 Select Programme guide then press OK EPG options NonPublish Use the EPG options menu to set or clear reminders change day and acces...

Page 29: ... 2 Select Setup Channel settings or Satellite settings Child lock Parental rating A message appears prompting you to enter the child lock code 3 Enter the child lock code with the Numeric buttons 4 Select an age rating then press OK All programs beyond the selected age rating are blocked For information on child lock codes see Use more of your TV Use timers and locks Child lock Page 29 Use subtitl...

Page 30: ...ten to music Press the Navigation buttons to select a music track then press OK Press to fast rewind or fast forward a track Press to exit content browser Press to access or exit the following settings Stop Stops audio playback Repeat Repeats a song or an album Play once Plays the file once Shuffle on Shuffle off Enables or disables random play of songs Watch video Press the Navigation buttons to ...

Page 31: ...to rewind or fast forward a file Press to exit the content browser During video playback press to access the following settings Stop Stops playback Repeat Repeats a video Shuffle on Shuffle off Enables or disables random play of videos Listen to digital radio NonPublish If digital broadcasting is available digital radio channels are installed automatically during installation 1 While watching TV p...

Page 32: ... extra commentary To switch on visually impaired audio if available 1 While watching TV press 2 Press the green button to select Visually impaired 3 Use the following buttons to select Red Off Turn off visually impaired audio Yellow Headphones Hear visually impaired audio from headphones only Green Speakers Hear visually impaired audio from speakers only Blue Speakers headphones Hear visually impa...

Page 33: ...Press to exit More picture settings NonPublish 1 Press 2 Select Setup TV settings Picture then press OK 3 Select a setting to adjust Smart picture Accesses pre defined smart picture settings Reset Resets to factory default settings Contrast Adjusts the intensity of bright areas keeping dark areas unchanged Brightness Adjusts the intensity and details of dark areas Colour Adjusts color saturation H...

Page 34: ... Drama Applies sound settings ideally suited for drama Sports Applies sound settings ideally suited for sports 3 Press OK to confirm your choice 4 Press to exit More sound settings NonPublish 1 Press 2 Select Setup TV settings Sound then press OK 3 Select a setting to adjust Smart sound Accesses pre defined smart sound settings Reset Resets to factory default settings Bass Adjusts the bass level T...

Page 35: ...2 Select Channel list then press OK 3 In the channel list select the channel to hide then press 4 Select Hide channel then press OK The channel is hidden Unhide channels 1 While watching TV press 2 Select Channel list then press OK 3 In the channel list press 4 Select Show hidden channels then press OK Hidden channels appear in the channel list but without channel information displayed 5 Select th...

Page 36: ...annel list Notes During installation leave Settings unchanged unless your digital provider provides you with the specific values to enter When digital TV channels are found the list of installed channels may display empty channel numbers You can rename reorder or uninstall these channels Access DVB C or DVB T channels If you have installed both DVB C and DVB T channels you have to switch to the re...

Page 37: ...atic unless your cable provider supplies you with a specific symbol rate value Fine tune analog channels If the reception of an analog TV channel is poor try fine tuning the TV channel Note If you are prompted to enter a code enter 8888 1 Press 2 Select Setup Channel settings Channel installation Analogue Manual installation Fine tune and then press OK 3 Press or to fine tune the channel 4 When th...

Page 38: ...network is installed select Browse Net TV in the home menu to open the Net TV start page What you need WARNING This TV complies with the EMC directive only when you use a shielded Cat5 ethernet cable To connect the router to your TV we strongly recommend that you use an ethernet cable which is shorter than 3 meters NonPublish To connect the TV to a PC network and internet you need a router in your...

Page 39: ...PC starts your Internet browser and opens the Wi Fi MediaConnect download page www wifimediaconnect philips com On the website you can check the necessary PC system requirements 4 Enter the code printed on the CD ROM envelope 5 Click the Download now button to download the free Wi Fi MediaConnect software 6 Once downloaded start the file Wi Fi MediaConnect_setup exe 7 Follow the on screen instruct...

Page 40: ...he Start Sharing button A pop up window tells you that the media server service is started Click OK Set folders for media sharing In TVersity click the Sharing tab Click the green plus icon and select Add folder In the Add media pop up window click Browse button In the Browse for Folder window select a folder with music photos or videos which you you want to share and click OK Enable media sharing...

Page 41: ... the device and click Allow To change particular settings on media sharing open the Settings window When the device icon the TV is checked with a green tick click OK Set folders for sharing In Windows Media Player select Library from the menu and select Add to Library In the Add to Library window select My folders and those of others that I can access and click the Advanced Options button With Adv...

Page 42: ...k mode is set to Automatic syncing the TV clock to Coordinated Universal Time UTC If your TV cannot receive UTC transmissions set the clock mode to Manual Country dependent applies UTC and gives you the option of setting Daylight saving 1 While watching TV press 2 Select Setup TV settings Preferences Clock Auto clock mode 3 Select Automatic Manual or Country dependent then press OK Enable or disab...

Page 43: ...Local updates If the TV is connected to a router which is connected to the Internet you can update the TV software directly from the Internet You need a high speed Internet connection 1 Press Setup Update now and press OK 2 Select Internet and press OK Follow the instructions on screen When the update is done the TV switches off and back on again automatically Wait for the TV to switch back on do ...

Page 44: ... remove the USB flash drive during the update If a power failure occurs during the update do not remove the USB flash drive from the TV The TV will continue the update as soon as power is restored If an error occurs during the update retry the procedure If the error reoccurs contact Philips Consumer Care 1 Switch on the TV 2 Connect the USB flash drive containing the upg Help file to the USB conne...

Page 45: ...ecurely into the antenna connector Note To receive DVB S broadcasts insert the antenna cable into the SAT DVB S connector on the side of the TV This is available on certain models only About cables Overview NonPublish Before you connect devices to the TV verify which connectors are available on the device Connect the device to the TV with the highest quality connection available Good quality cable...

Page 46: ...h Definition HD TV signals and to enable EasyLink The HDMI ARC connector on the TV features HDMI ARC functionality This allows output of TV audio to an HDMI ARC compliant device Do not use an HDMI cable longer than 5 meters 16 4 feet Y Pb Pr Use the Component Video Y Pb Pr connection together with an Audio Left and Right connection for sound Match the Y Pb Pr connector colours with the cable plugs...

Page 47: ... Pr Analog audio and video input from analog or digital devices such as DVD players or game consoles 5 Stereo audio output to headphones or earphones Bottom NonPublish 1 EXT 1 SCART Analog audio and video input from analog or digital devices such as DVD players or game consoles 2 DIGITAL AUDIO OUT Digital audio output to home theaters and other digital audio systems 3 HDMI Digital audio and video ...

Page 48: ...ellite 7 VGA Video input from a computer Side NonPublish 1 HDMI Digital audio and video input from high definition digital devices such as Blu ray players 2 USB Data input from USB storage devices 3 CI Common Interface Slot for a Conditional Access Module CAM 4 SD CARD Slot for a SD memory card Connect devices Blu ray disc player Use an HDMI cable to connect the Blu ray disc player to an HDMI conn...

Page 49: ... the DVD player to an HDMI connector on the bottom of the TV DVD Recorder First use two antenna cables to connect the antenna to the DVD recorder and the TV Finally use a SCART cable to connect the DVD Recorder to a SCART connector on the bottom of the TV ...

Page 50: ...eo synchronization sync If the sound does not match with the video on screen you can set a delay on most DVD Home Theatre Systems to match the sound and video EasyLink To automatically mute the TV speakers when content is played from your Home Theatre System enable EasyLink For more information see Connect the TV Use Philips EasyLink Configure TV speakers Page 60 ...

Page 51: ...antenna cables to connect the antenna to the receiver and the TV Finally use a SCART cable to connect the receiver to the back of the TV Dig receiver and DVD R First use three antenna cables to connect the digital receiver and the DVD Recorder to the TV ...

Page 52: ... SCART cable to connect the digital receiver to the TV Finally use two SCART cables to connect the two devices and the TV Dig receiver DVD R and HTS First use three antenna cables to connect the two devices and the TV ...

Page 53: ...les to connect the digital receiver to the DVD Recorder and the DVD Recorder to the TV Then use an HDMI cable to connect the Home Theatre System to the TV Finally use a digital audio cinch cable to connect the Home Theatre System to the TV ...

Page 54: ...al HD receiver to the TV Connect more devices Game console The most practical connections for a game console are at the side of the TV However more connectors are available at the back of the TV if needed Enable game mode To prevent picture delay set the TV to Game mode 1 Press 2 Select Smart picture Game then press OK 3 Press to exit ...

Page 55: ... connections for a game console are at the side of the TV If you cannot use the side connector use an HDMI or the EXT2 YPbPr and Audio L R cable to connect the game console to the back of the TV On certain models EXT2 is labelled EXT3 ...

Page 56: ...amera does not appear automatically you may need to enable Picture Transfer Protocol PTP on the camera Refer to the camera s user manual for instructions Dig camcorder The most practical connection for a camcorder is at the side of the TV Otherwise use an HDMI or the component video and audio cable YPbPr and Audio L R to connect the camcorder to the back of the TV ...

Page 57: ...el to decode and assign the decoder to the SCART connector 1 Press 2 Select Setup Channel settings Decoder Channel 3 Set the channel you want to decode 4 Select Status then the location of the decoder 5 Press OK PC NonPublish Connect a computer using one of the following cables HDMI cable DVI HDMI cable ...

Page 58: ...RAVIA Sync Sony Not all brands are fully compatible with Philips EasyLink To enable or disable EasyLink Note Do not enable Philips EasyLink if you do not intend to use it 1 Press 2 Select Setup TV settings EasyLink On or Off then press OK EasyLink features NonPublish With Philips EasyLink enabled the following features are available One touch play When you play content from a HDMI CEC compliant de...

Page 59: ...tle bar at the bottom of the screen To enable auto subtitle shift 1 Press 2 Select Setup TV settings EasyLink Auto subtitle shift 3 Select On then press OK to activate Audio only mode Audio only mode enables you to play audio from a connected Philips EasyLink device through the TV speakers while the TV is in standby Press to receive audio from the connected Philips EasyLink device If available aud...

Page 60: ...onfigure TV speakers 1 Press 2 Select Setup TV settings EasyLink TV speakers 3 Select one of the following options then press OK Off Turn off TV speakers On Turn on TV speakers EasyLink TV audio continues to be streamed through the TV speakers Switch the TV audio to the connected HDMI CEC audio device through the experience menu EasyLink autostart Turn off TV speakers automatically and streams TV ...

Page 61: ...n or Off 3 Press OK to activate Use a CAM Insert and activate a CAM NonPublish Caution Be sure to follow the instructions described below Wrong insertion of a Conditional Access Module CAM may damage both the CAM and your TV Notes This TV supports CI as well as CI CI allows service providers to offer premium HD digital programs with a high level of copy protection Refer to the documentation from y...

Page 62: ...d The SD card should contain a minimum storage capacity of 4 GB For high definition video ensure that you use an SD card with at least 8 GB of storage capacity Caution Ensure that you follow the instructions described in Connect the TV Insert SD card Insert and format Page 62 Wrong insertion of the SD card may damage your SD card All existing content on the SD card will be erased prior to the down...

Page 63: ...power cable If the blinking reoccurs contact Philips Consumer Care You forgot the code to unlock the child lock feature Enter 8888 The TV menu is in the wrong language Change the TV menu to your preferred language For more information see Set up the TV Change language settings Menu language see Menu language on page 38 When turning the TV on off to standby you hear a creaking sound from the TV cha...

Page 64: ...ars on the TV display The TV is in Shop mode Remove the e sticker by setting the TV to Home mode then restarting the TV See Setup the TV Change other settings TV location Page 42 for more information The computer display on the TV is not stable Check that your PC uses the supported resolution and refresh rate Set the TV picture format to unscaled Sound issues There is picture but no sound from the...

Page 65: ... Check that the USB storage device is set to Mass Storage Class compliant as described in the storage device s documentation Check that the USB storage device is compatible with the TV Check that the audio and picture file formats are supported by the TV Audio and picture files do not play or display smoothly The transfer performance of the USB storage device may limit the data transfer rate to th...

Page 66: ...ure Display Display type LCD Full HD W UXGA Diagonal size 32 inch 81 cm 37 inch 94 cm 40 inch 102 cm 46 inch 117 cm Aspect ratio Widescreen 16 9 Panel resolution 1920x1080p 100Hz Pixel Precise HD picture enhancement 1080p 24 25 30 50 60Hz processing 100 Hz LCD Sound Output power RMS 20W Incredible Surround Clear Sound Dynamic Bass Enhancement Mono Stereo NICAM Display resolutions NonPublish Comput...

Page 67: ...Nero MediaHome DiXiM for Microsoft Windows XP Macrovision Network Media Server for Microsoft Windows Fuppes for Linux uShare for Linux Supported DLNA audio video files WMV wmv video WMV9 VC1 MPEG mp2 mp3 mpg mpeg vob audio MPEG 1 Layer 2 MPEG 1 Layer 3 LPCM AC3 MPEG 4 mp4 video MPEG 4 AVC H 264 L2 CIF MPEG 4 AVC H 264 L4 HD audio AAC LC HE AAC MKV mkv video H 264 audio HE ACC AC3 Connectivity Rear...

Page 68: ... TV Make a note of the legend that corresponds to your TV Then navigate to the next page to view the dimensions Use your TV legend to note the dimensions of your TV with and without the stand Use your TV legend to note the thickness of your TV with and without the stand PF ...

Page 69: ...EN 69 English Use your TV legend to note the weight of the TV with stand Use your TV legend to note the weight of the TV without the stand UMv 3139 137 03595 20110415 ...

Page 70: ...antenna 45 connect channel decoder 57 connect PC 57 connect PC network 38 connect power 45 connect USB 30 connectors bottom 47 connectors rear 47 connectors side 48 controls side 14 D decoder 57 default settings 34 demo 34 devices add 20 devices watch 20 digital channels subtitles 29 digital radio 31 dimensions 67 display resolution 66 E EasyLink buttons 59 EasyLink enable 58 EasyLink features 58 ...

Page 71: ...e TV 25 O options menu 18 P pc network settings 40 pc network media server 40 pc network wired 39 PC connect 57 picture format 20 picture settings 33 position TV 12 power 66 R rear connectors 47 recycle 10 register product 8 remote control on screen 16 remote control overview 14 rename channels 35 reorder channels 35 S safety 8 Scenea enable 31 Scenea lounge light 21 Scenea upload picture 31 scree...

Page 72: ... teletext 2 5 28 teletext digital text 27 teletext dual screen 27 teletext enable 27 teletext enlarge 27 teletext language 37 teletext menu 27 teletext search 27 teletext subpages 27 teletext Table Of Pages 27 U universal access enable 32 V Videostore format SD card 25 62 Videostore rent videos 25 visually impaired 32 volume adjust 19 volume mute 19 W websites 23 ...

Page 73: ...l services To exit an interactive service press b Back 1 To access Digital Text or an other interactive service press e Browse and select Text Press OK to access the service For red button services press the Red key on the remote control BROWSE RED BACK Channel grid TV guide Text TV 2 ...

Page 74: ...hover in the UK Digital UK provides im partial information on what people need to do to prepare for the move to digital and when they need to do it How the switchover affects your TV equipment Your new TV has a digital tuner built in which means it is ready to receive the Freeview signal by simply plugging it into your aerial socket check if you can get digital TV through your aerial now or whethe...

Page 75: ...or channels and press OK 4 Select Reinstall channels and press OK 5 Select your country UK and press OK 6 Select Antenna DVB T and press OK 7 Select Start and press OK The installation can take several minutes When the installation is complete press OK Your TV is now retuned If you are missing any channels it may be that they are not available in your area or that your aerial needs upgrading When ...

Page 76: ...rmation Latvia 80002794 local Lithuania 880030483 local Luxemburg Luxembourg 080026550 Ortsgespräch Appel local Magyarország 06 80 018 189 Ingyenes hívás Nederland 0800 023 0076 Gratis nummer Norge 22 70 81 11 Lokalsamtale Österreich 0800 180 016 Polska 00800 3111 318 Portugal 0800 780 902 Chamada Grátis Россия 495 961 1111 8800 200 0880 бесплатный звонок по России România 0800 894910 Apel gratuit...

Page 77: ... 2011 Koninklijke Philips Electronics N V All rights reserved Document order number 313913703595 ...

Reviews: