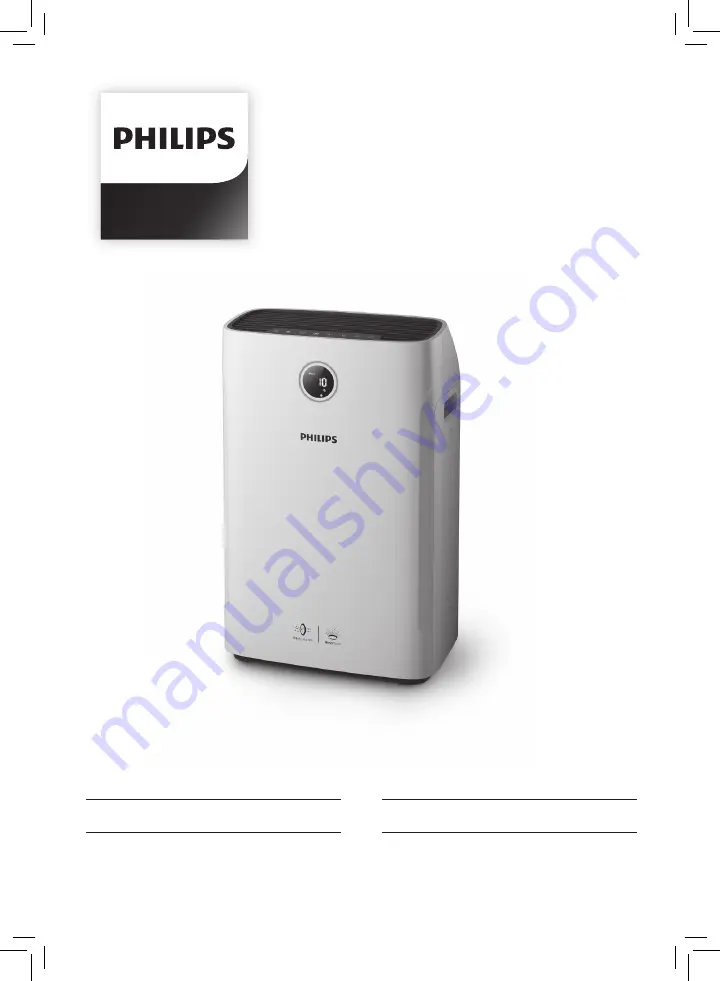
background image

ZH-S 

简体中文

 1 

EN   

User manual 

29

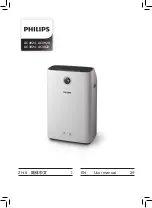
AC4924, AC4926

AC3824, AC3822

Summary of Contents for AC3822

Page 1: ...ZH S 简体中文 1 EN User manual 29 AC4924 AC4926 AC3824 AC3822 ...

Page 2: ......

Page 3: ...27 9 声明 27 电磁场 EMF 27 回收 27 目录 1 重要事项 4 安全 4 2 空气净化器 6 产品概述 7 控件概述 8 3 使用入门 9 安装纳米级劲护滤网 9 加湿准备 10 4 使用产品 12 了解空气质量指示灯 12 打开和关闭 12 设置湿度级别 12 切换操作模式 13 使用灯光开 关功能 13 切换显示模式 13 更改自动模式设置 14 更改风扇速度 15 设置定时器 15 设置童锁 16 水位 16 5 清洁 17 清洁计划 17 清洁产品机身 17 清洁空气质量传感器 17 清洁水箱 蓄水盘和纳米云旋 转式加湿滤网 18 清洁预过滤网 19 为纳米云旋转式加湿滤网除垢 20 ...

Page 4: ...确认产品侧面所标示的电 压是否与当地的电压相符 如果电源软线损坏 为避免 危险 必须由制造厂或其维 修部或类似的专职人员来 更换 如果插头 电源线或产品 本身受损 请勿再使用本 产品 本产品不可由肢体残障 精 神障碍或缺乏相关经验和 技能的人 包括8岁以上儿 童 使用 除非有负责安全 的人员对他们进行产品使用 的相关指导或说明 方可使 用本产品 不要让儿童在无人监督的情 况下进行清洁和保养 应照看好儿童 确保他们不 玩耍本器具 请勿堵塞进风和出风口 例 如不要将物体放置在出风口 上或进风口前方 注意 本产品不能替代正常通风 日常吸尘或者在烹饪时使用 的抽油烟机 如果连接产品的电源插座接 触不良 则产品的插头可能 会变得很热 确保所连接的 电源插座接触良好 一定要在干燥 稳固 平整 且水平的表面上放置和使用 本产品 产品的后侧及两侧均要留出 至少 20 厘米的空间 产品 上方至少要留出 30...

Page 5: ...他维护之前 务 必拔掉电源插头 请勿在温度变化较大的房间 内使用本产品 为防止产生干扰 产品与使 用无线电波的电器 例如电 视机 收音机和无线电控制 时钟 之间至少应保持 2 米 距离 当产品长期不用时 过滤网 上可能会生长细菌 长时间 不用之后 请仔细检查过滤 网 如果过滤网非常脏 请 进行更换 请参阅 更换滤 网和滤芯 一章 本产品仅限于家用并在正常 运行条件下使用 请勿在潮湿环境或高温环境 中 例如浴室 卫生间或厨 房 使用本产品 本产品不能去除一氧化碳 CO 或氡 Rn 因此在 发生燃烧和危险化学品事故 时 不能作为安全设备 使用 只能向水箱中注入冷水 切 勿使用地下水或热水 切勿将水以外的任何物质放 入水箱 切勿将香水倒入水 箱中 如果您长时间不使用加湿功 能 请清洁水箱和 纳米云旋 转式加湿滤网托盘 并将 纳 米云旋转式加湿滤网晾干 如果需要移动产品 请先断 开产品的电源 然后...

Page 6: ...利浦提供的支持 请在 www philips com welcome 注册您的 产品 飞利浦空气净化器可为您的房间带来清 新湿润空气 保证家人的健康 本产品 具有采用了 NanoCloud 技术的高级蒸 发系统 使用特殊加湿滤网向干燥的空 气中添加水分子 并产生健康的湿润空 气 而不会形成水雾 其加湿滤网可以 吸附水中的细菌 水垢和其他微粒 它 只向您家中提供纯净的湿润空气 冬季 或使用空调时不再有干燥的空气 使用本产品之前 请仔细阅读本用户手 册 并妥善保管以备日后参考 ...

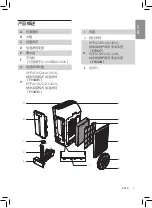
Page 7: ... D 加湿滤网支座 E 蓄水盘 F 万向轮 仅适用于AC4924和AC4926 G 加湿滤网轮盘 H 对于AC4924 AC4926 纳米云旋转式加湿滤网 FY4445 对于AC3822 AC3824 纳米云旋转式加湿滤网 FY3435 C B I J K L A H G F E D I 背盖 J 预过滤网 K 对于AC4924 AC4926 纳米级劲护滤网 专业S3型 FY3137 对于AC3822 AC3824 纳米级劲护滤网 专业S2型 FY2428 L 出风口 ...

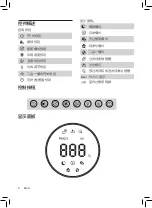
Page 8: ...8 ZH S 显示面板 睡眠模式 自动模式 去过敏原模式 纯净化模式 二合一模式 过滤网更换提醒 注水提示 预过滤网和加湿滤网清洁提醒 PM2 5 显示 室内过敏原指数 控件概述 控制按钮 开 关按钮 童锁按钮 智能模式按钮 风扇速度按钮 湿度级别按钮 光线调节按钮 二合一模式开关按钮 定时器 重置按钮 Control buttons Display panel 控制按钮 显示面板 ...

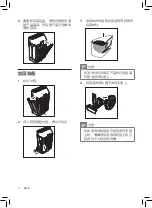
Page 9: ... 简体中文 3 去除纳米级劲护滤网的所有包装 材料 4 将纳米级劲护滤网放回产品中 5 将预过滤网放回产品内部 请先将 预过滤网安装到产品底部 然后朝 产品方向推动预过滤网顶部的固定 夹 3 使用入门 安装纳米级劲护滤网 使用产品之前 请先除去滤网的包装 然后按如下所述将其放到产品中 注意 确保带拉片的一面朝向您 1 将后面板顶部拉向自己 将其从产 品上取下 2 向下按两个固定夹 然后朝您自己 的方向拉动预过滤网 ...

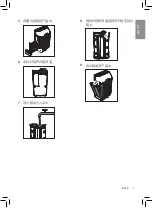
Page 10: ...10 ZH S 6 要重新安装后盖 请先将面板安装 到产品底部 然后朝产品方向推动 面板顶部 加湿准备 1 拉出水箱 2 向上轻轻提起水盘 再水平拉出 1 2 3 去除纳米云旋转式加湿滤网的所有 包装材料 注意 加湿滤网在您购买产品时已经组装 在加湿滤网轮盘上 4 将加湿滤网轮置于滤网支座上 注意 将加湿滤网轮盘放在加湿滤网支座 上时 请确保加湿滤网轮盘上的凸 起部位卡入相应的凹槽 ...

Page 11: ...11 ZH S 简体中文 5 将蓄水盘放回产品中 6 逆时针旋开水箱顶盖 7 向水箱中注入冷水 8 顺时针旋转顶盖将其牢牢锁定到水 箱上 1 9 将水箱放回产品中 ...

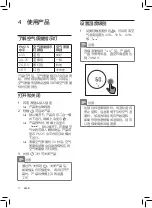
Page 12: ... 了解空气质量指示灯 PM2 5 水平 空气质量指示 灯颜色 空气质量 级别 35 蓝色 良好 36 75 蓝紫色 一般 76 115 紫红色 较差 115 红色 非常差 产品打开后 空气质量指示灯会自动亮 起 并按顺序亮起所有颜色 片刻后 空气质量传感器会选择与环境空气质量 相对应的颜色 打开和关闭 1 将电源插头接入插座 产品发出蜂鸣音 2 轻触 可启动产品 默认情况下 产品将在二合一模 式下运行 屏幕上会显示 产品预热时 屏幕上会显示 默认情况下 在测量空 气中的可吸入颗粒物后 产品将 显示 PM2 5 水平并在自动模式 下运行 测量空气质量约 30 秒后 空气 质量传感器会自动选择相应的 空气质量指示灯颜色 3 长按 3 秒可关闭产品 注意 通过开 关按钮 关闭产品后 如果插头仍在插座中 再次打开产 品时 产品将根据上次的设置 工作 ...

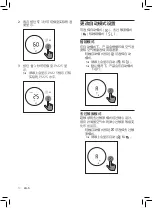
Page 13: ... 需要 1 轻触一次光线调节按钮 空气质 量指示灯将变暗 2 再次轻触光线调节按钮 空气质 量指示灯和显示面板将熄灭 3 第三次轻触光线调节按钮 所有 指示灯均将重新亮起 切换显示模式 产品具有三种显示模式 即 PM2 5 显 示 IAI 显示和湿度显示 PM2 5 即使是空气中最细微的颗粒变化 AeraSense 传感技术也可精确地检测 并快速响应 它提供实时的 PM2 5 反 馈 让您安枕无忧 IAI 专业级 AeraSense 传感器可检测室内 空气过敏原的级别 然后用 1 至 12 之 间的数字进行级别反馈 显示室内空气 过敏原的潜在风险级别 1 表示空气质 量最佳 注意 默认情况下 产品在 PM2 5 显示 模式下运行 1 按住 3 秒可切换至 IAI 显示 3S 屏幕上会显示 IAI 指示灯和实 际的 IAI 级别 ...

Page 14: ...式 在自动模式下 产品会根据环境空气湿 度和空气质量选择风扇速度 轻触自动模式按钮 可选择自动 模式 屏幕上会显示自动 和 默认情况下 产品会在自动模式 下运行 去过敏原模式 超敏感的去过敏原模式经过精心设计 旨在对周围空气中的微小过敏原等级变 化作出反应 轻触自动模式按钮 可选择去过敏 原模式 屏幕上会显示自动 和 2 再次按住 3 秒可切换至实际的湿 度显示 3S 3 按住 3 秒可切换至 PM2 5 显 示 屏幕上会显示 PM2 5 指示灯和 实际的 PM2 5 水平 3S ...

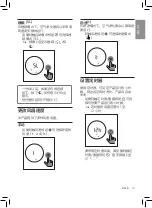
Page 15: ...幕上会显示睡眠 和 一分钟以后 如果没有按钮被 按下 除了 所有指示灯均会 熄灭 按任意按钮可打开指示灯 更改风扇速度 本产品提供了多种风速设置 手动 反复轻触风速按钮 可选择所需的 风速 1 2 或 3 劲速 t 在劲速模式下 空气净化器会以最高速 度运行 轻触风速按钮 可选择劲速模式 设置定时器 使用定时器 可设定产品运行的小时 数 到达设定的时间时 产品将自动 关闭 反复轻触定时器 重置按钮 可选 择您想要产品运行的小时数 定时器的设置范围为 1 至 12 小时 要停用定时器功能 请反复轻触定 时器 重置按钮 直至屏幕上显 示 ...

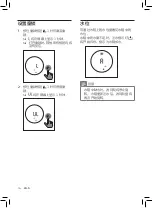
Page 16: ...16 ZH S 水位 可通过水箱上的水位窗看见水箱中的 水位 水箱中的水量不足时 注水指示灯 将开始闪烁 指示为水箱加水 注意 水箱中缺水时 滤网轮将停止旋 转 水箱重新注水后 滤网轮盘将 再次开始旋转 设置童锁 1 按住童锁按钮 3 秒可激活童 锁 将在屏幕上显示 3 秒钟 打开童锁时 其他所有按钮均将 没有反应 2 按住童锁按钮 3 秒可停用童 锁 将在屏幕上显示 3 秒钟 ...

Page 17: ...气质量 感应器上可能会形成冷凝水 因此 即使空气质量良好 空气质 量指示灯也可能指示空气质量差 在这种情况下 您必须清洁空气 质量感应器或者使用任一手动速度 设置 1 使用软毛刷清洁空气质量传感器进 风口和出风口 5 清洁 注意 清洁前务必拔掉电源插头 切勿将本产品浸入水中或任何其它 液体中 切勿使用研磨性 腐蚀性或易燃性 清洁剂 例如漂白剂或酒精 清洁 本产品的任何部件 只有预过滤网和纳米云旋转式加湿 滤网可以水洗 纳米级劲护滤网不 可水洗 也不可用真空吸尘器清 洁 清洁计划 频率 清洁方法 必要时 使用干软布清洁产品 表面 每周 冲洗水箱 蓄水盘和纳 米云旋转式加湿滤网 当清洁图 标 亮起 时 屏幕上 会显示 F0 清洁预过滤网 用稀释的白醋 醋酸度 为 5 或稀释的柠檬 酸为纳米云旋转式加湿 滤网除垢 ...

Page 18: ...18 ZH S 清洁水箱 蓄水盘和纳米云 旋转式加湿滤网 注意 每周清洁水箱 蓄水盘和纳米云旋 转式加湿滤网 使其保持清洁卫 生 1 拉出水箱 2 向上轻轻提起水盘 再水平拉出 1 2 3 将加湿滤网轮盘从滤网支座上 取下 2 打开空气质量传感器保护盖 3 使用稍微浸湿的棉签 清洁空气质 量感应器 进风口和出风口 4 使用干棉签将其擦干 5 重新盖上空气质量感应器的 保护盖 ...

Page 19: ...客户服务中心 联系购买 滤网提示灯状态 按此操作 当屏幕上显示 F0 预过滤网和加湿滤网 清洁提示灯 亮起 清洁预过滤网 1 将后面板顶部拉向自己 将其从产 品上释放 4 用自来水冲洗水箱 蓄水盘和 纳米 云旋转式加湿滤网 注意 清洁过程中 请勿将纳米云旋转式 加湿滤网从轮上取下 不要擦洗纳米云旋转式加湿滤网或 将其置于阳光直射的地方 如有必要 请使用温和的清洁剂清 洁水箱和蓄水盘 在这种情况下 彻底冲洗水箱和蓄水盘 5 将水箱外侧和蓄水盘擦干 6 将加湿滤网轮盘置于滤网支座上 注意 将加湿滤网轮盘放在机芯支座上 时 请确保加湿滤网轮盘上的凸起 部位卡入相应的凹槽 7 将水盘放回产品中 ...

Page 20: ...湿滤网除 垢 滤网提示灯状态 按此操作 当屏幕上显示 F0 预过滤网和加湿滤网 清洁提示灯 亮起 为纳米云旋转 式加湿滤网 除垢 1 拉出水箱 2 向上轻轻提起水盘 再水平拉出 1 2 2 要卸下预过滤网 请向下按两个固 定夹 然后朝您自己的方向拉动过 滤网 3 在水龙头下冲洗预过滤网 如果很 脏 请使用软刷清除上面的灰尘 4 晾干预过滤网 注意 确保预过滤网完全干燥 如果仍然 是湿的 细菌可能会乘虚而入 因 此缩短预过滤网的使用寿命 5 预过滤网完全干燥后 将其放回后 面板中 ...

Page 21: ...面和背面都冲洗干净 6 将纳米云旋转式加湿滤网晾干 注意 请勿将纳米云旋转式加湿滤网置于 阳光直射的地方 7 轻触并按住 3 秒可重置纳米云 旋转式加湿滤网的清洁时间 3 将加湿滤网轮盘从滤网支座上 取下 4 将纳米云旋转式加湿滤网在清洁剂 例如 稀释的白醋 柠檬酸溶 液 中浸泡 2 小时 2 hours 注意 请使用中性或酸性清洁剂 将白醋 醋酸度为 5 与等 量的水混合 4 升水 24 克柠檬酸 如果过滤网上面有白色残留物 水 垢 请确保将带有白色残留物的 一面浸入水中 除垢过程中 请勿将纳米云旋转式 加湿滤网从轮上取下 ...

Page 22: ...并按住 3 秒可重置纳米级 劲护滤网使用寿命计数器 6 更换滤网和滤芯 了解健康空气智能锁 本产品配备健康空气智能锁 旨在确保 产品运行过程中 纳米级劲护滤网和加 湿滤网在最佳条件下工作 当纳米级 劲护滤网和加湿滤网快要失效时 更 换指示灯 会开始闪烁 指示需要更 换滤网 如未及时更换净化滤网和加湿滤网 则 产品将停止运行并被锁定 更换纳米级劲护滤网 注意 纳米级劲护滤网不可水洗 也不可 重复使用 在更换过滤网之前 务必先关闭 空气净化器并从电源插座上拔下 插头 滤网提示灯状态 按此操作 屏幕上显示 A3 且 滤网更换指示灯 会闪烁 更换纳米级劲 护滤网 专业S3 型 AC4924 AC4926 纳米级劲护滤 网 专业S2型 AC3822 AC3824 ...

Page 23: ...3 ZH S 简体中文 3 依次松开加湿滤网边缘的锁定装 置 然后将轮盘拆开 4 将用过的纳米云旋转式加湿滤网取 出 5 去除新的纳米云旋转式加湿滤网的 所有包装材料 更换纳米云旋转式加湿滤网 滤网提示灯状态 按此操作 屏幕上显示 F1 且 滤网更换指示灯 会闪烁 更换纳米云旋转 式加湿滤网 1 将加湿滤网轮盘从滤网支座上 取下 2 握住轮盘另一侧的转轴旋钮 逆时 针旋转 将转轴从加湿滤网轮盘上 拆下 ...

Page 24: ...将其从蓄水盘中 取出 1 2 2 去除新抗菌滤芯的所有包装材料 3 将新抗菌滤芯放入蓄水盘 水平推 入卡槽 1 2 4 将蓄水盘和水箱放回产品中 5 轻触并按住 3 秒可重置抗菌滤 芯的使用寿命计数器 6 将新的纳米云旋转式加湿滤网放入 加湿滤网轮盘 然后紧固加湿滤网 轮盘上的锁定装置 7 将加湿滤网轮盘置于滤网支座上 注意 将加湿滤网轮盘放在滤网支座上 时 请确保加湿滤网轮盘上的凸起 部位卡入相应的凹槽 8 将蓄水盘和水箱放回产品中 9 轻触并按住 3 秒可重置纳米云 旋转式加湿滤网使用寿命计数器 ...

Page 25: ...有反应 检查儿童锁是否已 打开 纳米云旋转式加湿 滤网上有一些白色 残留物 这些白色残留物被称为水垢 它们由水中的矿物质组成 纳米云旋转式加湿滤网上的水垢将影响加湿性能 但不会 损害您的健康 请遵照用户手册中的清洁说明 出风口中无空气 排出 请将产品插入电源并启动产品 出风口排出的气流 比之前明显减弱 预过滤网变脏 清洁预过滤网 请参阅 清洁 一章 请确保已经去除纳米级劲护滤网的所有包装材料 达到目标湿度级别 需要很长的时间 纳米云自然加湿技术可将看不见的水分子均匀分配到您的 房间内 在干燥条件下初次使用 加湿器产生的水分子会 被墙壁 家具和房间内的其他物品吸收 外部干燥空气的 过度流通也会增加达到目标湿度所需的时间 要优化加湿和净化性能 建议在使用过程中关闭门窗 我没有看到产品中 有水蒸气冒出 产 品是否正在工作 如果雾非常细小 就无法看见 本产品采用纳米云加湿技 术 可从出风口区域产生...

Page 26: ...浦服务中心 滤网使用一段时间后可能会散发异味 这是因为吸附了室 内的气味导致 建议您将滤网置于阳光底下晾晒后继续使 用 如晾晒后异味仍较明显影响使用体验 建议更换滤 网 产品声音过大 您没有拆掉过滤网上的所有包装材料 请确保您已经取下 所有包装材料 更改风扇速度以降低风扇速度级别 我已经更换过了过 滤网 但是产品还 是提示需要更换过 滤网 或许您没有正确地轻触并按住定时器 重置按钮 插入产 品电源插头 轻触 打开产品 然后轻触并按住定时器 重置按钮 3 秒钟 屏幕上显示 E1 E2 E3 E4 或 E5 错误代 码 空气净化器出现故障 请与您所在国家 地区的客户服务 中心联系 ...

Page 27: ...其产品使用得 当 则对人体毫无危害 长期以来 Philips 始终在国际 EMF 和安全标准的制定工作中扮演着积极的 角色 这就使 Philips 总能预知标准的 发展趋势 并率先应用到其产品中去 回收 弃置产品时 请不要将它与一般生活垃 圾一同丢弃 应将其交给官方指定的回 收中心 这样做有利于环保 请遵循您所在国家 地区的电器及电子 产品分类回收规定 正确弃置产品有 助于避免对环境和人类健康造成负面 影响 8 保修与服务 如果您需要了解信息或有任何疑问 请访问飞利浦网站 www philips com 或与您所在国家 地区的飞利浦客户服 务中心联系 可在全球保修卡中找到 其电话号码 如果您所在的国家 地 区没有飞利浦客户服务中心 请向当 地的飞利浦经销商求助 订购部件或附件 如果您必须更换部件或需要购买额外 的部件 请转到您的飞利浦经销商或 访问 www philips com supp...

Page 28: ......

Page 29: ...bacteria cartridge 52 7 Troubleshooting 54 8 Guarantee and service 56 Order parts or accessories 56 9 Notices 56 Electromagnetic fields EMF 56 Recycling 57 Contents 1 Important 30 Safety 30 2 You air purifier 33 Product overview 34 Controls overview 35 3 Get started 36 Installing the NanoProtect filter 36 Preparing for humidification 37 4 Use the appliance 39 Understanding the air quality light 39...

Page 30: ...animals or to water plants When you empty the water tank pour the water down the drain Warning Check if the voltage indicated on the side of the appliance corresponds to the local power voltage before you connect the appliance If the power cord is damaged you must have it replaced by Philips a service center authorized by Philips or similarly qualified persons in order to avoid a hazard Do not use...

Page 31: ...er socket Always place and use the appliance on a dry stable level and horizontal surface Leave at least 20cm free space behind and on both sides of the appliance and leave at least 30cm free space above the appliance Do not place anything on top of the appliance Do not place the appliance directly below an air conditioner to prevent condensation from dripping onto the appliance Make sure all filt...

Page 32: ...he appliance is not used for a long time bacteria may grow on the filters Check the filters after a long period of disuse If the filters are very dirty replace them see the chapter Replace the filter and wick The appliance is only intended for household use under normal operating conditions Do not use the appliance in wet surroundings or in surroundings with high ambient temperatures such as the b...

Page 33: ...elcome to Philips To fully benefit from the support that Philips offers register your product at www Philips com welcome The Philips air purifier brings fresh humidified air to your house for the health of your family It offers you advanced evaporation system with NanoCloud technology using a special humidification filter which adds H2O molecules to the dry air and produces healthy humid air witho...

Page 34: ...4924 AC4926 only G Wick wheel H For AC4924 AC4926 NanoCloud rotary humidification wick FY4445 For AC3822 AC3824 NanoCloud rotary humidification wick FY3435 C B I J K L A H G F E D I Back side cover J Pre filter K For AC4924 AC4926 NanoProtect filter Pro S3 FY3137 For AC3822 AC3824 NanoProtect filter Pro S2 FY2428 L Air outlet ...

Page 35: ...on Humidity setting button Light dimming button 2 in 1 mode on off button Timer Reset button Control buttons Display panel Display panel Sleep mode Auto mode Allergen mode Purification ONLY mode 2 in 1 mode Filter replacement alert Water refill alert Pre filter and wick cleaning alert PM2 5 display Indoor Allergen Index ...

Page 36: ...s you 1 Pull the top part of the back panel towards you to release it from the appliance 2 Press the two clips down and pull the pre filter towards you 3 Remove all packaging materials of the NanoProtect filter 4 Place the NanoProtect filter back into the appliance 5 Put the pre filter back into the appliance mount the pre filter onto the bottom of the appliance first and then push the clips on th...

Page 37: ...r tank 2 Lift the water tray upwards and pull it out horizontally 1 2 3 Remove all packaging material of the NanoCloud rotary humidification wick Note The humidification wick has been assembled on the wick wheel upon purchase 4 Place the wick wheel on the wick support Note When placing the wick wheel on the wick support make sure that the projections on the wick wheel falls into the corresponding ...

Page 38: ...tightly lock it onto the water tank 1 9 Place the water tank back into the appliance 5 Place the water tray back into the appliance 6 Turn the top cap of the water tank anti clockwise to unscrew it 7 Fill the water tank with cold tap water ...

Page 39: ... shows the PM2 5 level and operates in the auto mode by default After measuring the air quality for approximately 30 seconds the air quality sensor automatically selects the appropriate air quality light color 3 Touch and hold for 3 seconds to switch off the appliance Note After the appliance is switched off by the on off button if the plug is still in the power socket the appliance will operate u...

Page 40: ...I indicator and the actual IAI level display on the screen Switching the operation mode The appliance has two operation modes the purification ONLY mode and the 2 in 1 mode Touch the mode selection button repeatedly to switch between the purification ONLY mode and the 2 in 1 mode displays on the screen when the appliance operates in the purification ONLY mode displays on the screen when the applia...

Page 41: ...ergen mode and the Sleep mode Auto mode In auto mode the appliance selects the fan speed in accordance with the ambient air humidity and air quality Touch the Auto mode button to select Auto mode Auto and display on the screen The appliance operates in Auto mode by default Allergen mode The extra sensitive allergen mode is designed to react to even a small change in allergen levels in the surround...

Page 42: ...erate The timer is available from 1 to 12 hours To deactivate the timer function touch the Timer Reset button repeatedly until displays on the screen Sleep SL In Sleep mode the air purifier operates quietly on a very low speed Touch the Auto mode button select the Sleep mode Sleep and display on the screen Note All lights will go off except if no buttons are touched after one minute You can turn o...

Page 43: ...is no water in the water tank the wick wheel will stop rotating When the water tank is refilled with water the wick wheel will start rotating again Setting the child lock 1 Touch and hold the child lock button for 3 seconds to activate child lock displays on the screen for 3 seconds When the child lock is on all the other buttons are not responsive 2 Touch and hold the child lock button for 3 seco...

Page 44: ...ity sensor or use one of the manual speed settings 1 Clean the air quality sensor inlet and outlet with a soft brush 5 Cleaning Note Always unplug the appliance before cleaning Never immerse the appliance in water or any other liquid Never use abrasive aggressive or flammable cleaning agents such as bleach or alcohol to clean any part of the appliance Only the pre filter and NanoCloud rotary humid...

Page 45: ...humidification wick every week to keep them hygienic 1 Pull out the water tank 2 Lift the water tray upwards and pull it out horizontally 1 2 2 Open the air quality sensor cover 3 Clean the air quality sensor the dust inlet and the dust outlet with a lightly moistened cotton swab 4 Dry them with a dry cotton swab 5 Reattach the air quality sensor cover ...

Page 46: ...he water tank water tray and NanoCloud rotary humidification wick under a running tap Note Do not take the NanoCloud rotary humidification wick off the wheel during cleaning Do not scrub the NanoCloud rotary humidification wick or place it under direct sunlight If necessary use a mild detergent to clean the water tank and water tray In this case rinse the water tank and water tray thoroughly 5 Wip...

Page 47: ...ck into the back panel 6 Touch and hold for 3 seconds to reset the pre filter cleaning time Cleaning the pre filter Note If the pre filter is damaged worn or broken do not use Visit www philips com support or contact the Consumer Care Center in your country Filter alert light status Follow this F0 displays on the screen and wick pre filter cleaning alert goes on Clean the pre filter 1 Pull the top...

Page 48: ...water If there are white deposits limescale on the filter make sure that the side with the white deposits is immersed in the water Do not take the NanoCloud rotary humidification wick off the wheel during descaling Descaling the NanoCloud rotary humidification wick Filter alert light status Follow this F0 displays on the screen and wick pre filter cleaning alert goes on Descale the NanoCloud rotar...

Page 49: ...filter Note The filter is not washable or reusable Always turn off the air purifier and unplug from the electrical outlet before replacing the filters Filter alert light status Follow this A3 is displayed and the filter replacement light flashes on the screen Replace the NanoProtect filter Pro S3 for AC4924 AC4926 NanoProtect filter Pro S2 for AC3822 AC3824 5 Rinse the NanoCloud rotary humidificat...

Page 50: ...tus Follow this F1 is displayed and the filter replacement light flashes on the screen Replace the NanoCloud rotary humidification wick 1 Remove the used NanoProtect filter from the appliance Note Do not touch the pleated filter surface or smell the filter as it has collected pollutants from the air Wash your hands after disposing of the used filters 2 Remove all packaging material of the new Nano...

Page 51: ...Place the new NanoCloud rotary humidification wick in the wick wheel and then fasten the locks on the wick wheel 1 Take the wick wheel off the wick support 2 Grip the shaft screw on the other side of the wheel rotate it anticlockwise to release the wick from the wheel 3 Unfasten the locks on the edge of the wheel successively to disassemble the wick wheel ...

Page 52: ...econds to reset the NanoCloud rotary humidification wick lifetime counter Replacing the anti bacteria cartridge Replace the anti bacteria cartridge at least once a year to prevent bacteria from growing in the water tray 1 Slide the anti bacteria cartridge horizontally and take it from the water tray 1 2 2 Remove all packaging materials of the new anti bacteria cartridge 3 Place the new anti bacter...

Page 53: ...53 EN En gli sh 4 Place the water tracy and water tank back into the appliance 5 Touch and hold for 3 seconds to reset the lifetime counter of the anti bacteria cartridge ...

Page 54: ...n the water tank The appliance does not work even though it is switched on The appliance is working but the buttons are not responsive Check if the child lock is on There are some white deposits on the NanoCloud rotary humidification wick The white deposits are called scale and they consist of minerals from the water Scale on the NanoCloud rotary humidification wick affects the humidifying perform...

Page 55: ...s you use the appliance it may produce a plastic smell This is normal However if the appliance produces a burnt smell contact your Philips dealer or an authorized Philips service centre The filter may produce smell after being used for a while because of the absorption of indoor air Remove the filter and place it where it has direct sunlight and ventilation for several hours Re install and try usi...

Page 56: ...re handled properly for their intended use they are safe to use according to scientific evidence available today Philips plays an active role in the development of international EMF and safety standards enabling Philips to anticipate further developments in standardization for early integration in its products 8 Guarantee and service If you need information or if you have a problem please visit th...

Page 57: ...its life but hand it in at an official collection point for recycling By doing this you help to preserve the environment Follow your country s rules for the separate collection of electrical and electronic products Correct disposal helps prevent negative consequences for the environment and human health ...

Page 58: ...者的法定权利 飞利浦提供 2 年全球联保服务 在产品由飞利浦正式销 售的所有国家中 都提供保修和保修期满的维修服务 要求保修时 您需提供发票正本 且请求保修的日期还在 保修期限之内 保修及服务 此产品是一件设计精良 用高品质元件制造之家用电器 在 正常使用及保养下应能发挥其优越性能 在购买日期后二 年内 若发生任何因制造工艺或元器件造成之损坏 飞利浦 中国维修服务中心将为持证用户提供免费门市维修服务 视情况更换零件或整个产品 无论在保期中或保期后 只要飞利浦正式行销该产品的任 何国家皆可获得维修服务 若飞利浦在当地无行销该项产品 飞利浦同样提供维修服务 但可能因未储备所需零件 维修时间可能较长 敬请见谅 请联络当地飞利浦经销商 或飞利浦服务部门 若您需洽询相关资讯 或遇困难事项时 请联络当地飞利浦 维修服务中心 或向飞利浦服务热线咨询 中国顾客服务热线 4008 800 008 用户需承担...

Page 59: ... 26572 规定的限量要求以下 表示该有害物质至少在该部件的某一均质材料中的含量超出 GB T 26572规定的限量要求 部件名称 铅 Pb 汞 Hg 镉 Cd 六价铬 Cr VI 多溴联苯 PBB 多溴二苯醚 PBDE 有害物质 主电路板组件 电源电路板组件 传感器板组件 电机组件 该表格中所显示的 有害物质 在产品正常使用情况下不会对人身和 环境产生任何伤害 该表格中所显示的 有害物质 及其存在的部件向消费者和回收处理 从业者提供相关物质的存在信息 有助于产品废弃时的妥善处理 保留备用 出版日期 2018 05 15 ...

Page 60: ... 全国顾客服务热线 4008 800 008 本产品根据国标 GB4706 1 2005 GB4706 45 2008 GB4706 48 2009 制造 飞利浦二合一空气净化加湿一体机 AC3822 甲 苯 高效级 噪声 声功率级 适用面积 产品性能指标 适用面积是按照国标GB T18801 2015根据颗粒物洁净空气量计算得出 以上性能指标数据是在第三方试验室按照国标GB T18801 2015 以特定 的烟尘颗粒物或气态污染物为目标污染物测试得出 23 40 m2 100 m3 h 目标污染物 洁净空气量 CADR 累计净化量 CCM 净化能效等级 颗粒物 高效级 甲 醛 高效级 335 m3 h P4 F3 200 m3 h 62 dB A 产品 型号 额定电压 额定频率 额定输入功率 生产日期 产地 KJ300F C10 220V 50Hz 45 W 请见产品本体 中国广东佛山 ...

Page 61: ... 全国顾客服务热线 4008 800 008 本产品根据国标 GB4706 1 2005 GB4706 45 2008 GB4706 48 2009 制造 飞利浦二合一空气净化加湿一体机 AC4924 甲 苯 高效级 噪声 声功率级 适用面积 产品性能指标 适用面积是按照国标GB T18801 2015根据颗粒物洁净空气量计算得出 以上性能指标数据是在第三方试验室按照国标GB T18801 2015 以特定 的烟尘颗粒物或气态污染物为目标污染物测试得出 29 49 m2 100 m3 h 目标污染物 洁净空气量 CADR 累计净化量 CCM 净化能效等级 颗粒物 高效级 甲 醛 高效级 410 m3 h P4 F4 200 m3 h 65 dB A 产品 型号 额定电压 额定频率 额定输入功率 生产日期 产地 KJ400F D02 220V 50Hz 73 W 请见产品本体 中国广东佛山 ...

Page 62: ... 2018 Koninklijke Philips N V 保留所有权利 4241 210 95634 ...

Reviews: