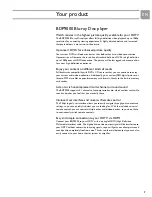
background image

www.usasupport.philips.com

For support call:

1-888-744-5477 (English, Español)

1-800-661-6162 (Français)

EN

Blu-ray Disc player

3

ES

Reproductor de Discos Blu-ray

44

FR

Lecteur de Disque Blu-ray

85

BDP9000

Summary of Contents for BDP9000

Page 1: ...www usasupport philips com For support call 1 888 744 5477 English Español 1 800 661 6162 Français EN Blu ray Disc player 3 ES Reproductor de Discos Blu ray 44 FR Lecteur de Disque Blu ray 85 BDP9000 ...

Page 2: ...2 ...

Page 3: ...EN 3 EN ...

Page 4: ...niversal remote control 12 Connect 13 Connect to the TV 13 Connect to the audio system optional 15 Connect to the power outlet 18 Set up 19 Set the TV connection 19 Set the audio connection 19 Open the Settings menu 19 Overview 20 Navigation 20 Configure the languages 20 Configure the audio output 21 Configure the video output 23 Change the parental control 25 Enjoy 27 Turn the product on 27 Load ...

Page 5: ...ting environment 36 Power 36 Video output 36 Audio output 36 Playable discs 37 Playable memory cards 38 Information 39 Trademarks and licenses 39 Environmental information 39 Maintenance and service 39 Philips limited warranty one 1 year 39 Glossary 42 Terms and definitions 42 ...

Page 6: ...t else you ll need Result after installation HDTV Television Power outlet j Audio cable i Component video cable g HDMI cable Additional HDMI cable e RC4380 User manual f Product registration card AC HDMI DVI cable Composite video cable Coaxial audio cable Audio cable 2x S Video cable Optical audio cable b RC4380 Remote control HDTV ...

Page 7: ...or listen to MP3 music files on popular memory card formats thanks to the built in memory card reader Listen to rich uncompressed multi channel surround sound The BDP9000 supports 5 1 channels of uncompressed audio which realizes real to life sound and makes you feel that you are really there Intuitive User interface and universal Remote control The Philips logical user interface allows you to eas...

Page 8: ...s convenience receptacles and the point where they exit from the apparatus 11 Only use attachments accessories specified by the manufacturer 12 Unplug this apparatus during lightning storms or when unused for long periods of time 13 Refer all servicing to qualified service personnel Servicing is required when the apparatus has been damaged in any way such as power supply cord or plug is damaged li...

Page 9: ... SERVICABLE PARTS ARE INSIDE REFER SERVICING TO QUALIFIED SERVICE PERSONNEL THIS UNIT EMPLOYS A LASER DUE TO POSSIBLE EYE INJURY ONLY A QUALIFIED SERVICE PERSON SHOULD REMOVE THE COVER OR ATTEMPT TO SERVICE THIS DEVICE TO PREVENT DAMAGE WHICH MAY RESULT IN FIRE OR ELECTRIC SHOCK HAZARD DO NOT EXPOSE THIS APPLICANCE TO RAIN OR MOISTURE TO PREVENT THE SPREAD OF FIRE KEEP CANDLES OR OTHER OPEN FLAMES...

Page 10: ...help Frequently asked questions Helpline i Be prepared to give this information A description of the problem and when it occurs The type number on the label of the product The date of purchase Language Telephone number English 1 888 PHILIPS 1 888 744 5477 French 1 800 661 6162 Spanish 1 888 PHILIPS 1 888 744 5477 ...

Page 11: ...about the product and the disc 6 Cover buttons Opens the user access panel 7 Next Forward button Videos music pictures Next short press Videos Forward long press 8 Previous Rewind button Videos music pictures Previous short press Videos Rewind long press 9 Stop button 10 Play pause button 11 Video output button video output lights Selects the video output The video output lights show the selected ...

Page 12: ...rt optical Connects the audio output to an amplifier 19 HDMI port Connects the video and audio signals to a TV or amplifier Recommended for HDTV 20 S Video port Display 1 Title Track indicator 2 Status indicator Shows the information about playing time clock and status 3 Memory card indicator 4 Disc type indicator 5 Video output resolution indicator 6 Play mode indicator Universal remote control R...

Page 13: ... Plug the other end of the HDMI DVI cable into the HD compliant TV 4 Take the supplied audio cable 5 Plug one end of the audio cable into the AUDIO L and AUDIO R ports 6 Plug the other end of the audio cable into the TV This product is designed for high definition televisions HDTV Need help Refer to the documentation that came with your TV for information about The devices that you can connect to ...

Page 14: ... cable into the TV Option 4 Standard quality Composite video 1 Take a composite video cable not supplied 2 Plug one end of the composite video cable into the VIDEO port 3 Plug the other end of the composite video cable into the TV 4 Take the supplied audio cable 5 Plug one end of the audio cable into the AUDIO L and AUDIO R ports 6 Plug the other end of the audio cable into the TV TV 1 3 2 4 5 6 T...

Page 15: ...UDIO R ports 6 Plug the other end of the audio cable into the TV Connect to the audio system optional Option 1 Best quality HDMI 1 If you connected the TV to the HDMI port unplug the HDMI cable on the TV TV 1 3 2 4 5 6 TV When a BD is played the output is disabled Need help Refer to the documentation that came with your audio system for information about The devices that you can connect to your au...

Page 16: ... digital audio optical connection 1 Take an optical audio cable not supplied 2 Plug one end of the optical audio cable into the OPTICAL port 3 Plug the other end of the optical audio cable into the audio system Option 3 Good quality digital audio coaxial connection 1 Take a coaxial audio cable not supplied 2 Plug one end of the coaxial audio cable into the COAXIAL port 3 Plug the other end of the ...

Page 17: ...ble 3 Take another two audio cables not supplied 4 Plug the three audio cables into the 5 1CH ANALOG AUDIO OUT ports 5 Plug the other ends of the three audio cables into the audio system Option 5 Standard quality stereo analog audio 1 If you connected the TV to the COMPONENT OUT VIDEO or S VIDEO ports or used a HDMI DVI cable unplug the audio cable on the TV 2 Plug the ends of the audio cable into...

Page 18: ...EN 18 Connect to the power outlet 1 Plug the power cable into the power outlet The standby on light on the front of the product comes on as red AC ...

Page 19: ... the on screen instructions Set the audio connection 1 Turn the audio system on 2 Set the audio system to the correct external input Open the Settings menu With the Settings menu you can change the set up of the product 1 Take the supplied universal remote control 2 Press the STANDBY ON button The Home menu shows 3 Select Settings and press OK The Settings menu shows TV connection Light HDMI HDMI ...

Page 20: ...tup Digital output PCM downsampling Dynamic compression Speaker setup Display setup TV shape Black level Resolution HDMI format Screen message Front display Parental control Use PIN Rating level New PIN Action Button Go up or down in a list Move a cell in the list Confirm a selection OK Language setup Parental control Display setup Audio setup Audio Player menu Disc menu Subtitle Settings Audio Pl...

Page 21: ... output Open the audio menu 1 Open the Settings menu 2 Select Audio setup and press OK The Audio setup menu shows Audio Player menu Subtitle English Disc menu Automatic Español Deutsch Français Italiano Language setup When the preferred language is not available the default language is used The default language is English Audio Player menu Subtitle Disc menu Español Deutsch English Français Nederl...

Page 22: ...mpling Audio setup Option Description PCM The format of the digital audio signal is PCM Bitstream The format of the digital audio signal is bitstream On Off Digital output Speaker setup Dynamic compression PCM downsampling Audio setup Option Description On If the format of the digital audio signal is 96 kHz PCM the audio is downsampled to 48 kHz Off Regardless of the sampling frequency of the digi...

Page 23: ...ounds below 100 Hz Set the subwoofer to off for output of the bass sounds through the front speakers Language setup Parental control Display setup Audio setup TV shape Resolution Black level Front display Screen message HDMI format Settings 4 3 Letterbox 16 9Widescreen 4 3 Panscan TV shape Resolution Black level Front display Screen message HDMI format Display setup A B C Option Description 4 3 Le...

Page 24: ...ses the darkness of black sections in the picture 1080p 1080i 720p 480p TV shape Resolution Black level Front display Screen message HDMI format Display setup Disc type Supported resolutions BD without token 720p 1080i 1080p BD Image Constraint Token ICT 720p 1080i 1080p BD Digital Only Token DOT 720p 1080i 1080p DVD 480p 720p 1080i 1080p Disc type Supported resolutions BD without token 720p 1080i...

Page 25: ...enu shows TV Monitor TV shape Resolution Black level Front display Screen message HDMI format Display setup Option Description TV The format of the HDMI signal is TV Use this if you connected the HDMI port to a TV Monitor The format of the HDMI signal is monitor Use this if you connected the HDMI port to a monitor On Off TV shape Resolution Black level Front display Screen message HDMI format Disp...

Page 26: ...he preferred option and press OK Change the PIN 1 Open the Parental control menu 2 Select New PIN and press OK 3 Follow the on screen instructions On Off Use PIN New PIN Rating level Parental control Option Description On The PIN is enabled Off The PIN is disabled 8 Adults 7 6 5 4 3 Use PIN New PIN Rating level Parental control For example when you set the rating level to 6 discs with rating level...

Page 27: ... STANDBY ON light comes on as blue Load a disc 1 Turn the product on 2 Press the OPEN CLOSE button The disc tray opens 3 Place the disc in the disc tray 4 Press the OPEN CLOSE button again The disc tray closes Before you load a disc into the Blu ray Disc player make sure that the disc type is supported Refer to Playable discs on page 37 ...

Page 28: ...ngs Blu ray Disc player Discs that contain a disc menu show the disc menu If the disc contains a disc menu the rest of the procedure is not applicable Refer to the documentation that came with the disc for instructions that tell you how to operate the disc menu Action Button Previous title Next title Action Button Play the title Pause the title Stop the title Restart the title Jump to the previous...

Page 29: ...scene 1 Play a title 2 Press the SCENE SEARCH button The Scene search menu shows 3 Select the type of scene search 4 Press OK 5 Select the category of the search 6 Press OK 7 Select the scene from the selection 8 Press OK i Tip You can use the universal remote control to jump to the next or previous chapter Refer to Control titles on page 28 for instructions Option Button Previous chapter Next cha...

Page 30: ...lay a title 2 Press the TITLE POPUP MENU button The disc menu shows 3 Control the disc menu with the universal remote control When you play a title frame by frame the audio is muted For BD only jump to the next frame is possible Option Button Jump to the next frame Jump to the previous frame When you play a title in slow motion the audio is muted For BD only jump slow forward is possible Option Bu...

Page 31: ... list shows 4 Use the universal remote control to go to the track i 5 Press the OK button Control tracks 1 Play the track 2 Use the universal remote control to control the track i Action Button Up Down Disc Memory card Video Music Pictures Music Pictures Settings Blu ray Disc player Action Button Next track Previous track Action Button Play the track Pause the track Stop the track Restart the trac...

Page 32: ...Rotate a picture 1 View the picture or stop the slide show 2 Press the INFO button The Info menu shows 3 Select Rotate The available options show 4 Choose the preferred option and press OK i Zoom in and out on a picture 1 View the photo or stop the slide show 2 Press the INFO button The Info menu shows 3 Select Zoom The available options show 4 Choose the preferred option and press OK i Disc Memor...

Page 33: ...CARD READER WITHOUT AN ADAPTER IF YOU DO YOU CAN DAMAGE THE BLU RAY DISC PLAYER AND THE MEMORY CARD Before you insert a memory card into the Blu ray Disc player make sure that the memory card is supported Refer to Playable memory cards on page 38 Left slot Right slot CF Type I MS MD MS PRO MS Duo only with adapter MMC RS MMC only with adapter SD Mini SD only with adapter Refer to Music on page 31 ...

Page 34: ...V on Set the TV to the correct external input Select the correct video output with the VIDEO OUTPUT SELECTION button on the front panel Change the resolution of the output to the TV Press and hold the button on the front panel for 5 seconds to restore the factory settings with no disc in the disc tray No high definition video signal on the TV via component video Does the disc contain high definiti...

Page 35: ... MP3 files from a disc or a memory card Make sure that the disc was recorded in the UDF ISO9660 or JOLIET format Make sure that the bit rate of the MP3 files is between 56 and 320 kbps Make sure that the sample rate of the MP3 files is 32 kHz 44 1 kHz or 48 kHz Cannot play a memory card Make sure the memory card is supported by the product Red cross in the upper right hand corner of the screen The...

Page 36: ...g Mains power AC 120 V 60 Hz Standby on switch Power consumption 51 W 10 W stand by Standby on light Red blue HDMI 480p 720p 1080i 1080p Component video Y 1 0 Vp p 75 Ω load Pb 0 70 Vp p 75 Ω load Pr 0 70 Vp p 75 Ω load Composite video 1 channel 1 0 Vp p 75 Ω load S Video Luminance 1 0 Vp p 75 Ω load Chrominance 0 3 Vp p 75 Ω load HDMI PCM multi channel audio PCM audio bitstream audio Digital audi...

Page 37: ...ital 2 Channel front left front right Bitstream bitstream from disc DVD with DTS PCM Mute Bitstream bitstream from disc Types BD BD ROM BD RE DVD DVD VIDEO DVD RW 4 7 GB DVD RW 4 7 GB DVD R 4 7 GB DVD R 4 7 GB CD AUDIO CD CD RW CD R Region codes BD A DVD All or 1 PRODUCT IS FULLY COMPATIBLE WITH THE FOLLOWING CURRENT FORMATS BD ROM BD R BD RE DVD Video DVD R DVD RW Audio CD CD R CD RW PRODUCT IS C...

Page 38: ...EN 38 Playable memory cards i Types CF Type I MD SM MS PRO MS Duo with adapter MMC RS MMC with adapter SD Mini SD with adapter ...

Page 39: ... Maintenance and service If the product is defective and needs repair but the warranty period has expired you can consult our specialists refer to page 10 Philips limited warranty one 1 year Warranty coverage PHILIPS warranty obligation is limited to the terms set forth below Who is covered Philips warrants the product to the original purchaser or the person receiving the product as a gift against...

Page 40: ...has been removed or defaced or e product accessories or consumables sold AS IS without warranty of any kind by including refurbished Philips product sold AS IS by some retailers This limited warranty does not cover Shipping charges to return defective product to Philips Labor charges for installation or setup of the product adjustment of customer controls on the product and installation or repair ...

Page 41: ...BREACH OF ANY EXPRESS OR IMPLIED WARRANTY ON THIS PRODUCT EXCEPT TO THE EXTENT PROHIBITED BY APPLICABLE LAW ANY IMPLIED WARRANTY OF MERCHANTABILITY OR FITNESS FOR A PARTICULAR PURPOSE ON THIS PRODUCT IS LIMITED IN DURATION TO THE DURATION OF THIS WARRANTY Some states do not allow the exclusions or limitation of incidental or consequential damages or allow limitations on how long an implied warrant...

Page 42: ...archive data CD RW CD Rewritable You can record a CD RW over and over again For example you can use a CD RW to make sequential back ups AUDIO CD Audio CD HDMI High Definition Media Interface It is a direct digital connection that can carry digital high definition as well as digital multi channel audio kbps Kilobit per second 1000 bit s JPEG Data compression standard for digital images MP3 Data com...

Page 43: ...EN 43 Title A complete video on a disc Track A music track on a disc GB Gigabyte Term Definition ...

Page 44: ...www usasupport philips com For support call 1 888 744 5477 English Español 1 800 661 6162 Français EN Universal remote control 3 ES Control remoto universal 27 FR Télécommande universelle 41 RC4380 ...

Page 45: ...2 ...

Page 46: ... 7 Prepare the remote control 7 Set up 7 Test the remote control 7 Identify devices 7 Enjoy 9 Volume buttons 9 Copy functions 11 Restore the factory default settings 13 Replace the batteries 14 Troubleshooting 15 Problems and tips 15 Technical data 15 Infra red capabilities 15 Dimensions 15 Power 15 Codes 16 TV 16 Amplifiers 19 Set top boxes 20 DVD 22 VCR 23 ...

Page 47: ...quently asked questions Helpline i Be prepared to give this information A description of the problem and when it occurs The type number on the label of the product The date of purchase Mode Device BD BDP9000 Blu ray Disc player TV TV AMP Amplifier OR Receiver SAT Satellite set top box OR Cable set top box DVD DVD Recorder OR DVD Player OR VCR Language Telephone number English 1 888 PHILIPS 1 888 7...

Page 48: ...R 4 Color buttons The TV shows the functions of the color buttons 5 Scene search button BD Scene search 6 Back button BD SAT DVD Back 7 Up down left and right buttons Move the cursor in the specified direction 8 OK button Confirms a choice 9 Disc menu button BD DVD Disc menu 10 Home menu button BD Home menu TV AMP SAT DVD Set up menu 11 Volume button BD TV SAT DVD TV volume up down AMP Amplifier v...

Page 49: ...olume of the rear loudspeakers 22 Play Pause button BD Play Pause SAT DVD Play 23 Fast forward button BD SAT DVD Fast forward AMP Increase the volume of the center loudspeaker 24 Slow forward button BD Slow forward DVD Pause 25 Stop button BD SAT DVD Stop 26 Channel button BD TV SAT DVD TV Channel up down 27 Title Pop up menu button BD Title pop up menu SAT DVD Guide 28 Info button BD TV SAT DVD I...

Page 50: ...ke sure that you can operate the TV with the universal remote control Refer to Overview on page 5 for an overview of the functions of the keys and the buttons Identify devices Manually If a device does not react correctly to the universal remote control you must identify the device yourself The instructions are applicable to a TV You can use the same pro cedure to identify other devices for exampl...

Page 51: ...r an overview of the functions of the keys and the buttons Search automatically for the correct code 1 Turn the TV on with its own remote control or the controls on the TV 2 Go to the first TV channel 3 Press the mode selector until the TV light comes on After the first and second digits the TV light flashes one time After the third digit the TV light goes off and flashes two times If the device d...

Page 52: ...ress the stand by key 8 Make sure that you can operate the TV with the universal remote control Refer to Overview on page 5 for an overview of the functions of the keys and the buttons Enjoy Volume buttons Depending on the selected mode the volume buttons are assigned to the TV or the amplifier These are the factory settings i You can change the assignment of the volume controls For example you ca...

Page 53: ...ess and hold the 1 and 6 until the TV mode light flashes two times 3 Press the 9 The mode light flashes one time 4 Press the 9 again The mode light flashes one time 5 Press the 3 The mode light flashes two times ...

Page 54: ...fier Copy functions You can copy the function of a device from its own mode to another mode For example the mute button of the AMP mode to the TV mode Then you can mute the amplifier in the TV mode 1 Select the AMP mode 2 Press and hold the 1 and 6 until the AMP mode light flashes two times ...

Page 55: ... the 9 again The mode light flashes one time 5 Press the 5 The mode light flashes one time 6 Press the mute button the source button The mode light flashes one time 7 Select the TV mode The TV mode light comes on 8 Press the target button The function is copied ...

Page 56: ...EN 13 Restore the factory default settings 1 Press and hold the 1 and 6 until the mode light flashes two times 2 Press the 9 The mode light flashes one time 3 Press the 8 The mode light flashes one time ...

Page 57: ...atteries make sure you replace them within 5 minutes The memory of the universal remote control holds all programmed settings for 5 minutes After 5 minutes the programmed settings are replaced with the factory default settings When you replace the batteries make sure that you do not press any key or but ton If you do the programmed settings can be replaced with the factory default settings To prev...

Page 58: ...respond AND the device indicator flashes when you press a key or button Remove any obstructions between the remote control and the device The universal remote control does not correctly operate the device Identify the device again Refer to page 7 You cannot copy functions The function copy keys is limited to six keys Restore the factory default settings to delete the copy keys Refer to page 13 Ope...

Page 59: ...ortyme 004 Concerto 004 Contec Cony 006 010 Craig 010 Crown 010 014 Curtis Mathes 004 007 016 017 024 CXC 010 Daewoo 003 004 008 017 041 067 Daytron 004 017 Dell 071 072 Dimensia 024 Electroband 001 Electrohome 001 002 004 Emerson 004 006 009 010 011 017 022 041 Envision 004 Fisher 040 Fujitsu 011 026 Funai 010 011 Futuretech 010 Gateway 045 GE 002 004 012 013 024 073 084 Goldstar 003 004 006 017 ...

Page 60: ...d 000 Motorola 002 019 MTC 003 004 016 Multitech 010 NAD 004 023 NEC 002 003 004 NET TV 046 Nikko 004 008 NTC 008 Onwa 010 Optimus 023 Optonica 019 Orion 009 022 035 Panasonic 002 013 014 034 059 Philco 002 003 004 005 006 014 Philips 002 005 006 014 033 047 060 076 Philips Magnavox 076 Pilot 017 Pioneer 004 023 048 Portland 003 004 008 017 Price Club 016 Prima 052 Prism 013 Proscan 024 Proton 004...

Page 61: ...arlite 010 Supre Macy 020 Supreme 001 Sylvania 004 005 014 025 074 078 Symphonic 010 021 029 Tandy 019 Tatung 002 Technics 013 Techwood 004 013 Teknika 000 003 004 005 006 008 010 011 016 017 TMK 004 Toshiba 016 028 061 080 Totevision 017 Universal 012 Victor 015 Vidtech 003 004 Viewsonic 077 Viking 020 Wards 000 003 004 011 012 014 024 White Westinghouse 041 Yamaha 003 004 Zenith 000 050 055 070 ...

Page 62: ...065 Linn 052 Magnavox 035 052 Marantz 000 052 Nakamichi 012 NEC 033 Onkyo 005 006 017 044 066 Optimus 008 Panasonic 001 045 046 Philips 052 067 071 Pioneer 004 009 010 023 036 042 056 068 Proton 035 Quasar 001 RCA 025 040 050 051 069 RePlay 028 Sansui 052 Sharp 029 030 031 032 Sherwood 011 048 Sony 020 041 047 055 060 061 062 Teac 019 Technics 001 045 046 054 Toshiba 027 Venturer 070 Victor 024 Wa...

Page 63: ...8 Hitachi 026 027 Hughes 051 Hughes Network Systems 021 031 JVC 025 Mitsubishi 040 Panasonic 019 045 048 049 Philips 028 037 044 051 054 109 Primestar 020 Proscan 000 001 016 033 RCA 000 001 016 024 033 038 050 051 Realistic 009 Samsung 041 042 051 Sony 017 034 036 039 043 052 STS 032 STS1 010 STS2 011 STS3 012 STS4 013 Toshiba 014 018 046 Uniden 015 029 Zenith 035 047 ...

Page 64: ...x 079 Motorola 107 Movie Time 080 NEC 058 NSC 080 Oak 069 082 Panasonic 097 100 Philips 064 065 066 068 072 078 083 084 085 Pioneer 086 087 Proscan 055 056 RCA 060 096 098 100 103 Realistic 062 Regal 075 088 102 Regency 070 Rembrandt 056 Samsung 087 Scientific Atlanta 059 089 090 091 104 Signal 071 Signature 056 Sony 105 Sprucer 100 Standard Component 092 093 Starcom 071 101 Stargate 071 Starquest...

Page 65: ...1 Pioneer 003 012 Polaroid 001 Proscan 080 099 Qwestar 013 RCA 024 030 036 044 055 069 074 080 Sampo 081 Samsung 014 031 053 Sansui 050 Sanyo 032 082 Sharp 015 016 026 060 062 Sherwood 083 Sony 017 018 046 048 049 063 Sylvania 045 056 066 Techwood 096 Toshiba 019 058 067 Venturer 004 Yamaha 101 Zenith 034 088 Apex Digital 181 Panasonic 175 Philips 173 176 178 179 Pioneer 177 RCA 172 Sony 174 Yamah...

Page 66: ...27 Cybernex 108 Daewoo 110 115 116 124 140 Daytron 124 DBX 104 105 Dimensia 127 Dynatech 115 Electrohome 109 117 Electrophonic 109 Emerson 107 109 110 113 115 117 147 Fisher 106 114 Fuji 103 113 Funai 115 128 Garrard 115 GE 108 113 127 153 Go Video 130 137 167 Goldstar 104 109 112 Gradiente 115 Harley Davidson 115 Harmon Kardon 104 Harwood 120 Headquarter 106 Hi Q 114 Hitachi 119 125 169 Instant R...

Page 67: ...Panasonic 113 141 142 143 150 165 Pentax 111 119 Pentex Research 112 Philco 113 121 Philips 113 121 122 135 Pilot 109 Pioneer 105 119 Polaroid 168 Portland 111 124 Proscan 127 Protec 120 Pulsar 123 Quarter 106 Quartz 106 Quasar 113 154 Radio Shack 109 122 Radio Shack Realistic 106 108 109 113 114 115 117 122 Radix 109 Randex 109 RCA 108 113 119 127 132 139 155 Realistic 106 108 109 110 113 114 115...

Page 68: ...Technics 113 Teknika 109 113 115 Tivo 138 TMK 108 Toshiba 110 119 157 159 160 162 Totevision 108 109 Unitech 108 Vector Research 104 105 110 111 Victor 105 Video Concepts 104 105 110 111 Videosonic 108 Wards 108 109 110 113 114 115 117 119 120 122 White Westinghouse 128 XR 1000 113 115 120 Yamaha 104 105 106 112 125 Zenith 103 123 126 136 158 170 ...

Page 69: ...EN 26 ...

Reviews: