background image

HD4777,  HD4775

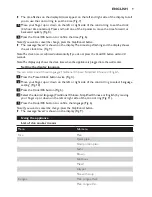
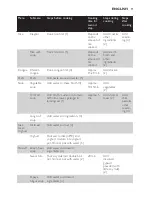
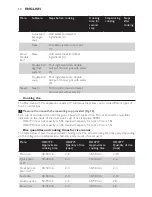
Summary of Contents for HD4775

Page 1: ...HD4777 HD4775 ...

Page 2: ...2 2 3 2 x 4 Language setting Clock setting 5 18 00 6 17 45 7 8 Saved Saved Saved 9 Clock setting Language setting 10 English Simplified Chinese Traditional Chinese 11 12 13 14 15 16 17 18 19 20 21 ...

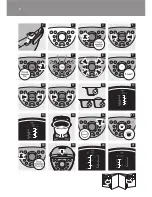
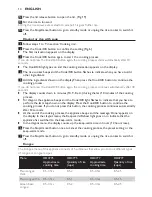
Page 3: ...3 16 17 19 20 15 18 22 21 23 24 25 26 27 4x 4 5 2 1 3 7 6 8 9 10 11 12 13 14 1 ...

Page 4: ...4 ...

Page 5: ...HD4777 HD4775 English 6 简体中文 34 ...

Page 6: ...ore you use the appliance and save it for future reference Danger Never immerse the main body of the rice cooker in water nor rinse it under the tap Warning Check if the voltage indicated on the appliance corresponds to the local mains voltage before you connect the appliance Only connect the appliance to an earthed wall socket Always make sure that the plug is inserted firmly into the wall socket...

Page 7: ...ible surfaces may become hot when the appliance is operating Only touch the control panel Beware of hot steam coming out of the steam vent during cooking or out of the rice cooker when you open the lid Do not lift and move the rice cooker by its handle while it is operating Be careful with the inner pot steam basket and double boil pot when you handle them after the cooking process as they may be ...

Page 8: ...ig 3 Buttons A flashing button indicates that you can press this button to go to the next step You can use the Stop Cancel button to stop a cooking process or to stop a preset timer You can also use this button as an undo button when you are programming a cooking process to go back to the previous screen Menu Some of the menus have submenus When you press the buttons for these menus the submenu ap...

Page 9: ...the clock time when the appliance is plugged into the wall socket Setting the display language You can select one of three languages Traditional Chinese Simplified Chinese or English 1 Press the Preset Clock button twice Fig 4 2 Move your finger up or down on the left or right side of the control ring to select Language setting Fig 10 3 Press the Cook OK button Fig 6 4 Select the desired language ...

Page 10: ...you what to you have to do next at certain points during the cooking process 1 Press the Cook OK button to start the cooking process If you do not press this button the cooking process starts automatically after 10 seconds 2 Press the Cook OK button to continue the cooking process If you do not press this button the cooking process continues automatically after 30 seconds 3 Cooking only starts if ...

Page 11: ...ble soup Add water to make broth 4 Approx 10 15min Add vegetables 2 TomYum soup Add broth mushroom tomato kaffir lime leaves galangal lemongrass 1 Approx 5 min Add shrimp meat 2 Add chilli paste other season ing 4 Long boil soup Add water and ingredients 4 Oat meal Yoghurt Oatmeal Add water and oat 4 Yoghurt Pour warm milk 40 C and yoghurt mixture into yoghurt pot fill inner pot with water 5 Desse...

Page 12: ...uncooked rice normally gives 2 bowls of cooked rice Do not exceed the quantities indicated on the inside of the inner pot 1 cup of rice is approx 180ml HD4777 inner pot capacity is 5 0L maximum capacity for cups of rice is 1 8L HD4775 inner pot capacity is 4 0L maximum capacity for cups of rice is 1 5L Rice quantities and cooking times for rice menus The table below shows the approximate cooking t...

Page 13: ...ount of rice used bubbling water may come out of the steam vent cap 5 Press the lid release button to open the lid 6 Put the inner pot in the rice cooker Fig 15 Make sure the pot is placed properly and the handles of the pot are aligned with the grooves in the main body Note Make sure the heating element and the outside of the inner pot are clean and dry 7 Put the plug in the wall socket and switc...

Page 14: ...10 minutes of the cooking process For claypot the appliance beeps and the Cook OK light flashes to indicate that you have to perform the last step shown on the display Press the Cook OK button to continue the cooking process If you do not press this button the cooking process continues automatically after 10 seconds At the end of the cooking process the appliance beeps and the message Done appears...

Page 15: ...om 30 minutes to 4 hours Tip Set 30 minutes if you cook 0 5 cups of rice in HD4775 or HD4777 Set 2 hours if you cook 2 5 cups of rice in HD4777 or 2 cups of rice in HD4775 7 Press the Cook OK button to start the cooking process Fig 6 The Cook OK light goes on and the cooking animation appears on the display The display counts down the cooking time in minutes At the end of the cooking process the a...

Page 16: ...e in hours 12 hours max 9 The appliance beeps and the Cook OK light flashes to indicate that you have to perform the next step shown on the display Press the Cook OK button to continue the cooking process If you do not press this button the cooking process continues automatically after 30 seconds 10 Press the Stop Cancel button to cancel the keep warm mode 11 Press the lid release button to open t...

Page 17: ...4777 Fig 23 HD4775 Fig 24 2 Follow steps 5 to 8 in section Cooking rice in this chapter 3 Press the Pasta button to select the Pasta menu Fig 25 The first instruction appears on the display 4 Press the Cook OK button The default cooking time of 30 minutes appears on the display 5 To adjust the cooking time move your finger up or down on the left or right side of the control ring Press and hold one...

Page 18: ...goes to the cooking time for vegetable soup and long boil soup after 10 seconds Press the Cook OK button to start the cooking process for TomYum soup The default cooking time 30 minutes for vegetable soup and 3 hours for long boil soup appears on the display 7 To adjust the cooking time move your finger up or down on the left or right side of the control ring Press and hold one of the 4 points to ...

Page 19: ...o not press this button the appliance automatically goes to the cooking time after 30 seconds The default cooking time of 4 hours appears on the display 9 To adjust the cooking time move your finger up or down on the left or right side of the control ring Press and hold one of the 4 points to move the time forward or backward quickly You can set any time from 3 to 6 hours 10 Press the Cook OK butt...

Page 20: ...r pot 2 Add the water Make sure all ingredients including water do not exceed the maximum water level on the scale for dessert indicated on the inside of the inner pot HD4777 Fig 23 HD4775 Fig 24 3 Follow steps 5 to 8 in section Cooking rice in this chapter 4 Press the Dessert button Move your finger up or down on the left or right side of the control ring to select the soup dessert you want to co...

Page 21: ...n the cooking process starts automatically after 30 seconds Note You cannot change the cooking time for sweet tofu The Cook OK light goes on and the cooking animation appears on the display The appliance beeps and the Cook OK button flashes to indicate when you have to add dissolved gypsum powder Be careful when you open the lid to add dissolved gypsum powder The lid and the steam that comes out o...

Page 22: ...trol ring to select the Stew menu Fig 33 5 Press the Cook OK button The first instruction appears on the display 6 Press the Cook OK button If you do not press this button the appliance automatically goes the cooking time after 10 seconds The default cooking time of 1 hour appears on the display 7 To adjust the cooking time move your finger up or down on the left or right side of the control ring ...

Page 23: ...right side of the control ring Press and hold one of the 4 points to move the time forward or backward quickly You can set any time from 20 minutes to 1 hour for double boil egg or milk custard or from 1 to 4 hours for double boil soup 10 Press the Cook OK button to start the cooking process The Cook OK light goes on and the cooking animation appears on the display The display counts down the cook...

Page 24: ...heated up properly Note Do not reheat cooled rice more than once 1 Loosen the cooled rice and evenly distribute it in the inner pot 2 Pour cup of water onto the rice to prevent it from becoming too dry The amount of water to be added depends on the amount of rice being reheated If the rice starts scorching add more water 3 Follow steps 5 to 8 in section Cooking rice in this chapter 4 Press the Kee...

Page 25: ... 1 hr 24 hrs Mixed 1 hr 24 hrs Claypot Rice with soup Congee Plain congee thick 1 hr 24 hrs Plain congee thin 1 hr 24 hrs Green bean congee 1 hr 24 hrs Millet congee 1 hr 24 hrs Chicken congee 1 hr 24 hrs Pasta Pasta Soup Vegetable soup TomYum soup Long boil soup 1 hr 12 hrs Yoghurt Oatmeal Yoghurt Oatmeal Dessert Green bean soup 1 hr 12 hrs Sweet tofu Papaya fungus soup 1 hr 12 hrs Lotus seed Lon...

Page 26: ...an the required total cooking time You can adjust the cooking time before you set the timer if the cooking time of the selected menu is adjustable Setting the ready time with the menu buttons 1 Press the button of the menu you want to use and if necessary select the desired submenu with the control ring Then press the Preset Clock button Note You can also press the preset button in the submenu scr...

Page 27: ...e all accessories inside the appliance in the following way Fig 46 Put the steam tray in the inner pot Put the yoghurt pots in the double boil pot Put the inner lid and outer lid on the double boil pot Put the double boil pot on the tray in the inner pot Put the stream tray in the inner pot 2 Store the appliance in a safe dry place Environment Do not throw away the appliance with the normal househ...

Page 28: ...ed Not enough water has been added Add water according to the scale on the inside of the inner pot see chapter Using the appliance The cooking process has not started You did not press the Cook OK button The inner pot is not properly in contact with the heating element Make sure that there is no foreign residue on the heating element The heating element is damaged Take the appliance to your Philip...

Page 29: ...d bean water ratio of 1 4 for the soy milk You have mixed dissolved gypsum powder and soy milk in the double boil pot too strongly As a result the tofu cannot coagulate properly Mix dissolved gypsum powder and soy milk in the double boil pot briefly If you do the tofu coagulates well and you get a firm result The sweet tofu tastes bitter and has a rough texture You have added too much tofu coagula...

Page 30: ...s for macaroni or 30 minutes for penne Then press the Cook OK button to cook 2 When the pasta cooking process is finished sprinkle some pepper or cheese on top and serve the pasta hot TomYum soup Ingredients 16 large shrimps 1200ml chicken stock 1 tomato quartered 400g sliced oyster mushrooms 6 kaffir lime leaves 2 tbsp coarsely chopped galangal 4 sprigs of lemongrass crushed and cut into smaller ...

Page 31: ... 2 Press theYoghurt Oatmeal button to select the Oatmeal submenu Set the cooking time to 10 minutes for 1 cup and to 20 minutes for 3 cups Then press the Cook OK button to cook 3 When the oatmeal cooking process is finished add some fruits or honey on top and serve Yoghurt Serves 4 persons Ingredients 500ml milk 100ml plain live yoghurt 1 Place the yoghurt in room temperature a few minutes before ...

Page 32: ... the rice cooker beeps add the dissolved coagulating agent to the double boil pot Stir the milk slowly Then close the lid and continue to cook Be careful when you open the lid to add the coagulating agent The lid and the steam that comes out of the double boil pot are hot 5 Boil the brown sugar water and ginger for later use 6 When the sweet tofu cooking process is finished put the syrup on top of...

Page 33: ...menu Set the cooking time to 30 minutes Press Cook OK to start cooking 5 The rice cooker beeps to indicate that the cooking process is finished You can serve the egg custard hot or you can put it in the fridge overnight and serve as cold Double boil milk custard Serves 1 2 persons Ingredients 3 egg whites 1 cup milk 3 tbsps sugar 0 25 cups water several drops of white vinegar 1 Stir the egg white ...

Page 34: ... 21 电饭煲把手 22 蒸篮 23 可分离式蒸架 24 炖盅 25 炖盅内盖 26 炖盅外盖 27 酸奶杯 注意事项 使用产品之前 请仔细阅读本使用说明书 并妥善保管以备日后参考 危险 切勿将电饭煲的煲身浸入水中 也不能在水龙头下冲洗 警告 在将产品连接电源之前 请先检查产品所标电压与当地的供电电压是否相符 产品必须插入有接地的插座 且务必确保其已稳固插入 如果插头 电源线 内锅或煲身已经损坏 请勿再使用本产品 如果电源软线损坏 为避免危险 必须由制造厂或其维修部或类似的专职人员来更 换 本产品不打算由肢体不健全 感觉或精神上有障碍或缺乏相关经验和知识的人 包括 儿童 使用 除非有负责他们安全的人对他们使用本产品进行监督或指导 应照看好儿童 确保他们不玩耍该产品 不要让儿童接触到电源线 切勿将电源线悬挂在放置本产品的桌子或工作台的边上 将插头接入插座之前 应确保加热元件 温度传感器和内锅...

Page 35: ...煲 在烹饪过程完成后 处理内锅 蒸篮和炖盅时应多加注意 它们可能很烫 并且较 重 切勿将产品直接曝晒于阳光下 切勿将金属物体或异物插入蒸汽孔 请勿将带磁性的物体放在锅盖上 请勿在带磁性的物体附近使用本产品 如果内锅已变形 请勿使用 请不要超出内锅中标明的最高水位标示 以防溢水 切勿在烹饪 保温或重新加热米饭时将饭勺放入锅中 每次使用后应清洁产品 请勿在洗碗机中清洗本产品 电磁场 EMF 这款飞利浦产品符合关于电磁场 EMF 的相关标准 据目前的科学证明 如果正确使用并 按照本用户手册中的说明进行操作 本产品是安全的 电源故障备份功能 如果在 2 小时内恢复供电 则本产品的备份功能可以记忆电源发生故障之前的状态 如果 在煮饭过程中发生电源故障 则恢复供电时 煮饭时间倒计时将从中断处继续 如果电源故障的持续时间长于 2 个小时 并且故障在煮饭过程中发生 则恢复供电时电饭 煲将自动重置为待机模式...

Page 36: ...调整设置 如时钟 定时器和烹饪时间 或选 择所需的菜单 按住 4 个控制点之一可快速向前或向后调整设置 设置时钟时间 注意 不能在烹饪过程中或当电饭煲处于保温模式下时调整时钟时间 1 将插头接入电源插座 打开产品电源 显示屏将显示问候信息 早上好 下午好 或 晚上好 2 按两次预约 时钟 Preset Clock 按钮 图 4 3 在控制环的左 右两侧上下移动手指以选择 Clock setting 时间设置 选 项 图 5 4 按烹调 OK Cook OK 按钮 图 6 显示屏上的时间将开始闪烁 其左 右两侧出现箭头 表明您可以使用控制环设置时 间 图 7 5 在控制环的左 右两侧上下移动手指以设置时钟 24 小时时间符号 按住 4 个控制 点之一可快速向前或向后调整时间 图 8 6 按烹调 OK Cook OK 按钮确认时间 图 6 注意 如果想取消更改 按停止 取消 Stop Canc...

Page 37: ...繁体中文 简体中文或英 文 图 11 5 按烹调 OK Cook OK 按钮确认语言 图 6 注意 如果想取消更改 按停止 取消 Stop Cancel 按钮 显示屏将显示 Saved 已储存 信息 图 9 使用本产品 电饭煲菜单列表 菜单 子菜单 米饭 白米 快煮 小米量 寿司米 糙米 糯米 杂锦米 煲仔饭 泡饭 粥 稠粥 稀粥 绿豆粥 小米粥 鸡粥 意大利面 意大利面 汤 菜汤 冬荫功 老火汤 燕麦 酸奶 燕麦 酸奶 甜品 绿豆汤 豆腐花 木瓜雪耳糖水 莲子桂圆汤 蛋糕 焖 炖 焖 简体中文 37 ...

Page 38: ...后自动进入烹饪 过程 5 按烹调 OK Cook OK 按钮 如果未按此按钮 则本产品将在 30 秒钟后自动进入烹饪 过程 菜单 子菜单 烹饪前的步骤 第二步的烹 饪时间 烹饪期间的 步骤 烹饪后 的步骤 米饭 煲仔饭 先煮饭 1 视要煮的米 饭量而定 加入肉及材 料 2 加入调 味 4 泡饭 先煮饭 1 视要煮的米 饭量而定 加入热汤底 及配料 2 粥 鸡粥 煮鸡粥的第一步 4 约需 15 20 分钟 加入鸡肉 2 意大利面 意大利面 添加意大利面 调料和水 5 汤 菜汤 加水 先烹调汤底 4 约需 10 15 分钟 加入蔬菜 2 冬荫功 先烹调汤底 加入蕃茄 香菇 柠檬叶 南姜及香 茅 1 约需 5 分 钟 加入虾 肉 2 加入辣 酱及调 味 4 老火汤 加水及配料 4 燕麦 酸 奶 燕麦 加水及麦片 4 酸奶 将温热牛奶 40 C 与酸 奶混合倒入酸奶杯 向内 锅注水 5 甜品 绿豆...

Page 39: ... HD4775 内锅容量为 4 0 升 用杯子盛放大米时最大容量为 1 5 升 煮米饭的用米量和烹煮时间 下表显示了大概煮饭时间 实际煮饭时间视电压 室温 湿度和用水量而定 菜单 HD4775 大概煮 饭时间 HD4775 用米量 杯 HD4777 大概煮 饭时间 HD4777 用米量 杯 白米 40 50 分钟 2 8 40 50 分钟 2 10 快煮 30 40 分钟 2 4 30 40 分钟 2 6 小米量 40 50 分钟 2 3 40 50 分钟 2 3 寿司米 40 50 分钟 2 8 40 50 分钟 2 10 糯米 50 90 分钟 2 6 50 90 分钟 2 8 糙米 40 50 分钟 2 4 40 50 分钟 2 6 杂锦米 40 50 分钟 2 4 40 50 分钟 2 6 煲仔饭 45 60 分钟 2 4 45 60 分钟 2 5 泡饭 35 70 分钟 2 8 ...

Page 40: ...屏以分钟为单位进行倒计时 10 9 8 等 烹饪过程结束时 本产品会发出哔声 营养保温 加热 Keep warm Reheat 指示灯将 亮起 指示本产品已切换至保温模式 显示屏以小时为单位累计保温时间 最多 12 小时 11 按停止 取消 Stop Cancel 按钮可取消保温模式 图 18 如果要再次启动保温模式 只需再次按营养保温 加热 Keep warm Reheat 按钮 12 按锅盖释放钮 打开锅盖 图 19 13 翻松米饭 搅动米饭可将多余蒸汽释放出来 使米饭更松软 14 按停止 取消 Stop Cancel 按钮进入待机模式 或拔下电饭煲的电源插头以关闭电 源 煲仔饭或泡饭 1 遵循 煮饭 部分的步骤 1 至 9 2 按烹调 OK Cook OK 按钮确认设置 图 6 显示屏上将出现烹饪过程的第一步说明 3 再次按烹调 OK Cook OK 按钮开始烹饪过程 如未再次按烹调...

Page 41: ...0 5 1 5 绿豆粥 0 5 4 小时 0 5 2 0 5 4 小时 0 5 2 5 小米粥 0 5 4 小时 0 5 2 0 5 4 小时 0 5 2 5 鸡粥 0 5 4 小时 0 5 2 0 5 4 小时 0 5 2 5 1 将原料放入内锅 2 加水 以内锅内侧对应粥的刻度为参照 确保包括水在内的所有原料不会超过最高水位标示 HD4777 图 20 HD4775 图 21 3 遵循本章中 煮饭 部分的步骤 5 至 8 4 按煮粥 Congee 按钮 在控制环的左 右两侧上下移动手指以选择要煮的粥的类 型 图 22 5 按烹调 OK Cook OK 按钮 默认的 1 小时烹饪时间将出现在显示屏上 6 要调整烹饪时间 请在控制环的左 右两侧上下移动手指 按住 4 个控制点之一可快 速向前或向后调整时间 您可以设置从 30 分钟至 4 小时的任意时间 提示 若要在 HD4775 或 HD...

Page 42: ... 4 小时的任意时间 8 按烹调 OK Cook OK 按钮开始蒸制 烹调 OK Cook OK 指示灯将亮起 显示屏上将出现烹饪动画 显示屏将以分钟为单位对烹饪时间进行倒计时 当烹饪过程结束时 本产品会发出哔声 营养保温 加热 Keep warm Reheat 指示灯 将亮起 指示本产品已切换至保温模式 显示屏以小时为单位累计保温时间 最多 12 小时 9 当本产品发出哔声 并且烹调 OK Cook OK 按钮开始闪烁时 必须执行显示屏上显 示的下一步骤 按烹调 OK Cook OK 按钮继续烹饪过程 如未按此按钮 则在 30 秒 钟后将自动继续烹饪过程 10 按停止 取消 Stop Cancel 按钮可停止保温模式 11 按锅盖释放钮 打开锅盖 12 按停止 取消 Stop Cancel 按钮进入待机模式 或拔下电饭煲的电源插头以关闭电 源 使用其它美食菜单进行烹饪 下表显示的是其它美...

Page 43: ...肉 45 分钟 3 小时 3 小时 炖蛋 炖奶 30 分钟 烹煮 3 个鸡蛋 20 分钟 1 小时 40 分钟 炖汤 3 小时 1 整套炖盅 1 4 小时 3 小时 蒸食品 30 分钟 300 克排骨 10 分钟 1 小时 1 小时 意大利面 1 将原料和水放入内锅 以内锅内侧对应意大利面的刻度为参照 确保包括水在内的所有原料不会超过最高水位标 示 HD4777 图 23 HD4775 图 24 2 遵循本章中 煮饭 部分的步骤 5 至 8 3 按意大利面 Pasta 按钮以选择 意大利面 菜单 图 25 显示屏上将出现烹饪过程的第一步说明 4 按烹调 OK Cook OK 按钮 显示屏上显示的默认烹饪时间是 30 分钟 5 要调整烹饪时间 请在控制环的左 右两侧上下移动手指 按住 4 个控制点之一可快 速向前或向后调整时间 您可以设置从 20 至 30 分钟的任意时间 6 按烹调 OK ...

Page 44: ...品将自动转至菜汤和 老火汤的烹饪时间 按烹调 OK Cook OK 按钮开始煲制冬荫功 显示屏上将显示默认的煲汤时间 菜汤为 30 分钟 老火汤则为 3 小时 7 要调整烹饪时间 请在控制环的左 右两侧上下移动手指 按住 4 个控制点之一可快 速向前或向后调整时间 若要烹饪菜汤 您可以设置从 30 分钟至 1 个半小时之间的任意时间 对于老火汤 您可 以设置 2 至 4 小时之间的任意时间 注意 您不能更改冬荫功的烹饪时间 8 按烹调 OK Cook OK 按钮开始蒸制 烹调 OK Cook OK 指示灯将亮起 显示屏上将出现烹饪动画 显示屏将以分钟为单位对烹饪时间进行倒计时 对于菜汤和冬荫功 当本产品发出哔声 并且烹调 OK Cook OK 按钮开始闪烁时 必须执行显示屏上显示的下一步骤 按烹调 OK Cook OK 按钮继续烹饪过程 如未 按此按钮 则在 30 秒钟后将自动继续烹饪过程...

Page 45: ... 要调整烹饪时间 请在控制环的左 右两侧上下移动手指 按住 4 个控制点之一可快 速向前或向后调整时间 您可以设置从 3 至 6 小时的任意时间 10 按烹调 OK Cook OK 按钮开始蒸制 烹调 OK Cook OK 指示灯将亮起 显示屏上将出现烹饪动画 显示屏将以分钟为单位对烹饪时间进行倒计时 烹饪过程结束时 本产品会发出哔声 显示屏上将显示 完成 Done 信息 11 按锅盖释放钮 打开锅盖 12 按停止 取消 Stop Cancel 按钮进入待机模式 或拔下电饭煲的电源插头以关闭电 源 燕麦 1 将原料和水放入内锅 以内锅内侧对应燕麦的刻度为参照 确保包括水在内的所有原料不会超过最高水位标示 HD4777 图 13 HD4775 图 14 2 遵循本章中 煮饭 部分的步骤 5 至 8 3 按酸奶 燕麦 Yoghurt Oatmeal 按钮 在控制环的左 右两侧上下移动手指以选 ...

Page 46: ...至 8 4 按甜品 Dessert 按钮 在控制环的左 右侧上下移动手指以选择要烹饪的甜汤的类 型 图 31 5 按烹调 OK Cook OK 按钮 显示屏上将出现烹饪过程的第一步说明 6 按烹调 OK Cook OK 按钮 如果未按此按钮 则本产品将在 10 秒钟后自动进入烹饪 过程 默认的 1 小时烹饪时间将出现在显示屏上 7 要调整烹饪时间 请在控制环的左 右丙侧上下移动手指 按住 4 个控制点之一可快 速向前或向后调整时间 您可以设置从 30 分钟至 4 小时的任意时间 8 按烹调 OK Cook OK 按钮开始蒸制 烹调 OK Cook OK 指示灯将亮起 显示屏上将出现烹饪动画 显示屏将以分钟为单位对烹饪时间进行倒计时 当烹饪过程结束时 本产品会发出哔声 营养保温 加热 Keep warm Reheat 指示灯 将亮起 指示本产品已切换至保温模式 显示屏以小时为单位累计保温时间...

Page 47: ...溶解的石膏粉 然后按烹调 OK Cook OK 按钮继续烹饪过程 如未按些按钮 则在 30 秒钟后将自动继续烹饪过程 显示屏将以分钟为单位对最后 20 分钟烹饪时间进行倒计时 烹饪过程结束时 本产品会发出哔声 显示屏上将显示 完成 Done 信息 10 按锅盖释放钮 打开锅盖 11 按停止 取消 Stop Cancel 按钮进入待机模式 或拔下电饭煲的电源插头以关闭电 源 蛋糕 1 将原料混合在一起 制成蛋糕面粉糊 2 给内锅涂上黄油 3 将蛋糕面粉糊放入内锅 4 遵循本章中 煮饭 部分的步骤 5 至 8 5 按甜品 Dessert 按钮 在控制环的左 右两侧上下移动手指以选择 蛋糕 菜 单 图 31 6 按烹调 OK Cook OK 按钮 显示屏上将出现烹饪过程的第一步说明 7 按烹调 OK Cook OK 按钮开始烹饪过程 如果未按此按钮 则在 10 秒钟后将自动开 始烹饪过程 注意 ...

Page 48: ...起 显示屏上将出现烹饪动画 显示屏将以分钟为单位对烹饪时间进行倒计时 烹饪过程结束时 本产品会发出哔声 显示屏上将显示 完成 Done 信息 当烹饪过程结束时 本产品会发出哔声 营养保温 加热 Keep warm Reheat 指示灯 将亮起 指示本产品已切换至保温模式 显示屏以小时为单位累计保温时间 最多 12 小时 9 按停止 取消 Stop Cancel 按钮可停止保温模式 10 按锅盖释放钮 打开锅盖 11 按停止 取消 Stop Cancel 按钮进入待机模式 或拔下电饭煲的电源插头以关闭电 源 炖 1 将原料放入炖盅中 2 将蒸架放入内锅 图 27 3 以内锅内侧对应炖品的刻度为参照 将水加至最高水位标示处 图 28 如果炖食物的时间超过 3 小时 建议您以对应意大利面的刻度为参照 将水加至最高水位 标示处 以防电饭煲中的水被烧干 HD4777 图 23 HD4775 图 24...

Page 49: ...上的标记 图 34 2 用量杯量 3 杯水 倒入内锅 3 杯水沸腾约需 8 分钟的时间 注意 添加的水量视要蒸制的食品量而定 3 将组装好蒸架的蒸篮放入内锅 图 35 4 将要蒸制的食品放在盘子或蒸篮上 注意 为确保蒸制食物时均匀受热 应将食物摆置均匀 不要堆积在一起 5 遵循本章中 煮饭 部分的步骤 5 至 8 6 按蒸 Steam 按钮选择所需的 蒸 菜单 图 36 显示屏上将出现烹饪过程的第一步说明 7 按烹调 OK Cook OK 按钮 如果未按此按钮 则本产品将在 10 秒钟后自动转至烹饪 时间 显示屏上显示的默认烹饪时间是 30 分钟 8 要调整烹饪时间 请在控制环的左 右两侧上下移动手指 按住 4 个控制点之一可快 速向前或向后调整时间 您可以设置 10 分钟到 1 小时之间的任意时间 9 按烹调 OK Cook OK 按钮开始蒸制 烹调 OK Cook OK 指示灯将亮起 ...

Page 50: ... Stop Cancel 按钮进入待机模式 或拔下电饭煲的电源插头以关闭电 源 保温 保温模式使您可以较长时间地保温米饭或食物 注意 建议米饭的保温时间不要超过 12 个小时 以保证其口感 1 按营养保温 加热 Keep warm Reheat 按钮激活保温模式 图 38 营养保温 加热 Keep warm Reheat 指示灯将持续亮起 在保温过程中 显示屏将显示小时数 0 至 11 0HR 1HR 11HR 12 小时后 保温模式自动结束 电饭煲发出 10 声哔声 显示屏将切换至时钟时间 定时器 下表显示在不同菜单中可用的定时器选项 菜单 子菜单 定时器选项 米饭 白米 1 小时 24 小时 快煮 小米量 1 小时 24 小时 寿司米 1 小时 24 小时 糙米 1 小时 24 小时 糯米 1 小时 24 小时 杂锦米 1 小时 24 小时 煲仔饭 泡饭 粥 稠粥 1 小时 24 小时...

Page 51: ...下要使用的菜单的按钮 并且根据需要 用控制环选择所需的子菜单 然后按烹调 OK Cook OK 按钮 3 要设置就绪时间 请在控制环的左 右两侧上下移动手指 按住 4 个控制点之一可快 速向前或向后调整时间 注意 例如 您可以用预约 时钟 Preset Clock 按钮将就绪时间设置在 18 30 图 41 4 按烹调 OK Cook OK 按钮启动定时器 显示屏将出现 Saved 已储存 信息 烹调 OK Cook OK 指示灯将亮起 显示屏上将出现 定时器已设置 的字样以及所 选菜单的预设就绪时间 烹饪过程开始后 显示屏上将出现烹饪动画和剩余烹饪时间 注意 如果预设时间比所选菜单中所需的烹饪总时间短 电饭煲会使用默认烹饪时间 立 即开始烹饪过程 如果预设时间比所需的烹饪总时间短 烹饪时间不会缩短 如果所选菜 单的烹饪时间是可调整的 则可以先调整烹饪时间 然后再设置定时器 使用菜单按钮设...

Page 52: ...盖 将内盖从外盖中取下 图 42 要重新安装内盖 将内盖的顶端插入外盖 并将释放钮按入到位 听到喀哒的一声 3 向上拉蒸汽孔帽 从外盖上拆下蒸汽孔帽 图 43 要取下蒸汽孔帽的底盖 请先将锁定卡舌扳至 开启 位置 然后从铰链上卸下底 盖 图 44 要重新装上蒸汽孔帽的底盖 请将底盖的突出部分插入蒸汽孔帽的锁槽中 然后朝蒸 汽孔帽的方向推底盖 1 并将锁定卡舌扳至关闭位置 2 咔哒 一声 图 45 要将蒸汽孔帽装回外盖的蒸汽孔 将蒸汽孔帽插入蒸汽孔并向下按紧 4 在热水中加入清洁剂 用海绵或布清洁内盖 内锅 带托盘的蒸篮 酸奶杯 炖盅 饭勺和蒸汽孔帽 不要用任何研磨性清洗剂 材料或金属网绒清洁内锅 以免损坏不粘涂层 5 只能用湿布擦拭电饭煲主体的内部和外部 切勿将电饭煲主体浸入水中 也不能在水龙头下冲洗 存储 1 您可按以下方式将所有附件存储在产品内 图 46 将蒸架放入内锅 将酸奶杯放入炖...

Page 53: ...养保温 加热 warm Reheat 指 示灯不亮 指示灯有故障 请将本产品送往当地的飞利浦经销商 或 经飞利浦授权的客户服务中心 您已经重新加热过食 物 烘烤过蛋糕 煮 过燕麦 做过酸奶 煮过泡饭 煮过意大 利面 做过豆腐花 炖过或蒸过食物 自动保温模式仅适用于煮饭 煮粥 煲 汤 焖炖和甜品菜单 显示屏不能工作 产品的电源插头没有 插上 如果产品的电源插头没有插上 则电源故 障备份功能将不起作用 显示屏将无法工 作 为显示屏供电的电池 已耗干 请将产品送往飞利浦经销商处或飞利浦授 权的服务中心 让其为您更换电池 饭没煮好 加水不足 将水加到内锅的相应水位标志 见 使用 本产品 一章 煮饭过程未启动 您没有按烹调 OK Cook OK 按钮 内锅与加热元件接触 不良 确保加热元件上没有黏附其他杂物 加热元件已损坏 请将本产品送往当地的飞利浦经销商 或 经飞利浦授权的客户服务中心 内锅已变形...

Page 54: ...将牛奶加热太长时间 以保证酸奶发 酵剂中乳酸菌的活性 要使酸奶变得更加 柔滑细腻且更易凝固 可在牛奶中加入 60 克奶粉 然后加热 豆腐花硬度不够 您用于制作豆腐花的 豆浆不够浓 如果您想用自制豆浆来制作豆腐 请确保 豆浆足够浓 浸泡的黄豆与水的比例应为 1 4 您在炖盅中混合溶解 石膏粉和豆浆的强度 过大 致使豆腐无法 正常凝结 在炖盅中短暂地混合溶解石膏粉和豆浆 如果这样做 那么豆腐会很容易凝结 并 达到适当的硬度 豆腐花有苦味 并 且很粗糙 您添加了过多的豆腐 凝固剂 确保豆腐凝固剂的用量适当 与所制作豆 腐的量相符合 请参阅 食谱 一章中的 豆腐花食谱 例如 每 500 毫升豆浆用 1 茶匙凝固剂 炖盅中的鸡蛋 牛奶 布丁硬度不够 鸡蛋或牛奶混合物中 的空气太多 例如 由于使用了电动搅拌 器 建议您手动搅动鸡蛋或牛奶混合物 这样 布丁就会达到适当的硬度 显示屏上出现错误 消息 E1...

Page 55: ...0 克意大利面 意大利通心粉或通心面 500 毫升意大利面酱 700 毫升水 1 将意大利面和意大利面酱放入内锅并加水至适合意大利面的水位标示 按意大利面 Pasta 按钮并将烹饪时间设置为适合通心粉的 20 分钟或适合通心面的 30 分钟 然 后按烹调 OK Cook OK 按钮开始烹饪 2 意大利面烹饪完成时 将胡椒粉或干酪撒在面上并趁热食用 冬荫功 物料 16 只大虾 1200 毫升鸡汤料 1 个西红柿 分成四份 400 克切片的平菇 6 片青柠檬叶 2 汤匙切成大块的姜 4 枝研成粉和切成小段的香茅 泰国辣椒酱 可选 8 个新鲜的红辣椒 4 汤匙鲜酸橙汁 鱼露 调味 芫荽叶 可选 水 1 将大虾去掉壳和血管 保留完整虾尾 2 将汤料 西红柿 蘑菇 青柠檬叶 姜和香茅放入内锅 加水至适合冬荫功的水位标 示 按煲汤 Soup 按钮选择 冬荫功 菜单 并按烹调 OK Cook OK 按钮...

Page 56: ... 将燕麦片放入内锅 根据所加的燕麦片量 加水至适合燕麦片的水位标示 2 按酸奶 燕麦 Yoghurt Oatmeal 按钮选择 燕麦 子菜单 对于 1 杯量 将烹饪时间 设置为 10 分钟 对于 3 杯量 设置为 20 分钟 然后按烹调 OK Cook OK 按钮开始 烹饪 3 燕麦烹饪过程结束时 将一些水果或蜂蜜加入其中 即可食用 酸奶 供 4 个人食用 物料 500 毫升牛奶 100 克普通活乳酸 1 将酸奶置于室温下几分钟 然后烧煮以加热酸奶发酵菌 将牛奶加热至 40 C 左右 用一个单独的大锅将酸奶和温热牛奶快速混合 然后将混合物倒入独立的酸奶杯 盖 上锅盖 注意 将牛奶加热至 40 C 只需几秒钟的时间 如果牛奶温度过高 则会破坏酸奶中的 发酵菌 2 将蒸架放入内锅 加水至适合酸奶的水位标示 然后将酸奶杯放在蒸架上 3 按酸奶 燕麦 Yoghurt Oatmeal 按钮选择 酸奶...

Page 57: ...将豆腐凝固剂溶于 30 毫升豆浆中 4 电饭煲发出哔声时 将溶解的凝固剂加入炖盅 缓慢搅拌豆浆 然后合上锅盖继续烹 饪 打开锅盖添加凝固剂时要多加注意 锅盖和炖盅中冒出的蒸汽很烫 5 将红糖 水和生姜进行烧煮 以备后用 6 豆腐花过程结束时 将椰汁加于其上并趁热食用 您也可以将其放入冰箱中保留一 夜 然后冷食 提示 如果您想用自制豆浆来制作豆腐 请确保豆浆足够浓 浸泡的黄豆与水的比例应为 1 4 如果加入过多的豆腐凝固剂 会使豆腐变得非常粗糙 在炖盅中要缓慢搅拌豆腐凝固剂和豆浆 否则 豆腐的凝固效果不好 蛋糕 物料 250 克蛋糕预拌粉 65 克黄油 100 毫升水或牛奶 1 个大鸡蛋 1 在一个大碗中混合蛋糕预拌粉 水或牛奶 黄油和鸡蛋 用一个电动搅拌器低速搅拌 1 分钟 然后以中速再搅拌 3 分钟 2 在内锅上涂上一些黄油 然后将蛋糕预拌粉倒入内锅 3 按甜品 Dessert 按钮选择...

Page 58: ...按钮选择 炖蛋 炖奶 菜单 将烹饪时间设为 30 分钟 按烹调 OK Cook OK 按钮开始烹饪 5 电饭煲发出哔声 指示烹饪过程已结束 您可以趁热食用鸡蛋布丁 也可将其放入冰 箱中保留一夜 然后冷食 炖奶 供 1 2 人食用 物料 3 个蛋清 1 杯牛奶 3 汤匙糖 0 25 杯水 几滴白醋 1 搅动蛋白 搅入水 牛奶 糖和白醋 搅拌均匀 提示 用手搅打的蛋白会比用电动 搅拌器搅打的效果更好 电动搅拌器会让搅拌的蛋白中产生太多的空气 从而做出来 的布丁不硬实 2 将蛋白混合液倒入炖盅中 将蒸架放入内锅并加水至适合炖盅的水位标示 然后将炖 盅放在蒸架上 3 按焖 炖 Stew Double boil 按钮选择 炖蛋 炖奶 菜单 将烹饪时间设为 30 分钟 按烹调 OK Cook OK 按钮开始烹饪 4 电饭煲发出哔声 指示烹饪过程已结束 您可以趁热食用炖奶 也可将其放入冰箱中 保留一夜 ...

Page 59: ...59 2009 05 20 ...

Page 60: ...60 ...

Page 61: ...61 ...

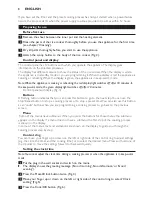
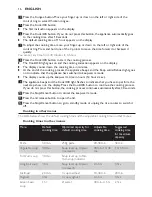
Page 62: ...62 62 22 23 24 25 26 27 28 29 30 31 32 33 34 35 36 2 x 37 38 39 Preset 40 18 30 41 ...

Page 63: ...63 42 43 44 1 2 45 46 47 ...

Page 64: ...4222 200 0340 2 ...

Reviews: