background image

4

Page  

Introduction.............................................................................................................. 4
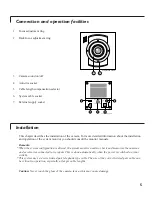
Connection and operation facilities ...................................................................... 
5
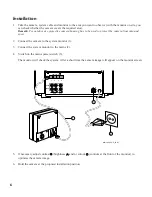
Installation .............................................................................................................. 
5
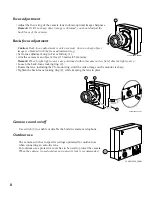
Camera position
Focus adjustment
Back-focus adjustment
Camera sound on/off
Outdoor use

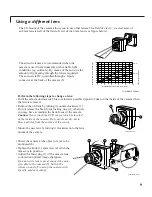
Using a different lens .............................................................................................. 9
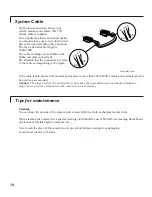
System cable .......................................................................................................... 
10
Tips for maintenance ............................................................................................ 
10

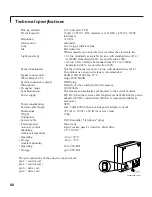
Colour Observation Camera

Table of contents

Read these instructions, before taking your system in operation.

This camera is especially designed for the colour Philips Observation Systems. It combines a high sensitivity
sensor with advanced digital signal processing, resulting in a high quality camera with excellent performance
under even  difficult circumstances. The camera has a standard camera mount allowing installation on, for
example, a tripod or wall bracket.

Camera accessories:
The following camera accessories are available:
•  Protective camera housing for protection against dust and theft
•  Weather proof housing for outside use
•  Extension system cables
•  Mains power adapter for providing additional power to the camera at large distances

English

Introduction

Summary of Contents for VCM7A79/00T

Page 1: ... Observation Systems It combines a high sensitivity sensor with advanced digital signal processing resulting in a high quality camera with excellent performance under even difficult circumstances The camera has a standard camera mount allowing installation on for example a tripod or wall bracket Camera accessories The following camera accessories are available Protective camera housing for protect...

Page 2: ...em configuration is altered the system monitor needs to check and memorise the cameras and accessories connected to its inputs This is done automatically when the power is switched on rear switch This system uses a 4 wire twisted pair telephone type cable The use of the correct twisted pair cable can be critical to operation especially at larger cable lengths Caution Never touch the glass of the c...

Page 3: ...onnect the camera to the system monitor 1 3 Connect the system monitor to the mains 2 4 Switch on the mains power switch 3 The monitor will check the system After a short time the camera image will appear on the monitor screen 5 If necessary adjust contrast brightness and or colour controls at the front of the monitor to optimise the camera image 6 Hold the camera at the proposed installation posi...

Page 4: ...8 Check the camera image on the monitor Adjust focus if necessary 13 Tighten the knob 4 and screw 5 when the camera is in position 14 Check if the cable length compensation 6 selector is set to the correct length The length set must be the same as the length of the system cable 0 300m 900ft max connecting monitor and camera Remark If the length of the system cable is more than 200m 600ft a mains p...

Page 5: ...d within thecamera view field dim the light source Loosen the back focus locking ring 2 Rotate the lens including the CS mount ring until the video image on the monitor is sharp Tighten the back focus locking ring 2 while keeping the lens in place Camera sound on off Use switch 9 to enable or disable the built in camera microphone Outdoor use The camera switches to specific settings optimised for ...

Page 6: ... ring 2 otherwise you may have to readjust the back focus of the camera Caution Never touch the CCD sensor which is located at the inside of the camera Only use clean dry air to blow particles from the surface of the sensor Mount the new lens by turning it clockwise onto the lens mount of the camera Direct the camera at the object or area to be monitored 6 Tighten the knob 3 and screw 4 when the c...

Page 7: ...0m 600ft a mains power adapter should be used see accessories Caution The plugs used for the observation system have the same dimensions as standard telephone plugs Never connect a telephone to the camera or system monitor Cleaning You can clean the outside of the camera with a moist fluff free cloth or shammy leather cloth When cleaning the camera lens a special cleaning cloth should be used Do N...

Page 8: ...tput RJIIE plug Microphone Built in can be switched off at the camera Frequency range 300 3000Hz Synchronisation The camera automatically synchronises to the system monitor Power supply 24VDC when the system cable length exceeds 200m 600ft a power adapter 24VDC current limit 500mA is required available as accessory Power consumption 3W System cable length max 300m 900ft when a mains power adaptor ...

Reviews: