background image

A

D

C

B

A

A

B

C

D

1

2

3

4

5

6

7

8

8

7

6

5

4

3

2

1

MCH

4/5/13

DWG.  NO.

DO NOT SCALE DRAWING

5780-0004

B

SHEET 3 OF 3

SIZE

Cardox Vise Assy, Fixed

UNLESS OTHERWISE SPECIFIED:

TITLE:

SCALE: 1:24 WEIGHT: 

NAME

REV

 .010

Customer

MATERIAL

STOCK SIZE

DRAWN

CHECKED

COMMENTS:

DATE

DIMENSIONS ARE IN INCHES

TOLERANCES:

FRACTIONAL  .063

ANGULAR: MACH 1°  BEND  2°

TWO PLACE DECIMAL      .030

THREE PLACE DECIMAL  

110 Mohr Drive

Mankato, MN 56001 USA

507-345-4553

www.pneumat.com

Pneumat



































 











 

  











TECHNICAL MANUAL

110 Mohr Drive

Mankato, MN 56001

1-800-458-9446

www.pneumat.com

Summary of Contents for Cardox CO2

Page 1: ...A B C D 8 7 6 TECHNICAL MANUAL 110 Mohr Drive Mankato MN 56001 1 800 458 9446 www pneumat com ...

Page 2: ...es a high pressure non explosive blast of CO2 through the discharge ports at the end of the tube that breaks up and dislodges the surrounding material After each use the Cardox tube can be rebuilt with a new energizer rupture disc gasket and recharged with liquid CO2 for use again 1 INTRODUCTION Pneumat Systems would like to thank you for your purchase of a Cardox Blockage Elimination System Emplo...

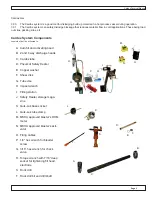
Page 3: ...o fill and activating head B 2 and 4 way discharge heads C Cardox tube D Pneumat Safety Heater E Copper washer F Shear disk G Tube vise H Impact wrench I Filling station J Safety Heater storage maga zine K Quik Lok base socket L Quik Lok tube clamp M MSHA approved blaster s OHM meter N MSHA approved blaster s acti vator O Firing cables P 1 4 hex wrench for bleeder screw Q 3 16 hex wrench for check...

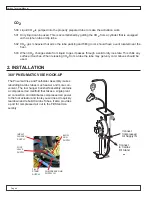
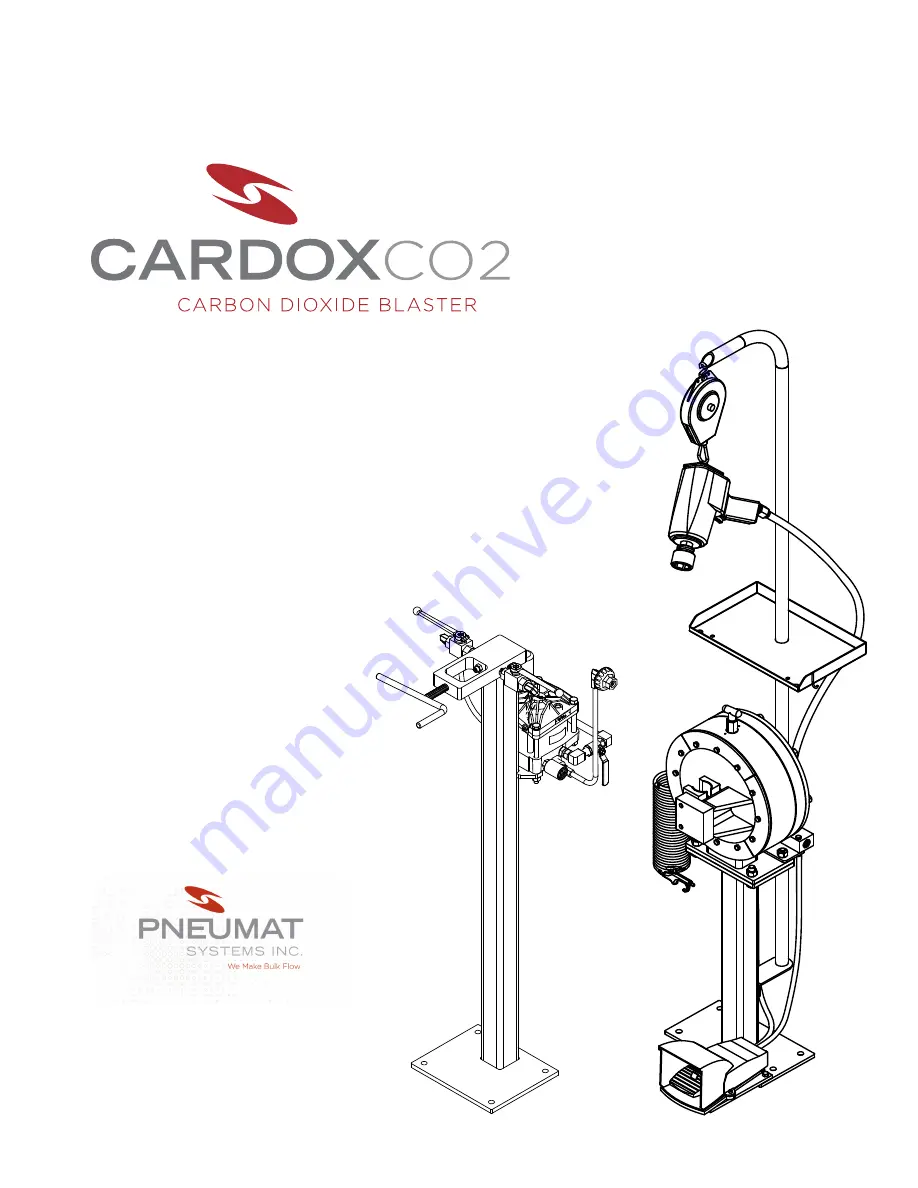
Page 4: ...it touches When releasing CO2 from a tube the tube may get very cold Gloves should be used 360 PNEUMATIC VISE HOOK UP The Pneumat Vise and Toolholder Assembly makes rebuilding Cardox tubes much easier and more con venient The tool hanger bar shelf assembly contains a compressed air manifold that takes a single plant air connection and distributes compressed air power to the foot actuator and tools...

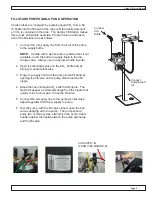
Page 5: ...le inverter 2 Open the discharge valve on the CO2 bottle fully by turning it counter clockwise 3 Purge the supply line from the pump to the fill head by opening the fill valve on the pump stand near the fill nipple 4 Bleed the line until liquid CO2 exits the fill nipple The liquid will appear as white discharge from the nipple that quickly turns to clear gas Close the fill valve 5 Connect the air ...

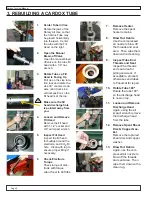
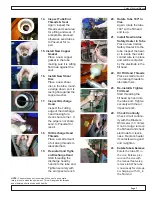
Page 6: ...ctrode and CO2 fill hole Clean with rag to ensure proper filling if necessary 6 Check Electrode Torque Check torque of elec trode with torque wrench set to 40 ft lbs 7 Remove Heater Remove the spent heater remains 8 Blow Out Debris Use the compressed air nozzle to blow off the threads and seat area Then wipe them down with a clean rag 9 Inspect Tube End Threads and Seat Inspect the threads and sea...

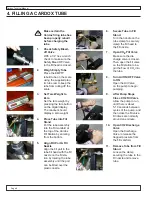
Page 7: ... Vise Again rotate the tube 180º so the fill head end is up 21 Install New Cardox Safety Heater in Tube Place a new Cardox Safety Heater into the tube Inspect the heat er to insure the center contact wire is in place and will be contacted by the electrode in the fill head 22 Oil Fill Head Threads Place a small amount of oil along threads to lubricate them 23 Re install Tighten Fill Head Start thre...

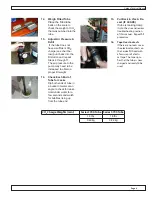
Page 8: ... in the tube fill head with the fill nozzle on the fill sta tion by rotating the tube assembly until the port can be fitted over the plastic nozzle 6 Secure Tube in Fill Stand Turn the handle on the tube clamp to securely clamp the fill head to the fill nozzle 7 Open CO2 Fill Valve Make sure the dis charge valve is closed Then open the fill valve on the fill station to be gin the flow of CO2 into ...

Page 9: ...ube for Leaks Dip both ends of tube in a bucket of water at an angle to check for leaks Hold under water for a few seconds and watch for bubbles rising up from the tube end 15 Put Back in Vise Re seal IF LEAKS If tube is leaking clamp it into the vise and review troubleshooting section of this manual Repeat fill procedure 16 Tape Over Contacts If there are no leaks cover the electrical contacts on...

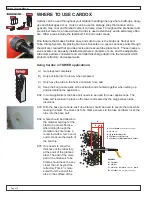
Page 10: ... now inserted into the hole through the socket on the vessel and secured with a half turn of the bayonet style coupling between the clamp and the socket 2 Quik Clamp available from Pneumat A Quik Clamp is fastened to the outside of a Cardox tube to provide an anchor point for attaching a chain wire rope or come along to act as a retaining line Make sure the retaining line is secured to something s...

Page 11: ...zed CO2 exit the tube to atmosphere This must be done before anything else since once the pressure is relieved from inside the tube that tube can no longer discharge unexpectedly If the continuity is out of range the heater will need to be replaced see page 6 Removal Disconnect wires from the activating machine and short circuit them remove wires and tape from the activating head connections wheth...

Page 12: ... a minimum time and D Keep the firing cable wires at the activator end shunted together when setting up and dismantling the application 8 02 In most applications the base port needs to be used for tower applications The base port is welded in place on the tower and sealed by the plug between tube insertions 8 03 With the base port a Quik Lok Tube Clamp should be used to secure the tube while makin...

Page 13: ...button to activate the safety heater inside the tube 8 11 The blast should occur immediately NOTE the goal is to have the tube inside of the tower heat for less than 5 minutes Once the blast has occurred remove the blaster and re shunt that end of the firing cables 8 12 If a blast does not occur immediately approach the tube Observe the location of the relief hole in the fill head Make certain tha...

Page 14: ...tivate the safety heater inside the tube 8 23 The blast should occur immediately NOTE the goal is to have the tube inside of the kiln heat for less than 5 minutes Once the blast has occurred remove the blaster and re shunt that end of the firing cables 8 24 If a blast does not occur immediately approach the tube Observe the location of the relief hole in the fill head Make certain that the relieve...

Page 15: ...he blast is secured Hold the left button down on the blaster until the red light comes on Continue to hold the left button with the light on and depress the right button to activate the safety heater inside the tube 8 34 The blast should occur immediately NOTE the goal is to have the tube inside of the cooler heat for less than 5 minutes Once the blast has occurred remove the blaster and re shunt ...

Page 16: ...ng cables 8 46 If a blast does not occur immediately approach the tube Observe the location of the relief hole in the fill head Make certain that the relieved gas will not strike you in the face Open the safety bleeder valve using a 1 4 hex wrench Let the gas bleed off before removing the tube completely Relieving this pressure will cause the inside of the tube to go back to equal pressure with th...

Page 17: ...fy that it can be emptied If all the gas is properly relieved the fill head is safe to use If not return it to Pneumat Systems Inc for the proper repairs 9 05 Make it a goal to place the tube for activation activate it successfully and remove the tube in under 5 minutes in hot applications 9 06 Be aware that the discharge head will be very hot when removed from the base port 9 07 Never use electri...

Page 18: ...e tube Adjust air regulator at pump inlet to maximize application of available plant air Pump will not operate Pump not primed Pump not funcitioning Follow procedure to prime pump Pump will need to be repaired Call Pneumat and a loner pump will be sent overnight to your facility If Cardox is required while the pump is out of service bypass the pump with the bottle discharge fill line Connect the f...

Page 19: ...off the tube remove the fill head remove the heater element and inspect for damage clean the threads seating shoulder in the tube and seating surface on the head replace the heater element lubricate as semble and tighten with the impact wrench Recharge the tube and retest If bubbles continue following re tightening inspect the washer and shear disk assembly to ensure it to be seated properly Bleed...

Page 20: ...for leaks If leak continues bleed off CO2 and remove fill head from tube Replace the electrical spin dle assembly with a new assembly Be sure the insulating and sealing washers are in the correct loca tion The insulating washer must be placed between the electrical spindle and the spindle nut The sealing washer must be placed between the electrical spindle and the seat in the fill head Recharge tu...

Page 21: ... is dim re place the 9 volt battery and retest Low CO2 volume will result in either an unburned heater or a partially burned heater and a unruptured shear disc Rebuild recharge and reweigh to insure correct volume of CO2 If still low check the CO2 cylinder for a low level Replace cylinder if neces sary If CO2 level in tank is fine clamp the tube back into fill stand increase the pump input pressur...

Page 22: ...Cardox Techical Manual Page 22 5780 0005 Cardox Fill Stand Assembly Parts List ...

Page 23: ...210 0002 HHCS 3 8 x 3 4 4 7 4210 0051 HHCS 5 8 x 2 4 8 4210 0056 HHCS 5 16 x 2 1 4 2 9 4215 0025 SHCS 1 4 x 3 4 2 10 4230 0002 Nut Whiz 5 16 2 11 4230 0009 Hex Nut 5 8 4 REF PART NUMBER DESCRIPTION QTY 12 5781 0054 Stand CDX Vise 1 13 5781 0056 Impact Wrench Hanger 1 14 5781 0083 Air Line Impact Wrench 1 15 5781 0084 Air Line Foot Manifold 1 16 5781 0085 Air Line Quick Exhaust 1 17 5790 0007 1 1 2...

Page 24: ...DX Vise 1 6 1345 0003 Button CDX Vise 28 7 4235 0011 Lock Washer 1 2 8 8 4110 0013 Bushing 1 1 2ID x 1 3 4OD x 3 4 1 9 2500 0050 Air Cylinder 12 9 Firestone Airstroke 1 10 4260 0057 T Handle Plastic 1 11 4260 0054 Return Spring CDX Vise 1 12 2200 0086 Adapter 4MP x 4MP 1 13 2500 0052 Quick Exhaust Valve 1 4 NPT 1 14 5781 0042 Indexing Nut CDX Vise 1 REF PART NUMBER DESCRIPTION QTY 15 5781 0043 Ind...

Page 25: ...Cardox Techical Manual Page 25 5730 0003 Auto Fill Activating Head w Eyebolt Parts List ...

Page 26: ...Cardox Techical Manual Page 26 Series 37 Cardox Consumable Sets Parts List Series 57 Cardox Consumable Sets Parts List ...

Page 27: ...Cardox Techical Manual Page 27 Series 3700 Firing Head Tube Body Discharge Head Parts List ...

Page 28: ...Cardox Techical Manual Page 28 Series 5700 Firing Head Tube Body Discharge Head Parts List ...

Page 29: ...Cardox Techical Manual Page 29 Quik Lok Base Socket Plug Parts List 5750 0001 Quik Lok Tube Clamp Parts List 5750 0004 ...

Page 30: ...9 Updated BOM pg 23 24 110 Mohr Drive Mankato MN 56001 Toll Free 800 458 9446 Phone 507 345 4553 Fax 507 345 3639 Website www pneumat com File Name pneumat nas Engineering Manuals Cardox Manual Current Cardox Manual indd Mod Date 2019 05 02 10 30 Output Date 2019 05 02 10 31 ...

Reviews: