

PI 711
ATTENZIONE:
utilizzare il kit solo su motori POLINI THOR 190 EVO. È importante sostituire tutte le parti del vostro motore con tutte le parti
comprese nella confezione.
Smontare l’avviatore “flash starter” dal motore, rimuovere il supporto testa e i convogliatori del sistema di raffreddamento forzato; smontare
la testa motore e la relativa guarnizione.
Pulire il piano superiore del cilindro e riposizionare la nuova guarnizione e la nuova testa.
Serrare i dadi della testa con chiave dinamometrica seguendo i valori riportati qui di seguito:
TABELLA COPPIE SERRAGGIO VITI TESTA
M
N.m
Dadi testa 8
22
Dadi testa 6
14
Procedere installando i nuovi convogliatori.
ATTENZIONE:
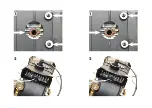
aggiungere una goccia di frena filetti sulle 2 viti che fissano il convogliatore aria forzata alla testa del motore (foto 1).
Posizionare la sonda termocoppia (se sprovvisti di sonda termocoppia posizionare il rasamento incluso nel kit) nell’apposita sede sulla testa
motore (foto1).
Posizionare lo spark cooler e chiudere la candela prestando la massima attenzione che il tutto sia posizionato nel modo corretto (foto 2).
ASSEMBLY MANUAL OF THE POLINI THOR 190 HF KIT
CAUTION:
use the kit on the POLINI THOR 190 EVO only. It is important to replace the parts of your engine with all the parts included in the
packaging.
Disassemble the “Flash starter “from the engine. Remove the head mounting and the forced cooling system shrouds; disassemble the engine
head and its gasket. Clean the cylinder upper surface and install the new gasket and the new head.
Tight the head nuts using a torque wrench following these parameters:
TIGHTENING TORQUE VALUE FOR HEAD SCREWS
M
N.m
Head
nuts
8 22
Head
nuts
6 14
Now install the new cooling shrouds.
CAUTION:
add a drop of thread locker to the 2 screws that fix the forced air shroud to the engine head (photo 1).
Install the thermocouple probe (if the thermocouple probe is not provided, position the washer included in the kit) in its housing on the engine
head (photo 1).
Place the spark cooler and tight the spark plug being very careful that all the parts are positioned in the right way (photo 2).
MANUEL DE MONTAGE DU KIT POLINI THOR 190 HF
ATTENTION:
utilisez le kit uniquement sur les moteurs POLINI THOR 190 EVO.
Il est important de remplacer toutes les pièces de votre moteur par toutes les pièces incluses dans l’emballage.
Démontez le démarreur “flash starter” du moteur, enlevez le support culasse et les convoyeurs du système de refroidissement forcé; démontez
la culasse du moteur et son joint.
Nettoyez la surface supérieure du cylindre et repositionnez le nouveau joint et la nouvelle culasse.
Serrez les écrous de la culasse avec une clé dynamométrique en respectant les valeurs indiquées ci-dessous:
TABLEAU DES COUPLES DE SERRAGE VIS CULASSE
M N.m
Ecrous culasse
8 22
Ecrous culasse
6 14
Continuez en installant les nouveaux convoyeurs.
ATTENTION:
ajoutez une goutte de frein filet sur les 2 vis qui fixent le convoyeur à air forcé à la culasse du moteur (photo 1)
Placez la sonde thermocouple (si vous n’avez pas de sonde thermocouple, placez la cale incluse dans le kit) dans son logement sur la culasse du
moteur (photo 1).
Placez le spark cooler et fermez la bougie en faisant très attention à ce que tout soit correctement positionné (photo 2).
PI 711
ATTENZIONE:
utilizzare il kit solo su motori POLINI THOR 190 EVO. È importante sostituire tutte le parti del vostro motore con tutte le parti
comprese nella confezione.
Smontare l’avviatore “flash starter” dal motore, rimuovere il supporto testa e i convogliatori del sistema di raffreddamento forzato; smontare
la testa motore e la relativa guarnizione.
Pulire il piano superiore del cilindro e riposizionare la nuova guarnizione e la nuova testa.
Serrare i dadi della testa con chiave dinamometrica seguendo i valori riportati qui di seguito:
TABELLA COPPIE SERRAGGIO VITI TESTA
M
N.m
Dadi testa 8
22
Dadi testa 6
14
Procedere installando i nuovi convogliatori.
ATTENZIONE:
aggiungere una goccia di frena filetti sulle 2 viti che fissano il convogliatore aria forzata alla testa del motore (foto 1).
Posizionare la sonda termocoppia (se sprovvisti di sonda termocoppia posizionare il rasamento incluso nel kit) nell’apposita sede sulla testa
motore (foto1).
Posizionare lo spark cooler e chiudere la candela prestando la massima attenzione che il tutto sia posizionato nel modo corretto (foto 2).
ASSEMBLY MANUAL OF THE POLINI THOR 190 HF KIT
CAUTION:
use the kit on the POLINI THOR 190 EVO only. It is important to replace the parts of your engine with all the parts included in the
packaging.
Disassemble the “Flash starter “from the engine. Remove the head mounting and the forced cooling system shrouds; disassemble the engine
head and its gasket. Clean the cylinder upper surface and install the new gasket and the new head.
Tight the head nuts using a torque wrench following these parameters:
TIGHTENING TORQUE VALUE FOR HEAD SCREWS
M
N.m
Head
nuts
8 22
Head
nuts
6 14
Now install the new cooling shrouds.
CAUTION:
add a drop of thread locker to the 2 screws that fix the forced air shroud to the engine head (photo 1).
Install the thermocouple probe (if the thermocouple probe is not provided, position the washer included in the kit) in its housing on the engine
head (photo 1).
Place the spark cooler and tight the spark plug being very careful that all the parts are positioned in the right way (photo 2).
MANUEL DE MONTAGE DU KIT POLINI THOR 190 HF
ATTENTION:
utilisez le kit uniquement sur les moteurs POLINI THOR 190 EVO.
Il est important de remplacer toutes les pièces de votre moteur par toutes les pièces incluses dans l’emballage.
Démontez le démarreur “flash starter” du moteur, enlevez le support culasse et les convoyeurs du système de refroidissement forcé; démontez
la culasse du moteur et son joint.
Nettoyez la surface supérieure du cylindre et repositionnez le nouveau joint et la nouvelle culasse.
Serrez les écrous de la culasse avec une clé dynamométrique en respectant les valeurs indiquées ci-dessous:
TABLEAU DES COUPLES DE SERRAGE VIS CULASSE
M N.m
Ecrous culasse
8 22
Ecrous culasse
6 14
Continuez en installant les nouveaux convoyeurs.
ATTENTION:
ajoutez une goutte de frein filet sur les 2 vis qui fixent le convoyeur à air forcé à la culasse du moteur (photo 1)
Placez la sonde thermocouple (si vous n’avez pas de sonde thermocouple, placez la cale incluse dans le kit) dans son logement sur la culasse du
moteur (photo 1).
Placez le spark cooler et fermez la bougie en faisant très attention à ce que tout soit correctement positionné (photo 2).
MANUALE DI INSTALLAZIONE DEL
KIT POLINI THOR 190 HF
MANUALE DI INSTALLAZIONE DEL
KIT POLINI THOR 190 HF


