background image

Summary of Contents for EX3550

Page 1: ...EX3 Series Tweeter Component Speaker Systems...

Page 2: ...2 Contact Polk Customer Service 800 377 7655 polkcs polkaud o corn...

Page 3: ...Attached 2Machine Screws ForFlush Mount Installation 16 Sheet Metal Screws ForSurface Mount Tweeter Installation 4 Crossover Mounting 4 Driver Mounting 8 12Speed Nuts 8Driver Mount 4Surface Mount 2El...

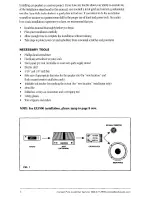
Page 4: ...eakers isaserious project Ifyouhave anydoubts about yourability toexecute any oftheinstallation steps found inthismanual save yourself alotofgriefandcontact aprofessional installer Your PolkAudio deal...

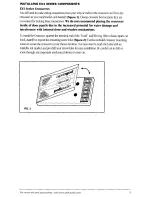
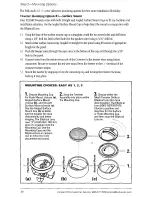
Page 5: ...tial for water damageand interferencewith internal door andwindow mechanisms Toinstall theCrossover squeeze theterminal endofthe hood andliftitup likeaclassic sports car hood nut toexpose themounting...

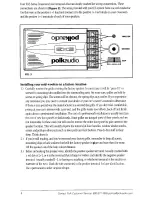
Page 6: ...fessional installation Thecost ofaprofessional installation isusually less than thecost ofnew door panels ordashboards Some grilles areintegral parts oftheirpanels andare notremovable Inthese cases yo...

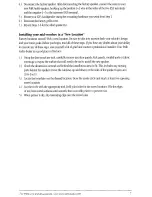
Page 7: ...self alotofgriefandcontact aprofessional installer Your Polk Audio dealer isagood place tofindone 1 Using thedoor panel ply tool carefully remove anydoor panels kickpanels molded parts orfabric coveri...

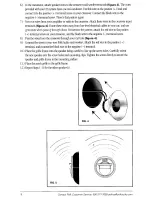
Page 8: ...gh doors Remember thepattern attach thered wiretothepositive terminal screw onyourcrossover andtheblack wiretothenegative terminal screw 8 Pass thewires fromthecrossover through yourcuthole figure 41...

Page 9: ...ththeElliptical Lens onit andALSO listen toitwithjusttheGrille onit Ifyou re planning asurface installation trythiswithboththe Straight Surface Mount Cup andtheAngled Surface Mount CupRotate theAngled...

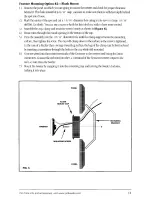
Page 10: ...ng faston connectors Besure toconnect thered wirestrand fromthetweeter tothe terminal ofthe crossover tweeter output 5 Mount thetweeter bysnapping itintothemounting cup andturning thetweeter cl vise l...

Page 11: ...inthebottom ofthecup 5 Press theassembly intothe115 16 diameter holeuntiltheclamp edge isbelow themounting surface then tighten thescrew Thecupwillclamp down tothesurface asthescrew istightened Inthe...

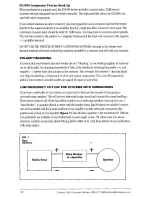
Page 12: ...byreversing thepositive and negative tweeter wires thatconnect tothecrossover Thisreversal ofthetweeter s absolute phase mayhelptheblending orintegration ofallofyoursystem components Thiscould beparti...

Page 13: ...toomuchvolume fromalow powered amporreceiver thanfromahigh powered one TECHNICAL ASSISTANCE OR SERVICE If after following these hookup andinstallation directions youexperience difficulty please double...

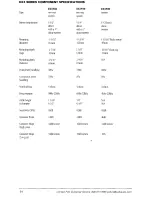
Page 14: ...Hz 22kHz Grilleheight diameter I 16 6 2 Sensitivity SPL 92dB Crossover Point 4kHz Crossover Slope highpass 1Zdb octave Crossover Slope lowpass 12db octave 5 l 4 driver with a 1 dometweeter 1 25l11n1 d...

Page 15: ...parts andProducts become property ofPolkAudio Products replaced orrepaired under thisWarranty willbereturned toyou withinareasonable time freight prepaid ThisWarranty does notinclude service orparts t...

Page 16: ...cialists POLK AUDIO 5601 METRO DRIVE BALTIMORE MARYLAND 21215 800 377 7655 http www polkaudio com Polk Audio and The Speaker Specialists are trademarksof BritanniaInvestmentCorporationused underlicens...

Page 17: ...dults and children in your household MaleFemale Male Female 1 0 2 0 1 0 2 0 MO h Yeal MO h 1 0 2 0 1 02 0 i Mcm h Yeal MO h 22 I located onUPC barfoundon productcarton Seeexample lncludina vourself wh...

Page 18: ...Baltimore MD21215 129F 1BUSINESS REPLY MAIL FIRST CLASS MAIL PERMIT NO 18230 BALTIMORE MD POSTAGE WILL BE PAID BY ADDRESSEE polkaudio the speaker specialists PRODUCT REGISTRATION DEPARTMENT 5601 METRO...

Page 19: ...ase to verify purchase date and warranty status l Privacy The data we gather on our on line registration is never sold or otherwise shared with anyone l Free membership in Club Polk Club Polk members...

Page 20: ...DO NOT THROW AWAY EX3560 Mounting Template b3 l 6 4 7mm c I I I 6 h c9 I __ _ 0 05 5 32 131mm I I I I HO Cut along dotted line See Instruction Manual for details...

Page 21: ...DO NOT THROW AWAY EX3550 Mounting Template 05 17 32 140 6mm 3 l 6 X WI 6 5 0 X 7 4mm 4 13 16 122mm I 1 I I Qg Cut along dotted line See Instruction Manual for details...

Reviews: