background image

SAVE THIS MANUAL FOR FUTURE USE.

PGH45123

  12/11/12  rev M

POWERHORSE ENGINES

Operation Manual

Summary of Contents for PGH45123

Page 1: ...SAVE THIS MANUAL FOR FUTURE USE PGH45123 12 11 12 rev M POWERHORSE ENGINES Operation Manual ...

Page 2: ...California Proposition 65 WARNING The engine exhaust from this product and this product contains chemicals known to the state of California to cause cancer and birth defects or other reproductive harm ...

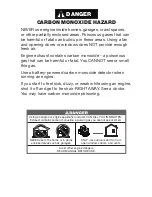
Page 3: ...ell this gas Use a battery powered carbon monoxide detector when running an engine If you start to feel sick dizzy or weak while using an engine shut it off and get to fresh air RIGHT AWAY See a doctor You may have carbon monoxide poisoning DANGER Using an engine or engine application indoors CAN KILL YOU IN MINUTES Exhaust contains carbon monoxide a poison gas you cannot see or smell NEVER use in...

Page 4: ...laced on the engine Safety messages preceded by a safety alert symbol and one of three signal words DANGER WARNING or CAUTION These safety alert symbols mean If you do not follow instructions it WILL cause you SERIOUS INJURY or DEATH If you do not follow instructions it MAY cause you SERIOUS INJURY or DEATH If you do not follow instructions it may cause you SERIOUS INJURY or EQUIPMENT DAMAGE Safet...

Page 5: ...and know how to stop the engine quickly in case of an emergency Keep children away from the engine and do not let them operate it Keep children and pets away from the area of operation Operate this engine in well ventilated areas NEVER run engine indoors Refueling the Engine Gasoline is extremely flammable and gasoline vapor can explode When refueling the engine take the following precautions Perf...

Page 6: ... and other equipment during operation Do not place flammable objects close to the engine Carbon Monoxide Hazard Exhaust gas contains carbon monoxide a poisonous gas Avoid inhalation of exhaust gas Always run the engine in a well ventilated area Never run the engine indoors Other Equipment Review the instructions provided with the equipment powered by this engine for any additional safety precautio...

Page 7: ...ling 13 Fuel Recommendations 14 Engine Oil Level Check 14 Engine Oil Change 15 16 Engine Oil Recommendations 15 Air Filter Inspection 16 Air Filter Service 16 Spark Plug Service 16 Helpful Tips and Suggestions 17 19 Storing your engine 17 Maintenance Schedule 18 Storage Precautions 19 Transportation 19 Technical Consumer Information 20 Emission Control System Information 20 Consumer Information 02...

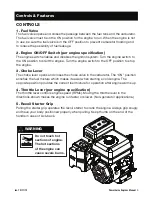
Page 8: ...ever The choke lever opens and closes the choke valve in the carburetor The ON position enriches the fuel mixture which makes it easier when starting a cold engine The opposite position provides the correct fuel mixture for operation after engine warms up 4 Throttle Lever per engine specification The throttle lever controls engine speed RPMs Moving the throttle lever in the directions shown makes ...

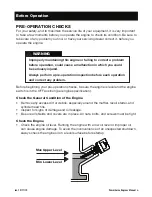
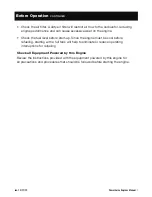
Page 9: ...pection before each operation and correct any problem Before beginning your pre operation checks be sure the engine is level and the engine switch is in the OFF position per engine specification Check the General Condition of the Engine Remove any excess dirt or debris especially around the muffler recoil starter and cylinder head fins Inspect for signs of damage and oil leakage Be sure all shield...

Page 10: ...e fuel level before start up Since the engine must be cool before refueling starting with a full tank will help to eliminate or reduce operating interruptions for refueling Check all Equipment Powered by this Engine Review the instructions provided with the equipment powered by this engine for all precautions and procedures that should be followed before starting the engine Before Operation CONTIN...

Page 11: ...n with starting shutting down or operating the engine STARTING THE ENGINE 1 Place the fuel valve to the ON position if applicable 2 To start a cold engine move the choke lever to the ON position 3 Move the throttle lever away from the SLOW position about 1 3 of the way toward the FAST position per engine specification 4 Turn the engine switch to the ON position per engine specification 5 Pull the ...

Page 12: ... to run slowly for cool down This reduces the chance of backfire Non generator applications 2 Turn the engine switch to the OFF position per engine specification 3 Turn the fuel valve lever to the OFF position SETTING ENGINE SPEED Position the throttle lever for the desired engine speed For engine speed recommendations refer to the instruction manual provided with the equipment powered by this eng...

Page 13: ... authorized LCT Service Center will improve performance and allow this engine to continually meet US EPA and California ARB emission standards throughout its useful life Important Note When the carburetor has been modified for high altitude operation the air fuel mixture may be too lean for operation at 5000 feet or below This could result in the engine overheating and could cause serious engine d...

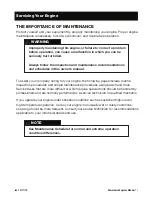
Page 14: ...r your engine the following pages include routine inspection procedures and simple maintenance procedures using basic hand tools Service tasks that are more difficult or which require special tools should be handled by professionals and are normally performed by a service technician or qualified mechanic If you operate your engine under stressful conditions such as sustained high load or high temp...

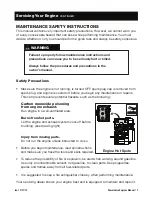
Page 15: ... or repairs This can prevent several potential hazards such as the following Carbon monoxide poisoning from engine exhaust Run engine in a well ventilated area Burns from hot parts Let the engine and exhaust system cool off before touching see drawing right Injury from moving parts Do not run the engine unless instructed to do so Before you begin maintenance read all instructions and make sure you...

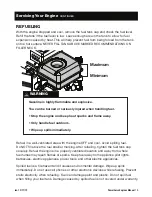
Page 16: ... well ventilated area with the engine OFF and cool Avoid spilling fuel Do NOT fill above the fuel strainer marking After refueling tighten the fuel tank cap securely Refuel the engine in a properly ventilated location and away from where fuel fumes may reach flames or sparks Keep fuel away from appliance pilot lights barbecues electric appliances power tools and other electric appliances Spilled f...

Page 17: ... dipstick into the filler neck and turn clockwise until fully seated Then remove the dipstick by turning it counter clockwise Check the oil level shown on the dipstick 3 If the oil level is low fill to the edge of the oil filler hole with the recommended oil 4 Securely screw in the filler cap dipstick Running the engine with a low oil level can cause engine damage Always check the engine oil befor...

Page 18: ...le with the recommended oil Engine Oil Capacities 136cc 16 oz 473 liter 208cc 16 oz 473 liter 291cc 32 oz 946 liter 414cc 38 oz 1 123 liter NOTICE Running the engine with a low oil level can cause engine damage 4 Securely screw in the filler cap dipstick ENGINE OIL RECOMMENDATIONS Engine oil affects performance and service life Use 4 stroke automotive detergent oil SAE 10W 30 is recommended for ge...

Page 19: ...lug cross reference BPR6ES BOSCH plug cross reference is WR6DC NOTICE Using an incorrect spark plug may cause engine damage 1 When engine is cool disconnect the spark plug cap and remove any debris from the spark plug area with high pressure air 2 Remove the spark plug with a 13 16 inch spark plug wrench 3 Inspect the spark plug Replace it if the electrodes are worn or if the insulator is cracked ...

Page 20: ...water that passes through the air filter or muffler can enter the cylinder and cause severe damage Water contacting a hot engine can cause damage If the engine has been running allow it to cool for at least half an hour before washing Adding a Fuel Stabilizer to Extend Fuel Storage Life 1 Turn the fuel valve off while engine is running and allow the engine to run until it stops Turn engine OFF whe...

Page 21: ...al under extreme operating conditions Helpful Tips Suggestions CONTINUED Engine Oil Level Engine Oil Level Engine Oil Engine Oil Air Filter Air Filter Spark Plug Spark Plug Cylinder Head Fins Cylinder Head Fins Oil Leaks Oil Leaks Bolts Fuel Hose Clamps Bolts Fuel Hose Clamps FIRST MONTH EVERY 40 HOURS EVERY 6 MONTHS ONCE A YEAR Check Check Check Check Replace Replace Clean Replace Replace Clean D...

Page 22: ...ngine is level to avoid fuel or oil leakage When the engine and exhaust system are cool cover the engine to keep out dust A hot engine and exhaust system can ignite or melt certain materials Do not use sheet plastic as a dust cover A nonporous cover can trap moisture around the engine causing rust and corrosion Removal From Storage Check your engine as described in the BEFORE OPERATION chapter of ...

Page 23: ...tem may increase emissions beyond the legal limit Among those acts that constitute tampering are Removal or alteration of any part of the intake fuel or exhaust systems Altering or defeating the governor linkage or speed adjusting mechanism to cause the engine to operate outside its design parameters CONSUMER INFORMATION Manufacturer Publications These publications will give you additional informa...

Page 24: ...lt and equipped so as to conform with all applicable regulations adopted by the Air Resources Board pursuant to its authority in Chapters 1 and 2 Part 5 Division 26 of the Health and Safety Code and 2 Free from defects in materials and workmanship that cause the failure of a warranted part to be identical in all material respects to the part as described in the Liquid Combustion Technology LLC s e...

Page 25: ...warranted part Throughout the engine s warranty period defined in 2 above Liquid Combustion Technology LLC will maintain a supply of warranted parts sufficient to meet the expected demand for such parts Any replacement part may be used in the performance of any warranty maintenance or repairs and will be provided without charge to the owner Such use will not reduce the warranty obligations of Liqu...

Page 26: ...CT CONSEQUENTIAL OR SPECIAL SUFFERED BY OWNER OWNER S SOLE REMEDY SHALL BE THE REPAIR OR REPLACEMENT OF THE DEFECTIVE LIQUID COMBUSTION TECHNOLOGY LLC COMPONENT PART OR EQUIPMENT THEREOF AT LIQUID COMBUSTION TECHNOLOGY LLC S DISCRETION ALL IN ACCORDANCE WITH THIS WRITTEN LIMITED WARRANTY LIQUID COMBUSTION TECHNOLOGY LLC HAS NOT AUTHORIZED ANY PERSON TO MODIFY ALTER OR EXPAND THE WARRANTIES CONTAIN...

Page 27: ... If any emissions related part on your equipment is defective the part will be repaired or replaced by Liquid Combustion Technology LLC OWNER S WARRANTY RESPONSIBILITIES As the small off road engine owner you are responsible for the performance of the required maintenance listed in your owner s manual Liquid Combustion Technology LLC recommends that you retain all receipts covering maintenance on ...

Page 28: ...s supplied is warranted for the period of time before the first scheduled replacement date for that part If the part fails prior to the first scheduled replacement the part will be repaired or replaced by Liquid Combustion Technology LLC s according to 4 below Any such part repaired or replaced under warranty will be warranted for the remainder of the period prior to the first scheduled replacemen...

Page 29: ...ntake manifold iii Air filter 3 Ignition System i Spark plugs ii Magneto or electronic ignition system iii Spark advance retard system 4 Exhaust Gas Recirculation EGR System i EGR valve body and carburetor spacer if applicable ii EGR rate feedback and control system 5 Air Injection System i Air pump or pulse valve ii Valves affecting distribution of flow iii Distribution manifold 6 Catalyst or The...

Page 30: ... 5 1 8 2 1 8 1 Displacement 136cc 208cc 291cc 414cc Cast iron sleeve yes yes yes yes Bore and stroke 64mm x 42 5mm 70mm x 54mm 80mm x 58mm 90mm x 65mm Fuel gasoline gasoline gasoline gasoline Compression release yes yes yes yes Dry weight 31lbs 14 1kg 36lbs 15kg 46lbs 21kg 58lbs 26kg Low oil shut off if equipped if equipped if equipped if equipped Fuel shut off valve yes yes yes yes Specifications...

Page 31: ......

Reviews: