


WELCOME TO A
PERSONALIZED FITNESS EXPERIENCE
FOR YOUR HOME
Quick
Start
Card
PRECISION
™
SERIES
AND ENERGY
™
SERIES
ELLIPTICALS
HEART RA
TE INFORMA
TION
CHOO
sE
A W
ORKOUT
• Determine y
our level of fitnes
s: beginner,
intermediat
e, or advanc
ed.
• Determine y
our immediate g
oal: enduranc
e
training, car
dio-conditioning, or w
eight loss.
If you ar
e a beginner, star
t with a cardio-c
onditioning
work
out to gr
adually adjust your body t
o the demands of
exer
cise. Over a r
ecommended eight
-w
eek period, you will
increase y
our enduranc
e and streng
th.
For all fitnes
s levels, plan t
o exer
cise at an appropriat
ely
challenging pace f
or 20 to 30 minut
es a day. W
ear a chest
strap t
o monitor y
our heart r
ate. Supplement y
our plans
with fitness w
orkouts fr
om the Prec
or web sit
e
(www
.prec
or.com). T
he Prec
or web sit
e also provides
exper
t advice t
o help you r
each your fitnes
s goals.
MONIT
OR Y
OUR H
EART R
ATE
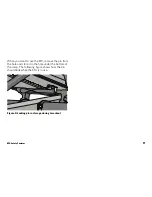
The Smar
tRate and hear
t rat
e displays pr
ovide visual cues
that help you adjust y
our fitness r
outine to r
each your
goals. Use these f
eatures t
o keep y
our heart r
ate within
the target z
ones.
Wear a C
hest Str
ap
During a work
out, the heart r
ate f
eatures appear on
the display when y
ou wear a chest str
ap. T
o rec
eive an
accur
ate r
eading, the chest strap needs t
o be in direct
contact with y
our skin. After y
ou put on the chest strap
,
fac
e the display c
onsole for a minimum of 15 sec
onds. This
allow
s the rec
eiver in the c
onsole to r
ecogniz
e the signal
from the chest str
ap.
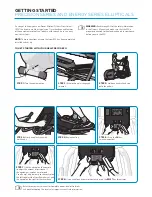
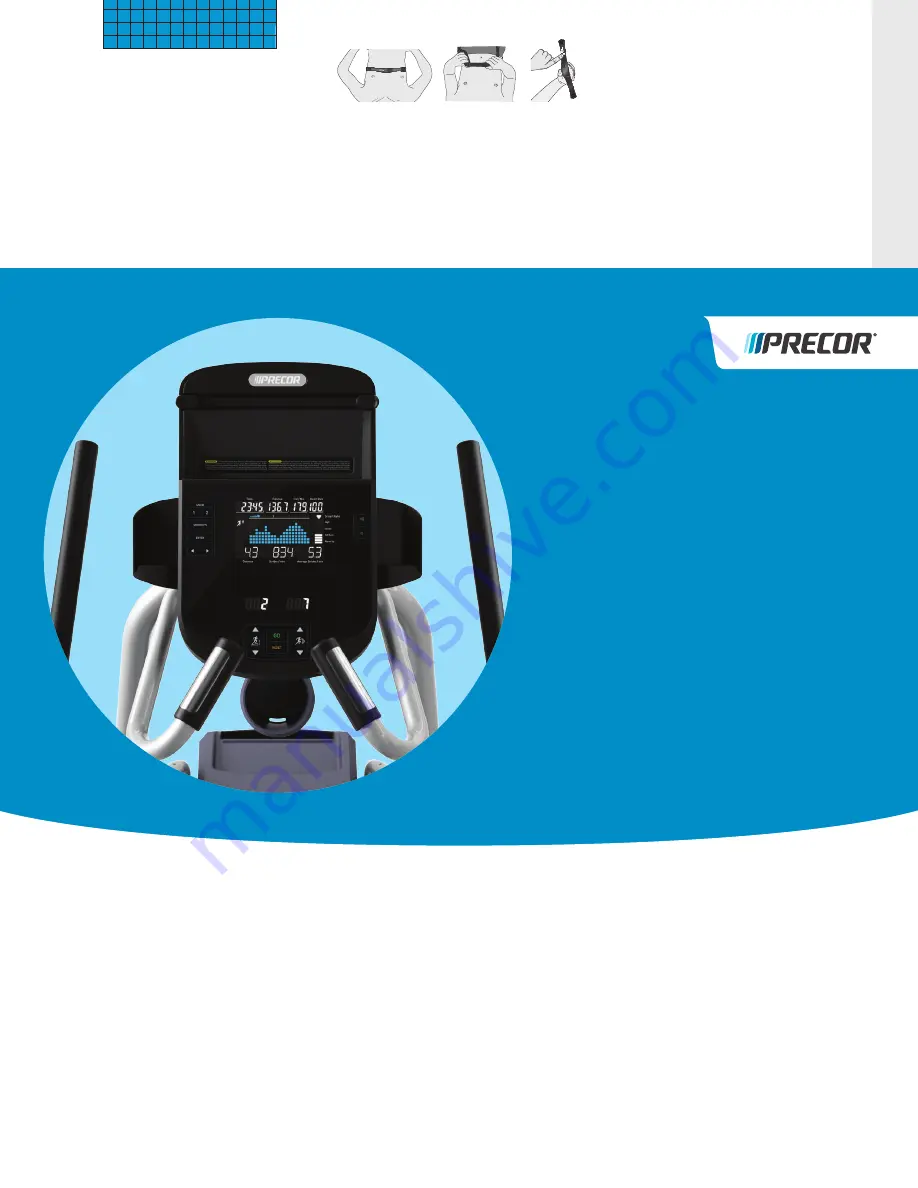
1. Carefully dampen the back of the str
ap with tap
wat
er (Diagram A
).
Important
:
Do not use deionized w
ater
. It does
not have the pr
oper minerals and salts t
o conduct
electrical impulses.
2. Adjust the str
ap and fast
en it around y
our chest.
The str
ap should feel snug, not r
estrictive
(Diagram B
).
3. Make sur
e that the chest strap is right side up
, lies
horizontally acr
oss y
our chest, and is cent
ered in
the middle of your chest (Diagr
am C).
When these steps ar
e complet
e, you ar
e ready t
o view
your hear
t rat
e.
touch-
Sensitive Handr
ail Grips
Sever
al Prec
or products inc
orporat
e touch-sensitiv
e
heart r
ate grips on the handr
ails. If you pr
efer t
o use
the touch-sensitiv
e handrail grips, use both hands.
Make sur
e both hands are moist (not dry
) and avoid
grasping the sensor
s too tightly
.
not
e:
For the best hear
t rat
e monitoring r
esults, wear a
chest strap
.
sMARTR
ATE
® FEA
TUREs
When you begin an e
xer
cise session, a blinking
segment in the SmartRat
e display appear
s if you
enter
ed your ag
e during the setup phase. The blinking
segment indicates the curr
ent zone of y
our heart r
ate.
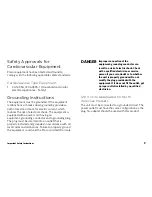
The calculation used f
or the heart r
ate tar
get z
one is
your maximum aer
obic heart r
ate:
207 - (ag
e x 0.6
7), multiplied by a per
centag
e.
For the ideal w
eight loss r
ange, y
our heart r
ate should
remain bet
ween 55% and 6
9% of your maximum
aerobic hear
t rat
e. T o impr
ove y
our over
all
cardio
vascular and r
espirat
ory fitness le
vel, maintain
your hear
t rat
e betw
een 70% and 85% of y
our
maximum aerobic hear
t rat
e. For the gr
eatest benefits,
maintain your hear
t rat
e in either zone f
or 30 minutes or
more at least thr
ee times a week.
Ca
UtI
on: Y
our heart r
ate should ne
ver e
xceed
85% of your maximum aer
obic heart r
ate or g
o
above y
our target z
one (Diagram D
).
COO
l DO
WN A
FTER Y
OUR W
ORKOUT
Cooling do
wn is an important aspect of y
our work
out
because it helps reduc
e muscle stiffness and
sorenes
s by tr
ansporting e
xces
s lactic acid out of the
working muscles. C
ooling down f
or at least three
minutes helps pr
ovide a smooth tr
ansition that allow
s
your hear
t rat
e to r
eturn to its normal, non-e
xer
cising state.
20031 142nd A
venue NE | P
.O
. Box 7
202
Woodin
ville, WA US
A 98072
-4002
www.pr
ecor
.com
P/N 30
3172-
112 | ©2014 P
rec
or Incorpor
ated
Diagram D: Hear
t Rat
e Tar
get Zones
Diagram A
Diagram B
Diagram C
Choo
se a P
rog
ram
•
Dete
rm
ine yo
ur l
evel o
f fitn
ess:
beg
inne
r,
interme
dia
te, or adva
nced
.
•
Dete
rmine you
r imme
diat
e goal
: endur
ance
trai
ning, c
ard
io-c
onditioni
ng,
or wei
ght
loss.
If yo
u are
a b
egi
nner
, sta
rt a
card
io-con
ditio
ning
program t
o sl
owly
adjust
your body
to a
com
fort
abl
e
level
of e
xerc
ise
. O
ver
a re
commend
ed
8-w
eek
perio
d, y
ou w
ill in
creas
e you
r end
ura
nce a
nd s
tre
ngth
whi
le i
mpr
ovi
ng fle
xib
ility
.
If yo
u ha
ve been
ex
ercis
ing a
nd fee
l that yo
u h
ave
rea
ched
an int
erm
edia
te or
ad
van
ced f
itne
ss lev
el, yo
u
probabl
y ha
ve e
sta
blis
hed
goals f
or y
our
self.
For al
l fit
ness lev
els, p
lan
to
exerci
se
at a comf
ortab
le
pac
e for 20 to 3
0 mi
nutes
a day
. W
ear a
ches
t str
ap
to monitor yo
ur heart r
ate
. Supp
leme
nt your pl
ans
with
fitn
ess w
ork
outs fr
om the
Precor
web
site
(www
.precor
.co
m). Th
e Pr
ecor w
eb s
ite
als
o p
rov
ides
expert
ad
vice to he
lp y
ou rea
ch you
r fitn
ess go
als.
Monit
or Y
our
Heart R
ate
The
Sm
artR
ate an
d he
art r
ate
dis
pla
ys pr
ovi
de v
isua
l
cues
tha
t help
yo
u adj
ust yo
ur fitne
ss rou
tine to rea
ch
your g
oal
s. Us
e the
se f
eatur
es to
keep y
our
heart
rate
with
in th
e targ
et z
ones
.
Wear
a
Chest Str
ap
Duri
ng a
work
out, th
e he
art r
ate
feature
s a
ppe
ar on
the d
isp
lay
whe
n you
wea
r a
ches
t s
trap
. T
o rece
ive
an
acc
urate
read
ing
, th
e c
hes
t s
trap
ne
eds
to b
e in
direc
t cont
act w
ith yo
ur s
kin.
After
you
put
on
the
ches
t str
ap,
fac
e the
dis
pla
y con
sole
for a
minim
um of
15 s
eco
nds
. T
his a
llow
s the
re
ceive
r in the
co
nsol
e to
recog
nize th
e sig
nal from
the c
hest s
trap
.
1.
Care
fully
da
mpen
th
e back of
the str
ap with
ta
p
wate
r (Diagr
am
A).
Im
portant:
Do not
use deioni
zed wat
er. I
t does
not ha
ve th
e proper minera
ls and sa
lts t
o c
onduct
ele
ctric
al i
mpu
lse
s.
2.
Adj
ust th
e str
ap an
d fa
sten it
ar
ound
your c
hes
t.
The s
tra
p s
hou
ld fe
el s
nug
, not re
stric
tiv
e
(D
iag
ram
B).
3.
Make
su
re that
the
ch
est s
trap i
s ri
ght s
ide u
p, l
ies
horizo
ntally
ac
ross
your c
hes
t, and
is
cent
ered in
the
middle
of y
our
ches
t (D
iag
ram
C).
When
thes
e st
eps a
re co
mplet
e, y
ou
are re
ady to
view
your
hea
rt r
ate!
Tou
ch-
Sen
sit
ive
H
an
dra
il G
rip
s
Seve
ral Prec
or produ
cts in
corpor
ate
to
uch-s
ens
itive
heart
rate
grip
s o
n the
han
dra
ils.
If y
ou
pref
er to
use
the touc
h-s
ensi
tive ha
ndra
il gr
ips,
us
e bo
th ha
nds.
Mak
e s
ure b
oth ha
nds a
re
mois
t (no
t d
ry)
w
hen yo
u
gra
sp t
he t
ouc
h-s
ens
itiv
e h
and
rai
l g
rip
s.
SmartRat
e
®
Featu
res
When
yo
u beg
in an exerc
ise
ses
sio
n, a blin
king
seg
men
t in
th
e S
mar
tR
ate
di
spl
ay a
ppe
ars
if y
ou
entere
d y
our a
ge d
uring
the s
etup p
has
e. T
he bl
inking
seg
men
t indi
cate
s the cu
rrent z
one of
your h
ear
t rat
e.
The ca
lcula
tion us
ed for th
e heart r
ate t
arge
t zone is
your
maxi
mum
ae
robi
c hear
t r
ate
:
(220
minus
your ag
e) multi
plied
by a p
erc
ent.
For
th
e id
eal
w
eig
ht l
oss
ran
ge,
yo
ur h
ear
t ra
te s
hou
ld
remain
betw
een 5
5%
an
d 70%
of y
our ma
ximum
aerob
ic h
eart
ra
te. T
o imp
rove
you
r over
all
card
iovas
cula
r an
d respir
atory
fit
ness le
vel, m
aint
ain
you
r h
eart r
ate b
etw
een
70%
an
d 8
5%
of
your
maximu
m aer
obi
c he
art
rate.
For t
he gr
eate
st b
enef
its,
ma
inta
in
your h
eart
rate
in
eithe
r zon
e fo
r 3
0 mi
nutes
or more
at le
ast
three
time
s
a week
.
CA
UTI
ON:
Y our
hea
rt
rate
sh
ould
nev
er e
xce
ed
85%
of
yo
ur m
axi
mu
m a
ero
bic
he
art
rat
e o
r g
o
ab
ove
yo
ur t
arg
et z
on
e (
Dia
gra
m D
).
Diag
ram
D
Co
ol Down
Afte
r Y our
Wor
kou
t
Coolin
g dow
n is a
n im
portan
t aspec
t of
your w
ork
out
beca
use it
he
lps
re
duc
e m
usc
le s
tiffn
ess an
d
sor
enes
s b
y trans
por
ting
exces
s la
ctic a
cid o
ut of th
e
workin
g mu
scle
s. C
ooling
do
wn for at
le
ast t
hre
e
minu
tes he
lps
prov
ide a
sm
oot
h transi
tio
n th
at a
llo
ws
your hea
rt rat
e to retu
rn to its no
rmal, non-
exercis
ing
sta
te.
Diag
ram A
Diag
ram
B
Diag
ram
C
20
25
30
35
40
45
50
55
60
65
70
75
70
80
90
100
120
130
140
150
160
170
180
190
200
110
Heart
Ra
te T
arg
et Z
on
es
Your
Age
Y
o
u
r Hea
rt R
a
te
Peak
Ca
rdio
Warm
up
Rec
om
men
ded
C
ard
iov
asc
ula
r Z
one
Rec
om
men
ded
W
eig
ht
Lo
ss
Zo
ne
Fatb
urn
High
Preco
r Inc
orp
ora
ted
20
03
1 1
42
nd A
ven
ue N
E
P.O
. B
ox 7
202
Wood
invi
lle, W
A US
A 98
072
-4
002
www.pr
ecor
.com
HR
IN
FO 4814
0-10
4
©200
7
Preco
r Inc
orp
ora
ted
Choo
se a P
rog
ram
•
Dete
rm
ine yo
ur l
evel o
f fitn
ess:
beg
inne
r,
interme
dia
te, or adva
nced
.
•
Dete
rmine you
r imme
diat
e goal
: endur
ance
trai
ning, c
ard
io-c
onditioni
ng,
or wei
ght
loss.
If yo
u are
a b
egi
nner
, sta
rt a
card
io-con
ditio
ning
program t
o sl
owly
adjust
your body
to a
com
fort
abl
e
level
of e
xerc
ise
. O
ver
a re
commend
ed
8-w
eek
perio
d, y
ou w
ill in
creas
e you
r end
ura
nce a
nd s
tre
ngth
whi
le i
mpr
ovi
ng fle
xib
ilit
y.
If yo
u ha
ve been
ex
ercis
ing a
nd fee
l that yo
u h
ave
rea
ched
an int
erm
edia
te or
ad
van
ced f
itne
ss lev
el, yo
u
probabl
y ha
ve e
sta
blis
hed
goals f
or y
our
self.
For al
l fit
ness lev
els, p
lan
to
exerci
se
at a comf
ortab
le
pac
e for 20 to 3
0 mi
nutes
a day
. W
ear a
ches
t str
ap
to monitor yo
ur heart r
ate
. Supp
leme
nt your pl
ans
with
fitn
ess w
ork
outs fr
om the
Precor
web
site
(www
.precor
.co
m). Th
e Pr
ecor w
eb s
ite
als
o p
rov
ides
expert
ad
vice to he
lp y
ou rea
ch you
r fitn
ess go
als.
Monit
or Y
our
Heart R
ate
The
Sm
artR
ate an
d he
art r
ate
dis
pla
ys pr
ovi
de v
isua
l
cues
tha
t help
yo
u adj
ust yo
ur fitne
ss rou
tine to rea
ch
your g
oal
s. Us
e the
se f
eatur
es to
keep y
our
heart
rate
with
in th
e targ
et z
ones
.
Wear
a
Chest Str
ap
Duri
ng a
work
out, th
e he
art r
ate
feature
s a
ppe
ar on
the d
isp
lay
whe
n you
wea
r a
ches
t s
trap
. T
o rece
ive
an
acc
urate
read
ing
, th
e c
hes
t s
trap
ne
eds
to b
e in
direc
t cont
act w
ith yo
ur s
kin.
After
you
put
on
the
ches
t str
ap,
fac
e the
dis
pla
y con
sole
for a
minim
um of
15 s
eco
nds
. T
his a
llow
s the
re
ceive
r in the
co
nsol
e to
recog
nize th
e sig
nal from
the c
hest s
trap
.
1.
Care
fully
da
mpen
th
e back of
the str
ap with
ta
p
wate
r (Diagr
am
A).
Im
portant:
Do not
use deioni
zed wat
er. I
t does
not ha
ve th
e proper minera
ls and sa
lts t
o c
onduct
ele
ctric
al i
mpu
lse
s.
2.
Adj
ust th
e str
ap an
d fa
sten it
ar
ound
your c
hes
t.
The s
tra
p s
hou
ld fe
el s
nug
, not re
stric
tiv
e
(D
iag
ram
B).
3.
Make
su
re that
the
ch
est s
trap i
s ri
ght s
ide u
p, l
ies
horizo
ntally
ac
ross
your c
hes
t, and
is
cent
ered in
the
middle
of y
our
ches
t (D
iag
ram
C).
When
thes
e st
eps a
re co
mplet
e, y
ou
are re
ady to
view
your
hea
rt r
ate!
Tou
ch-
Sen
sit
ive
H
an
dra
il G
rip
s
Seve
ral Prec
or produ
cts in
corpor
ate
to
uch-s
ens
itive
heart
rate
grip
s o
n the
han
dra
ils.
If y
ou
pref
er to
use
the touc
h-s
ensi
tive ha
ndra
il gr
ips,
us
e bo
th ha
nds.
Mak
e s
ure b
oth ha
nds a
re
mois
t (no
t d
ry)
w
hen yo
u
gra
sp t
he t
ouc
h-s
ens
itiv
e h
and
rai
l g
rip
s.
SmartRat
e
®
Featu
res
When
yo
u beg
in an exerc
ise
ses
sio
n, a blin
king
seg
men
t in
th
e S
mar
tR
ate
di
spl
ay a
ppe
ars
if y
ou
entere
d y
our a
ge d
uring
the s
etup p
has
e. T
he bl
inking
seg
men
t indi
cate
s the cu
rrent z
one of
your h
ear
t rat
e.
The ca
lcula
tion us
ed for th
e heart r
ate t
arge
t zone is
your
maxi
mum
ae
robi
c hear
t r
ate
:
(220
minus
your ag
e) multi
plied
by a p
erc
ent.
For
th
e id
eal
w
eig
ht l
oss
ran
ge,
yo
ur h
ear
t ra
te s
hou
ld
remain
betw
een 5
5%
an
d 70%
of y
our ma
ximum
aerob
ic h
eart
ra
te. T
o imp
rove
you
r over
all
card
iovas
cula
r an
d respir
atory
fit
ness le
vel, m
aint
ain
you
r h
eart r
ate b
etw
een
70%
an
d 8
5%
of
your
maximu
m aer
obi
c he
art
rate.
For t
he gr
eate
st b
enef
its,
ma
inta
in
your h
eart
rate
in
eithe
r zon
e fo
r 3
0 mi
nutes
or more
at le
ast
three
time
s
a week
.
CA
UTI
ON:
Y our
hea
rt
rate
sh
ould
nev
er e
xce
ed
85%
of
yo
ur m
axi
mu
m a
ero
bic
he
art
rat
e o
r g
o
ab
ove
yo
ur t
arg
et z
on
e (
Dia
gra
m D
).
Diag
ram
D
Co
ol Down
Afte
r Y our
Wor
kou
t
Coolin
g dow
n is a
n im
portan
t aspec
t of
your w
ork
out
beca
use it
he
lps
re
duc
e m
usc
le s
tiffn
ess an
d
sor
enes
s b
y trans
por
ting
exces
s la
ctic a
cid o
ut of th
e
workin
g mu
scle
s. C
ooling
do
wn for at
le
ast t
hre
e
minu
tes he
lps
prov
ide a
sm
oot
h transi
tio
n th
at a
llo
ws
your hea
rt rat
e to retu
rn to its no
rmal, non-
exercis
ing
sta
te.
Diag
ram A
Diag
ram
B
Diag
ram
C
20
25
30
35
40
45
50
55
60
65
70
75
70
80
90
100
120
130
140
150
160
170
180
190
200
110
Heart
Ra
te T
arg
et Z
on
es
Your
Age
Y
o
u
r Hea
rt R
a
te
Peak
Ca
rdio
Warm
up
Rec
om
men
ded
C
ard
iov
asc
ula
r Z
one
Rec
om
men
ded
W
eig
ht
Lo
ss
Zo
ne
Fatb
urn
High
Preco
r Inc
orp
ora
ted
20
03
1 1
42
nd A
ven
ue N
E
P.O
. B
ox 7
202
Wood
invi
lle, W
A US
A 98
072
-4
002
www.pr
ecor
.com
HR
IN
FO 4814
0-10
4
©200
7
Preco
r Inc
orp
ora
ted
2025
3035
4045
5055
6065
7075
70
80
90
100
120
130
140
150
160
170
180
190
200
110
Y
our Heart Rate
High
Cardio
Warm Up
Your
Age
Re
co
mm
en
de
d C
ard
io
va
scu
la
r Z
on
e
Re
co
mm
en
de
d W
eig
ht
Lo
ss
Z
on
e
Fat Bur
n
CAUTION:
Befor
e beginning any fitnes
s progr
am, see your ph
ysician f
or a thorough e
xamination. Ask y
our physician about the appr
opriate t
arget hear
t rat
e for y
our fitness le
vel.


