


ENG
3214 PRIMUS
MicronTrail
INSTRUCTIONS FOR USE
3214
-0048-16
54390
ID: 048BO-0009
Design and Quality Primus AB Sweden
Tel: +46 8 564 842 30
www.primus.se
IMPORTANT:
Read these instructions carefully and
familiarize yourself with the product before fitting
the appliance to the LP Gas cartridge. Review the
instructions periodically to maintain awareness.
Retain these instructions for future reference.
USE OUTDOORS ONLY!
NEVER
cover the stove (gas cartridge) with wind shields,
rocks or similar which may cause ”over heating”
and damage the stove and cartridge. Overheating a
gas cartridge by this means is highly dangerous.
1. INTRODUCTION
1.1 This appliance shall be used exclusively with Primus
Propane/Butane/Isubutane mix cartridges 2206,
2202 and 2207.
1.2 It may be hazardous to attempt to fit other types of
gas cartridges.
1.3 Gas consumption:
321450/51/53: 160 g/h / 2.2 kW (CE). 10 000
Btu/h (ANSI).
321452: 198 g/h / 2.6 kW (CE). 8000 Btu/h (ANSI).
1.4 Jet nipple: 0.30 mm (321450/51/53), 0.37 mm
(321452).
1.5 This gas appliance conforms to the provisions of
EN521/ANSI Z21.72-16/CSA 11.2-16.
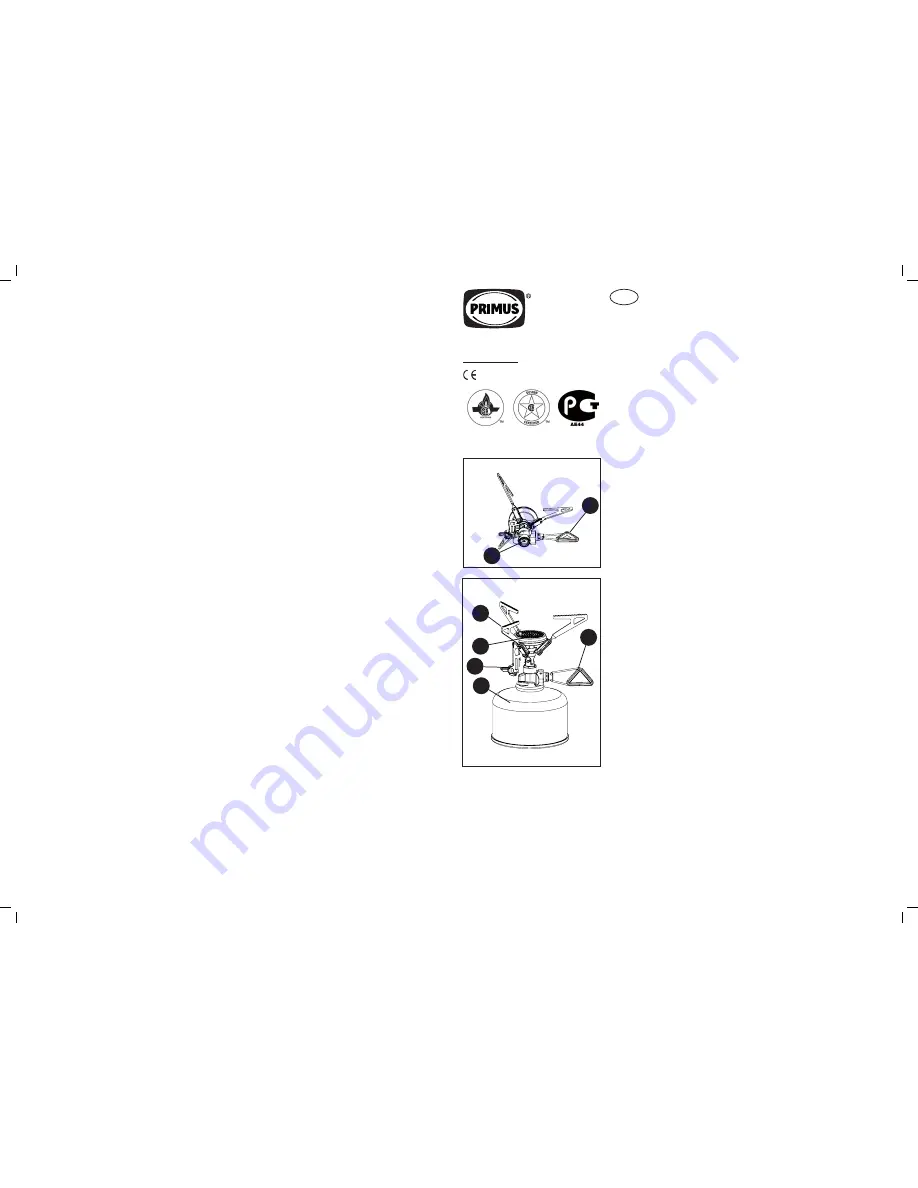
2. SAFETY INFORMATION (fig.1)
2.1 Ensure that the appliance seals (1) are in place and
in good condition before fitting the gas cartridge.
O-ring shall be loosely fitted in the valve body.
2.2 The appliance should be used outdoors only.
2.3 The appliance must be operated on a level surface.
2.4 Make sure that no inflammable materials are near
the gas appliance, see section 5.6.
2.5 Always change or fit the gas cartridge in a safe
place, only outside, away from any source of igni-
tion such as naked flames, pilot lights, electric fires
and away from other people.
2.6 If you have to check the gas soundness of the
appliance, do this outdoors. Do not check for leaks
with a naked flame. Use soapy water only.
2.7 Never use an appliance with damaged or worn
seals and never use a leaking, damaged or malfun-
ctioning appliance.
2.8 Never leave the appliance unattended when lit.
2.9 Do not allow pans to boil dry.
3. HANDLING THE APPLIANCE
3.1 Be careful not to touch hot parts of the appliance
during, or after use.
3.2 Storage: Always unscrew the cartridge from the
appliance when not in use. Store them in a safe dry
place away from heat.
3.3 Do not misuse the appliance, or use it for anything
for which it has not been designed.
3.4 Handle the appliance with care. Do not drop it.
4. ASSEMBLING THE APPLIANCE (fig.2)
4.1 Make sure that the control knob (2) is fully closed
(by turning it clockwise as far as it will go). (Push
the trigger (5) downwards and check that a spark is
fired and strikes the burner, with the piezo igniter (5)
if standard.)
4.2 Keep the cartridge (3) upright when fitting it to the
valve.
4.3 Place the valve squarely on top of the cartridge (as
shown in fig .2).
4.4 Gently screw the cartridge into the valve until it
meets the O-ring of the valve. Be careful not to
fit the cartridge cross threaded.
Screw hand
tight only. Do not overtighten or you will
damage the cartridge valve.
4.5 Ensure that a complete gas seal has been made.
If you have to check the gas soundness of the
appliance, do this outdoors. Do not check for leaks
with a naked flame. Use soapy water only, applied
to the joints and connections of the appliance.
Any leakage will show up as bubbles around the
leakage area. If you are in doubt or you can hear
or smell gas, do not attempt to light the appliance.
Unscrew the cartridge and contact your local dealer
4.6 R
otate the legs (pot supports) (6) into their correct
operating positions.
4.7 Make sure that the burner is securely screwed in.
The stove is now ready for use.
5. OPERATING THE APPLIANCE
5.1 Always operate the appliance on firm level of
surface.
5.2 Turn the knob anticlockwise (2) and light the burner
(4) immediately (with the piezo igniter (5) if stand-
ard).
5.3 Adjust the size of the flame by turning the control
knob (2).
5.4 After lighting, operate the appliance upright and
do not move it around. Flaring may occur if the
appliance has not fully warmed, or if it is moved
carelessly.
5.5 After use, ensure that the valve is fully shut (con-
trol knob turned fully clockwise).
5.6 Distance to inflammable materials must be ensu-
red. Minimum distance to combustibles at least
500 mm (20 inches) from sides and from top.
To avoid a fire hazard these minimum
distances must be complied with.
6. CHANGING THE CARTRIDGE
6.1 Shut the valve fully. Be sure the flame is exting-
uished and no other flame is nearby. Take the
unit outdoors away from other people. Unscrew
the cartridge from the valve and replace the
appliance sealing O-ring if it is cracked or worn.
Avoid cross threading by puting the valve onto
the cartridge screw thread squarely and screw on
hand tight only, as described in section 4.
7. ROUTINE SERVICE AND MAINTENANCE
7.1 Always ensure that the O-ring sealing is in place
and in good condition. Always check this each
time prior to fitting the appliance. Replace the
O-ring if it is damaged or worn.
7.2 New sealing O-rings are available from your local
dealer.
8. SERVICE AND REPAIR
8.1 If you cannot rectify any fault by following these
instructions, return the appliance to your local
retailer.
8.2 Never attempt any other maintenance or repair.
8.3 Never modify the appliance. This may cause the
appliance to become unsafe.
9. SPARES AND ACCESSORIES
9.1 Use only Primus brand spares and accessories.
Be careful when fitting spares and accessories.
Avoid touching hot parts.
9.2 Replacement Cartridges: Use only Primus 2206,
2202, 2207 Propane/Butane mix gas cartridges
with this appliance.
9.3 Spare parts
732060 Jet nipple
732440 O-ring
(740700 Piezo igniter, 321451/52)
An optional cartridge support 721171 (for
extra stability) is available.
9.4 In the event of difficulties in obtaining spare parts
or accessories, consult the distributor in your
country. Visit www.primus.se
Fig 1
PRIMUS
micron trail
Fig 2
1
3
5
4
6
2
2