Operating and Maintenance
Bedienungsanleitung
Notice d’utilisation et d’entretien
CHARGE
TM
2 MODE
English
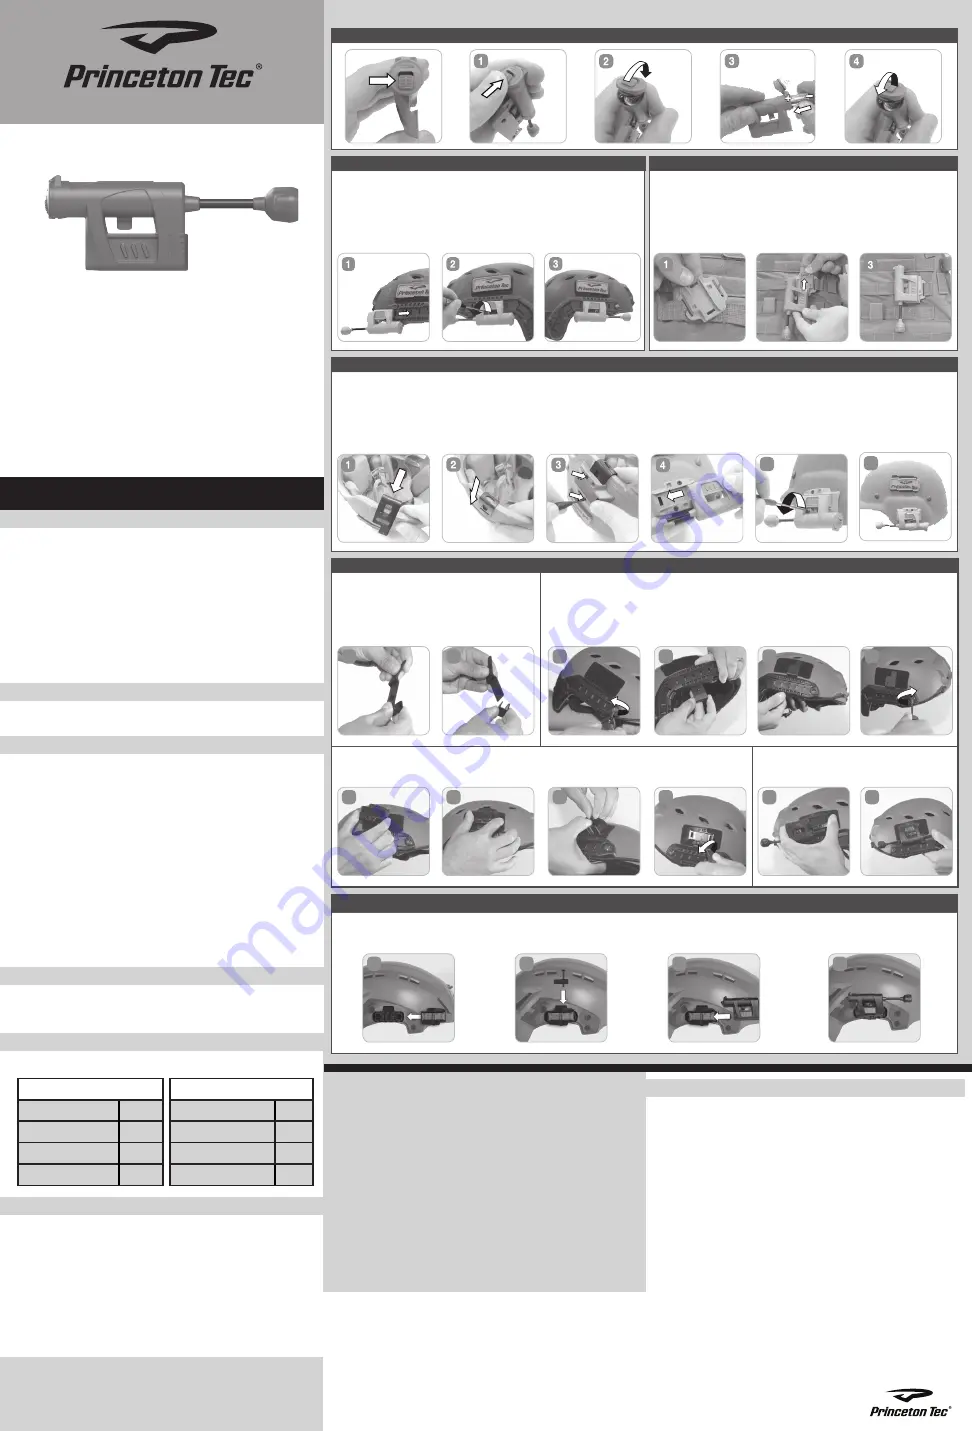
Battery Installation
1 AA Lithium or Alkaline
To install battery, grip the light in either hand with the battery
door facing straight up. Slide battery door latch forward with your
thumb and use your free hand to open the battery door. With a
battery installed, spring tension will make this operation possible
with one hand. To close the battery door, push it closed and then
slide the latch toward you to lock.
Princeton Tec cares about the environment and recommends
recycling batteries. For more information about battery recycling,
see www.batteryrecycling.com.
WARNING
!
• Always remove drained battery immediately. Remove battery
during long periods of storage.
Switch Operation
Charge has a recessed power button to prevent accidental
discharge. The large button is textured, making it easy to locate
even while wearing gloves.
Charge has two light sources to choose from: three Ultrabright
LEDs or one Maxbright LED. Ultrabright LEDs have two modes:
high and low. The Maxbright LED has one mode.
Charge will turn on in Ultrabright “low” mode with one button
press. By pressing and releasing the button again within 1.5
seconds of the previous button press, Ultrabright “high” mode will
be selected. Pressing the button once more will turn the light off.
Holding the power button down for two seconds at any point will
switch to the Maxbright light source.
If the light has been on for more than two seconds in any mode,
pressing the button will turn the light off.
Mounting System
Charge is compatible with the following mounting systems: Hel-
met Rail, Above Rail, Helmet Mount, MOLLE/PALS and Picatinny
Rail. See figures 1,2,3,4 & 5 for mounting instructions.
Specifications
Maxbright = 55 Lumens, 28.6 meters
Burntime - Lithium
Burntime - Alkaline
Modes
Hours
Modes
Hours
Power LED White
4.32
Power LED White
1.51
3 mm High
27.56
3 mm High
12.19
3 mm Low
26.03
3 mm Low
50.65
Troubleshooting
If the Charge fails to light:
• Check battery for proper installation.
• Replace battery if proper installation is confirmed.
• Check the light for water contamination on the circuit board by
removing the five screws located on the back of the light body.
Remove batteries if there is water in the electronics, and cease
use until the light has completely dried out. If moisture accumu-
lates inside the lens, remove the bezel with a small screwdriver
and open the lens to allow moisture to evaporate.
USA– International 1-Year Warranty
WARRANTY – Princeton Tec warrants this product to be free
from defects in workmanship and materials under normal use for
Return Policy
If your light fails to operate, follow these simple steps:
1. Check batteries. Replace if necessary.
2. To send your light in for repair or replacement, first contact
Princeton Tec customer service on
1-800-257-9080
to
request an RMA number. Please have your light model,
date of purchase and a brief description of the fault your are
experiencing. No warranty repairs will be accepted without an
RMA number.
3. Return the light to:
Princeton Tec, PO Box 8057 Trenton NJ
08650.
Postage due and freight collect items will not be accepted.
4. Upon receipt your light will be processed in about two weeks.
Please allow additional time for return transportation from NJ.
Princeton Tec
PO Box 8057, Trenton, NJ 08650
Phone: 609-298-9331
Fax: 609-298-9601
www.princetontec.com
© 2017 Princeton Tec
Battery installation
1. ARC Rail Installation
2. MOLLE Mount
Charge is designed to attach directly to the ARC Rail – Helmet Rail System.
Charge can mount to either left or right helmet rail. Using a flathead
screwdriver, back the set screw out approximately 5 turns, then slide
Charge dovetail into open end of helmet rail. The spring-loaded ball bearing
will engage detents. When the light is situated to your preference, hand
tighten set screw to secure Charge.
Using a flathead screwdriver, back the set screw out approximately 5
turns. Slide MOLLE mount onto any strap position, then slide Charge
dovetail into open end of MOLLE mount. The spring-loaded ball bearing
will engage detents. When the light is in place, tighten set screw to secure
Charge.
2
3. MICH Mount Installation
LEFT SIDE mounting is recommended to keep low profile. While it is possible to mount Charge/Helmet Mount on right side, this increases risk of
snagging. Remove screws from the plastic mounting plate and choose the appropriate metal U-clip. Slide the U-clip onto the bot tom edge of the helmet. If
excessive play is present, bend the metal clip with pliers until there is about 1mm of play between the clip and helmet. Attach the plastic mounting plate on
the outside of the hel met. Holding the metal mount tight against the bottom of helmet edge, tighten both screws until secure. Using a flathead screwdriver,
back the set screw out approximately 5 turns, then slide Charge dovetail into open end of helmet rail. The spring-loaded ball bearing will engage detents.
When the light is situated to your preference, tighten set screw to secure Charge.
5
6
4. (ABR) Above Rail Mount
A. If using MPLS ABR on a ballistic helmet, skip
to step two. For use with nonballistic helmets,
begin by snapping off unneeded portion of
ABR mount by hand or with a pair of pliers, and
discarding the smaller ‘hook’ portion
Loosen or remove front rail screw, and slide ABR into desired position
beneath rail. Retighten front rail screw.
1a
2a
1b
2b
3b
4b
Select Charge MPLS mount and secure with included machine screws,
gently tightening with a Phillips screwdriver.
Install Charge MPLS and tighten set screw
onto mount.
1c
2c
3c
4c
1d
2d
5. Picatinny Rail Mount
To mount Charge on a Picatinny Rail, first install the main adapter piece and then insert the retaining clamp and screw. Next, hand-tighten the screw with a
flat blade screwdriver. Finally, slide the Charge into the adapter until it snaps into place. If desired, tighten the locking screw on the Charge.
1
2
3
4
0717
one year. This warranty covers all of the component parts of the
product except batteries. This warranty does not cover deteriora-
tion due to normal wear or damage due to misuse, alteration, neg-
ligence, accidents, or unauthorized repair. Princeton Tec will repair
or replace parts which are defective in workmanship or materials.
Your authorized Princeton Tec Dealer and Princeton Tec are the
only facilities authorized to repair the product. After (3) unsuc-
cessful attempts (within the warranty period) to repair the product,
you have the right to elect replacement of the product or a refund
of the purchase price less allowance for use of the product. NO
INCIDENTAL OR CONSEQUENTIAL DAMAGES ARE INCLUDED
IN THIS WARRANTY. (Some states do not allow the exclusion or
limitation of incidental or consequential damages, so the above
limitations or exclusions may not apply to you.) This warranty gives
you specific legal rights, and you may also have other rights which
vary from state to state.
Princeton Tec reserves the right to change product specifica-
tions without notice.
FOR CALIFORNIA RESIDENTS
WARNING: This product contains Bisphenol A (BpA) a chemical
known to the State of California to cause birth defects or other
reproductive harm.