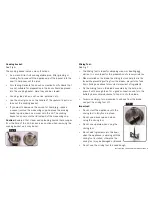
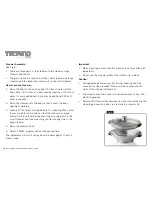
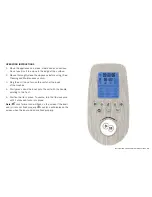
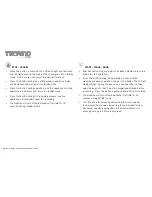
background image

PRO-TP

WWW.PROAPPLIANCES.COM.AU

INSTALLATION & OPERATION

INSTRUCTIONS

MULTI-FUNCTIONAL

 KITCHEN


APPLIANCE

Summary of Contents for PRO-TP

Page 1: ...PRO TP WWW PROAPPLIANCES COM AU INSTALLATION OPERATION INSTRUCTIONS MULTI FUNCTIONAL KITCHEN APPLIANCE ...

Page 2: ...itchen Appliance Note Please read through the instructions carefully before using or installing the product and ensure that the manual is kept in a safe place for future reference The system must be properly installed and located in accordance with the installation instructions before it is used Electrical Requirements Australia New Zealand 220V 240V 50 60Hz Due to manufacturing alterations produc...

Page 3: ...ating equal to the rating of this appliance Do not use attachments not recommended or sold by the manufacturer as it may lead to fire electric shock or injury Position the appliance at a minimum distance of 20cm away from walls curtains and other appliances and provide adequate space above and on all sides for air circulation Do not operate or place any part of the appliance on or near any hot sur...

Page 4: ... any appliance containing hot liquids or foods Wait until the appliance has switched off automatically or switch it off manually before moving it CAUTION This appliance generates heat and escaping steam during operation Proper precautions must be taken to prevent the risk of burns fire and other damage to persons or property The appliance becomes very hot during steaming and may cause burns when t...

Page 5: ...A INSTALLATION INSTRUCTIONS Component identification and content check list Model PRO TP Ref Description Qty Main Components A Main body 1 B Blending bowl 1 C Bowl lid 1 D Measuring cup 1 E Blade not shown located inside Blending bowl 1 A B C D ...

Page 6: ...6 INSTALLATION AND OPERATING INSTRUCTIONS ACCESSORIES 1 Small steamer 2 Large steamer 3 Steamer lid 4 Cooking basket 5 Mixing tool 6 Spatula 7 Scale 1 5 6 7 2 3 4 ...

Page 7: ...s the bowl and lid is properly secured To secure turn the lid clockwise until it clicks into place See Fig 1 Measuring cup See Fig 2 The measuring cup serves as a part of the lid to prevent heat loss during cooking or ingredients splashing up and to measure the ingredients with a full capacity of 100ml Place the measuring cup into the hole of the lid and turn clockwise to lock it into position Imp...

Page 8: ... blade Important The blade is very sharp Please wrap the blade with a cloth when assembling or removing the blade base Please make sure that the fixing bracket and the sealing ring are in place and locked tightly with blade assembly If the sealing ring isn t positioned correctly the food inside the bowl may leak out and cause damage to the appliance Do not use this blade in the Thermopro Mixing Bo...

Page 9: ... hole of the lid Also exercise caution when removing the cooking basket as it may be hot Mixing Tool See Fig 7 The Mixing tool is ideal for whipping cream or beating egg whites It is also ideal for the preparation of creamy mixtures When installed on the blade the mixing tool can help to mix the food while preventing cutting from the blades prevents the food from sticking and allows for constant m...

Page 10: ...re that some slots remain open so that the steam can spread evenly Tip Place food that requires longer cooking time in the small steamer and foods requiring shorter cooking time in the large steamer 4 Place the steamer lid on 5 Select STEAM program and set the desired time The ingredients will start cooking when the water begins to boil in steam mode Important When steaming ensure that the steamer...

Page 11: ...g and Maintenance section 3 Plug the unit in and turn on the switch at the back of the machine 4 Firmly press down the bowl onto the unit with the handle pointing to the front 5 Position the lid in place To secure turn the lid clockwise until it clicks and locks into place Note Lock failure icon will flash on the screen if the bowl and or lid is not fixed properly Lock Icon will display on the scr...

Page 12: ...ine will turn off automatically if left idle for 30 seconds during standby mode START PAUSE KNOB After desired setting or program has been selected press this button to start operation Press this button during the operating process and the machine will pause operation and go into standby The LCD will display During the pause you can open the lid take away the bowl etc But it must be properly posit...

Page 13: ...some auto programs where maximum working time is up to 12 hours SPEED To adjust the speed press this button during stand by mode or during the operating process Note some auto programs the speed is fixed and cannot be adjusted The signal on the LCD will flash indicating that the speed can be adjusted Turn the knob to select desired speed Speed range from level 1 10 The speed can be adjusted during...

Page 14: ...on during stand by mode or during heating process Note some auto programs the temperature is fixed and cannot be adjusted The signal on LCD will flash indicating that the heat power can be adjusted Turn the knob to select desired heat power Heat power range from level 1 10 For some sticky foods it is recommended that low heat power is selected to reduce the risk of burning at the base of the bowl ...

Page 15: ... and hold DIY for 5 seconds to keep the updated setting in memory During working of DIY program the machine will stop for 10 seconds at the end of the step and will beep to allow you to PAUSE the machine and add ingredients if needed If left idle during these 10 seconds the machine goes to next step according to the setting During working of DIY program all settings can be adjusted freely but it w...

Page 16: ...ect the desired program For the programs QUICK SOUP THICK SOUP STIR STEW REHEAT BOIL RICE PORRIDGE after completion it will show End on the screen If left idle for 5 minutes it will enter WARM mode automatically for 12 hours until manually stopped Some settings in certain auto programs are fixed and cannot be adjusted ...

Page 17: ...justable from 30 60 minutes CHOP Time adjustable from 1 10 minutes BOIL All settings non adjustable SAUTE Time adjustable from 1 30 minutes YOGURT Time adjustable from 3 12 hours STIR Time adjustable from 5 60 minutes Speed adjustable from level 0 3 Temperature adjustable from 90 120 C RICE All settings non adjustable KNEAD Time adjustable from 5 20 minutes Speed adjustable from level 2 3 Temperat...

Page 18: ...tle the blending bowl and blade refer to page 7 8 Clean the inside and outside of the bowl without the mixing knife with cleansing agent and a soft sponge cloth The mixing knife spatula mixing tool steamer measuring cup bowl lid and cooking basket can be cleaned in the same way Note Remove the black seal ring prior to washing blade assembly and ensure that both parts are dried before fitting back ...

Page 19: ...go above speed level 4 when using the ThermoPro Mixing Bowl 2 Do not use a different blade assembly for this bowl only the mixing blade assembly that comes with this bowl can be used 3 Do not use this jar for hard food like bones ice etc 4 Do not touch the bowl wall during high temperature heating 5 Only the measuring cup can be used to cover the hole of the lid 6 Make sure the black sealing ring ...

Page 20: ...semble the bowl and make sure it is fixed properly and tightly E3 Motor blocked Quantity is exceeded in the bowl Decrease the volume of the food in the bowl or cut the food to smaller pieces and re start the machine E4 Temperature is too high No food in the bowl or very little food with high temperature setting for a long period of time Add food in the bowl E5 Motor temperature too high The machin...

Page 21: ...h manually and fix the bowl and restart E8 Motor NTC missing Motor temperature sensor connection loose or damaged Stop using and contact customer service E9 Fan doesn t work The fan is damaged or connection loose Stop using and contact customer service E10 Electric current for Fan is not strong enough The fan is damaged or connection loose Stop using and contact customer service E11 Pulse function...

Page 22: ...sumer Law You are entitled to a replacement or refund for a major failure and compensation for any other reasonably foreseeable loss or damage You are also entitled to have the goods repaired or replaced if goods fail to acceptable quality and the failure does not amount to a major failure Conditions of this warranty 1 This product has been fully installed in accordance with the user manual instal...

Page 23: ...INSTALLATION AND OPERATING INSTRUCTIONS 23 ...

Page 24: ...Aquaport Corporation Pty Ltd 70 Hardys Road Torrensville SA 5031 Phone 08 8354 0711 Facsimile 08 8354 0722 Email aquaport aquaport com au www proappliances com au proappliances proappliancesau MULTI FUNCTIONAL KITCHEN FOOD PROCESSOR ...

Reviews: