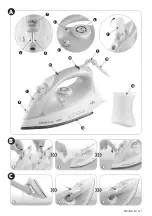
background image

PSI1165G

PS

I1165G

KULLANIM KILAVUZU 

BUHARLI ÜTÜ 

USER MANUAL 

STEAM IRON

3–7

8–12

TR

EN

/ steam iron

BUHARLI ÜTÜ

Summary of Contents for PSI1165G

Page 1: ...PSI1165G PSI1165G KULLANIM KILAVUZU BUHARLI T USER MANUAL STEAM IRON 3 7 8 12 TR EN steam iron BUHARLI T...

Page 2: ...A PSI1165G 001_v01 C B 1 2 3 1 2 3 1 6 5 7 4 2 3 12 9 10 13 14 11 7 8...

Page 3: ...l veya d zg n al m yorsa t y kullanmay n t leme s ras nda veya hemen sonras nda t taban plakas na dokunmay n s cakt r t leme s ras nda ve tamamlanmas ndan hemen sonra sembol ile belirlenen alana temas...

Page 4: ...y n n n tersine do ru evirerek kapat n M N pozisyona ayarlay n t y k sa bir s re i in kullanmak istemiyorsan z buhar reg lat r n ayarlayarak buhar fonksiyonunu kapat n z En az ayda bir kez T N N TABA...

Page 5: ...2 Giysilere p sk rtme k noktas n y neltiniz 3 P sk rtme d mesi bas n z P sk rtme d meye birka kez bast ktan sonra ortaya kabilir t yap s 1 Buhar d zenleyici 2 ok buhar d mesi 3 P sk rtme d mesi 4 Ken...

Page 6: ...da daha s k ger ekle tirmenizi neririz 1 t n n haz rlanmas ad mlar n takip edin 2 S cakl k d zenleyici pozisyonlar na eviriniz 3 Is t c g sterge yanar C OK BUHAR Bu zellik a r buru uk k vr lm malzemel...

Page 7: ...ir y zey zerine yerle tirin ve tamamen so umas n bekleyin 13 t n n tabann nemli bir bez ile siliniz Akan su ok s cakt r zellikle dikkatli olunuz DAMLAMA EMN YET S z nt y nleme sistemi t yeterince s ca...

Page 8: ...st after ironing It is hot Please refer to the following figure 1 and figure 2 Caution Hot surface Figure 1 Right side Figure 2 Left side The appliance generates high temperature Use it carefully and...

Page 9: ...Features 1 Steam Control 2 Steam Burst Button 3 Spray Button 4 Self Clean Button 5 Temperature Indicator 6 Temperature Dial A Never direct the steam to human or pets The iron must not be left unatten...

Page 10: ...over B DRY IRONING 1 Proceed as described in the Before First Use section 2 Set the Steam Control to position 3 Turn the Temperature Dial to or 4 The Heater Light will come on The light will go off on...

Page 11: ...cooled completely store it vertically in a safe place Emptying The Water Tank Set the Steam Control to position Unplug the unit 1 Hold the iron upside down and shake it gently to remove the remaining...

Page 12: ...es in vertical position 2 The Auto Off Light will pulse flash which indicates that the iron is in the automatic shot off mode 3 Move the unit to continue ironing The iron will go back to the previous...

Page 13: ...yaz ma formunu doldurarak ya da 216 528 91 88 nolu telefona faks ekerek ula abilirsiniz A a da yer alan konulara zen g stermenizi nemle rica ederiz 1 Cihaz n z mutlaka kullanma k lavuzunda belirtilen...

Page 14: ...lcili i ithalat s veya imalat reticisinden birisinin d zenleyece i raporla ar zan n tamiri m mk n bulunmad n n belirlenmesi durumlar nda t ketici mal n cretsiz de i tirilmesini bedel iadesi veya ay p...

Page 15: ...PSI1165G 001_v01 Notes...

Page 16: ...G venli otomatik kapanma zelli i 3 Kendi kendini temizleme zelli i 4 Kire olu mas n engelleyen entegre anti kalsiyum sistemi 1 Reinforced PRO STEAM iron soleplate 2 Automatic switch off function 3 Se...

Reviews: