background image

Circular Saw with Laser

User’s Manual

Model No.: PRO-SC1500

English: 2   I   Español: 18

Summary of Contents for PRO-SC1500

Page 1: ...Circular Saw with Laser User s Manual Model No PRO SC1500 English 2 I Español 18 ...

Page 2: ...ound electrical system b Avoid body contact with ground surfaces such as radiators pipes ranges and refrigerators There is an increased risk of electrical shock if your body is grounded c Do not operate power tools in the rain or wet conditions Water entering a power tool increases the risk of electrical shock d Do not stress the power cord Never carry the power tool by the cord or disconnect the ...

Page 3: ...e with clamps or other practical methods to provide a secure work platform Holding the work by hand or against your body is not secure and may lead to loss of control b Do not use the incorrect tool for the work The proper tool will do the work faster and safer c Do not use the tool if the OFF ON switch is not working Operating a tool that cannot be controlled by you is dangerous and must be repai...

Page 4: ... by the blade b Do not reach underneath the workpiece The guard cannot protect you from the blade below the workpiece c Adjust the cutting depth to the thickness of the workpiece Less than a full tooth of the blade teeth should be visible below the workpiece d Never hold a piece being cut in your hands or across your leg Secure the workpiece to a stable platform It is important to support the work...

Page 5: ...stigate and take corrective actions to eliminate the cause of blade binding Kickback is the result of saw misuse and or incorrect operating procedures or conditions and can be avoided by tacking proper precautions as given below a Maintain a firm grip with both hands on the saw and position your arms to resist kickback forces Position your body to either side of the blade but not in line with the ...

Page 6: ...h the blade or any other part in all angles and depths of cut b Check the operation of the lower guard spring If the guard and the spring are no operating properly they must be serviced before use Lower guard may operate sluggishly due to damaged parts gummy deposits or a build up of debris c Lower guard should be retractedmanuallyonlyforspecial cuts such as plunge cuts and compound cuts Raise low...

Page 7: ...re the workpiece that will be cut off has sufficient room to move sideways Failure to do so may result in the off binding against the blade Let the blade reasch full speed before commencing the cut Let the blade come to a complete stop before removing any jammed or off cut material from around the blade area SAW FEATURES 23 11 9 10 6 1 3 8 2 17 16 13 14 15 21 1 Laser light Module 2 Laser light swi...

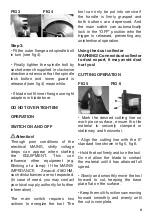
Page 8: ...y assembled except for the rip fences BLADE INSTALLATION For your own safety and protection do not attempt to operate this saw until is completely assembled and installed according to this instruction Read and understand the capability of the multi function saw and the hazards associated with its operation Sandwich the blade between two flanges The procedure is as follows Step 1 Unscrew the spindl...

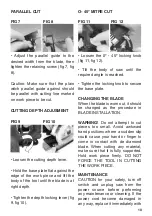
Page 9: ...witch requires two actions to energize the tool The tool can only be put into service if the handle is firmly grasped and both buttons are depressed And the main switch can automatically lock in the OFF position whn the trigger is released preventing any unintentional operation Using the dust collector WARNING Connectdustcollector to dust export it may avoid dust hurt you CUTTING OPERATION FIG 5 F...

Page 10: ... locking knob fig 11 fig 12 Tilt the body of saw until the required angle is reached Tighten the locking knob to secure the base plate CHANGING THE BLADE When the blade is worn out it should be changed as the procedure in BLADE INSTALLATION WARNING Do not attempt to cut pieces too small Avoid awkward hand positions where a sudden slip could cause your hand or finger to come in contact with de diam...

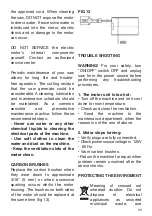
Page 11: ...ation slots of the motor clean CARBON BRUSHES Replace the carbon brushes when they wear down to approximate 3 16 5 mm or when excessive sparking occurs whitin the motor housing The brushes on both sides of the motor should be replaced at the same time fig 13 FIG 13 TROUBLE SHOOTING WARNING For your safety turn ON OFF switch OFF and unplug saw from the power source before performing any troubleshoo...

Page 12: ...ol for a higher capacity one if the original does not meet your requirement by paying the difference in price All the attributes offered by the warranty are valid presenting the original purchase invoice 2 For warranty service please contact the present the warranty card and the original invoice for the warranty service 3 This Warranty DOES NOT applies for Transportationdamagesaftersales Services ...

Page 13: ...NOTES ...

Page 14: ...www promakertools com ...

Page 15: ...Sierra Eléctrica con Láser Manual del Usuario Modelo No PRO SC1500 ...

Page 16: ...rá en un tomacorriente polarizado de una sola manera Si no encaja completamente en el tomacorriente invierta el enchufe y vuelva a intentarlo Si todavía no encaja completamente póngase en contacto con un electricista calificado para instalar un enchufe polarizado No modifique el cable de alimentación a tierra ni el sistema eléctrico de tierra b Evite el contacto del cuerpo con superficies de tierr...

Page 17: ...aldrá volando y puede causar lesiones personales e No se esfuerce ni se extienda demasiado corporalmente al operar la herramienta eléctrica Mantenga la postura y el equilibrio en todo momento Un buen equilibrio y una base sólida permiten un mejor control en situaciones inesperadas f Siempre use equipo de seguridad apropiado Siempre use protección para los ojos mientras maneja una herramienta eléct...

Page 18: ...esorios recomendados para su modelo Los accesorios adecuados para una herramienta pueden resultar peligrosos cuando se utiliza en otra herramienta 5 LÁSER Evitar la exposición directa de los ojos por Radiación Láser El Flash puede causar ceguera 6 SERVICIO El servicio de herramientas mecánico y o eléctrico solo debe ser realizado por personal de reparación calificado El servicio realizado por pers...

Page 19: ...de recto Esto mejora la precisión del corte y reduce la posibilidad de que la cuchilla se atasque g Siempre utilice cuchillas con el tamaño correcto y afiladas de los orificios del eje Las cuchillas que no coinciden con el equipo de montaje de la sierra se ejecutarán excéntricamente causando pérdida de control h Nunca utilice arandelas o pernos dañados o incorrectos Las arandelas de las cuchillas ...

Page 20: ...l trabajo o tirar de la sierra hacia atrás mientras la cuchilla está en movimiento o puede ocurrir un contragolpe Investigue y tome acciones correctivas para eliminar la causa del enganche de la cuchilla c Al reiniciar una sierra en la pieza centrar la cuchilla de la hoja de la sierra en el corte y comprobar que los dientes de la sierra no estén enganchados en el material Si la hoja de la sierra e...

Page 21: ...tar la guarda inferior Para el siguiente aserrado la guarda inferior debe funcionar automáticamente d Observe siempre que la guarda inferior cubre la cuchilla antes de colocar la sierra en el banco o en el piso Una cuchilla desprotegida que se mueve hacia atrás hará que la sierra camine hacia atrás cortando lo que esté a su camino Tenga en cuenta el tiempo que tarda la cuchilla en detenerse despué...

Page 22: ... la velocidad máxima antes de comenzar el corte 6 Deje que la cuchilla se detenga completamente antes de retirar cualquier material atascado o cortado del área de la cuchilla CARACTERÍSTICAS DE LA SIERRA 23 11 9 10 6 1 3 8 2 17 16 13 14 15 21 1 Módulo de luz láser 2 Interruptor luz láser 3 Apertura luz láser 4 Interruptor de gatillo 5 Botón de bloqueo 6 Carcasa del motor 7 Manija principal 8 Manij...

Page 23: ...sierra viene embalada completamente ensamblada a excepción de la guía INSTALACIÓN DE LA CUCHILLA HOJA Para su propia seguridad y protección no intente operar esta sierra hasta que esté completamente montada e instalada de acuerdo con estas instrucciones Lea y comprenda la capacidad de la Sierra Multifunción y los peligros asociados con esta operación Empareje la cuchilla entre dos tuercas El proce...

Page 24: ...lo parpadeo de una lámpara Si la MAINS IMPEDANCE Zmax 0 418OHM talesperturbacionesno se esperan En caso de necesidad puede ponerse en contacto con su autoridad local de suministro para obtener más información El Interruptor Principal requiere dos acciones para energizar la herramienta La herramienta solo puede ponerse en servicio si el asa está firmemente agarrada y se activan los dos botones El i...

Page 25: ... pieza a cortar AJUSTE DE PROFUNDIDAD DE CORTE FiG 9 FIG 10 Abrazar la palanca de profundidad de corte Sujete la placa base contra el borde de la pieza de trabajo y levante el cuerpo de la herramienta hasta que la cuchilla esté a la profundidad correcta Apriete la palanca de bloqueo de profundidad Fig 9 Fig 10 CORTE DE INGLETE 0 45º FIG 11 FIG 12 Afloje la perilla de bloqueo 0 45º Fig11 Fig 12 Inc...

Page 26: ... la sierra genera podría ser considerable Se debe mantener un programa de limpieza lubricación y mantenimiento Como una práctica habitual de mantenimiento sensible y preventivo siga estos pasos recomendados Nunca utilice agua o cualquier otro líquido químico para limpiar partes eléctricas de la máquina Use paños suaves para limpiar el agua y polvo de la máquina Mantenga limpias las ranuras de vent...

Page 27: ... mano de obra empleada en su fabricación Ofrece 2 años de servicio de mantenimiento y mano de obra gratuitaparacambiodeconsumibles Otorga un periodo de prueba de 2 meses donde puede canjear la herramienta por una de mayor capacidad si el rendimiento no cumple con su requerimiento abonando la diferencia del precio Todos los atributos ofrecidos por la garantía son válidos presentando la factura de c...

Page 28: ...www promakertools com ...

Reviews: