
SS-257/SS-259
LCD Smart Soldering Iron Station
Main menu
Thank you for purchasing the
SS-257/SS-259 LCD Smart
Soldering Iron Station. Please read this manual before operating the
SS-257/SS-259.
Please store the manual in a safe, easily accessible place for future
reference.
Features
• Large screen with backlight, LCD contrast and brightness are adjustable.
• Designed with functional manual and shuffle knob for easy setting, more
convenient and user friendly.
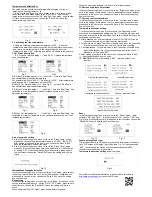
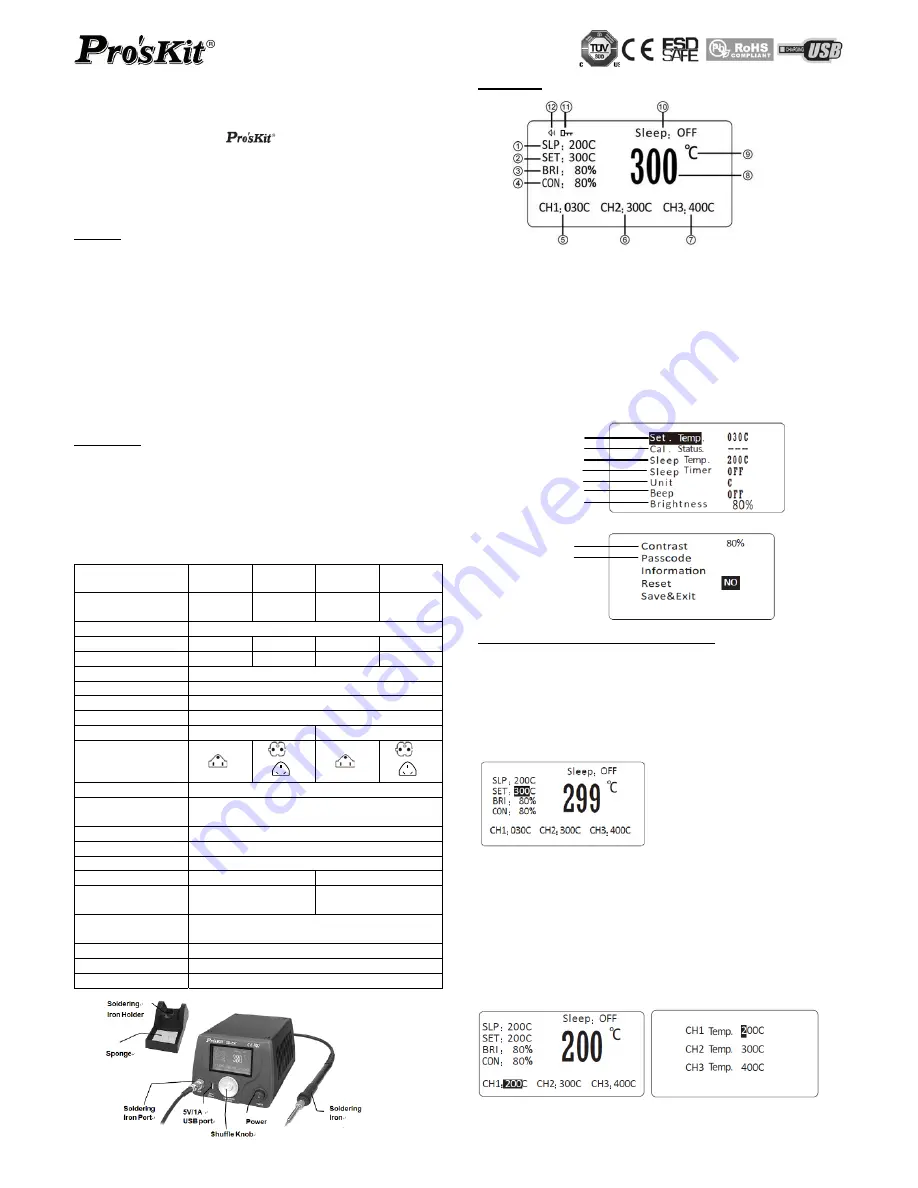
LCD Display function description
1. Temperature of sleep mode 2.Serting temperature
•Comes with high end quad-wire heating element for heat fast recovery.
3. LCD brightness ratio 4.
LCD screen contrast ratio
• Microprocessor controlled provide best performance and accurate
temperature control.
5. CH1 temperature memory setting
6. CH2 temperature memory setting
• Temperature calibration function.
7. CH3 temperature memory setting
• Auto sleep and wake up function, system lock, tip calibration and low
consumption.
8. Current temperature
9. Temperature unit 10. Current sleep mode
•3 data memories store and recall frequently used temperature values.
11. Temperature lock 12. Current beep on or off
•Built-in DC 5V/1A USB port for power supply.
• Complies with CE and ESD standard, conform to RoHS.
Function setting menu
• Comes with UL Certified Wires.
Press knob for 3 sec., it will enter the function setting menu.
• Silicone handpiece cord wire heat-resistant up to 200°C.
• Resettable fuse protection design.
Packing List
Temperature setting
Please check the contents of the Soldering station package and confirm
that all the items listed below are included.
Calibration of temp.
Soldering Station………..……………1
Iron Stand
(
with cleaning sponge
)
.1
Soldering Iron…………………………1
Power Cord…………………..….……1
Alligator Clip Grounding Wire….…....1
User’s Manual……………...…………1
Specifications
Model No.
SS-257E
SS-257EU
SS-257B
SS-257H
SS-259E
SS-259EU
SS-259B
SS-259H
Input Voltage
110~120V
60Hz
220~240V
50Hz
110~120V
60Hz
220~240V
50Hz
Control system
Microprocessor-controlled
Power
consumption
75W 75W 90W 90W
Output
voltage
24VAC 24VAC 25VAC 25VAC
LCD Display
73mmX40mm
,
240X120 dot. Backlight
Temperature range
30~500°C /86~932°F
Temperature calibration
0~699
℃
(32~1290
℉
)
,
Adjustment
Temperature stability
±2
℃
/±36
℉
(no load)
Heating element
High end quad-wire heater
High end Silver alloy heater
Plug
E
B
H
E
B
H
Sleep mode
OFF & 1~360min adjustment
Temperature of sleep
mode
30~400
℃
/86~752
℉
USB port output
DC 5V/1A
Memory setting
3set
Temperature lock function
yes
Replacement heater
9SS-257-HT
9SS-259-HT
Replacement soldering
iron
9SS-257-SI
9SS-259-SI
Tip-to-ground resistance
potential
≦
2
Ω
/
≦
2mV
Size (mm)
180 x 150 x 106mm
Weight 2.3kg
Package Color
Box
Setting up & operating the Soldering Station
Start to use
Turn on the soldering station, LCD screen will display main menu after
three seconds, last set temperature will display.
Temperature setting
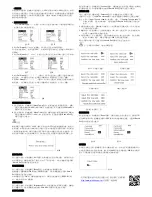
In the main menu, press lower part of shuffle knob, move cursor to
the ”SET” mode (as follow picture)
,
rotate around the
shuffle knob
in
c
lockwise direction to increase temperature
,
counter clockwise direction to
decrease temperature.
Temperature memory choose
In the main menu, press the center of shuffle knob twice, cursor will move
to the CH1/CH2/CH3(see fig.1)
,
press the left or right position of shuffle
knob, choose the temperature needed.
Temperature memory setting
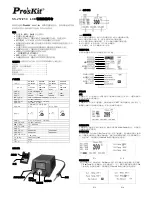
Press 3 seconds of shuffle knob into the function setting menu. Press knob
and move cursor to the ”Set. Temp.” mode, press knob again to the
temperature setting (see fig 2.), rotate around the
shuffle knob
in c
lockwise
direction to increase temperature,
counter clockwise direction to decrease
temperature. Press knob to the next menu, choose the “Save & Exit” save
the temperature and exit the menu.
Fig.1 Fig.2
Temperature unit
Sleep time setting
Sleep temperature setting
Beep setting
LCD brightness setting
LCD contrast ratio setting
Temperature passcode


