background image

®

CV-100

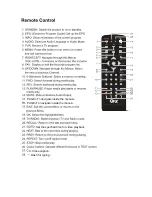
Summary of Contents for CV-100

Page 1: ...CV 100...

Page 2: ...w the attached installation instructions and use only shielded cables when connecting to other FCC NOTICE device devices Modifications not authorized by the manufacturer o t y t i r o h t u a s r e s...

Page 3: ...outside antenna system extreme care should be taken to keep from touching such power lines or circuits as contact with them might be fatal...

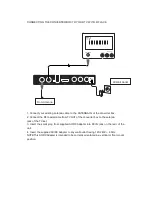
Page 4: ...following the power supply cord or...
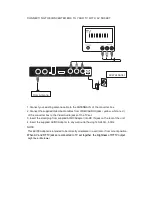
Page 5: ...io output CVBS composite video broadcast signal video outout This connector is not only compliant with NTSC Analog TV RF CH3 4 USB port for connection to extenal USB device Switch analog TV output bet...

Page 6: ...Set the specfied time for video playback Dash for typing C Close caption PAGE To navigate inside the menus PAGE To navigate inside the menus...

Page 7: ...between the unit and the transmitter the transmitter may not operate when direct sunlight an incandescent lamp fluorescent lamp or any other strong light shines on the remote control of the unit the r...

Page 8: ...TV set 3 Insert the small plug from supplied AC DC Adapter into DC IN jack on the rear of the unit 4 Insert the supplied AC DC Adapter to any wall outlet having 120 240V 60Hz NOTE This AC DCAdapter is...

Page 9: ...from supplied AC DCAdapter into DC IN jack on the rear of the unit 4 Insert the supplied AC DC Adapter to any wall outlet having 120 240V 60Hz NOTE This AC DCAdapter is intended to be correctly orien...

Page 10: ...jack on the rear of the unit 5 Insert the supplied AC DC Adapter to any wall outlet having 120 240V 60Hz NOTE This AC DCAdapter is intended to be correctly orientated in a vertical or floor mount pos...

Page 11: ...re now ready to watch TV BASIC OPERATION Program Manage Settings Press the MENU button and select Program The Menu provides options to adjust the Program Manage Settings Select an option and press OK...

Page 12: ...o delete the program 2 Repeat the previous steps to select more programs to delete Skip TV Program 1 Select the program you would like to skip and press the 02 Skip button a skip symbol will appear Th...

Page 13: ...select the preferred program If there is more than one page of information use 01 button for page up and the 02 button for page down Sort your channels from the following options LCN Sort the channels...

Page 14: ...NTSC for NTSC format TV PAL for PAL format TV Channel Search Press the MENU button and select Channel Search The Menu provides options to search channel Select an option and press the RIGHT LEFT butto...

Page 15: ...ithout changing the current channels list 1 Select Manual Search and press the OK or RIGHT button to start channel search To channel search screen will appear 2 Press the RIGHT LEFT button to select t...

Page 16: ...output will be switched off Meanwhile digital TV signal split and output will be switched on Time Setting Press the MENU button then select Time The menu provides options to adjust the time settings P...

Page 17: ...er all the setting are made press EXIT to return setting will be saved automatically Option Press the MENU button and select Option The menu options to adjust the OSD Language Audio Language Select an...

Page 18: ...strict the channel access of the channels which are unsuitable for children To restrict lock the channel you will need to enter either the default password 000000 or your own password Set Password To...

Page 19: ...gs In main menu move the cursor to system select Restore Factory Default and press the OK button Enter your password or the default password 000000 and press OK to confirm This option will delete all...

Page 20: ...connected USB storage device is displayed Formats the connected device WILL DELETE ALL FILES Record First connect USB storage memory and press the RECORD button Press the PVR button to record the curr...

Page 21: ......

Page 22: ......

Page 23: ......

Page 24: ...Reasons What to do No picture Power is not connected Connect the power The power switch is not on Switch on the power Screen shows No Signal No correct antenna cable Plug in the antenna cable Incorre...

Page 25: ...MANUAL DE USUARIO CV 100 Lea este manual antes de la instalaci n y uso...

Page 26: ...riente obsoleto Para evitar descargas el ctricas no utilice este enchufe polarizado con un cable de extensi n recept culo u otro tomacorriente a menos que las hojas se puedan insertar completamente si...

Page 27: ...ndiciones de trabajo 22 Montaje de pared o techo El producto debe montarse en una pared o techo de acuerdo con las instrucciones del fabricante 23 Calor El producto se debe colocar lejos de fuentes de...

Page 28: ...Panel frontal Bot n de encendido sensor remoto Panel trasero CH3 4 interruptor Entrada DC Puerto USB Salida HD TV Salida a TV Salida directa de RF para un dispositivo externo Entrada para antena de T...

Page 29: ...num ricos y seleccione directamente el canal ingresando su n mero 11 B squeda adelante 12 B squeda atr s 13 PLAY PAUSE REPRODUCIR PAUSA 14 MUTE SILENCIAR 15 Page para navegar dentro de los men s 16 P...

Page 30: ...Conexi n an loga Si desea utilizar esta conexi n puede ver canales digitales en los canales 3 y 4 de su TV an logo Cuando utilice una misma antena para la se al digital y an loga puede conectar la sa...

Page 31: ...1...

Page 32: ...1 a a a a b b b b c c c...

Page 33: ...a a b b c c d e d 2...

Page 34: ...Service ONID Ordenar la identificaci n de la red orignial 3 2...

Page 35: ...3 a b...

Page 36: ...da para TV an loga a trav s de puerto de Salida de TV an loga Las se ales an logas se conectan al dispositivo a trav s del puerto de TV an loga a continuaci n conecte a la salida para TV an loga a tra...

Page 37: ...4 El receptor puede pasar autom ticamente al modo de espera cuando no se utiliza durante un per odo de tiempo La selecci n de tiempo son off 1 a 12 horas 5 Sleep...

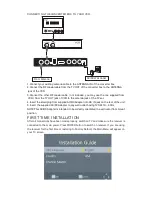
Page 38: ...5 6 Close Caption...

Page 39: ...7...

Page 40: ......

Page 41: ......

Page 42: ......

Page 43: ......

Page 44: ...148 85 25mm Connection Antenna Jack TV out Loop Through Jack AV out Jack HDTV output Jack L R audio output jack USB External Power Source Input Jack 7 5W 0 5W...

Reviews: