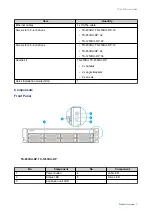
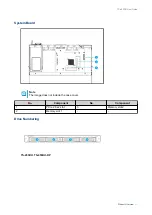
background image

TS-x53DU

TS-453DU

TS-453DU-RP
TS-853DU-RP

TS-1253DU-RP

User Guide

Document Version: 1
19/06/2020

Questo manuale d’istruzione è fornito da trovaprezzi.it. Scopri tutte le offerte per 
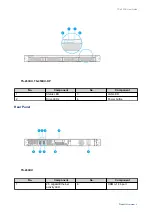
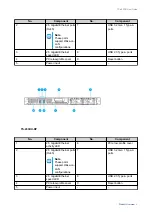
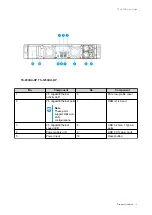
QNAP TS-453DU

TS-453DU-4G

 o cerca il tuo prodotto tra le 

migliori offerte di Server

Summary of Contents for TS-53DU Series

Page 1: ...S 853DU RP TS 1253DU RP User Guide Document Version 1 19 06 2020 Questo manuale d istruzione fornito da trovaprezzi it Scopri tutte le offerte per QNAP TS 453DU TS 453DU 4G o cerca il tuo prodotto tra...

Page 2: ...alling Expansion Cards 25 Replacing Memory Modules 29 Hot Swapping Redundant Power Supply Units 32 Expansion Unit Installation 34 Installing Handles 37 Rail Kits 39 QTS Installation 39 Installing QTS...

Page 3: ...myQNAPcloud ID 51 Qfinder Pro 51 QTS 51 7 Notices Limited Warranty 52 Disclaimer 52 GNU Public License 52 CE Notice 60 FCC Notice 60 VCCI Notice 60 BSMI Notice 61 SJ T 11364 2006 61 2...

Page 4: ...t the user has a basic understanding of storage and backup concepts Document Conventions Symbol Description Notes provide default configuration settings and other supplementary information Important n...

Page 5: ...qnap com Ordering P N Drive bays Memory Power supply TS 453DU 4G 4 4 GB Single TS 453DU RP 4G 4 4 GB Redundant TS 853DU RP 4G 8 4 GB Redundant TS 1253DU RP 4G 12 4 GB Redundant Component TS 453DU TS...

Page 6: ...2 5 GbE RJ45 Note The 2 5 Gigabit Ethernet port provides 4 network connection speeds 2 5G 1G 100M and 10M Wake on LAN Yes 2 5 GbE RJ45 External I O Ports Expansion Slots PCIe slots 1 x PCIe 2 0 x2 Ti...

Page 7: ...teries according to local regulations or the instructions of the battery manufacturer Sound level TS 453DU 38 db A TS 453DU RP 37 5 db A 23 6 db A 24 6 db A Note The sound level was tested at a bystan...

Page 8: ...rives TS 453DU TS 453DU RP 12 TS 853DU RP 24 TS 1253DU RP 36 Handle kit TS 453DU TS 453DU RP 2 x handles 2 x angle brackets 8 x screws Quick Installation Guide QIG 1 Components Front Panel TS 853DU RP...

Page 9: ...RP No Component No Component 1 Status LED 3 LAN LED 2 Drive LEDs 4 Power button Rear Panel TS 453DU No Component No Component 1 2 5 Gigabit Ethernet activity LED 6 HDMI v1 4b port TS x53DU User Guide...

Page 10: ...profile cover 9 Reset button 5 Power input TS 453DU RP No Component No Component 1 2 5 Gigabit Ethernet activity LED 6 PCIe low profile cover 2 2 5 Gigabit Ethernet ports RJ45 Note These ports suppor...

Page 11: ...low profile cover 2 2 5 Gigabit Ethernet ports Note These ports support Wake on LAN configurations 7 HDMI v1 4b port 3 2 5 Gigabit Ethernet speed LED 8 USB 3 2 Gen 1 Type A ports 4 Power supply unit...

Page 12: ...Board Note The image does not include the case cover No Component No Component 1 PCIe 2 0 x2 slot 3 Memory slot 2 2 Memory slot 1 Drive Numbering TS 453DU TS 453DU RP TS x53DU User Guide Product Overv...

Page 13: ...ures should have physical access to the device To avoid potential injury or damage to components ensure that the drives and other internal system components have cooled before touching them Observe el...

Page 14: ...temperature 0 C to 40 C 32 F to 104 F Non condensing relative humidity 5 to 95 Wet bulb temperature 27 C 80 6 F Flat anti static surface without exposure to direct sunlight liquids or chemicals Hardwa...

Page 15: ...cards For details see Installing Expansion Cards 5 Connect the NAS to the network 6 Optional Connect expansion units For details see Connecting USB Expansion Units and Connecting SATA JBOD Expansion...

Page 16: ...g Moving fan blades Keep your hands and other body parts away from moving fan blades Other moving components Keep your hands and other body parts away from other moving components 1 Power off the NAS...

Page 17: ...2 Slide the cover back 3 Lift the cover off the NAS TS 853DU RP TS 1253DU RP 1 Loosen the screws TS x53DU User Guide Installation and Configuration 16...

Page 18: ...cover back 3 Lift the cover off the NAS Attaching the Case Cover Warning Moving fan blades Keep your hands and other body parts away from moving fan blades TS x53DU User Guide Installation and Config...

Page 19: ...parts away from other moving components 1 Attach the case cover TS 453DU TS 453DU RP 1 Place the cover on the NAS 2 Slide the cover forward 3 Attach the screws that connect the case cover to the chass...

Page 20: ...TS 853DU RP TS 1253DU RP 1 Place the cover on the NAS 2 Slide the cover forward 3 Tighten the screws TS x53DU User Guide Installation and Configuration 19...

Page 21: ...n 3 5 inch Trays Tip For the list of compatible drive models go to https www qnap com compatibility Warning Installing a drive deletes all data on the drive Observe electrostatic discharge ESD procedu...

Page 22: ...ull the tray handle outward b Pull the tray out 3 Install a drive on the tray a Place the tray on the drive so that the holes on the tray are aligned with those on the drive b Attach the screws TS x53...

Page 23: ...4 Load the tray into the bay a Insert the tray into the bay b Slide the tray into the bay c Push the handle d Lock the tray TS x53DU User Guide Installation and Configuration 22...

Page 24: ...on the drive Observe electrostatic discharge ESD procedures to avoid damage to components Moving fan blades Keep your hands and other body parts away from moving fan blades Other moving components Ke...

Page 25: ...ive on the tray a Place the tray on the drive so that the holes on the tray are aligned with those on the drive b Attach the screws 4 Load the tray into the bay TS x53DU User Guide Installation and Co...

Page 26: ...the company website are shipped with the brackets necessary to fit the TS x53DU Warning Moving fan blades Keep your hands and other body parts away from moving fan blades Other moving components Keep...

Page 27: ...TS 453DU TS 453DU RP 1 Remove the screw that secures the cover to the bracket 2 Pull the bracket away from the slot 3 Remove the screw that secures the cover to the bracket 4 Pull the cover away from...

Page 28: ...y from the slot 3 Optional Attach the QNAP bracket to the expansion card a Remove all screws of the existing bracket b Carefully pull the bracket away from the card c Attach the QNAP bracket to the ca...

Page 29: ...all the expansion card TS 453DU TS 453DU RP 1 Hold the card by the edges 2 Insert the card into the riser card slot 3 Attach the screw 4 Insert the riser card into the slot 5 Attach the screws TS x53D...

Page 30: ...slot 3 Attach the screw 5 Attach the case cover For details see Attaching the Case Cover Replacing Memory Modules The TS x53DU has two memory slots You can increase the memory capacity of the NAS by u...

Page 31: ...n blades Keep your hands and other body parts away from moving fan blades Other moving components Keep your hands and other body parts away from other moving components 1 Power off the NAS 2 Disconnec...

Page 32: ...le and the motherboard c Hold the module by the edges 6 Install a new module a Align the notch with the ridge in the slot b Insert the module into the slot c Verify that the metal connectors are compl...

Page 33: ...ue for Total memory Hot Swapping Redundant Power Supply Units Warning The NAS may have one or more power supply unit PSU cords To avoid serious injuries a trained service technician must disconnect al...

Page 34: ...4 Insert the new PSU TS 453DU RP TS 853DU RP TS 1253DU RP TS x53DU User Guide Installation and Configuration 33...

Page 35: ...on units and USB expansion units For details please see table below You can purchase storage expansion accessories from QNAP or an authorized reseller For details go to https shop qnap com Expansion U...

Page 36: ...orts SATA HDD SSD 4 x SFF 8088 to SFF 8644 connector cables QXP 1600eS host bus adapter TL R400S Uses a SAS 6 Gbps SFF 8088 interface Supports SATA HDD SSD 1 x SFF 8088 connector cable QXP 400eS A1164...

Page 37: ...be installed on the NAS For details on the required accessories see Expansion Unit Installation 1 Power off the NAS 2 Install a host bus adapter on the PCIe slot Important The QNAP QXP host bus adapte...

Page 38: ...ts are listed Installing Handles Installing handles enables you to better grip and further secure the NAS on a rack Handles on the TS 453DU and TS 453DU RP require manual installation 1 Power off the...

Page 39: ...gle bracket with the holes on the chassis Note Ensure that the handle faces the same direction as the front panel b Attach the screws 4 Install a second handle on the other side of the chassis 5 Power...

Page 40: ...d For details see Installing QTS Using Qfinder Pro Computer Network cable Qfinder Pro installer Cloud installation If the NAS is connected to the internet you can do the following Scan the QR code on...

Page 41: ...The name supports letters A to Z a to z numbers 0 to 9 and hyphens but cannot end with a hyphen Password Specify an administrator password with 1 to 64 characters The password supports all ASCII char...

Page 42: ...rn to this page to complete the installation after creating an account 6 Specify the myQNAPcloud device name for the NAS Note The myQNAPcloud device name is used when remotely accessing the NAS For se...

Page 43: ...ceeding 1 Connect an HDMI display to the NAS 2 Connect a USB keyboard to the NAS or prepare the QNAP IR remote control not available on all models 3 Power on the NAS The Welcome screen of the Smart In...

Page 44: ...Warning Clicking Next deletes all data on the drive before installing QTS 11 Click Next QTS is installed TS x53DU User Guide Installation and Configuration 43...

Page 45: ...ample if the MAC address of adapter 1 is 11 22 33 44 55 66 then the admin password will be 112233445566 Tip You can find the MAC address of adapter 1 using Qfinder Pro A label attached to the device a...

Page 46: ...n the device is powered on The following LED information applies only when the drive is correctly installed and when the device is connected to the network or to a host For details on the location of...

Page 47: ...k volume is about to reach its full capacity The system fan is not functioning An error occurred when accessing read write the data A bad sector is detected on the hard drive The device is in degraded...

Page 48: ...k connection has been established Flashes orange The device is being accessed from the network Off There is no network connection Drive Flashes red The data is being accessed and a read write error oc...

Page 49: ...front USB port but the data cannot be copied Long beep 1 5 seconds 3 every 5 minutes The system fan is not functioning 2 The disk volume is about to reach its full capacity The disk volume has reache...

Page 50: ...s RAID 1 One member drive fails RAID 5 One member drive fails RAID 6 One or two member drives fail 1 Log on to QTS 2 Go to Main Menu Storage Snapshots Storage Disks VJBOD 3 Locate the failed drive 4 P...

Page 51: ...an inactive RAID 0 and JBOD configuration to normal Disk Volume RAID Recovery Support Maximum Number of Removed Drives Single No N A JBOD Yes 1 RAID 0 Yes 1 RAID 1 Yes 1 RAID 5 Yes 2 RAID 6 Yes 3 RAI...

Page 52: ...lex port forwarding settings myQNAPcloud Provides various remote access services such as DDNS and myQNAPcloud Link myQNAPcloud ID Email address that was used to register for a myQNAPcloud account Qfin...

Page 53: ...QNAP makes no warranty or representation expressed implied or statutory with respect to its products or the contents or use of this documentation and all accompanying software and specifically discla...

Page 54: ...this version of the GPL to prohibit the practice for those products If such problems arise substantially in other domains we stand ready to extend this provision to those domains in future versions of...

Page 55: ...he work The Corresponding Source need not include anything that users can regenerate automatically from other parts of the Corresponding Source The Corresponding Source for a work in source code form...

Page 56: ...not combined with it such as to form a larger program in or on a volume of a storage or distribution medium is called an aggregate if the compilation and its resulting copyright are not used to limit...

Page 57: ...curs as part of a transaction in which the right of possession and use of the User Product is transferred to the recipient in perpetuity or for a fixed term regardless of how the transaction is charac...

Page 58: ...overed work except as expressly provided under this License Any attempt otherwise to propagate or modify it is void and will automatically terminate your rights under this License including any patent...

Page 59: ...such an agreement or commitment not to enforce a patent against the party If you convey a covered work knowingly relying on a patent license and the Corresponding Source of the work is not available f...

Page 60: ...published by the Free Software Foundation If the Program specifies that a proxy can decide which future versions of the GNU General Public License can be used that proxy s public statement of acceptan...

Page 61: ...s are designed to provide reasonable protection against harmful interference when the equipment is operated in a commercial environment This equipment generates uses and can radiate radio frequency en...

Page 62: ...SJ T 11364 2006 RoHS RoHS Pb Hg Cd CR VI PBB PBDE 0 0 0 0 0 0 0 0 0 0 0 0 0 0 0 0 0 0 0 0 0 0 0 0 0 0 0 0 0 0 0 0 0 0 0 0 0 0 0 0 0 0 0 0 0 0 0 0 O SJ T11363 2006 X SJ T11363 2006 TS x53DU User Guide...

Reviews: