background image

USER GUIDE


DS-200iQ / DS-600iQ

Summary of Contents for DS-200iQ

Page 1: ...USER GUIDE DS 200iQ DS 600iQ...

Page 2: ...ervice and or maintenance may result in property damage and or serious bodily injury Ensure all safety information detailed in section 1 3 Safety including it s sub sections are read and understood in...

Page 3: ...s 17 3 2 2 8 Imported Files 18 3 2 3 Service Settings Supervisor 18 3 2 3 1 Diagnostics 19 Typical Sensor Values 19 3 2 3 2 System Options 22 3 3 Jobs Screen 23 1 SAFETY STANDARDS COMPLIANCE 1 1 1 Abo...

Page 4: ...1 1 Envelope Separator Adjustment 59 5 1 2 Loading the Versatile Feeder Hopper 59 5 1 2 1 Versatile Feeder Separator Adjustment 60 5 1 3 Loading the Flex Folder Hopper 62 5 1 3 1 500 Sheet Hoppers 62...

Page 5: ...kup Rollers 106 6 4 Maintaining the Wetter System 106 6 4 1 Cleaning the Wetter Tank 106 6 4 2 Changing the Reservoir Bottle 107 5 1 3 3 Reading Orientations 64 5 1 3 4 Non Reading Orientations 66 5 1...

Page 6: ...8 2 Insert Head Specifications 114 8 2 1 Cycling Speeds 115 8 2 2 Pack Details 115 8 2 3 Envelope Details 116 8 3 Versatile Feeder Specifications 118 8 3 1 Enclosure Details 118 8 3 2 Daily Mail Versa...

Page 7: ...1 USER GUIDE DS 200iQ DS 600iQ 1 SAFETY STANDARDS COMPLIANCE...

Page 8: ...ibility Directive 2014 30 EU The product presented in this guide meets the requirements of applicable directives All machines are built to strict safety specifications in accordance with UL Standards...

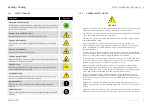
Page 9: ...be operated maintained and or serviced only by trained and authorised personnel Do not operate the machine unless all of the covers are in place and undamaged and all warning labels are in place and l...

Page 10: ...rth feature Ensure the plug is always connected to a properly wired three prong outlet Do not use a two prong adapter without grounding the machine properly The machine must be earthed Never remove th...

Page 11: ...5 USER GUIDE DS 200iQ DS 600iQ 2 INTRODUCTION...

Page 12: ...rcode 2D OMR with a number of barcode symbologies are compatible for use with a mark reading Versatile Feeder or Flex Folder allowing a group of forms to be collated on the track prior to folding The...

Page 13: ...or in conjunction with Versatile Feeders It folds documents either separately or in groups using an accumulator and is fitted with various options of feed pods maximum of 2 feed pods NOTE Folding incl...

Page 14: ...te them for subsequent franking operation mainly applicable to C4 envelopes and C5 with vertical windows Turner can be fitted to an Output Sorter or on its own Operation of the Turner is programmed wi...

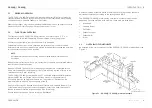
Page 15: ...r button located at the front bottom left panel of the Insert Head as shown in Figure 2 4 QTL RND OPS 00000179 A 00 Figure 2 4 Front I O power button NOTE A green LED indicates that the machine is swi...

Page 16: ...10 USER GUIDE DS 200iQ DS 600iQ 3 INTEGRATED MAIL OPERATING SYSTEM IMOS...

Page 17: ...ring creating new documents envelopes barcodes and labels reading definitions and postal products etc Admin and Engineer services for hardware and unit set ups and diagnostics NOTE Access to the Menu...

Page 18: ...Documents Envelopes and Postal Products that have been defined and available for use when defining a mailset Existing definitions within the library can be copied and edited if needed as well as the o...

Page 19: ...TS LIBRARY To create new Documents to be used when defining a mailset see section 4 2 4 Creating a New Document for further assistance 3 2 1 4 ENVELOPES LIBRARY To create new Envelopes to be used when...

Page 20: ...he security level options available and an example list of certain operations and features available to each associated security level Security Level Security Type Operator Level Description On Startu...

Page 21: ...plete as shown in Figure 3 6 NOTE The USB key supplied with the machine plugged into the PC at all times can also be used as the backup location allowing the data to be stored remotely off the PC hard...

Page 22: ...SCR 00000109 A 00 Figure 3 8 Assigning a Machine Id Multiple machines on the same site should have different Machine ID s 3 2 2 5 MACHINE NAME Machine Name allows the user to assign a name for the ma...

Page 23: ...existing licences on the machine Press Ok once complete as shown in Figure 3 10 QTL RND SCR 00000111 A 00 Figure 3 10 Generating a Licence file 3 2 2 7 LICENCED FEATURES Licenced Features displays th...

Page 24: ...are no files imported or if no Flexbarcode licence on the machine 3 2 3 SERVICE SETTINGS SUPERVISOR Supervisor Service settings can be accessed by selecting Service under Services within the Menu scr...

Page 25: ...an be calibrated individually or together by pressing the Cal All Paper sensors button in the bottom right corner of the screen 4 Press Exit once the desired settings have been made TYPICAL SENSOR VAL...

Page 26: ...ead QTL RND SCR 00000128 A 00 Figure 3 16 Insert Head typical analog sensor values NOTE Wetter fluid sensor will always show a typical value above 4 5V Blocked because it is detecting fluid Versatile...

Page 27: ...e 3 18 shows typical analog sensor values for the Flex Folder QTL RND SCR 00000166 A 00 Figure 3 18 Flex Folder typical analog sensor values Output Sorter Analog sensors Figure 3 19 shows typical anal...

Page 28: ...n No Yes If No is selected the machine and PC will be set to automatically power down after 60 minutes of idling no activity and when in an auto ended state Allow Custom fold selection No Yes If Yes i...

Page 29: ...en shown in Figure 3 22 is displayed once logged into IMOS and may be accessed anytime by pressing the Jobs button in the IMOS control panel QTL RND SCR 00000064 A 00 Figure 3 22 Jobs screen The Jobs...

Page 30: ...b indicator AIMS Job indicator indicates whether AIMS is enabled ON or OFF for the current job Speed Control indicator Speed Control indicator indicates the cycling speed 0 9 of the current job press...

Page 31: ...es If the current job is programmed with AIMS only Present at Exit will be enabled 3 4 1 1 PRESENT AT EXIT Present at Exit allows the operator to check the contents of envelopes to determine if the co...

Page 32: ...ence Make any adjustments as necessary by following the procedure below 1 Open the operator side cover to view the fingers 2 Select the required Finger Sequence from the list of options as shown in Fi...

Page 33: ...position NOTE Moves the envelope further into insert position 2 If required press Revert to revert back to the default setting 3 Press Exit once the desired settings have been made 3 4 1 4 FINGER ADJ...

Page 34: ...the job count total is set at 0 the machine will run without stopping 3 Press Ok once the desired settings have been made 3 4 3 BATCH COUNT SETTINGS Pressing the Batch Count button from the Run scree...

Page 35: ...nt to set which exit is used for displaying the batch count on the Run screen 7 Press Ok once the desired settings have been made 3 5 HELP MENU The Help menu can be accessed anytime by pressing the He...

Page 36: ...ol panel TeamViewer will launch with a unique ID and Password as shown in Figure 3 33 QTL RND SCR 00000007 A 00 Figure 3 33 TeamViewer dialog box 2 Communicate the ID and Password to the support engin...

Page 37: ...e g change settings libraries hardware unit setup etc Access rights available to a specific user will depend on the user level Three levels of access rights can be allocated to each user as shown in...

Page 38: ...Machine CAN Special Reset Machine F6 Envelope Only Reset CAN Trace CAN Test AIMS Reset COM Clear Faults F7 Output Information F8 Input Information F9 Debug Information F10 Not used F11 Not used F12 No...

Page 39: ...counters as shown in Figure 3 39 QTL RND SCR 00000120 A 00 Figure 3 39 F4 Key function 3 7 5 F5 KEY Press F5 to access the following Engineer and Factory F5 Key functions as shown in Figure 3 40 QTL...

Page 40: ...Figure 3 42 QTL RND SCR 00000123 A 00 Figure 3 42 F7 Key function 3 7 8 F8 KEY Press F8 to view Input log information of mail pieces at the input of the machine as shown in Figure 3 43 QTL RND SCR 000...

Page 41: ...35 USER GUIDE DS 200iQ DS 600iQ 4 OPERATOR IMOS SETTINGS...

Page 42: ...Sorting Output Placement Output Settings Saving the Job When defining the Document BCR or OMR definitions can be optionally enabled NOTE To use a Barcode definition it must exist as part of the defin...

Page 43: ...ss Settings to define the envelope usage Seal mode as shown in Figure 4 3 QTL RND SCR 00000069 A 00 Figure 4 3 Defining the envelope usage 3 Select the required Seal mode from the list default set to...

Page 44: ...If the order is set to Manual documents are inserted in the order created in the job Document Order is not available when reading 4 2 2 CREATING A NEW ENVELOPE 1 To create a new envelope for the mails...

Page 45: ...e quantity of envelopes sealed before the wetter tank is topped up 8 Enter a Max pack thickness as required NOTE Max pack thickness 200iQ 6mm 600iQ 10mm 9 Press Save once the desired settings have bee...

Page 46: ...2 x adjacent hoppers from Versatile Feeders Maximum of 3 x mark reading hoppers from a Flex Folder Maximum of 4 x non reading hoppers from a Flex Folder QTL RND SCR 00000160 A 00 Figure 4 9 Cascading...

Page 47: ...Thickness Doubles Change default setting only if needed Off On auto On optical On mechanical NOTE The Flex Folder only has Off or On mechanical as an available setting for Thickness Doubles Feed Contr...

Page 48: ...ge the size will change to Custom 5 Make any other relevant settings as required 6 When entering the paper weight gsm the true weight g will automatically be calculated by default If required deselect...

Page 49: ...its string value with the string entered in Doc Id to confirm that the correct document type is used 13 Press Save once the desired settings have been made For further assistance on BCR definitions a...

Page 50: ...ce the desired settings have been made 4 4 FOLD SETTINGS The machine automatically selects the optimum fold type 1 To change the fold type deselect Auto Fold Type and select the required type from the...

Page 51: ...the desired settings have been made 4 4 1 ADVANCED FOLD SETTINGS 1 Press Edit Advanced as shown in Figure 4 17 for advanced fold settings QTL RND SCR 00000078 A 00 Figure 4 17 Accessing advanced fold...

Page 52: ...Undersize Handling Action of machine after diverting with the following options available Divert and Continue Divert and Stop Stop in Accumulator NOTE Not available if Split Oversized is set The foll...

Page 53: ...l Sorts Figure 4 18 shows the maximum configuration of 2 sorters and 3 output conveyors QTL RND GEN 00000090 A 00 Figure 4 18 Mail sorting configuration 4 5 1 POSTAL PRODUCT A Postal Product is a comp...

Page 54: ...sers with appropriate access rights can also create Postal Products following the same procedures from the Libraries within the Menu Screen 4 5 2 MAIL SORT SETTINGS A Mail sort is part of the Postal P...

Page 55: ...combinations of criteria some of which may overlap you can determine which has priority Figure 4 22 shows Weight Group 2 and Weight Group 3 both using Mail sort 2 It is possible to change the priority...

Page 56: ...TINGS Output settings control how certain outputs are used whether by an Output Conveyor Turner Franker Printer or a combination of these depending on the units installed and configured within IMOS ha...

Page 57: ...cted set the required Batch complete pause time that the machine will pause for 4 7 1 TURNER OUTPUT SETTINGS The following rotate envelope settings are available when an Turner is fitted with a Franki...

Page 58: ...then press Ok as shown in Figure 4 28 QTL RND SCR 00000087 A 00 Figure 4 28 Franker output settings 2 Finally select the Franking job from the list e g Current job 4 7 3 OUTPUT CONVEYOR SETTINGS The f...

Page 59: ...ngs dialog box NOTE The name entered must be the same as the column in the Flexmail database Mailshot sequential non reset Setting is the same as Mailshot sequential but if the machine is Autoended th...

Page 60: ...ic head mode to either On or Off 6 Press Next once the desired settings have been made 4 8 SAVING THE JOB 1 Enter a Job name and Job description using the on screen keypad as shown in Figure 4 33 QTL...

Page 61: ...ce If the job number and mail piece are valid then the inserter will continue to process the document mail piece Following successful processing IMOS will report back to AIMS and AIMS will then update...

Page 62: ...56 USER GUIDE DS 200iQ DS 600iQ 5 OPERATOR INSTRUCTIONS...

Page 63: ...e the loaded envelopes forward Adjustments to the envelope hopper side guides may be needed to suit the envelope size being processed 3 Use the adjustment wheel as shown in Figure 5 2 and adjust the s...

Page 64: ...ition once the desired adjustment has been made NOTE Once feeding begins the backstop should be left in its pulled back state and let the conveyor move the envelopes forward towards the pickup rollers...

Page 65: ...5 1 2 LOADING THE VERSATILE FEEDER HOPPER 1 To load the Versatile Feeder hopper first insert a single document or enclosure into the hopper 2 Loosen the backrest thumb screw knob and then slide the ba...

Page 66: ...ments or enclosures being processed are fed through correctly and centred 6 Re tighten the thumb screw knob once the desired adjustments have been made 5 1 2 1 VERSATILE FEEDER SEPARATOR ADJUSTMENT Ta...

Page 67: ...separator prevents more than one enclosure being fed at a time and can be adjusted using the adjustment knob located behind the versatile feeder hopper as shown in Figure 5 11 QTL RND OPS 00000117 A 0...

Page 68: ...Figure 5 12 and adjust the hopper guides by moving them inwards or outwards to an approximate clearance of 1 2mm on each side of the paper QTL RND OPS 00000119 A 00 Figure 5 12 Adjusting the 500 Shee...

Page 69: ...OPS 00000121 A 00 Figure 5 14 Adjusting the 1000 Sheet hopper guides NOTE The guides move in unison when being adjusted ensuring the paper forms being processed are fed through correctly and centred 2...

Page 70: ...64 Jun 2020 USER GUIDE 5 OPERATOR INSTRUCTIONS DS 200iQ DS 600iQ REV 00 5 1 3 3 READING ORIENTATIONS QTL RND GEN 00000101 A 00 Figure 5 16 UK and European Document Reading Orientations...

Page 71: ...65 Jun 2020 USER GUIDE 5 OPERATOR INSTRUCTIONS DS 200iQ DS 600iQ REV 00 QTL RND GEN 00000102 A 00 Figure 5 17 US Document Reading Orientations...

Page 72: ...66 Jun 2020 USER GUIDE 5 OPERATOR INSTRUCTIONS DS 200iQ DS 600iQ REV 00 5 1 3 4 NON READING ORIENTATIONS QTL RND GEN 00000103 A 00 Figure 5 18 UK and European Document Non Reading Orientations...

Page 73: ...67 Jun 2020 USER GUIDE 5 OPERATOR INSTRUCTIONS DS 200iQ DS 600iQ REV 00 QTL RND GEN 00000104 A 00 Figure 5 19 US Document Non Reading Orientations...

Page 74: ...ted together before folding as a group NOTE The side guide should just cover the indicator pre set size markings QTL RND OPS 00000123 A 00 Figure 5 20 Adjusting the Accumulator side guides NOTE The gu...

Page 75: ...r close the gap use the markers indicated in Figure 5 23 as a visual aid to help achieve the required setting QTL RND OPS 00000126 A 00 Figure 5 23 Adjusting the Flex Folder separator gap NOTE The sep...

Page 76: ...re 5 24 QTL RND OPS 00000127 A 00 Figure 5 24 Adjusting the curled paper guide 3 Adjust the thumb knobs upwards or downwards using the marker indicated in Figure 5 25 as a visual aid to help achieve t...

Page 77: ...d portrait orientated forms documents Always position the CIS Readers for both top and bottom reader fully to left or right side Do not position the reader in between as this can cause bad read errors...

Page 78: ...g the Insert Head perspex top cover 2 The paper control lever can be adjust according to the following Upwards towards exit For thick packs or if lightweight prime documents are struggling to get into...

Page 79: ...5 31 Adjusting the Insert Head catch tray 3 Re tighten the thumb screw knobs once the desired adjustments have been made 5 1 6 OUTPUT CONVEYOR BACKSTOP ADJUSTMENT To help envelopes feed onto the conve...

Page 80: ...e Output Conveyor rollers 3 Re tighten the thumb screw knobs once the desired adjustments have been made 5 1 7 OUTPUT CONVEYOR BACKREST ADJUSTMENT When the envelopes reach the end of the conveyor they...

Page 81: ...e envelope size being processed as shown in Figure 5 35 QTL RND OPS 00000137 A 00 Figure 5 35 Adjusting the Output Sorter catch tray 3 Re tighten the thumb screw knob once the desired adjustments have...

Page 82: ...djust the backstop so that the opposite edge of the envelope lies approximately 35mm from the datum side guide on the other side as shown in Figure 5 37 QTL RND OPS 00000139 A 00 Figure 5 37 Adjusting...

Page 83: ...ed tuning in the Run Screen GUI as shown in Figure 5 39 QTL RND SCR 00000097 A 00 Figure 5 39 Accessing Fine Tuning from the Run Screen Any fine tuning adjustments made will only apply to the current...

Page 84: ...al position of the envelope Select to adjust the position of the envelope further in towards the seal rollers in increments of 1mm Adjust Env Reverse Pos mm Adjusts the envelope forward travel after w...

Page 85: ...hanical or Auto Versatile Feeder only Optical Doubles Sensitivity Available only if On optical is selected Low is more tolerant of high contrast printing The following options are available only if a...

Page 86: ...Select Main to display the decoded CIS image as shown in Figure 5 44 QTL RND SCR 00000176 A 00 Figure 5 44 CIS image Scope Select Scope to check the OMR marks against the programmed pitch of the OMR...

Page 87: ...ent barcodes that were read as shown in Figure 5 46 QTL RND SCR 00000178 A 00 Figure 5 46 Diagnostic Data Matching Data If running a matching job select Matching Data to check and display a defined fi...

Page 88: ...de according to the job requirement prior to running the job see section 5 1 Setting up a Job for further assistance 5 3 1 SINGLE CYCLE 1 X PROCEDURE Before running a full job it is advisable to run a...

Page 89: ...Cascading must first be enabled in the document settings to be used for the selected job see section 4 2 3 Document Mailset for further assistance The following applies when using Cascading for a Fle...

Page 90: ...s an 80gsm sheet set the separator gap to 1mm 4 Press Run on the Run Screen to begin processing and feed the daily post into the hopper within 30 seconds after this press Run again 5 To disable the da...

Page 91: ...r divert sensor to feed document QTL RND SCR 00000103 A 00 Figure 5 54 Confirming the daily mail feed mode 5 Once the machine begins running feed the daily post fully into the accumulator within 30 se...

Page 92: ...86 USER GUIDE DS 200iQ DS 600iQ 6 OPERATOR MAINTENANCE...

Page 93: ...ervice and or maintenance may result in property damage and or serious bodily injury Ensure all safety information detailed in section 1 3 Safety including it s sub sections are read and understood in...

Page 94: ...ns power cable completely from the electrical power supply 6 1 1 CLEANING SENSORS The machine uses optical sensors to track the movement of mail pieces along the paper path and must be regularly clean...

Page 95: ...envelope hopper QTL RND OPS 00000145 A 00 Figure 6 3 Cleaning the envelope deskew sensor 5 Clean the collate pocket and collate entry sensors as shown in Figure 6 4 looking away from the envelope hopp...

Page 96: ...Clean the input conveyor sensors as shown in Figure 6 7 QTL RND OPS 00000147 A 00 Figure 6 7 Cleaning the input conveyor sensors 9 Lower the side cover then lift the overguide inside the closer cavit...

Page 97: ...RND OPS 00000150 A 00 Figure 6 11 Cleaning the envelope hopper sensor 13 Open the side cover then lower the front output cover below the envelope feeder as shown in Figure 6 12 QTL RND OPS 00000151 A...

Page 98: ...Feeder side cover as shown in Figure 6 14 to access from the side for sensor cleaning QTL RND OPS 00000153 A 00 Figure 6 14 Opening the Versatile Feeder side cover 3 Clean the module exit sensors show...

Page 99: ...OPS 00000157 A 00 Figure 6 18 Cleaning the track sensors MARK READING VERSATILE FEEDERS 1 Raise the Insert Head perspex top cover to access the first installed Versatile Feeder mark reading station fo...

Page 100: ...59 A 00 Figure 6 20 Opening the Flex Folder top cover 2 Insert the air duster under the chassis bridges to clean the sensors shown in Figure 6 21 QTL RND OPS 00000160 A 00 Figure 6 21 Cleaning the Fle...

Page 101: ...A 00 Figure 6 23 Raising the Output Sorter top cover 2 Clean the input sensor shown in Figure 6 24 QTL RND OPS 00000162 A 00 Figure 6 24 Cleaning the input sensor 3 Clean the output sensor shown in Fi...

Page 102: ...mplete surface of the conveyor belts may be required To clean the belts use a lint free cloth dampened with water This method will normally be sufficient however for more stubborn soiling the use of a...

Page 103: ...res set out below for the relating unit affected only 6 2 1 INSERT HEAD PAPER JAMS 1 Open the Insert Head side cover operator side and lower the front sealer cover as shown in Figure 6 29 QTL RND OPS...

Page 104: ...ad perspex top cover back down into it s original position Ensure only the jammed paper inside the collate pocket area is removed Removing the subsequent document being processed will result in an IMO...

Page 105: ...over 6 2 3 1 BASE UNIT PAPER JAMS 1 Raise and latch the transport assemblies No 1 No 2 and No 3 by pushing the levers indicated in Figure 6 34 QTL RND OPS 00000172 A 00 Figure 6 34 Raise and latching...

Page 106: ...knobs clockwise or anti clockwise to wind it into view 3 Pull the jammed paper out and lower the transport assembly and roller assembly back into their original position 4 Close the Flex Folder operat...

Page 107: ...d or changed in a similar way as follows 6 3 1 INSERT HEAD FEED TYRES AND PICKUP ROLLERS 1 To replace the Insert Head feed tyres on the envelope tractor assembly simply slip off the tyres as shown in...

Page 108: ...ler 4 Slide the spring loaded collar of the pickup roller assembly inwards to release the drive dog as shown in Figure 6 40 QTL RND OPS 00000264 A 00 Figure 6 40 Sliding the spring loaded collar to re...

Page 109: ...w knobs 2 Open the side guides to their widest extent 3 Lift the feed bed plate out of the chassis to access the feed shaft rollers beneath as shown in Figure 6 42 QTL RND OPS 00000176 A 00 Figure 6 4...

Page 110: ...feed bed ensure that the flat spot on the shaft is located on the operator side as shown in Figure 6 45 QTL RND OPS 00000271 A 00 Figure 6 45 Shaft flat spot located on the operator side This indicate...

Page 111: ...collar of the pickup roller assembly on the operator end inwards to release the drive dog as shown in Figure 6 47 or Figure 6 48 for lower 1000 Sheet hopper QTL RND OPS 00000265 A 00 Figure 6 47 Relea...

Page 112: ...kup rollers 3 Refit the removed hoppers once feed pickup roller replacement is complete 6 4 MAINTAINING THE WETTER SYSTEM The wetter system comprises of a tank which should be removed for cleaning at...

Page 113: ...the attached weight out of the reservoir bottle as shown in Figure 6 51 QTL RND OPS 00000178 A 00 Figure 6 51 Changing the reservoir bottle 3 Remove the empty reservoir bottle and replace with a new...

Page 114: ...108 USER GUIDE DS 200iQ DS 600iQ 7 TROUBLESHOOTING GUIDE...

Page 115: ...fully closed Fingers not inserting properly Check outer fingers are narrower than the envelope by 9 10m on each side but must be wider than the insert Reduce the side clearance if necessary See secti...

Page 116: ...nit Fine Tuning for further assistance 7 6 OUTPUT SORTER TURNER TROUBLESHOOTING Output Sorter Turner Troubleshooting Problem Suggested Cause and Curative Action Envelopes not franking Ensure Franking...

Page 117: ...111 USER GUIDE DS 200iQ DS 600iQ 8 TECHNICAL SPECIFICATIONS...

Page 118: ...t Conveyor 1600mm incl backrest 420mm Width 435mm Output Sorter 530mm Length 520mm Width 240mm Turner 900mm Length 360mm Width 250mm Unit Weights Insert Head 101Kg unpackaged 119Kg packaged Versatile...

Page 119: ...Rated current x rated volts x 3 412 e g 2464 BTU Hour for typical configuration of Insert Head 3 x Versatile Feeders 1 x Flex Folder Watts Rated current x rated volts e g 722W for typical configuratio...

Page 120: ...gh levels of static may be generated impairing machine performance The machine will function with humidity levels higher than 80 RH but moisture absorption into the material may impair machine perform...

Page 121: ...alculated as units per hour Document DS 200iQ DS 600iQ Accumulation Speed A4 unfolded documents 7 800 12 000 NOTE Figures calculated as units per hour When feeding from a non prime hopper i e hopper n...

Page 122: ...sm 28lbs bond Envelope Requirements Envelope to be of good quality machine fill type Dimensions and quality to be consistent across manufactured batches Side seams must be securely glued to the top of...

Page 123: ...117 Jun 2020 USER GUIDE 8 TECHNICAL SPECIFICATIONS DS 200iQ DS 600iQ REV 00 QTL RND GEN 00000094 A 00 Figure 8 2 Envelope specifications QTL RND GEN 00000095 A 00 Figure 8 3 Envelope specifications...

Page 124: ...m 35 8 for reading units Max 216mm 81 2 NOTE Max suggested width difference between inserts is 32mm 1 This may be increased subject to testing If this difference is exceeded the insertion fingers will...

Page 125: ...hown in the following Figure 8 5 Figure 8 6 and Figure 8 7 Single pod variations of either 1 x 1000 Sheet Hopper or 2 x 500 Sheet Hoppers are also available for the DS 200iQ only Contact your local Te...

Page 126: ...e this problem Paper Weight Min 70gsm 18lbs bond Max 120gsm 32lbs bond for folded documents 2mm thick for unfolded inserts subject to testing 2 5mm thick for Daily Mail subject to testing Folding Capa...

Page 127: ...ight NOTE C4 C5 with vertical windows will be turned Other sizes will pass unturned 8 6 1 COMPATIBLE FRANKING MACHINES IJ 80 IJ 90 and IJ 110 FM Base Conveyor or DS 200i Output Conveyor IS 5000 and IS...

Page 128: ...ading device may be optionally fitted to Versatile Feeders and Flex Folders It consists of a full portrait paper width unit capable of reading Barcodes 1D 2D and OMR marks 1 track 2 track with a maxim...

Page 129: ...123 USER GUIDE DS 200iQ DS 600iQ 9 DISPOSAL INSTRUCTIONS...

Page 130: ...arly certain materials and components of electrical waste and electronic equipment need selective treatment as their injudicious handling or disposing of on or into land water or air would represent a...

Reviews: