background image

Franking Machine

User Guide

IS-240/280

Summary of Contents for IS-240

Page 1: ...Franking Machine User Guide IS 240 280...

Page 2: ...9 4 2 Managing Credit 60 4 3 Unlocking the Meter Postal Inspection 63 5 Managing Accounts and Access Rights 65 5 1 Accounting and Access Rights Overview 67 5 2 Setting up Machine PIN Code 68 5 3 Selec...

Page 3: ...ories 136 9 10 Connection Settings 139 9 11 Time and Date Management 144 10 Options and Updates 145 10 1 Options and Updates Process 147 10 2 Using the Mailbox 148 10 3 Managing Options 150 10 4 Manag...

Page 4: ...utions and environ mental recommendations to operate your equipment in the best possible conditions 1 1 What you will find in this Manual 3 1 2 Safety Requirements 6 How to Disconnect your Mailing Sys...

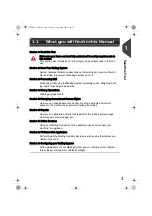
Page 5: ...Read this First 2 1 ALPHA1_UK book Page 2 Jeudi 6 septembre 2012 4 08 16...

Page 6: ...ney Operations Loading postage credit Section 5 Managing Accounts and Access Rights How you can change accounts as user or set up accounts and control access to the machine as supervisor Varies with m...

Page 7: ...gans Section 11 Maintaining your Mailing System Changing the ink cartridge and maintaining other system components Section 12 Troubleshooting What to do when a problem occurs poor printing etc Sectio...

Page 8: ...IP Advice to help save you time when processing your mail SUPERVISOR Indicates that you have to log in as supervisor Using the supervisor PIN to perform the procedure Postage functions of the Mailing...

Page 9: ...ween pieces of furniture or over sharp edges Make sure there is no strain on the Power Supply cord Avoid using outlets controlled by wall switches or shared by other equipment 1 2 Safety Requirements...

Page 10: ...ng of old mailing machines Please contribute to the protection of the environment by consulting Neopost Ltd for information about the collection and treatment of your machine when it reaches the end o...

Page 11: ...nts Ink PSD avoid using too much force to prevent personal injury or damaging equipment To prevent overheating do not block the equipment ventilation openings or try to stop internal fans Do not remov...

Page 12: ...ch the Mailing System to Sleep Mode See How to Switch to Sleep or Wake Mode p 22 if there is no emergency 2 Unplug the Power Supply from the wall plug Unplug the power supply cord only when the mailin...

Page 13: ...ning Do not install telephone jacks or LAN connectors in a wet location Disconnect the telephone or LAN cable from the wall before removing equipment To prevent damage to equipment do not mistake tele...

Page 14: ...ailing system in this section 2 1 System Layout 13 2 2 Control Panel Features 16 2 3 Connections 19 2 4 Power Management 21 How to Switch to Sleep or Wake Mode 22 2 Meet Your Mailing System ALPHA1_UK...

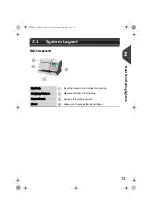
Page 15: ...Meet Your Mailing System 12 2 ALPHA1_UK book Page 12 Jeudi 6 septembre 2012 4 08 16...

Page 16: ...1 System Layout Mail Path Inserting location of envelopes for printing Weighing Platform Measures weight of mail pieces Control Panel Controls the mailing system Cover Allows you to access the ink ca...

Page 17: ...Cover Pull the upper left side corner to open the cover Ink cartridge Prints the postal imprint on envelopes See also Changing the Ink Cartridge p 168 Postal security device PSD Postage meter ALPHA1_U...

Page 18: ...ter can be directly connected to the mailing system for printing mailing related reports For more information about compatible printers that can connect to your mailing system please contact technical...

Page 19: ...ted when present Job memory Displays selected job memory when applicable Mailbox Indicates unread messages in message box Postage Indicates the amount to be printed on the imprint Rate and services In...

Page 20: ...ories Accesses preset imprint and account memories These presets are managed by the supervisor Credit Accesses credit management KEYPAD Alphanumeric keys Allows the entry of alpha or numeric values po...

Page 21: ...ng keys several times in a row Key Alpha numeric Custom text Modem settings 1 1 1 1 2 2ABCabc ABC2 2ABC 3 3DEFdef DEF3 3D 4 4GHIghi GHI4 4 5 5JKLjkl JKL5 5 6 6MNOmno MNO6 6 7 7PQRSpqrs PQRS7 7 8 8TUVt...

Page 22: ...SB ports that allow you to connect a PC Meter Link various modems optional a printer or memory devices 2 3 Connections Power connector To AC mains adaptor USB ports To peripherals see detail in next t...

Page 23: ...ptional To memory device To printer Square USB plug type B For PC Meter Link The machine can only use the LAN if the LAN is connected BEFORE power is plugged in Or before the machine leaves the Soft o...

Page 24: ...can change this default setting as supervisor You can also switch to a low power mode manually A very low power sleep mode called Soft off mode is also available This mode should only be used for long...

Page 25: ...e Low power mode Amber blinking The Mailing System is in Soft off mode Very low power mode 2 When switching to Soft off mode the machine may display a screen to schedule an automatic call Press OK to...

Page 26: ...How to Apply Postage Running Mail 38 How to Enter Postage Amount Manually Settings 40 How to Apply Postage Manually Entered Running Mail 42 3 4 Printing Received for Incoming Mail 43 How to Process I...

Page 27: ...Processing Mail 24 3 ALPHA1_UK book Page 24 Jeudi 6 septembre 2012 4 08 16...

Page 28: ...Normal type of imprint is selected at power up Home Screen and Configuration Menu Each Type of imprint is associated to a specific Home screen that displays current parameters weight postage Configura...

Page 29: ...as supervisor See also To set default values as supervisor see Configuring your Mailing System p 117 Type of process Type of imprint Parameters Apply postage to outgoing mail Normal Rate Weight Date...

Page 30: ...ion involves Sorting mail by type and task to make processing faster p 28 Logging into the system to start a work session p 29 Selecting the Type of imprint that corresponds to each set of mail p 31 F...

Page 31: ...ow to Sort Mail How to Sort Mail Make up mail stacks according to the following steps 1 Check the type of process to apply See table in Parameters of the Type of Imprint p 26 2 Check the account to us...

Page 32: ...ve to enter a PIN code Your work session ends when the system returns to Sleep Mode How to Log in and Start a Work Session How to Log in andStarta Work Session To log as User 1 Press to wake the syste...

Page 33: ...formation To end the session see How to Switch to Sleep or Wake Mode p 22 To choose the policy for accounting and access control as supervisor see Managing Accounts and Access Rights p 65 Find your ac...

Page 34: ...ent Type of Imprint How to Change theCurrent Type of Imprint Once you are logged 1 As User The Imprint screen is displayed 2 Press OK The Type of imprint screen is displayed 3 Select the type of impri...

Page 35: ...on the weighing plat form your home screen should display 0 g If _ g is displayed perform a rezero of the WP See How to Re Zero the Weighing Platform p 129 Is there enough ink in the cartridge To disp...

Page 36: ...eter settings and mail handling sequences for the mail processes that use the Normal type of imprint to apply postage using different rates About the Types of imprint see alsoThe different Types of Im...

Page 37: ...type of imprint The Home Screen indicates weight postage and currently selected rate as illustrated above 2 To change the type of imprint if you are not in Normal mode Press and type 1 to access the...

Page 38: ...ction Select Slogan Select a Slogan or None in the Select slogan screen For more details see How to Add or Cancel a Slogan on the Imprint p 54 To select an option in the screen Highlight the option us...

Page 39: ...Imprint p 51 Press or to return to the Home screen 4 Select a rate and services Press to open the Rate selection screen Type a rate number to select a rate or display new rate options Press 8 to selec...

Page 40: ...e default weighing type see Changing the default weighing type p 128 You can still enter the weight manually by pressing and select 1 or Manual weight entry If you need to change the current account b...

Page 41: ...e screen and the postage amount is updated 4 Insert the mail piece or a label into the system with the side to be printed facing upwards The Mailing System applies the imprint on the mail piece This i...

Page 42: ...printed facing upwards The Mailing System applies the imprint on the mail piece If a mail piece is bigger than mail path maximum thickness see Mail Specifications p 179 you may print on a label instea...

Page 43: ...y se lected rate as illustrated below 2 Check or change the type of imprint Press and type 1 to access the Imprint screen The type of imprint is indicated on line 2 of the screen To change the type of...

Page 44: ...he date or date format from the Imprint screen as follows Select Date Select a date option in the Date advance screen Select No date advance to print the current date For more details see How to Chang...

Page 45: ...Mail The postage amount is displayed on the home screen To print postage directly on mail pieces 1 Insert the mail piece or a label tape into the mail path against the rear guide wall with the side to...

Page 46: ...ings Required settings 1 Make sure you are on the Home Screen of the RCVD type of imprint The type of imprint is indicated at the top of the home screen as illustrated 2 To check or change the type of...

Page 47: ...current status of the options How to Process Received Mail Running Mail How to Process Received Mail Running Mail On the Received Home Screen 1 Insert the mail piece into the system with the side to b...

Page 48: ...ccounts How to Change Accounts To change accounts as User 1 Either The list of accounts is displayed 2 Select the desired account with Up and Down arrows then press OK 3 Press to return to the home sc...

Page 49: ...nd services in complete lists of options How to Select a Rate How to Select a Rate To select a rate 1 Either The Rate selection screen is displayed 2 On this screen you can Type a rate number 1 to 7 t...

Page 50: ...at you selected are displayed in a list including No services After you select a service any additional services available will be displayed Wizard Summary Screen Summary screen displays all the selec...

Page 51: ...icon on the screen indicates which type is active To change the weighing type See Details on the Weighing Types p 48 follow the procedure below How to Change the Weighing Type How to Change the Weighi...

Page 52: ...ght Manually How to Enter Weight Manually To enter the weight manually from the Home Screen 1 Either The Weighing type screen is displayed 2 Select Manual weight entry or type 1 The Manual weight entr...

Page 53: ...on menu of the type of imprint Press to return to the type of imprint home screen Changing the date on the imprint Advancing the Date The Date Advance function allows you to change the date printed on...

Page 54: ...e advance screen is displayed 3 On the Date Advance screen you can configure the printed date as follows To choose another day select the corresponding item in the list The icon indicates the current...

Page 55: ...o the imprint as illustrated below Imprint with slogan Imprint with ERA See also The supervisor manages the lists of the available ERAs and slogans See Managing ERAs p 154 and Managing Slogans p 152 Y...

Page 56: ...the list or None for printing no ERA The icon indicates the current selection 4 Press OK to validate your selection The Imprint screen is displayed with updated parameters Press and type 1 Or Select...

Page 57: ...rent selection 4 Press OK to validate your selection The Imprint screen is displayed with updated parameters Additional information The supervisor manages the lists of the available ERAs see Managing...

Page 58: ...e job memories list is displayed 2 Select a job memory in the list 3 Press OK to validate and apply memory parameters The job memory area Mem of the Home Screen displays the current job memory name If...

Page 59: ...Processing Mail 56 3 ALPHA1_UK book Page 56 Jeudi 6 septembre 2012 4 08 16...

Page 60: ...ng system to allow postage operations 4 1 Overview 59 4 2 Managing Credit 60 How to Check the Meter Credits 60 How to Add Credit to the Meter 61 4 3 Unlocking the Meter Postal Inspection 63 How to Unl...

Page 61: ...Money Operations 58 4 ALPHA1_UK book Page 58 Jeudi 6 septembre 2012 4 08 16...

Page 62: ...es through an Internet connection or the telephone line Tracking Credit You can generate reports on the use of the credit as all mailing operations in volving postage are recorded in the Mailing Syste...

Page 63: ...te your current task Use the following procedure to display remaining credit How to Check the Meter Credits How to Check the Meter Credits To check the credit in the machine 1 Either The Credit menu i...

Page 64: ...to the Meter To add credit to the Meter 1 Either 2 Select Credit or type 2 3 If the system asks for a PIN code enter the code using the keypad and press OK The Credit screen is displayed By default th...

Page 65: ...y actually add depending on your postal account balance 6 You can open the Credit information screen to check the new values see How to Check the Meter Credits p 60 See also As supervisor you can set...

Page 66: ...Postal Services 1 Either 2 Select Audit Or type 3 The system asks for confirmation 3 Press OK to connect to the Postal Services If the audit is successful the system displays a successful message and...

Page 67: ...Money Operations 64 4 ALPHA1_UK book Page 64 Jeudi 6 septembre 2012 4 08 16...

Page 68: ...te Access control and set the Machine PIN code 68 5 3 Selecting an Account Mode 69 5 4 Guidelines to Setup Account Modes 70 How to Change the Shared PIN Code 71 5 5 Selecting an Account Mode 74 How to...

Page 69: ...Managing Accounts and Access Rights 66 5 ALPHA1_UK book Page 66 Jeudi 6 septembre 2012 4 08 16...

Page 70: ...ge for information about reports see Reports p 79 Accounts from the User s Perspective If the Accounts function is activated users of the mailing system must select an account when starting their work...

Page 71: ...ne PIN code As supervisor See How to Log in as Supervisor p 120 1 Either The Access control screen is displayed 2 Select ON with up and down arrows A screen to set the Machine PIN code appears 3 Enter...

Page 72: ...see Accounting and Access Rights Overview p 67 The table below lists the account functional access control for each account mode 5 3 Selecting an Account Mode Access Control Function No Yes Accounting...

Page 73: ...to the machine Self service type This is the default mode in the machine Implementing No account Follow the procedure How to Display and Change the Account Mode p 74 Then select the No account mode No...

Page 74: ...he No account with access control mode 2 In the procedure enter the 4 digit shared PIN code the users will have to enter at log in No account with access control Management Menu In No Account with acc...

Page 75: ...p 74 and select the Account mode 2 Create accounts as indicated in How to Create an Account p 76 Account Mode Management Menu In Account mode the menu allows you to manage the accounts See also To add...

Page 76: ...2 Create accounts with PIN codes as indicated in How to Create an Account p 76 Account with PIN Code Mode Management Menu In Account with PIN code mode the menu allows you to manage the accounts You c...

Page 77: ...isor p 120 1 Either The Account Mode Selection screen is displayed In the screen the current Account mode is selected 2 Select another Account mode The system asks for a confirmation 3 Press OK to con...

Page 78: ...rt p 88 5 6 Managing the Accounts Account names must be unique within the system Param Format Description Number 11 numeric characters Number of the account Two accounts cannot have the same number An...

Page 79: ...Add Account 3 Using the keypad Enter Account Number 11 characters maximum and press OK Enter Account Name 32 characters maximum and press OK Select the account status active or inactive and press OK O...

Page 80: ...r The Account list screen is displayed 2 Select the account or type its number using the arrow keys Press OK 3 Select Edit Modify or type 1 The Edit Modify screen is displayed 4 Change each parameter...

Page 81: ...Edit Account Parameters p 77 2 Change the status parameter the button displays the current status active or inactive and press OK 3 On the Account modification summary screen press OK to validate the...

Page 82: ...ating Reports 83 How to Generate Reports User 83 How to Generate Reports Supervisor 84 6 3 Postage Data 85 6 4 Credit Data 86 6 5 Account Data 88 How to Generate the Account Report 88 6 6 System Data...

Page 83: ...Reports 80 6 ALPHA1_UK book Page 80 Jeudi 6 septembre 2012 4 08 16...

Page 84: ...e following table lists the available reports List of Reports Output on L Label Or Envelope S Screen P USB printer optional F USB memory device 6 1 Report Overview Advanced Reports are not available o...

Page 85: ...e configuration Supervisor settings imprint default data date advance postal services connec tions MMI ink cartridge weighing etc PF p 91 Base Errors PSD Errors Events listed for diagnostics with cust...

Page 86: ...ort type and press OK 4 Depending on the report type the system may ask for para meters such as Period of time targeted begin date end date Desired account etc Select or type the required parameters a...

Page 87: ...s Supervisor To generate a report as Supervisor See How to Log in as Su pervisor p 120 1 Either 2 Carry out the following steps according to How to Generate Reports User Press and type 2 Or Select the...

Page 88: ...in 1st day of the current month End current day You can specify another End date but the maximum is Begin date 31 days Output Screen External printer if installed USB memory device See also Generating...

Page 89: ...Current date and time Printed report only Meter status Printed report only Die number Printed report only Credit used ascending Total postage printed by the machine Credit available descending Postag...

Page 90: ...Outputs Screen External printer if installed USB memory device See also Generating Reports p 83 Fields Comments Period Default period Begin Current date 6 months End Current date Die number On printe...

Page 91: ...isor Outputs External printer if installed USB memory device How to Generate the Account Report HowtoGenerate the Account Report To generate the report 1 As supervisor See How to Log in as Supervisor...

Page 92: ...rrent date Requirements The current account mode has to be Accounts or Accounts with PIN code see Managing Accounts and Access Rights p 65 Outputs Screen For other outputs see Multi Account Report p 9...

Page 93: ...5 You have to specify the period for the report Begin and End dates Default period Begin 1st day of current month End current date Outputs USB printer if installed USB memory device See also Generatin...

Page 94: ...erating Reports p 83 6 6 System Data Fields Imprint default settings Default ERA Default Ad die Default Rate Date advance parameters Credit settings High value Low Credit Connections settings phone nu...

Page 95: ...onal USB Key See also Generating Reports p 83 If you use screen to see this report Scroll the errors using the arrow keys and Press if you want to go back to the selection of the out put Fields Commen...

Page 96: ...tional USB Key See also Generating Reports p 83 If you use screen to see this report Scroll the errors using the arrow keys and Press if you want to go back to the selection of the out put Fields Comm...

Page 97: ...be connected to the network with a modem or LAN Output The IP Configuration Report outputs are Screen USB printer USB memory device How to Generate a IP Configuration Report HowtoGenerate a IP Configu...

Page 98: ...gged in as a supervisor Output The Proxy Configuration report output is Label How to Generate a Proxy Configuration Report HowtoGenerate a Proxy Configuration Report To generate a Proxy Configuration...

Page 99: ...Reports 96 6 ALPHA1_UK book Page 96 Jeudi 6 septembre 2012 4 08 16...

Page 100: ...ne Services Overview 99 7 2 Connecting to Online Services 100 How to Call Online Services Manually 101 How to Call Online Services Manually 101 How to Test the Connection to Online Services 103 7 3 Up...

Page 101: ...Online Services 98 7 ALPHA1_UK book Page 98 Jeudi 6 septembre 2012 4 08 16...

Page 102: ...order Remote diagnostics and technical support experienced technical professionals analyze your mailing machine s error logs diagnose your mailing machine before an on site service visit and your syst...

Page 103: ...uled to upload corre sponding data For the Reports service the mailing system automatically connects at the end of each month to upload accounting and postal category statistics For the Ink Management...

Page 104: ...ices Manually How to Call Online Services Manually To trigger a generic call as Supervisor See How to Log in as Supervisor p 120 1 Either The Mailing System connects to the server and downloads the av...

Page 105: ...a ping command This test Validates connection parameters see Connection Settings p 139 Indicates that the LAN is functional Indicates that the modem optional is functional Indicates that the server c...

Page 106: ...2 Logged as Supervisor See How to Log in as Supervisor p 120 The call process starts and displays its sequence of ope rations on the screen Press and type 9 1 Or Select the path Online Services Ping s...

Page 107: ...to Upload Report Data to the Services Server In the Supervisor Mode 1 See How to Log in as Supervisor p 120 The call to the server is triggered 7 3 Uploading Statistics Your system uploads basic stati...

Page 108: ...ate Protection ensures that the latest postal rates are installed on your mailing system When the Postal Service announce changes in their rate and fee schedule the Online Services server downloads th...

Page 109: ...number of accounts How to check your number of accounts 1 As Supervisor See How to Log in as Supervisor p 120 The Options list screen is displayed order may differ from the picture below Here Acc 0 m...

Page 110: ...application functionalitites 8 1 PC Meter Link Application Overview 109 8 2 Credit Management 111 8 3 Online Services 112 8 4 Support 113 8 5 Configure Alerts 114 8 6 Maintenance 115 8 PC Meter Link...

Page 111: ...PC Meter Link Application 108 8 ALPHA1_UK book Page 108 Jeudi 6 septembre 2012 4 08 16...

Page 112: ...servers When the connection to the Mailing System is available all the PC Meter Link appli cation menu on your screen are accessible 8 1 PC Meter Link Application Overview To use the PC Meter Link ap...

Page 113: ...status of connection appears in the System Tray with the following pictograms to notify an alert a warning an error to notify that all connections are available to notify that at least one connection...

Page 114: ...it 1 Click on Add credit A dialog box pops up 2 Type credit amount you want to add 3 Validate the amount withOK A dialog box pops up to check the value entered 4 Validate the value with OK else click...

Page 115: ...ervices This section describes functions related to calls for Online Services The Online Sevices screen allows you to Call OLS Server Upload statistics to the server 8 3 Online Services ALPHA1_UK book...

Page 116: ...t It also gives access to the Mailing System user guide The Support screen allows you to Access the customer knowledge base Online Support Download the Mailing System User Guide Check the latest PC Me...

Page 117: ...the settings of the PC Meter Link application that you can manually modify The Configure Alerts screen allows you to be notified of A scheduled server connection Alert A missed server connection 8 5...

Page 118: ...iagnostics software download etc The Maintenance screen allows you to Resynchronize your Mailing System with OLS Backup settings to save your Mailing System settings Update your Mailing System softwar...

Page 119: ...PC Meter Link Application 116 8 ALPHA1_UK book Page 116 Jeudi 6 septembre 2012 4 08 16...

Page 120: ...t Supervisor 123 How to Change the Soft off timeout Supervisor 124 9 5 Credit Warnings 125 How to Set the High Value Warning Amount 125 How to Set the Low Credit Threshold 126 9 6 Credit PIN Code 127...

Page 121: ...ine Services Connection 140 How to Set LAN High speed Internet Parameters 141 How to Set PC Meter Link Parameters 142 How to Set the Analog Modem Parameters 143 9 11 Time and Date Management 144 How t...

Page 122: ...ther functions such as managing accounts and access rights generating certain reports etc The supervisor settings allow you to Change the default user settings Modify system sleep modes time outs Set...

Page 123: ...gin screen is displayed 2 Type the supervisor PIN code and press OK The supervisor Main menu is displayed Exiting the Supervisor Mode Follow the procedure below to exit the supervisor mode This is nec...

Page 124: ...sions you can set the default display contrast How to Change the Display Contrast by Default How to Change the Display Contrast by Default To change the display contrast by default logged as Superviso...

Page 125: ...mode These modes are described in section Power Management p 21 How to Change the Sleep timeout User How to Change the Sleep timeout User To change the Sleep time out logged as User 1 Either The Sleep...

Page 126: ...p time out Supervisor How to Change the Sleep time out Supervisor To change the Sleep time out logged as Supervisor See How to Log in as Supervisor p 120 1 Either The Sleep timeout screen is displayed...

Page 127: ...Supervisor See How to Log in as Supervisor p 120 1 Either The Soft off timeout screen is displayed 2 Enter the new value in hours of the soft off time out 3 Press OK to validate The Time out settings...

Page 128: ...t remaining in the Meter is getting low low credit threshold High value How to Set the High Value Warning Amount How to Set the High Value Warning Amount To set a high value warning amount logged as S...

Page 129: ...logged as Supervisor See How to Log in as Supervisor p 120 1 Either 2 Enter the low credit warning amount Or If you want to disable the warning function press C and enter 0 as amount 3 Press OK to va...

Page 130: ...IN Code How to Set Cancel a Credit PIN Code To set a crediting PIN code logged as Supervisor See How to Log in as Supervisor p 120 1 Either 2 Enable or disable the PIN code 3 Enter the crediting PIN c...

Page 131: ...il piece with the Weighing Platform Manual Weight Entry to enter manually a weight value How to change the default weighing type How to change the default weighing type To change the default weighing...

Page 132: ...r 2 Remove all items from the Weighing Platform 3 Press OK to set to zero the Weighing Platform How to Re Zero the Weighing Platform How to Re Zero the Weighing Platform To re zero the Weighing Platfo...

Page 133: ...teps below How to Change the GEO Code How to Change the GEO Code To change the GEO code as Supervisor See How to Log in as Supervisor p 120 1 Either 2 See the map and table on the next pages to get th...

Page 134: ...Configuring your Mailing System 131 9 Figure 1 Latitudes ALPHA1_UK book Page 131 Jeudi 6 septembre 2012 4 08 16...

Page 135: ...Configuring your Mailing System 132 9 Figure 2 GEO codes from latitude and altitude ALPHA1_UK book Page 132 Jeudi 6 septembre 2012 4 08 16...

Page 136: ...vation De activation of Automatic Date Advance On list screens a mark indicates the default parameter How to Change the Default Rate How to Change the Default Rate To change the default rate logged as...

Page 137: ...ange the Default Slogan To change the default slogan logged as Supervisor See How to Log in as Supervisor p 120 1 Either 2 Select the default slogan from the list or None for no slogan 3 Press OK to v...

Page 138: ...ays logged as Su pervisor See How to Log in as Supervisor p 120 1 Either The Automatic date advance setting screen is displayed The second line of the screen indicates whether the function is active o...

Page 139: ...d delete the Job Memories Each Job Memory is identified by a name and a number The system displays the name of the currently used Job Memory on the home screen Job Memory Content The table below gives...

Page 140: ...yed in the Job Me mories screen 2 Select a line named None in the list 3 Press OK to create a new job memory 4 Enter the name of the new job memory then press OK 5 Select parameters and press OK to va...

Page 141: ...lect the parameters then press OK to modify the parameters 6 Press to quit How to Delete a Job Memory How to Delete a Job Memory To delete a Job memory logged as Supervisor See How to Log in as Superv...

Page 142: ...e line through a Modem optional PC Meter Link Modem optional use USB ports of the Mailing System First use the procedure below to select a connection then configure the connection See also To physical...

Page 143: ...select LAN and press Ok or type 2 To use an analogue telephone line modem optional select Modem and press Ok or type 1 3 For further settings see For PC Meter Link How to Set PC Meter Link Parameters...

Page 144: ...d as Supervisor See How to Log in as Supervisor p 120 1 Either The LAN configuration menu is displayed 2 Select Auto to automatically configure the LAN recom mended Otherwise select Manual to set para...

Page 145: ...parameters of the PC Meter Link 1 See PC Meter Link Application p 107 Make sure the PC Meter Link application is installed on your PC before selecting the PC Meter Link connection type see the instal...

Page 146: ...log Modem Parameters To set the parameters of the modem as Supervisor See How to Log in as Supervisor p 120 1 Either 2 In the screens that are displayed next enter the parameters as required and press...

Page 147: ...date However you can ask the machine to check the current time and date and display them See also Automatic Date Advance p 135 How to Check the Machine Time and Date How to Check the Machine Time and...

Page 148: ...o Delete your Messages 149 10 3 Managing Options 150 How to Display the Options 150 How to Load New Options 151 10 4 Managing Slogans 152 How to Display the List of Slogans 152 How to Modify or Delete...

Page 149: ...Options and Updates 146 10 ALPHA1_UK book Page 146 Jeudi 6 septembre 2012 4 08 16...

Page 150: ...to Access the Options and Updates Menu How to Access the Options and Updates Menu To access to the Options and Updates Menu logged as Supervisor See How to Log in as Supervisor p 120 1 Either The Opt...

Page 151: ...1 Either The Mail box screen is displayed 2 Select the message to read and press OK 3 Select Open to read the message How to Read your Messages How to Read your Messages To read your Messages logged...

Page 152: ...te message to erase the message How to Delete your Messages How to Delete your Messages To delete your Messages logged as Supervisor See How to Log in as Supervisor p 120 1 Either The Mailbox screen i...

Page 153: ...Display the Options To display the option list logged as Supervisor See How to Log in as Supervisor p 120 1 Either The Options list screen is displayed 2 To display the details of an option select the...

Page 154: ...he Online Services server 1 Check that your Mailing System is connected to a network or a telephone line see Connections p 19 Also verify that the connection is properly configured See Connection Sett...

Page 155: ...d default slogan See also How to Change the Default Slogan p 134 How to Display the List of Slogans How to Display the List of Slogans To display the list of slogans logged as Supervisor See How to Lo...

Page 156: ...2 Change the slogan name using the keypad and press OK The system updates the slogan list To delete the slogan 1 Select Delete The system asks for a confirmation 2 Press OK to confirm deletion The sys...

Page 157: ...es the ERA that is printed by default if any If None is ticked no ERA is printed by default Users can change the current ERA during their work session How to Display the List of ERAs How to Display th...

Page 158: ...an ERA 1 Display the list of ERAs See How to Display the List of ERAs p 154 2 Select an ERA and select Edit Del The Edit ERA menu is displayed To change the name of the ERA 1 Type 1 or select Edit 2 C...

Page 159: ...Rate Updates How to Check the Rate Updates To display the list of rate tables logged as Supervisor See How to Log in as Supervisor p 120 1 Either The list of rate tables is displayed in the Rate mana...

Page 160: ...w Postal Rates How to Download New Postal Rates To download new rates 1 Display the list of rate tables see How to Check the Rate Updates p 156 above 2 Select Check for updates and press OK The Mailin...

Page 161: ...software download is available To open your mailbox see p 148 Apply the following procedure to update your mailing system How to Update the System Software How to Update the System Software To update...

Page 162: ...see Connections p 19 After restarting the Mailing System calls the server to confirm installation The mailing system is ready for use with the new software This call does not occur when using the PC M...

Page 163: ...Options and Updates 160 10 ALPHA1_UK book Page 160 Jeudi 6 septembre 2012 4 08 16...

Page 164: ...ridge Data 164 How to Display Ink Level and Cartridge Data 164 How to Align the Print Heads 165 How to Clean the Printing Head Automatically 167 How to Clean the Printing Head Automatically 167 How to...

Page 165: ...Maintaining your Mailing System 162 11 ALPHA1_UK book Page 162 Jeudi 6 septembre 2012 4 08 16...

Page 166: ...artridge printing head has to be mechanically aligned An alignment process is provided p 165 When there is no more ink indicated in the cartridge you have to change the cartridge as indicated p 168 In...

Page 167: ...nformation screen is displayed How to Display Ink Level and Cartridge Data How to Display Ink Level and Cartridge Data To display the Ink Level and the Cartridge Data logged as Su pervisor See How to...

Page 168: ...eads How to Align the Print Heads To align the print heads logged as Supervisor See How to Log in as Supervisor p 120 1 Either The following screen is displayed The machine requires you to align the p...

Page 169: ...et alignment screen is displayed 3 Observe the pattern and use the Up Down keys to select the letter that corresponds to the straightest and complete vertical line here F 4 Press OK to validate 5 Pres...

Page 170: ...d Automatically To clean the printing head automatically logged as Supervisor See How to Log in as Supervisor p 120 1 Either The cleaning starts automatically Manual Cleaning If automatic cleaning is...

Page 171: ...moves to the replacement position and the following message is displayed 2 Open the cover by pulling it towards you from the top left 3 Pull on the left side of the blue lever to unlock the cartridge...

Page 172: ...disengage it 5 Remove the protective strips from the new ink car tridge 6 Insert the new ink cartridge and then push it forward until it stops 7 Put the blue lever back into place 8 Close the cover 9...

Page 173: ...og in as Supervisor p 120 1 Either A confirmation message is displayed 2 Press OK 3 Select Update registration or type 4 4 Connect your USB memory device and press OK 5 Select the new town die and pre...

Page 174: ...ing Problems 173 12 2 Diagnostics and System Data 174 How to Access the Diagnostic Function 174 How to Display the Software Data 175 How to Display Hardware Data 175 How to Display the Error Lists 176...

Page 175: ...Troubleshooting 172 12 ALPHA1_UK book Page 172 Jeudi 6 septembre 2012 4 08 16...

Page 176: ...n the weighing area Use a solid and steady table Far from any door or window Far from any fan Something is touching or laying on the weighing platform Clear the weighing zone and re zero the weighing...

Page 177: ...iagnostic tests then displays the list of the tests 12 2 Diagnostics and System Data No Diagnostic Comments 1 Ping server Sends a message to a server if connected to check the line 2 Base sensors Repo...

Page 178: ...To display the Software Data logged as Supervisor See How to Log in as Supervisor p 120 1 Either 2 The system displays the data about the software How to Display Hardware Data How to Display Hardware...

Page 179: ...rors displayed items are The Code of the error The Date when the error happened The Cycles count when the error occurred For Server Connection History displayed items are The Date The Information 6 No...

Page 180: ...tions contains the main specifications of your mailing system 13 1 Mail Specifications 179 13 2 General Specifications 180 13 3 Weighing Platform 181 13 Specifications ALPHA1_UK book Page 177 Jeudi 6...

Page 181: ...Specifications 178 13 ALPHA1_UK book Page 178 Jeudi 6 septembre 2012 4 08 16...

Page 182: ...eristics Envelope Dimensions Your Mailing System can handle envelope flap sizes as illustrated below note the illustration is not drawn to scale Envelope Thickness 13 1 Mail Specifications Min 0 2 mm...

Page 183: ...x Height 225 mm x 316 mm x 194 mm Weight 3 8 kg Power Frequency 50 Hz Max current rating full configuration 0 2 A Power supply 230 V 10 2 poles with EARTHED circuit Up to standards NFC15 100 13 2 Gene...

Page 184: ...Specifications 181 13 Weighing Platform Max capacity 2 kg 13 3 Weighing Platform ALPHA1_UK book Page 181 Jeudi 6 septembre 2012 4 08 16...

Page 185: ...Specifications 182 13 ALPHA1_UK book Page 182 Jeudi 6 septembre 2012 4 08 16...

Page 186: ...40 Envelope Dimensions 179 I Ink cartridge 14 Ink 32 Ink Cartridge 163 168 Ink Level 164 Ink Management 105 J Job Memories 55 136 Job memory 16 M Machine PIN code 67 68 Mail Path 13 Mailbox 16 148 Ma...

Page 187: ...gan 16 152 Sorting Mail 28 Specifications 180 Standard weighing 39 Supervisor 120 Synchronizing Call 102 T Type of Imprint 31 W Weighing Platform 13 Weighing mode 16 Work Session 29 ALPHA1_UK book Pag...

Page 188: ...4146368H G 27 11 2019...

Reviews: