The Basemate Easy Connect™ fits most extension and multi-way ladders. The Easy
Connect clamp system allows the user to attach and remove the Basemate Easy
Connect™ in seconds without the need to modify the ladder. This provides the ability
to move the Basemate from one ladder to another or to remove it when not required.
STEP ONE
:
Attaching the Basemate Easy Connect™ arch to the clamps
The
orientation of the Basemate is essential for safe operation. Look for the logo stamped
on the top of the Basemate arch. The
reflective markings
on the Easy Connect
clamps should facing up when the arrows on the stamp are facing down. The Easy
Connect clamps attach to the sliding brackets on the arch using a bolt and a locking
nut. Insert the bolt in the same direction as the arrows on the arch. Tighten nuts until
they begin to compress the brackets and then loosen by ¼
"
turn. This will allow the
Easy Connect clamp brackets to rotate as necessary in the brackets.
STEP TWO
:
Attaching the Basemate Easy Connect™ to a Ladder
Place your ladder on a pair of sawhorses, a workbench, or other raised surface. The
ladder should be orientated with the climbing side (front side) down. The Easy Connect
clamps attach to the
lowest two rungs
of the ladder.
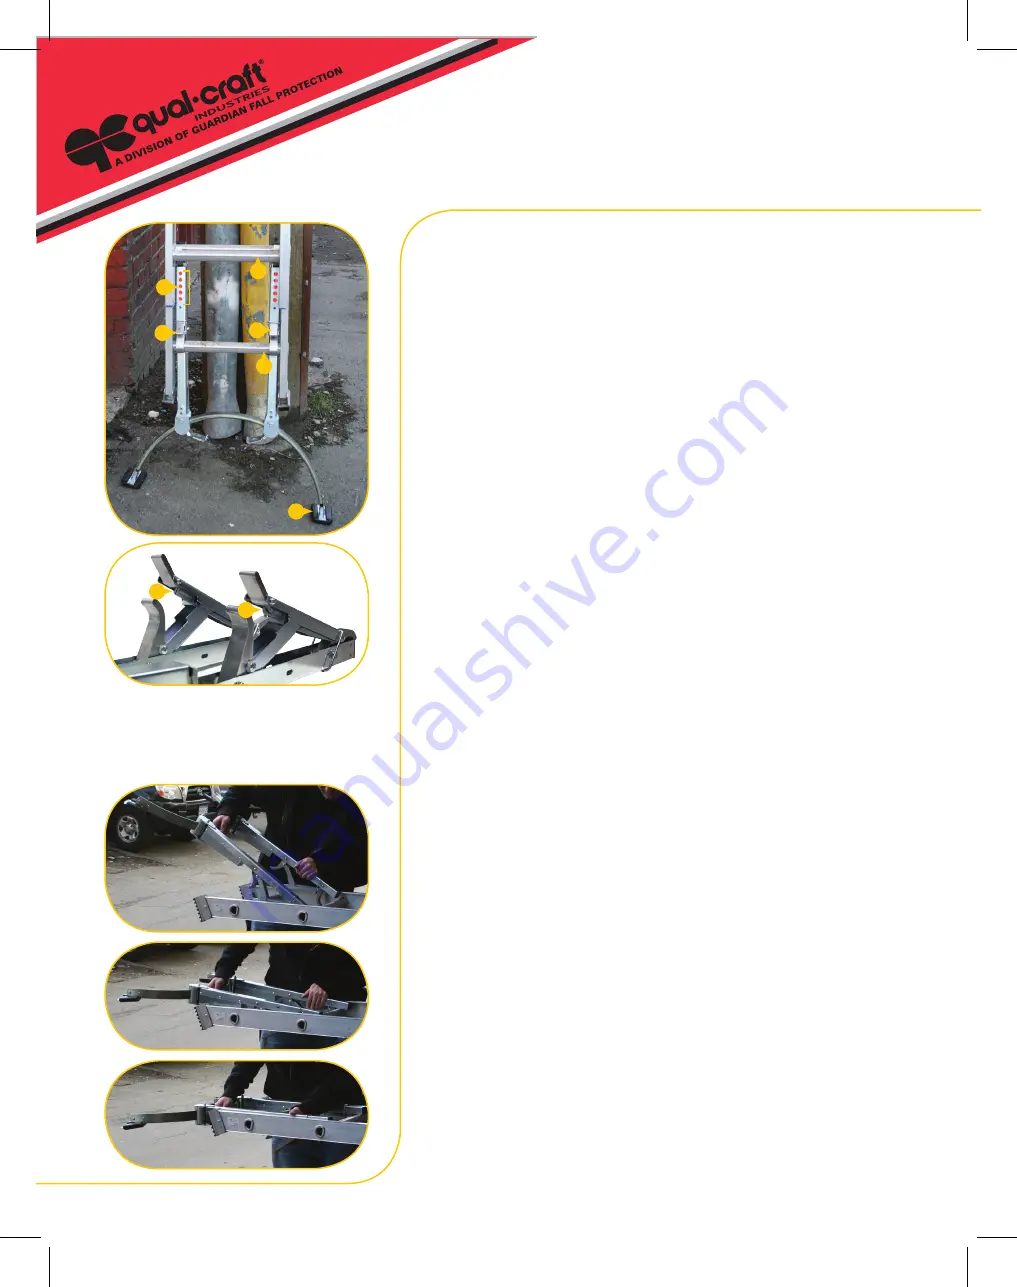
A) Open the clamps by pulling up on the
release lever
.
B) Position the clamps over the rungs of the ladder with the reflective material facing
down and test the clamping pressure by closing the clamps on the rungs.
Each clamp should also be placed as close to the side of ladder rails as possible.
They should be close enough to allow the ladder rings to slide up and down.
(See top left picture for reference)
C) The
adjustment screws
are located under each top arm. Tighten the clamps by
rotating clockwise, or loosen the clamps by rotating the screw counter-clockwise.
D) The clamps should grip tightly when compressed and should not slide along the
ladder rungs with moderate pressure. You should feel and hear a click when the
clamps lock into position.
E) Slide the
locking rings
down to prevent the clamps from springing open. Your
ladder is now ready to use.
STEP THREE: Leveling a Ladder with Basemate Easy Connect™
Hold the ladder in a vertical position and allow its full weight to rest on the foot on the
highest side of where you want the ladder to rest. Depress the leveling pedal closest to
the high side and allow the ladder’s weight to level the base while holding the ladder in
a vertical position. Fine adjustments can be made by depressing the right pedal to slide
the ladder to the right side of the arch or vice versa. Use the level vials built in to the
Easy Connect clamps to ensure the ladder is vertical.
STEP FOUR:
Setting the Ice Pick Feet
The
ice pick feet
on the Basemate Easy Connect™ can be folded up so the metal
edge can dig into hard slippery surfaces for added traction. The feet should be left
rubber side down on soft surfaces to prevent the ladder from settling.
STEP FIVE
:
Removal
To safely remove the Basemate Easy Connect™ from the ladder, simply reverse the
instructions shown in step two.
WARNING
Do not modify the Basemate Easy Connect™ in any way or use other than as directed above.
Always follow the ladder manufacturer’s usage guidelines and instructions.
Basemate Easy Connect
™
Installation Instructions
1. Reflective markings to front
2. Locking ring - must slide down to secure the clamps
3. Ice grip on feet facing away
4. Release lever
5. Lowest rung
6. Second rung
7. Adjustment screws
2.
1.
3.
4.
5.
6.
7.
7.
Qual-Craft
®
Industries,
A Division of Guardian Fall Protection
60 Maple Street, Mansfield, MA 02048 • www.qualcraft.com www.guardianfall.com
Roof Brackets • Shingle Removers • Safety • Ladder Accessories
Job-Site Cleanup • Pump Jacks • Portable Scaffolding
Made in China
Model #2475


