background image

First steps

First dreams

Quax

®

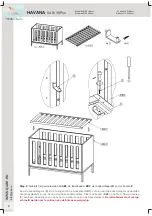
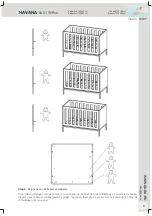
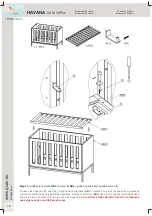
Het is belangrijk de bedbodem goed vast te maken aan de bedstructuur
Il est important que le sommier soit bien fi xé à la structure du lit 
Es ist wichtig dass den Boden gut an den Bettstruktur befestigt ist
It is important to attach the mattress support to the structure of the bed

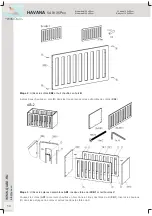
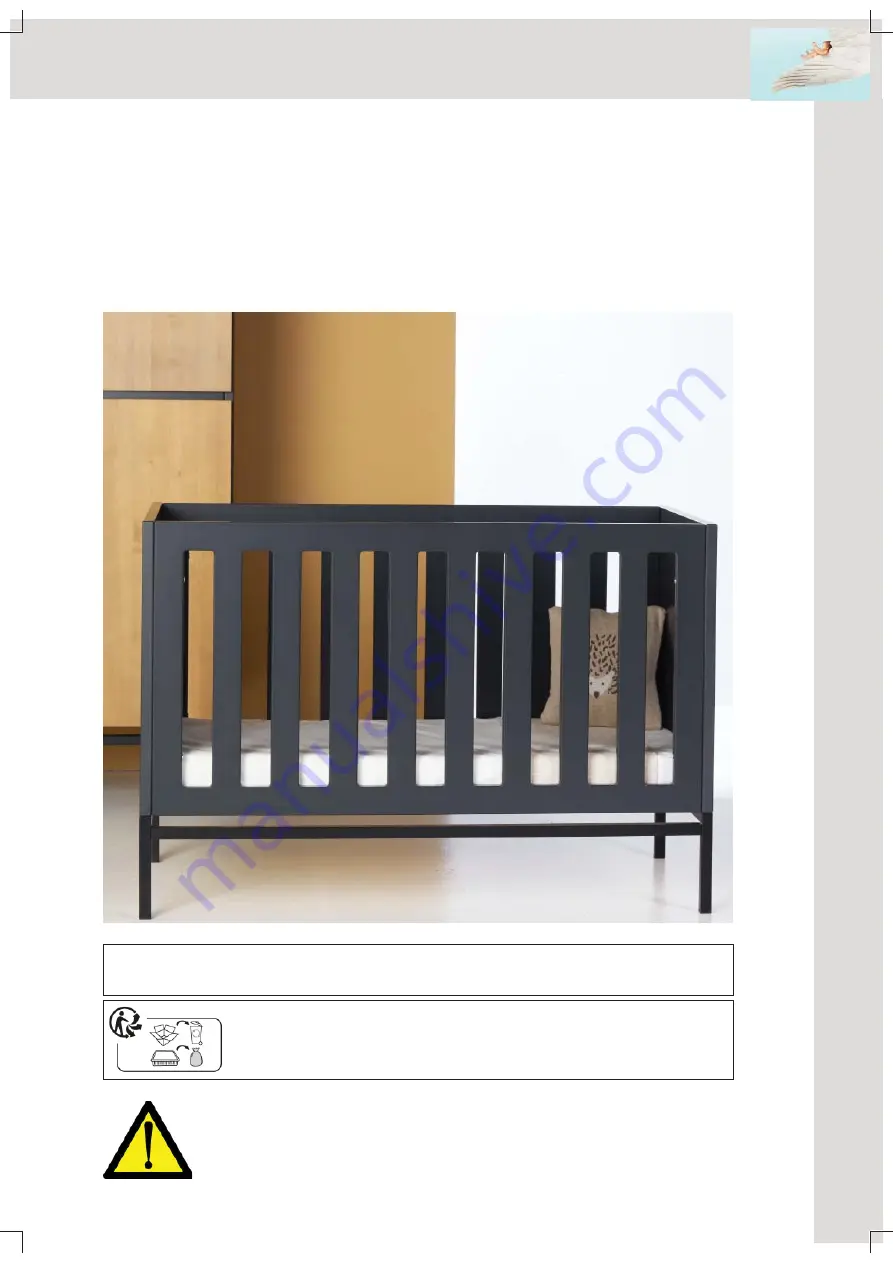
Handboek - Manuel - Bauanleitung - Manual

V1.0 Jun 2018

Tested by Notifi ed Bodies

For children who cannot climb out the bed by themselves

Nederlands : pagina 2

Français : page 10

Deutsch : 18

English : page 26

          EN 716:2017

Répond aux exigences de sécurité

Meets the safety prescriptions

V

oldoet aan de veiligheidsvoorschriften

Entspricht den beschriebenen Sicherheitsvorschriften
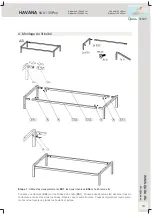
HAVANA


54 01 35Pxx

Lit bébé 120x60 cm

Baby cot 120x60 cm

Kinderbed 120x60 cm
Kinderbett 120x60 cm

Summary of Contents for HAVANA 54 01 35P Series

Page 1: ...he structure of the bed Handboek Manuel Bauanleitung Manual V1 0 Jun 2018 Tested by Notified Bodies For children who cannot climb out the bed by themselves Nederlands pagina 2 Fran ais page 10 Deutsch...

Page 2: ...zodanig moet zijn dat af stand tussen de bovenkant van de matras en de bovenzijde van de bedrand minimaal 500 mm in de laagste stand en minimaal 200 mm in de hoogste stand bedraagt Deze laatste wordt...

Page 3: ...N 71 3 voor grond en eindlak Gewicht 41 kg Beschikbare kleuren xx zie www quaxpro eu Verstelbare bodemhoogtes 26 35 en 48 cm Garantie Dit meubel wordt twee jaar lang gewaarborgd op fabricagefouten en...

Page 4: ...elbare bodem KInderbett mit verstelbarer Boden Quax First dreams First steps 3 Onderdelenlijst Controleer of je alle hieronder vermelde onderdelen terugvindt in de verpakking www quax eu info quax eu...

Page 5: ...acht bouten A Duw een dwarsbalk ES2 op de flenzen in een onderstel ES1 Duw twee bouten A in de boringen van de dwarsbalk en draai vast in de flenzen Herhaal met de andere dwarsbalk Duw nu het andere o...

Page 6: ...outen drevels in de boringen van de eindzijden EB1 Duw de bouten C doorheen de boringen in de zijkaders en draai ze vast in de eindzijden Stap 2 Gebruik beide zijkanten EB2 en acht houten drevels B Du...

Page 7: ...oeren F en zes bouten G Duw de cylindrische moeren F in de boringen onderaan de binnenkant van de eindzijden Plaats de bovenbouw op de boringen van het onderstel Duw de bouten G door deze boringen en...

Page 8: ...en AB3 Let erop dat alle bodemdragers op dezelfde hoogte geplaatst zijn van de drie mogelijke bodemposities Plaats de bodem EB3 in het bed Duw de bouten E doorheen de boringen van de bodem en draai ze...

Page 9: ...bindingen met de bouten C een beetje los Schroef de bodem EB3 los en verplaats de bodem dragers naar andere voorziene gaten op gelijke hoogte Herbevestig de bodem met de bouten E en draai de verbindin...

Page 10: ...du matelas jusqu la partie sup rieure du cadre du lit soit au moins 500 mm dans la position la plus basse du sommier et au moins 200 mm dans la position la plus haute Cette derni re indiqu e par le m...

Page 11: ...e finition Poids 41 kg Coloris disponibles xx check www quaxpro eu Hauteurs r glables du fond 26 35 et 48 cm Garantie Ce meuble b n ficie d une garantie de deux ans contre tout d faut de fabrication e...

Page 12: ...fgitter mit verstelbarer Boden Quax Quax First dreams First steps 3 Liste des pi ces d tach es Contr lez si vous retrouvez dans l emballage toutes les pi ces d tach es mentionn es ci dessous www quax...

Page 13: ...rbed 120x60 cm Kinderbett 120x60 cm Etape 1 Utilisez les deux pi tements ES1 les deux traverses ES2 et huit boulons A Poussez une traverse ES2 sur les brides d un cadre ES1 Poussez deux boulons A dans...

Page 14: ...s assembl es AB1 les deux t tes de lit EB1 et huit boulons C Poussez les c t s AB1 avec leurs chevilles en bois dans les trous des t tes de lit EB1 Ins rez les boulons C dans les per ages des c t s et...

Page 15: ...derbett 120x60 cm Etape 4 Utilisez les pi ces assembl es AB2 et AS six crous cylindriques F et six boulons G Poussez les crous cylindriques F dans les per ages situ s en bas de l int rieur des t tes d...

Page 16: ...mmier EB3 quatre querres D et quatre boulons E Poussez les querres D dans les per ages des extr mit s AB3 Veuillez que tous les querres sont plac s la m me hauteur des trois positions possibles Ins re...

Page 17: ...x60 cm Kinderbett 120x60 cm Etape 6 Changer la position du sommier D serrez l g rement toutes les connexions avec les boulons C D vissez le sommier EB3 et d placez les querres vers d autres ouvertures...

Page 18: ...Matratze muss so sein dass der Abstand zwischen die obere Seite der Matratze und die obere Bettkante h her ist als 200 mm in die h ch ste Bodenposition durch die Markierung auf dem Bett angedeutet und...

Page 19: ...Endlack Gewicht 41 kg Verf gbare Farben xx check www quaxpro eu Verstellbare Boden H hen 26 35 und 48 cm Garantie F r dieses M bel gibt es eine zweij hrige Garantie angesichts Produktionsfehler mittel...

Page 20: ...teps 3 Unterteileliste berpr fen Sie die Vollst ndigkeit aller nachstehenden Unterteile in der Verpackung www quax eu info quax eu 20 HAVANA 54 01 35Pxx Lit b b 120x60 cm Baby cot 120x60 cm Kinderbed...

Page 21: ...0 cm Kinderbett 120x60 cm Schritt 1 Benutzen Sie beide Gestelle ES1 beide Traversen ES2 und acht Bolzen A Schieben Sie eine Querstange ES2 auf die Flansche in einem Rahmen ES1 Zwei Bolzen A in die Boh...

Page 22: ...en Sie die zusammengebauten Teile AB1 beide Bettk pfe EB1 und acht Bolzen C Die Seiten AB1 mit ihren Holzd bel in die Bohrungen der Bettk pfe EB1 dr cken Die Bolzen C durch die L cher in der Seiten dr...

Page 23: ...20x60 cm Schritt 4 Benutzen Sie die zusammengebauten Teile AB2 und AS sechs zylindrische Muttern F und sechs Bolzen G Dr cken Sie die zylindrischen Muttern F in die Bohrungen an der Unterseite der Inn...

Page 24: ...n Lattenrost EB3 vier Bodentr ger D und vier Bolzen E Dr cken Sie die Bodentr ger D mit ihren Zapfen in die L cher der Bettk pfe EB3 Beachten Sie da alle Bo dentr ger auf der gleichen H he positionier...

Page 25: ...x60 cm Kinderbett 120x60 cm Schritt 6 Positionsab nderung des Bodens Alle Verbindungen mit dem Bolzen C ein wenig l sen Schrauben Sie den Boden EB3 los und dr cken Sie die Bodentr ger in einer neuen P...

Page 26: ...must be so that the distance between the upper side of the mattress and the upper side of the bed is minimally 500 mm with the base in the lowest position and minimally 200 mm in the highest position...

Page 27: ...kg Available colors xx check www quaxpro eu Adjustable bottom heights 26 35 and 48 cm Guarantee This furniture comes with a two year guarantee on manufacturing defects on presenta tion of a proof of p...

Page 28: ...verstelbare bodem Laufgitter mit verstelbarer Boden Quax Quax First dreams First steps 3 Parts lis Check whether all parts mentioned below are included in the packaging www quax eu info quax eu 28 HA...

Page 29: ...t 120x60 cm Kinderbed 120x60 cm Kinderbett 120x60 cm Step 1 Use both leg frames ES1 both crossbars ES2 and eight bolts D Push a crossbar ES2 onto the flanges in a frame ES1 Push two bolts A into the d...

Page 30: ...se the assembled parts AB1 both head panels EB1 and eight bolts C Push the sides AB1 with their wooden dowels into the drillings of the head panels EB1 Push the bolts C in the holes of the sides and t...

Page 31: ...Kinderbett 120x60 cm Step 4 Use the assembled parts AB2 and AS six cylindrical nuts F and six bolts G Push the cylindrical nuts F into the drillings at the bottom of the inside of the head panels Plac...

Page 32: ...r bottom supports D and four bolts E Push the bottom supports D with their pin into the provided drillings on the head panels AB3 Make sure that all of the bottom supports are positioned at the same h...

Page 33: ...d 120x60 cm Kinderbett 120x60 cm Step 6 Changing the position of the mattress support Unscrew all connections with the bolts C a little Unscrew the bottom EB3 Replace the bottom supports on a differen...

Reviews: