background image

B-QAM-SDI-IP-

2

CH-LL

User Manual

Summary of Contents for DVB C

Page 1: ...B QAM SDI IP 2CH LL User Manual...

Page 2: ...ICE S INSTALLATION FLOW CHART ILLUSTRATED AS FOLLOWING 5 2 4 ENVIRONMENT REQUIREMENT 5 2 5 GROUNDING REQUIREMENT 6 CHAPTER 3 OPERATION 7 3 1 LCD MENUS 7 3 2 INITIAL STATUS 8 3 3 GENERAL SETTINGS FOR M...

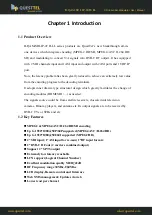
Page 3: ...I SDI as needed The signals source could be from satellite receivers closed circuit television cameras Blue ray players and antenna etc Its output signals are to be received by DVB C TVs or STBs and e...

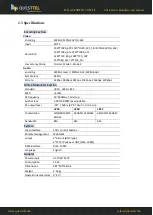
Page 4: ...83A J 83B J 83C MER 42dB RF frequency 30 960MHz 1KHz step Symbol rate 5 000 9 000Msps adjustable RF output level 30 10dbm 81 97 db V 0 1db step J 83A J 83B J 83C Constellation 16 32 64 128 25 6QAM 64Q...

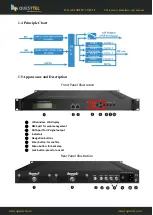
Page 5: ...display NMS port for web management DATA port for IP signal output Indicators Navigation buttons Enter button for confirm Menu button for back step Lock button press to lock set Rear Panel Illustratio...

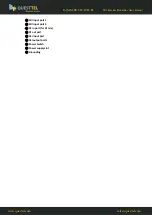
Page 6: ...1 SDI input port 2 RF in port for RF mix RF out port ASI input port ASI output ports Power Switch Power supply slot Grounding SDI Encoder Modulator User Manual B QAM SDI IP 2CH LL www questtel com sal...

Page 7: ...s external antenna and others 2 2 Power precautions When you connect the power source make sure if it may cause overload Avoid operating on a wet floor in the open Make sure the extension cable is in...

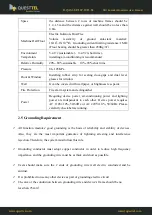
Page 8: ...conditioning power and lighting power are independent to each other Device power requires AC 110V 10 50 60Hz or AC 220V 10 50 60Hz Please carefully check before running 2 5 Grounding Requirement All...

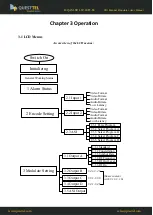
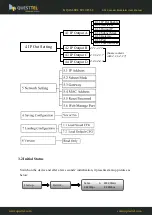
Page 9: ...2 3 1 Parse Program 2 3 2 Select Program A 2 3 3 Select Program B 2 3 4 Select Program C 2 3 5 Select Program D Low Latency Low Latency 3 Modulate Setting 3 1 Output A 3 5 ASI Output 3 2 Output B 3 3...

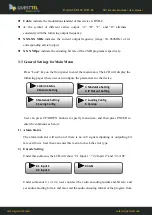
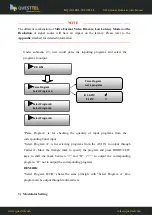
Page 10: ...ay 4 1 6 Port 4 2 1 4 2 7 Same content with 4 1 1 4 1 7 4 3 1 4 3 7 4 4 1 4 4 7 4 1 7 Filter Null Pkt 3 2 Initial Status Switch on the device and after a few seconds initialization it presents start u...

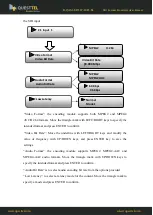
Page 11: ...tons to specify menu item and then press ENTER to enter the submenus as below 1 Alarm Status The alarm indicator will turn on if there is no A V signals inputting or outputting bit rate overflows User...

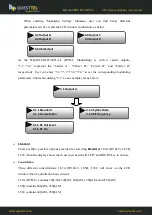
Page 12: ...MPEG2 AAC and MPEG4 AAC audio formats Move the triangle mark with UP DOWN keys to specify the intended format and press ENTER to confirm Audio Bit Rate is to select audio encoding bit rate from the o...

Page 13: ...s for selecting programs from the ASI IN to output through Carrier A Move the triangle mark to specify the program and press RIGHT LEFT keys to shift the mark between and X to output the corresponding...

Page 14: ...rovided for selecting Standard J 83A DVB C J 83B J 83C when the display shows them user just need swift LEFT and RIGHT key to choose Constellation Three different constellations J 83A DVB C J 83B J 83...

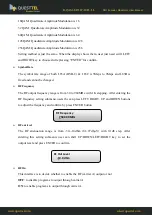
Page 15: ...nge is from 30 to 960MHz with 1K stepping After entering the RF frequency setting submenu users the can press LEFT RIGHT UP and DOWN buttons to adjust the frequency and confirm by press ENTER button R...

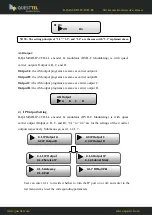
Page 16: ...Output Setting B QAM SDI IP 2CH LL encoder modulator DVB C Modulating is with quad carrier output Output A B C and D 4 1 to 4 4 are for the settings of the 4 carrier outputs respectively Submenus go...

Page 17: ...r saving settings Choose yes and 5 5 Reset Password 5 6 Web Manage Port 5 3 Gateway 5 4 MAC Address IP Address 192 168 000 136 Subnet Mask 255 255 255 000 Gateway 192 168 000 001 MAC Address fffffffff...

Page 18: ...device into factory configuration by choosing 7 2 the display will show as below 8 Version User can check the software version and hardware version of this equipment under this submenu Save Configurat...

Page 19: ...omputer and the device with net cable and use ping command to confirm they are on the same network segment I G the PC IP address is 192 168 99 252 we then change the device IP to 192 168 99 xxx xxx ca...

Page 20: ...click any item here to enter the corresponding interface to check information or set the parameters It automatically identifies and displays the signal source interface and real time encoding bit rate...

Page 21: ...D Tick the corresponding box es to enable the related program output through the corresponding Carrier One program can output through a single or multiple Carriers However it is suggested that a sing...

Page 22: ...the 2ed SDI encoding slot ASI Input Click ASI Input it will display ASI input program information as Figure 4 Figure 4 Select the carrier output channel for the multiplexed programs Every carrier cha...

Page 23: ...output programs with one time clicking Time limitation to parse the input programs Click this button to trigger a dialog box as below where to add the PIDs which need pass through In some occasions th...

Page 24: ...t the carrier output channel for the inserted NIT Click Add from this page it will display the screen as Figure 6 where it requires to add Service ID and configure other parameters for the programs Fi...

Page 25: ...as Figure 8 where to set the multicast IP Output address for the device if needed and set the IP output for the programs After setting the parameters click Apply to save the setting Figure 8 Modulator...

Page 26: ...utput level ASI Output To select carrier output channel for ASI output Output A The ASI output programs are same as carrier A Output B The ASI output programs are same as carrier B and the like After...

Page 27: ...n Figure 10 Restart the Device Click Reboot from the menu the screen will display as Figure 11 Here when clicking Reboot box it will restart the device automatically Figure 11 Update the Device Click...

Page 28: ...ng the device user needs to restart the device by using Reboot option Figure 12 Network When user clicks Network it will display the screen as Figure 13 It displays the network information of the devi...

Page 29: ...or view the device information and configurations User can t operate the keyboard LCD while only the device IP address can be noted in the LCD window Backup Load Click Backup Load from the menu it wil...

Page 30: ...Load File to load the backup file to the device Figure 15 Browse Button SDI Encoder Modulator User Manual B QAM SDI IP 2CH LL www questtel com sales questtel com...

Page 31: ...ange if it is necessary Checking all signal cables have been properly connected Frequently switching on off device is prohibited the interval between every switching on off must greater than 10 second...

Page 32: ...ontent DVB T ISDB T distribution 2 Outside Audio Video contents ON AIR DVB T ISDB T distribution 3 Hotel Audio Video contents DVB T ISDB T distribution 4 Bar Audio Video contents distribution SDI Enco...

Page 33: ...5 Cinema Audio Video contents DVB T ISDB T distribution 6 Company Audio Video contents distribution SDI Encoder Modulator User Manual B QAM SDI IP 2CH LL www questtel com sales questtel com...

Page 34: ...apter 7 Packing List 1PC 1PC 2PCs B QAM SDI IP 2CH LL Encoder Modulator User s Manual SDI Cables Power Cord 1PC SDI Encoder Modulator User Manual B QAM SDI IP 2CH LL www questtel com sales questtel co...

Page 35: ...MI mpeg2 170 H 264 347 5 SDI mpeg2 227 5 H 264 367 5 Mode 2 HDMI mpeg2 222 5 H 264 395 SDI mpeg2 240 H 264 397 5 DVB C HD STB 720p 50 14M Mode 1 HDMI mpeg2 85 75 H 264 237 5 SDI mpeg2 127 5 H 264 295...

Page 36: ...ntact with them might be fatal 6 Overloading Do not overload wall outlets and extension cords as this can result in a risk of fire or electric shock 7 Object and Liquid Entry Never push objects of any...

Reviews: