background image

RADEMACHER

Mounting- and
Operating Instruction

comfort

Article No. 2610

VBD 377-1 (06.02) GB

Summary of Contents for Troll Comfort

Page 1: ...RADEMACHER Mounting and Operating Instruction comfort Article No 2610 VBD 377 1 06 02 GB...

Page 2: ...and the electrical installation of your TROLL Please read through this instruction completely Observe all safety advices before starting with your work Please keep this instruction for furt her refer...

Page 3: ...Key Operating mode selection LCD Display Twilight Key Sun Key Covering Clock Key Weekly Key SET Key IR Receiver Installation housing without illustration Summer Winter time Plug connection for the li...

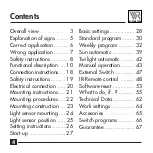
Page 4: ...unting instructions 21 Mounting procedures 22 Mounting construction 23 Light sensor mounting 24 Light sensor position 25 Setting instructions 26 Start up 27 Basic settings 28 Standard program 30 Weekl...

Page 5: ...nents etc It requires safety measures for the protection of health and life of the person concerned Here it concerns your safety Please do observe and obey all instructions marked like this COMMENT In...

Page 6: ...h mechanic or electronic Please do observe the instructions given by the motor manufacturers regarding switching time and maximum operating time Operating Conditions Do only operate the Troll in dry r...

Page 7: ...l the manual sender and the Rademacher tube motors are coordinated components Non original components which replace or influence the function of the Troll are to be employed only after being released...

Page 8: ...llowed to be executed by an authorized electrician Observe the regulations of the local power supplier Before starting to execute the electrical connection switch the power line connecting point in an...

Page 9: ...g examine the Troll for not being damaged and do never use defective or damaged appliances In this case please do contact our service department Incorrect executed repairs can en danger your life caus...

Page 10: ...enclosed installation housing The different operating modes and functions Manual mode with the operating keys on the appliance with the assistance of an external sensor with an infrared manual sender...

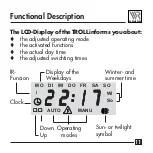
Page 11: ...he adjusted operating mode the activated functions the actual day time the adjusted swichting times Clock IR Funcion 2 2 2 2 2 2 2 2 2 2 iiiii 7 7 7 7 7 AUTO MANU Down Up Operating modes MO DI MI DO F...

Page 12: ...le with the operating keys on the appliance with the assistance of an external switch In addition the parallel connection of several Trolls on one external switch permits the mutual remote control of...

Page 13: ...witching times are valid for all weekdays Automatic mode Weekly program Individual every day adjust ment of the opening and closing time for your roller shutter In addition it is possibletoadjustoneop...

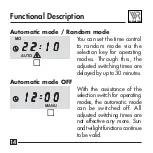
Page 14: ...djusted switching times are delayed by up to 30 minutes Automatic mode OFF With the assistance of the selection switch for operating modes the automatic mode can be switched off All adjusted switching...

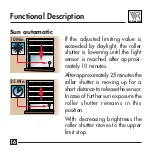
Page 15: ...nding on the brightness In this case the light sensor is fastened to the window pane and connected to the Troll using a plug Sun automatic The sun automatic enables the automatic moving down and up of...

Page 16: ...is reached after approxi mately 10 minutes After approximately 25 minutes the roller shutter is moving up for a short distance to release the sensor In case of further sun exposure the roller shutter...

Page 17: ...is exceeded for approximately 10 seconds moving to the bottom limit stop The roller shutter does not open before the adjusted opening time is reached or after manual com mand UP COMMENT If the moving...

Page 18: ...er minals are located on the bottom side of the installation housing Limit stops adjustment of the tube motor Before the final electrical connection is executed the limit stops of the tube motor have...

Page 19: ...be carried out by an authorized electrician Please do observe the safety instructions stated on page 8 Faulty wiring can lead to short circuit and to the destruction of the appliance Please do observe...

Page 20: ...RADEMACHER 20 PE N L1 MOTOR 1 N L1 Secondary entries Electrical connection Basic circuit diagramm Secondary entries only on request...

Page 21: ...1 x 58 flush socket according to DIN 49073 We recommend a deep socket 1 x Covering frame enclosed The Troll can be integrated with most commercially available switch and frame programs see switch prog...

Page 22: ...housing into the flush box and tighten with the corresponding screws Put the covering frame on If available insert the light sensor plug into the bottom side of the Troll and press the sensor cable ca...

Page 23: ...RADEMACHER 23 Mounting construction Covering frame Installation housing Troll comfort control Light sensor plug Flush box without illustration...

Page 24: ...RADEMACHER 24 Mounting of Light sensor...

Page 25: ...your roller shutter is to lower on exceeding the limiting values too much sun Twilight automatic The light sensor position chosen for the sun auto matic can be maintained COMMENT Please do avoid damag...

Page 26: ...he current time appears in the display if no adjustments are entered for a longer period of time Deactivation of switching times Set the requested time to 0 00 thus the belonging control command is no...

Page 27: ...If any time appears in the display after switching on please do carry out a software reset see page 53 before executing further adjustments The Troll is ready for operation immediately after switchin...

Page 28: ...e f ex 13 00 o clock The figures of the clock are changing in fast forward running of time Let the key go as soon as the current day time is reached Slow forward running time hold key tip SET key Fast...

Page 29: ...winter time With changing over from winter to summer time the internal clock is put forward by 1 hour With changing over from summer to winter time the internal clock is put backward by 1 hour Changi...

Page 30: ...rward running of time let keys go as soon as the desired opening time is reached Slow forward running time hold key tip SET key Fast forward running time hold and SET key Slow backward running time ho...

Page 31: ...press and hold backward running of time let keys go as soon as the desired closing time is reached Slow forward running time hold key tip SET key Fast forward running time hold and SET key Slow backwa...

Page 32: ...ening and closing times for each individual day of the week you have to activate the input mode of the weekly program Activate input mode of the weekly program Adjust current day Tip several times unt...

Page 33: ...ram starts again with Monday after pressing once again the weekly key COMMENT When activating the weekly programs the opening and closing times of the standard program are adopted The adjustment or co...

Page 34: ...day 1 x The opening and closing time adjusted for Monday is shown in turn 1 x Calling of works adjustment press and hold forward running of time Let the keys go as soon as the new opening time appears...

Page 35: ...several times until all input points of the weekly program have been passed if you do not want to execute further adjustments Adjustment of two mutual weekly switching times wich are valid on each da...

Page 36: ...this display appears Adjustment of the additional opening and closing times as described before Leaving the input mode The weekly program is now active 1 x MO DI MI DO FR SA SO 8 8 8 8 8 0 0 0 0 0 0...

Page 37: ...d if necessary amend the switching times of the current weekday by tipping the s UP or t DOWN key Calling the actual opening time e g for Monday 1 x Amending the current daily switching time Please ob...

Page 38: ...ogram Changing between weekly and standard program Each time the weekly key is pressed the operating mode changes 2 s The Standard programm is active MO DI MI DO FR SA SO 2 2 2 2 2 2 2 2 2 2 IIIII 7 7...

Page 39: ...tic is switched on or switched off by repeated tipping of the key 1 x Current measured bright ness 0 29 With in creasing sun the mea sured value rises Adjusted limiting value entirely bright 29 dark 0...

Page 40: ...switched off ON Sun automatic is switched on FLASHING Sun automatic is active If the Sun program is active it is interrupted by Manual Operation Addressing an automatic function Activating the IR remo...

Page 41: ...holding additionally or pressing Adjusting the Sun Automatic Adopting the current brightness value as limiting value Execute the adjustment of the limiting value with the brightness used for lowering...

Page 42: ...e 41 now using the moon key Observe the off period for the renewed activation of the twilight automatic If your roller shutter is closed using the twilight automatic and afterwards reopened through a...

Page 43: ...by hand is in every operating mode possible and it has priority before the automatic mode Stop the roller shutter or press shortly Operating the Troll Manual Mode UP DOWN The roller shutter moves to t...

Page 44: ...ller shutter moves to the respective adjustment after pressing the operating key each time Tipping mode The roller shutter moves as long as the respective operating see page 46 key remains to be press...

Page 45: ...Changing over from the normal mode to the tipping mode In this case a connecting path has to be quarried out on the backside of the Troll using a small screw driver Operating the Troll Manual Mode Co...

Page 46: ...e Troll Manual Mode Operating in tipping mode or 1 x tipping The roller shutter opens closes until you let the key go or 3 s pressing The roller shutter moves to the upper bottom limit stop or tipping...

Page 47: ...ss key the roller shutter moves up Ext UP tip key the roller shutter stops or Ext DOWN press key change direction of rotation The same applies for the DOWN direction COMMENT If required several Trolls...

Page 48: ...everal roller shutter drives with one Rademacher infrared manual sender Normal Operation Lifting and lowering of the roller shutters Sender Eye Control LED Collective Key all Channel Keys With these k...

Page 49: ...n without allocation of a channel press The roller shutter moves in the corresponding direc tion Pressing the or key once again the roller shutter stops Tipping mode As long as one of the keys is pres...

Page 50: ...sible to combine your roller shutters into groups If you would like to control several roller shutters at the same time the combination has to be made under the same channel number Activate multiple c...

Page 51: ...emote Control with IR Manual Sender Multiple channel mode at first press the requested channel key then within 3 minutes the requested control command Delete channel allocation 4 s press without furth...

Page 52: ...the multiple channel mode it is possible to operate all controlled roller shutters mutually without deleting the adjusted groups or changing into single channel mode Collective mode press collective...

Page 53: ...s to be executed INDICATION After executing a software reset the works adjustments are valid Delete all adjustments press and hold After approx 8 seconds the software reset is executed and the display...

Page 54: ...the display deletes Readjust the current time 1x Repeat all adjustments starting from page 28 Software Reset SET Display after a soft ware reset or after 8 hours of power fai lure AUTO Wi IIIII 2 2 2...

Page 55: ...re Solution Remove the cause for power failure and verify the display If the current time appears your Troll is active again If the reset display see page 54 appears the power failure exceeded 8 hours...

Page 56: ...commands are executed Cause Your Troll is possibly in the manual mode MANU Solution Switch the Troll to automatic mode AUTO the adjusted switching times are not met exactly Cause Your Troll is possib...

Page 57: ...Afterwards repeat all adjustments starting from page 28 If necessary check the Troll with the works adjustments the sun automatic is disturbed Cause The sensor wire of the light sensor has been buckle...

Page 58: ...he sun automatic is interrupted and it starts again The procedure to come depends on the sun condition Solution In this case the light sensors have to be exchanged completely Remove the cause for crea...

Page 59: ...higher than the adjusted limiting value Solution The adjustment for the limiting value of the sun automatic has to be increased the roller shutter is not moving down in the evening with activated twi...

Page 60: ...diation or artificial light do influence the range of the sender Solution Point your remote control as directly as possible to the Troll the roller shutter does not react after activating the manual s...

Page 61: ...oes not illuminate when pressing the key Cause The battery is not inserted correctly or it is spent Solution Verify the polarity of the battery and exchange it if necessary the range of the IR manual...

Page 62: ...Capacity 8 4 A Protection class II Standby Capacity 2 W Secondary Entries 2 Breaking Voltage of Secondary entries 230 V Connecting cross section 3 x 1 5 mm2 Mounting mode concealed Dimensions 70 x 70...

Page 63: ...es sun sensitivity 2000 20 000 Lux twilight sensitivity 2 50 Lux Maintain data With a short power failure the times adjusted by the operator and the current data time day continue to maintain In this...

Page 64: ...ime 12 00 o clock Switching times Standard program UP 07 00 o clock DOWN 20 00 o clock Daily switching times Weekly program UP 07 00 o clock DOWN 20 00 o clock Common weekly switching times UP 00 00 o...

Page 65: ...RADEMACHER 65 Accessories Light sensor Article No 3720 IR manual sender Article No 9490...

Page 66: ...GIRA Standard system creme white pure white Trias Form creme white pure white brown Trias Facet pure white Trias Gala creme white brown metallic pure white S Color System pure white brown PEHA Dialog...

Page 67: ...g instructions 3 Improper operating or stressing 4 External influences f ex damages caused by shocks impacts or weather influences 5 Repairs and modifications executed by unauthorized third parties 6...

Page 68: ......

Reviews: