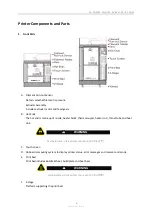
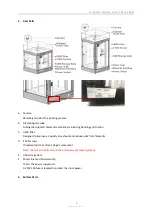
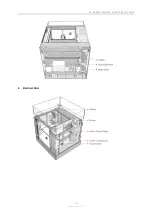
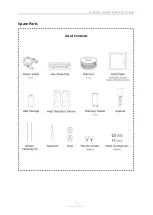
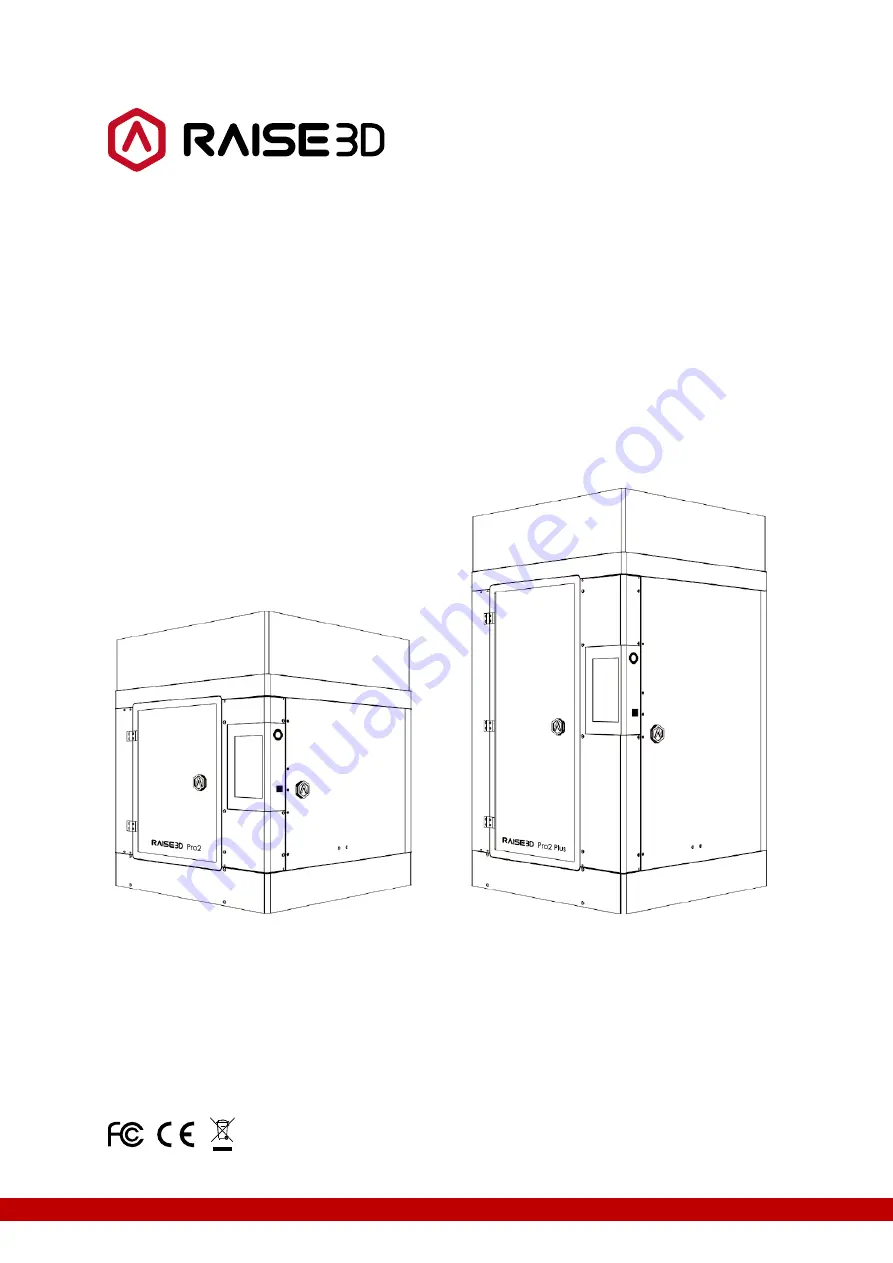
background image


3D PRINTER MANUAL 

RAISE3D


PRO2


SERIES


REV: V1.0 

Pro2


Pro2 Plus


Summary of Contents for Pro2 Plus

Page 1: ...3D PRINTER MANUAL RAISE3D PRO2 SERIES REV V1 0 Pro2 Pro2 Plus ...

Page 2: ...UAL RAISE3D PRO2 SERIES 1 www raise3d com The contents of this Quick Start Guide may be updated over time For the latest version scan the QR code or visit the link below www raise3d com pages download down quickguide ...

Page 3: ...tromagnetic Compatibility EMC 4 Technical Specifications 6 Printer Components and Parts 8 Spare Parts 11 Precaution and Hardware Installation 12 Software Installation 18 WLAN Connection 24 Start First Print 25 User Interface 29 Dual Extruder Print 30 Experiencing Difficulties 40 ...

Page 4: ...e nozzle Nozzle temperatures in the printer can reach 300 572 Hot Surface The hot surface sign indicates the presence of devices with high temperatures Always use extra care when working around heated components Always wear the heat resistant gloves provided in the Starter Box Moving Parts The moving parts sign indicates that a hazard exists where you touched which can cause serious bodily injury ...

Page 5: ...Maximum Output Power EIRP WiFi 2412 2472 MHz 18 25dBm b 16 30dBm g 15 21dBm HT 5150 5250 MHz 15 9 dBm a 14 71 dBm HT20 14 28 dBm HT40 5725 5850 MHz 15 9 dBm a 14 71 dBm HT20 14 28 dBm HT40 FCC Output power table Function Frequency Maximum Output Power WiFi 2412 2462 MHz 18 31dBm b 15 62dBm g 14 9dBm HT 20 5150 5250 MHz 15 36 dBm a 14 79 dBm HT20 14 41 dBm HT40 5725 5850 MHz 15 48 dBm a 14 49 dBm H...

Page 6: ... with the instructions may cause harmful interference to radio communications However there is no guarantee that interference will not occur in a particular installation If this equipment does cause harmful interference to radio or television reception which can be determined by turning the equipment off and on the user is encouraged to try to correct the interference by one or more of the followi...

Page 7: ...bient Temperature Storage Temperature FFF Dual head with electronic lifting system 1 75 mm 0 78125 0 78125 0 078125 micron 30 150 mm s Heated aluminum build plate with magnetic holding 110 C Silicone Pre calibrated leveling PLA ABS HIPS PC TPU TPE NYLON PETG ASA PP PVA Glass Fiber Filled Carbon Fiber Enforced Metal Particles Filled Wood Filled 0 4 mm Default 0 2 0 6 0 8 1 0 mm Available 300 C Wi F...

Page 8: ... 7 www raise3d com Motion Controller Logic Controller Memory Onboard Flash OS Ports ATM Cortex M7 400MHZ FPU Freescale i mx6 Quad core 1Ghz ARM processor 1 GB 8 GB Embedded Linux Usb2 0 2 Ethernet 1 When you are printing with dual material ...

Page 9: ...ds The hot end is made up of nozzle heater block thermocoupler heater rod throat tube and heat sink Temperatures in the printer can reach 300 572 C Touch screen D Onboard computing system to display printer status error messages and receive commands E Print bed Print bed includes Buildtak sheet build plate and heat bed Temperatures in the printer can reach 110 230F F Z stage Platform supporting th...

Page 10: ...ing bending and friction C HEPA filter Designed to improve air quality on exhaust and reduce odor from filaments D Z ball screws Threaded rods that drive Z stage s movement Note the nuts and bolts around the ball screws are loose by design E USB storage slots F Power inlet and Power switch That is the power supply unit A 250V 10A fuse is located to protect the input power 3 Bottom Parts ...

Page 11: ...3D PRINTER MANUAL RAISE3D PRO2 SERIES 10 www raise3d com 4 Electrical Parts ...

Page 12: ...3D PRINTER MANUAL RAISE3D PRO2 SERIES 11 www raise3d com Spare Parts List of Contents ...

Page 13: ...e allowed to accumulate on or within the printer can damage the plastic components Operating temperature shall be in the range of 15 C to 30 C 59 F to 86 F with relative humidity range of 10 to 90 non condensing Storage temperature shall be in the range of 25 C to 55 C 13 F to 131 F with relative humidity range of 10 to 90 non condensing NOTE The Pro2 and Pro2 plus printers are capable of generati...

Page 14: ...re designed to hold the extruder assembly in place during shipping and should be saved for future transport Do not operate printer with clips installed Select the largest of the included hex head wrench 3mm and remove all four hex head security bolts from Z axis clamps 2 bolts each These are located on the left and right sides on the printer on the ball screw thread Plug the machine into a wall ou...

Page 15: ...ton OK the request and the print bed will begin to home or move to the origin position This will also allow you to access your accessory packages Open the front door and remove the starter box and filament box from the base of the printer Open these packages and compare with the following contents list Lower the Z platform by 50mm To do this set the interval at 10mm by selecting it in the Move Ste...

Page 16: ...m by rotating them counter clockwise Remove the aluminum build plate from the foam packaging Using the included spatula remove the leveling calibration model from your build plate Slide the build plate onto the Z platform with the logos facing upwards and the handle edge facing the front of the machine ...

Page 17: ...nter and install the spool holders into the mounting points Open one of the included spools of filament and place it on the holder NOTE The direction of filament spool should be placed to rotate in clockwise if at points B and D and should be oriented to rotate counterclockwise at mount points A and C Locate the open end of the filament and feed it through the guide tube ...

Page 18: ... tab on the screen and set the temperature of the left nozzle for the filament that you re using Press the Load button and the printer will begin to heat When the target temperature is reached press Load Complete the feeding operation according to the instructions on the screen ...

Page 19: ...n The ideaMaker slicing software is available on the USB storage drive included with your printer Additional downloads and versions are available online at www raise3d com pages download Open the installer and choose your preferred language Select the installation location for ideaMaker and click Next ...

Page 20: ...AL RAISE3D PRO2 SERIES 19 www raise3d com Follow the instructions provided by the console and click Install After the installation is finished click Next to go to the next step Click Finish and ideaMaker is installed ...

Page 21: ... drive Included with your printer or download the latest version from www raise3d com pages download down im Drag the ideaMaker icon left into the Application folder on the right side ideaMaker Initial Setting When launching ideaMaker for the first time you you will need to select your printer model from the drop down list then press Next ...

Page 22: ...he diameter of your filament Press Finish to finalize the initial settings NOTE ALL Pro2 Series printers use 1 75mm filaments Using ideaMaker Click the button to import Giveaway Spinner included in the USB storage Click the Start or button to begin slicing the model ...

Page 23: ... type of Platform Addition and the type of Support Select your type of Platform Addition and Support in the Edit window Click Save and Close to return to the previous menu Click Slice to generate your file Save the sliced files gcode and data by exporting to the USB storage drive NOTE File names that do not conform to the Western Latin character set may not display properly ...

Page 24: ...3D PRINTER MANUAL RAISE3D PRO2 SERIES 23 www raise3d com Confirm that the files are saved and eject the USB storage ...

Page 25: ... SSID and inputting the password When the WIFI module is manufactured 2 4G is set at HT20 5GHz is set at HT40 The wifi s frequency is fixed before being manufactured The customer is not allowed to modify WIFI s parameters If needed please contact tech support at Raise 3D Or Add Other Network by inputting name and password ...

Page 26: ...Save the Raise Touch and Motion Controller Board Firmware files inside the root directory of the USB drive included with your printer Power off the printer and insert the USB drive into one of the available ports on the side of the touchscreen Power on The Raise Touch Firmware will be automatically detected and start on boot up Follow the on screen instructions to complete the installation ...

Page 27: ... right of the touchscreen and select USB storage Select your USB device and then click the firmware accept the pop up to update the machine and follow the onscreen instructions Click the Settings icon in the top right hand side of any tab Confirm that the firmware has been updated properly Allow this process to complete before removing the USB drive ...

Page 28: ... the X Y Axis by selecting the home button then Z axis home button If the homing procedures complete without issues reposition the print head Select 10mm for Move Steps and move X to 50mm Y to 10mm Use the feeler gauge to check the distance between nozzle and printing platform The optimal distance between is 0 2mm The best indication of this is feeling only slight friction when you slide the feele...

Page 29: ...Insert this USB drive into the USB slot on the side of touchscreen Select the Print tab and choose USB Storage Select the file and check the printing parameters and settings Press Print to start printing the test file During printing you can check the status of your print including printing time remaining and other parameters from the touchscreen in the Home interface NOTE The touch screen will di...

Page 30: ...3D PRINTER MANUAL RAISE3D PRO2 SERIES 29 www raise3d com User Interface Manual Extruder Control ...

Page 31: ... raise3d com Dual Extruder Print Dual Extruder Print Slicing Open ideaMaker Click the button to import your two models stl obj 3mf file You can download a file or use the test model included in the USB storage drive Click Move and Align Together ...

Page 32: ...om Choose one of the models and set the designated Extruder as Left Extruder from the left side Model Info window Note Model info available with view or pan selected Choose the other model and set Extruder as the Right Extruder using the Model Info window ...

Page 33: ... the model especially around curved surfaces Wipe Wall Loop Lines adjust the thickness of Wipe Wall Wipe Wall Type changes the shape of Wipe Wall The difference among the following 3 types are the distance between Wipe Wall and the model Contoured type will generate a Wipe Wall structure with almost the same shape of the outlines of the model In some cases it will be too close to the model which m...

Page 34: ...selected to print with PVA ideaMaker will automatically edit some additional settings for better performance with PVA This will disable some settings under the Advanced menu and will not be directly editable If you need to edit these settings please open Printer Filament Settings PVA 1 75mm ...

Page 35: ...3D PRINTER MANUAL RAISE3D PRO2 SERIES 34 www raise3d com Click the Start or button to begin the slicing of the model ...

Page 36: ...rm Addition and the type of Support Select your type of Platform and Support in the Edit window Click Save and Close to return to the previous menu Click Slice to generate your file Save the sliced files gcode and data to your USB storage drive NOTE File names that do not conform to the Western Latin character set may not display properly Confirm that the files are saved and eject the USB storage ...

Page 37: ...stallations steps please see with Part Hardware Installation in this guide Install the filament holder in the mount point on the side of the printer and place a spool of filament on the holder NOTE The direction of filament spool should be placed to rotate in clockwise at mount points B and D and counterclockwise at mount points A and C Feed the filament through the guide tube ...

Page 38: ...ased on the Raise3D PLA filament delivered with the printer We advise that using the Raise3D PLA for this initial setup and testing Dual Extruder Print Start First Print The Pro2 Pro2 Plus units are pre leveled in the factory but we recommend verifying that the z offset has not changed during shipping First home the X Y Axis by selecting the home button then Z axis home button If the homing proced...

Page 39: ...y turning the thumb screw on the left front corner of the Z plate the higher the screw stands the further the distance between the nozzle will be from the printing platform Home the Z axis after each adjustment Insert the USB storage that contains your sliced model gcode and data files Insert this USB drive into the USB slot on the side of touchscreen Open the Print tab and choose USB Storage to o...

Page 40: ...ncluding the remaining printing time and other parameters from the Home interface on the touchscreen NOTE The touch screen will display an image of your model on screen during printing This image will only be shown when the file is sliced by ideaMaker and the data file is saved in USB storage or uploaded to screen ...

Page 41: ...MANUAL RAISE3D PRO2 SERIES 40 www raise3d com Experiencing Difficulties If you run into any issues during the guided setup please contact our expert technicians by opening a ticket online at http help raise3d com ...

Page 42: ...PRO2 SERIES 4th Floor Building B5 1600 North Guoquan Rd Shanghai China 200438 86 21 65337855 43 Tesla Irvine CA 92618 USA 1 888 963 9028 Stationsplein 45 Unit A4 004 3013AK Rotterdam the Netherlands 31 1080 8068 www raise3d com ...

Reviews: