background image

60

5

16

97000

Ferrari SF1000

2.4GHz

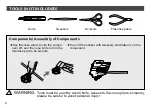
Summary of Contents for Ferrari SF1000

Page 1: ...60 5 16 97000 Ferrari SF1000 2 4GHz ...

Page 2: ...ies are not to be mixed exhausted batteries should be removed from the model The battery should be replaced under adult supervision and be put inside the model with correct polar ity Power terminals must not be short circuited Non rechargeable batteries should not be recharged Rechargeable batteries should be removed from the model before charging and be recharged under the supervision of adult Da...

Page 3: ... compo nent off and then use knife to trim the interface part to be smooth Peel off the sticker with tweezers and flatten it on the component Components Assembly of Components WARNING Tools must be used by adult knife tweezers flat nose pliers scissors please be careful to avoid personal injury ...

Page 4: ...old the edge of the back plate and put the sticker on the model 4 Fix the sticker with fingers and make the sticker in place 5 Gently press the sticker downwards until the bubbles disappear COMPONENTS INSTALLED PROCEDURES FOR Ferrari SF1000 1 Take all parts out and make sure nothing is missing 2 Do not remove all the parts at first but just do assembly step by step according to instruction of the ...

Page 5: ...able remote controller is 91600 2 There are numbers corresponding to each model please do assembly based on the corresponding numbers according to instructions B13 B24 40 43 C25 C39 A5 12 3 55 54 56 2 1 4 57 58 51 59 60 91600 61 62 63 ...

Page 6: ... on how to assemble each part Please pay attention to where there are icons on the right stickers accessaries 5 1 Stickers on the corresponding position according to the serial number marked in the figures Install B20 on 3 3 3 3 B20 B20 16 14 15 28 17 ...

Page 7: ...2 6 Stickers on the corresponding position according to the serial number marked in the figures 1 Install C34 on 1 2 Install 3 on 1 3 1 1 C34 18 ...

Page 8: ...3 7 Stickers on the corresponding position according to the serial number marked in the figures 1 Combine 42 with 43 2 Install the combined 42 to 3 3 Install 2 to 3 3 2 2 43 42 19 ...

Page 9: ...4 8 Stickers on the corresponding position according to the serial number marked in the figures Install A7 and A8 on 3 3 A7 A7 A8 A8 56 57 ...

Page 10: ...9 5 A10 3 C35 C35 A9 27 Stickers on the corresponding position according to the serial number marked in the figures 1 Install A9 and A10 on 3 2 Install C35 on 3 ...

Page 11: ...37 56 C25 A11 A11 A12 A12 3 Stickers on the corresponding position according to the serial number marked in the figures 1 Install C25 on 3 2 Install A11 and A12 on 3 3 Install 56 on 3 4 Install C37 on 3 60 61 ...

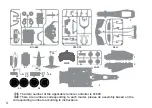
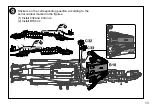
Page 12: ...7 11 C29 3 C26 1 Install C29 on 3 2 Install C26 on 3 ...

Page 13: ...8 Install 6 pieces of 57 on the left and right sides of 3 12 57 57 57 57 57 57 3 ...

Page 14: ...9 13 Stickers on the corresponding position according to the serial number marked in the figures 1 Install C32 and C33 on 4 2 Install B18 on 4 4 B18 C33 C32 54 55 ...

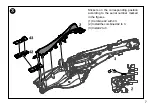
Page 15: ...10 14 C38 C30 C31 4 1 Install C38 on 4 2 Install C30 and C31 on 4 ...

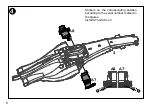
Page 16: ...11 15 C28 C27 4 Install C27 and C28 on 4 ...

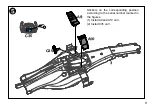
Page 17: ...12 16 4 B14 B15 Install B14 and B15 on 4 ...

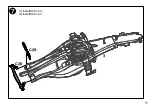
Page 18: ...17 13 4 B13 59 1 Install 59 on 4 2 Install B13 on 59 ...

Page 19: ...18 14 4 51 B23 B24 51 Install B23 and B24 respectively to the corresponding positions of 4 align the holes with bolt 51 and then lock them ...

Page 20: ...15 19 Stickers on the corresponding position according to the serial number marked in the figures 1 Install B17 on 4 2 Install C36 on 4 4 B17 58 59 ...

Page 21: ...20 16 61 62 4 1 Install 61 on 4 as shown in the figure 2 Install 62 on 4 as shown in the figure ...

Page 22: ...21 17 63 4 Install 63 on 4 as shown in the figure Pay attention to the correspondence between positive and negative poles ...

Page 23: ...17 18 22 60 B16 4 1 Install 60 on 4 as shown in the figure 2 Install B16 on 4 as shown in the figure ...

Page 24: ...19 23 A5 C39 4 1 Install C39 on A5 2 Install A5 on 4 ...

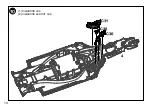
Page 25: ...20 24 4 B21 B22 Install B21 and B22 on 4 ...

Page 26: ... 54 40 55 41 1 Install front and rear wheels as shown in the figure when installing the front and rear wheels please align the inside of the tire with the belt buckle do not squeeze it 2 Install the assembled front and rear wheels on 4 ...

Page 27: ...22 26 Please press the wire into the gap Plug in respectively while matching by same colours and same shapes ...

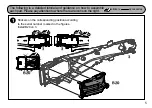
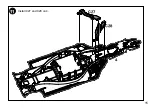
Page 28: ...17 23 27 Combine the assembled models as shown in the figure ...

Page 29: ...1 Install A6 on 4 as shown in the figure 2 Put 3 pieces of 1 5V AA batteries into the car according to its polarity and then close the battery cover B19 3 Twist C36 to lock the battery cover A6 B19 4 C36 C36 ...

Page 30: ...s according to the correct polarity into the remote controller then close the lid and twist the chassis piece to lock the battery cover Turn switch on R C car to ON position when indicator light on remote control is flashing it is in the status of code matching when the flashing indicator light on remote control turns off which means the code is matched you can control the car freely Please refer ...

Page 31: ...o be replaced When it is not in use please take the batteries out of remote controller and the car This product uses 2 4GHz communication technology which is compatible for multi device and multi user with fast response speed high response precision and strong anti interference capability FEATURES AND FUNCTIONS Function Forward Reverse Turn Left Turn Right Feature Authentic car styling with inject...

Page 32: ...or recharge them Do not operate your car on the streets where people gather or under high voltage wires Stay safe Don t put your vehicle near heat or in direct sunlight Always turn switches OFF after operating Point the antenna of the remote control upward to the car and control the car within the effective range so as not to affect the play effect Don t drive your vehicle in sand through water or...

Page 33: ...r long periods of time Clean the vehicle with a soft cloth Avoid being heated or being exposed to strong sunlight Keep dry Regularly examine the toy for any damage to its wires plug enclosure and other parts and they must not be used until the damage has been repaired ...

Page 34: ...33 BODY LOGO Put the stickers on the corresponding position according to the serial number 8 54 58 42 36 32 34 40 44 46 62 48 50 12 64 20 38 ...

Page 35: ...34 7 65 55 59 39 35 31 33 43 41 45 63 47 49 13 21 37 ...

Page 36: ...35 6 51 55 25 30 29 23 13 54 12 5 4 ...

Page 37: ...36 4 52 22 23 14 15 24 11 28 42 40 44 62 6 10 2 1 5 53 9 26 25 39 43 41 63 3 ...

Page 38: ...duct is complex so it must be used under adult supervision Licensee RASTAR HK INDUSTRIAL COMPANY LIMITED Manufacturer RASTAR GROUP Add Xinghui Industrial Park Xiadao Road Shanghua Chenghai Shantou Guangdong China Http www rastar com Produced under license of Ferrari S p A The name FERRARI the PRANCING HORSE device all associated logos and distinctive designs are property of Ferrari S p A The body ...

Reviews: