


For use in GB and IE
01/10 EINS 511342
raywarranty@aga-web.co.uk
PLEASE READ THESE INSTRUCTIONS BEFORE INSTALLING THIS APPLIANCE
Installation
Instructions
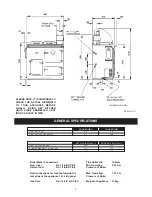
208G/L
THIS APPLIANCE MUST BE INSTALLED IN ACCORDANCE WITH THE MANUFACTURERS INSTRUCTIONS
AND THE REGULATIONS IN FORCE AND ONLY USED IN A SUITABLY VENTILATED LOCATION.
REMEMBER, when replacing a part on tbis appliance, use only spare parts that you can be assured conform to the safety
and performance specification that we require. Do not use reconditioned or copy parts that have not been clearly
authorised by AGA.


